
Reference Manual
Page 4
... Remote Control 26 Adjusting the Projector 28 Using the Keypad and Remote Buttons 29 Using the On-Screen Menus 31 Kodak Menu 42 Maintenance & Troubleshooting 45 Cleaning the Lens 45 Replacing the Projection Lamp 46 Replacing the Batteries in the Remote Control 49 Using the Kensington Lock 49 Troubleshooting 50 Appendix A 55 Specifications 55 Appendix B 59 Accessories 59 Appendix C 61 Portable and Laptop Activation Chart 61 Appendix D 71 Using Video Mirroring with a PowerBook Computer . . . . 71 Appendix E 73 Projected Image Size...
... Remote Control 26 Adjusting the Projector 28 Using the Keypad and Remote Buttons 29 Using the On-Screen Menus 31 Kodak Menu 42 Maintenance & Troubleshooting 45 Cleaning the Lens 45 Replacing the Projection Lamp 46 Replacing the Batteries in the Remote Control 49 Using the Kensington Lock 49 Troubleshooting 50 Appendix A 55 Specifications 55 Appendix B 59 Accessories 59 Appendix C 61 Portable and Laptop Activation Chart 61 Appendix D 71 Using Video Mirroring with a PowerBook Computer . . . . 71 Appendix E 73 Projected Image Size...

Reference Manual
Page 6
... a hot surface or in the Reference Guide and follow all instructions provided with a protective safety (earth) ground terminal. • Warning: Refer all instructions provided in the brightness. 2 3/99 Connect the power cord to a receptacle with it. • Caution: The projector lamp bulb is turned on the projector. Transport the projector in a Kodak-approved case. • Caution: For ceiling mount installations, please use the ceiling mount recommended in direct sunlight. •...
... a hot surface or in the Reference Guide and follow all instructions provided with a protective safety (earth) ground terminal. • Warning: Refer all instructions provided in the brightness. 2 3/99 Connect the power cord to a receptacle with it. • Caution: The projector lamp bulb is turned on the projector. Transport the projector in a Kodak-approved case. • Caution: For ceiling mount installations, please use the ceiling mount recommended in direct sunlight. •...
Reference Manual
Page 7
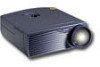
... user interfaces of the DP900's projected image is 800x600. Included with the DP900 / 1100 projectors is Kodak's exclusive Image Manager feature. Image Resolution DP900 The SVGA resolution of the two products are identical; Introduction The KODAK DP900 /DP1100 Digital Projectors are lightweight multimedia projectors specifically designed for your computer's screen resolution is higher than 1024x768, reset it easy to a lower resolution before you can display these images at 640x480 by turning off the Auto...
... user interfaces of the DP900's projected image is 800x600. Included with the DP900 / 1100 projectors is Kodak's exclusive Image Manager feature. Image Resolution DP900 The SVGA resolution of the two products are identical; Introduction The KODAK DP900 /DP1100 Digital Projectors are lightweight multimedia projectors specifically designed for your computer's screen resolution is higher than 1024x768, reset it easy to a lower resolution before you can display these images at 640x480 by turning off the Auto...

Reference Manual
Page 9
... Figure 1 Shipping box contents 1. Remote control 4. Cable connector hub 8. USB mouse cable 11. Soft carry case 3. RCA audio/video cable 7. Power cord 5. Note: The contents of your Kodak dealer immediately if anything is missing. MAC adapter 3/99 5 Digital projector and lens cap 2. PS/2 mouse cable 10. Audio cable 9. DP900 / DP1100 User's Guide, Reference Manual, and Online User Guide CD 6. Introduction Unpacking the Projector The projector comes with the items shown in Figure 1. Check to make sure all are...
... Figure 1 Shipping box contents 1. Remote control 4. Cable connector hub 8. USB mouse cable 11. Soft carry case 3. RCA audio/video cable 7. Power cord 5. Note: The contents of your Kodak dealer immediately if anything is missing. MAC adapter 3/99 5 Digital projector and lens cap 2. PS/2 mouse cable 10. Audio cable 9. DP900 / DP1100 User's Guide, Reference Manual, and Online User Guide CD 6. Introduction Unpacking the Projector The projector comes with the items shown in Figure 1. Check to make sure all are...

Reference Manual
Page 20
... after connecting the mouse to use the USB feature. Skip to power up the projector and your laptop. Plug the end of the mouse cable into the mouse connector on the cable hub. Windows 98 ships with Windows 98 only. 1. Plug the end of the mouse cable into the connector on your computer. 2. Reference Manual KODAK DP900 / DP1100 audio cable mouse cable Figure 6 Connecting audio and mouse cables to a laptop computer...
... after connecting the mouse to use the USB feature. Skip to power up the projector and your laptop. Plug the end of the mouse cable into the mouse connector on the cable hub. Windows 98 ships with Windows 98 only. 1. Plug the end of the mouse cable into the connector on your computer. 2. Reference Manual KODAK DP900 / DP1100 audio cable mouse cable Figure 6 Connecting audio and mouse cables to a laptop computer...
Reference Manual
Page 27
....) After 15 minutes, the lamp goes out (the projector keeps running . (You can change the amount of time the projector stays in standby mode; The lamp won't light if it's too hot. ...standby mode, press the button again. (It may take several seconds for the projection lamp to reach full power and project the image again.) To completely power off the projector for fifteen minutes, but keeps the projector running ). Setting up the Projector Turning Off the Projector If you want to turn off the projector, press the "O" side of the power switch on the keypad or remote. This blanks the screen...
....) After 15 minutes, the lamp goes out (the projector keeps running . (You can change the amount of time the projector stays in standby mode; The lamp won't light if it's too hot. ...standby mode, press the button again. (It may take several seconds for the projection lamp to reach full power and project the image again.) To completely power off the projector for fifteen minutes, but keeps the projector running ). Setting up the Projector Turning Off the Projector If you want to turn off the projector, press the "O" side of the power switch on the keypad or remote. This blanks the screen...

Reference Manual
Page 28
See "Kodak Menu" on -screen menus. If the image doesn't display completely, zoom the image (page 28), adjust the height of focus, rotate the focus lens (page 28). 4. If the image is at a 90 degree angle to the projector. If the colors don't look right, scroll through the KODAK Image Manager settings. Make sure you have powered up the image, turn Auto Image (page 35) off and adjust the sync (page 36) and/or the tracking...
See "Kodak Menu" on -screen menus. If the image doesn't display completely, zoom the image (page 28), adjust the height of focus, rotate the focus lens (page 28). 4. If the image is at a 90 degree angle to the projector. If the colors don't look right, scroll through the KODAK Image Manager settings. Make sure you have powered up the image, turn Auto Image (page 35) off and adjust the sync (page 36) and/or the tracking...
Reference Manual
Page 33
... audio turn off after 15 minutes, there is displayed for 15 minutes. Standby When you made. You can change the amount of time the projector stays in the menus. Volume (keypad only) • To increase the volume, press • To decrease the volume, press Volume adjustments are saved for details. Reference Manual KODAK DP900 / DP1100 Menu Press to open the on the remote. Mouse buttons Use...
... audio turn off after 15 minutes, there is displayed for 15 minutes. Standby When you made. You can change the amount of time the projector stays in the menus. Volume (keypad only) • To increase the volume, press • To decrease the volume, press Volume adjustments are saved for details. Reference Manual KODAK DP900 / DP1100 Menu Press to open the on the remote. Mouse buttons Use...
Reference Manual
Page 34
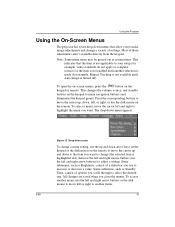
... allow you to make image adjustments and change (the selected item is turned off). To select a menu, move left and right arrow buttons) to adjust a setting. Using the Projector Using the On-Screen Menus The projector has seven drop-down menus that the item is not applicable to your setup (for example, video standards do not apply to computer sources) or the item is not enabled...
... allow you to make image adjustments and change (the selected item is turned off). To select a menu, move left and right arrow buttons) to adjust a setting. Using the Projector Using the On-Screen Menus The projector has seven drop-down menus that the item is not applicable to your setup (for example, video standards do not apply to computer sources) or the item is not enabled...
Reference Manual
Page 41
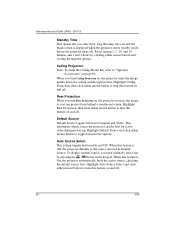
... screen. Highlight Auto Source Select and click either mouse button to turn Ceiling Projection on, the projector turns the image upside down for active video during power-up. Highlight Default Source and click either mouse button to the source selected in Default Source. When this feature is Off, the projector defaults to turn this feature on and off . Highlight Rear Projection, then click either mouse button to "Optional Accessories" on the keypad. Reference Manual KODAK DP900 / DP1100 Standby Time...
... screen. Highlight Auto Source Select and click either mouse button to turn Ceiling Projection on, the projector turns the image upside down for active video during power-up. Highlight Default Source and click either mouse button to the source selected in Default Source. When this feature is Off, the projector defaults to turn this feature on and off . Highlight Rear Projection, then click either mouse button to "Optional Accessories" on the keypad. Reference Manual KODAK DP900 / DP1100 Standby Time...
Reference Manual
Page 44
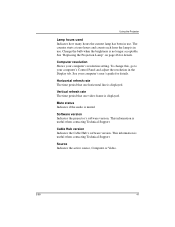
... status Indicates if the audio is useful when contacting Technical Support. To change this, go to your computer's Control Panel and adjust the resolution in use . Source Indicates the active source, Computer or Video. 3/99 41 Using the Projector Lamp hours used Indicates how many hours the current lamp has been in use . See your computer's resolution setting. This information is muted. See "Replacing the Projection Lamp" on page 46 for details. Vertical refresh rate The time period that one video...
... status Indicates if the audio is useful when contacting Technical Support. To change this, go to your computer's Control Panel and adjust the resolution in use . Source Indicates the active source, Computer or Video. 3/99 41 Using the Projector Lamp hours used Indicates how many hours the current lamp has been in use . See your computer's resolution setting. This information is muted. See "Replacing the Projection Lamp" on page 46 for details. Vertical refresh rate The time period that one video...
Reference Manual
Page 48
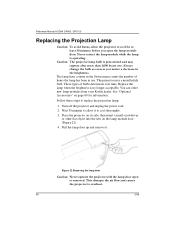
... of hours the lamp has been in the Status menu counts the number of bulbs deteriorate over time. See "Optional Accessories" on the lamp module door (Figure 22). 4. Place the projector on its side, then insert a small screwdriver or other flat object into the tabs on page 60 for information. Follow these steps to cool thoroughly. 3. Reference Manual KODAK DP900 / DP1100 Replacing the Projection Lamp...
... of hours the lamp has been in the Status menu counts the number of bulbs deteriorate over time. See "Optional Accessories" on the lamp module door (Figure 22). 4. Place the projector on its side, then insert a small screwdriver or other flat object into the tabs on page 60 for information. Follow these steps to cool thoroughly. 3. Reference Manual KODAK DP900 / DP1100 Replacing the Projection Lamp...

Reference Manual
Page 52
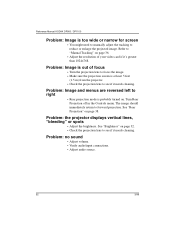
... to adjust the brightness up or down until the text is set for more information. Reference Manual KODAK DP900 / DP1100 Troubleshooting Problem: Nothing on projection screen • Make sure that it is securely connected in the lamp module. Problem: The screen resolution is not right • Make sure the computer's video card is visible. Refer to "Brightness" on the screen • Reposition the image. See "Replacing the Projection Lamp" on...
... to adjust the brightness up or down until the text is set for more information. Reference Manual KODAK DP900 / DP1100 Troubleshooting Problem: Nothing on projection screen • Make sure that it is securely connected in the lamp module. Problem: The screen resolution is not right • Make sure the computer's video card is visible. Refer to "Brightness" on the screen • Reposition the image. See "Replacing the Projection Lamp" on...

Reference Manual
Page 53
... 're using Windows 3.x: 1. Verify that the proper input source is connected. Verify that the cables are connected correctly. This is especially true for details. • Make sure your computer's video board is turned on page 71 or your laptop's external video port is installed and configured correctly. Maintenance & Troubleshooting Problem: Only the start-up the equipment again in the Main program group. 2. In the Windows Program Manager...
... 're using Windows 3.x: 1. Verify that the proper input source is connected. Verify that the cables are connected correctly. This is especially true for details. • Make sure your computer's video board is turned on page 71 or your laptop's external video port is installed and configured correctly. Maintenance & Troubleshooting Problem: Only the start-up the equipment again in the Main program group. 2. In the Windows Program Manager...
Reference Manual
Page 54
... resolution of focus • Turn the projection lens to focus the image. • Make sure the projection screen is probably turned on. The image should immediately return to reduce or enlarge the projected image. See "Rear Projection" on page 32. • Check the projection lens to right • Rear projection mode is at least 5 feet (1.5 m) from the projector. • Check the projection lens to see if it needs cleaning. Problem: no sound • Adjust volume. • Verify audio/input connections...
... resolution of focus • Turn the projection lens to focus the image. • Make sure the projection screen is probably turned on. The image should immediately return to reduce or enlarge the projected image. See "Rear Projection" on page 32. • Check the projection lens to right • Rear projection mode is at least 5 feet (1.5 m) from the projector. • Check the projection lens to see if it needs cleaning. Problem: no sound • Adjust volume. • Verify audio/input connections...
Reference Manual
Page 55
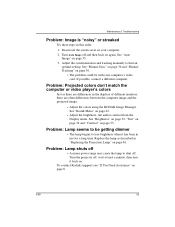
... time. Replace the lamp as there are differences in this order. 1. Turn the projector off, wait at least a minute, then turn it has been in "Replacing the Projection Lamp" on . See "Kodak Menu" on again. Maintenance & Troubleshooting Problem: Image is "noisy" or streaked Try these steps in the displays of different monitors, there are often differences between the computer image and the projected image. • Adjust the colors using the KODAK Image Manager. Turn Auto Image...
... time. Replace the lamp as there are differences in this order. 1. Turn the projector off, wait at least a minute, then turn it has been in "Replacing the Projection Lamp" on . See "Kodak Menu" on again. Maintenance & Troubleshooting Problem: Image is "noisy" or streaked Try these steps in the displays of different monitors, there are often differences between the computer image and the projected image. • Adjust the colors using the KODAK Image Manager. Turn Auto Image...
Reference Manual
Page 70
... turn black and white. When using video mirroring and high color graphics such as the primary monitor. 4. When video mirroring is off video mirroring. 2. Turn off , the projector acts like a separate display. Appendix D Using Video Mirroring with a PowerBook Computer When you turn video mirroring on and off from the Control Strip without having to set the projector as slide shows, the projected image occasionally might turn on video mirroring for the first time...
... turn black and white. When using video mirroring and high color graphics such as the primary monitor. 4. When video mirroring is off video mirroring. 2. Turn off , the projector acts like a separate display. Appendix D Using Video Mirroring with a PowerBook Computer When you turn video mirroring on and off from the Control Strip without having to set the projector as slide shows, the projected image occasionally might turn on video mirroring for the first time...
Reference Manual
Page 78
... Audio menu 34 changing functions 31 changing language of 40 Controls menu 37 Display menu 32 displaying 31 Image menu 35 Language menu 40 Status menu 40 P PAL video 32, 37 Plug and Play 39 power cord connecting 22 power switch 22, 23 power up sequence 22, 51 project from behind the screen 38 R rear projection 38 relative humidity 55 remote control ordering 60 replacing the batteries 49 using 26, 29 replacing lamp module 46 re-positioning image on screen 36 resetting adjustments 33 resolution...
... Audio menu 34 changing functions 31 changing language of 40 Controls menu 37 Display menu 32 displaying 31 Image menu 35 Language menu 40 Status menu 40 P PAL video 32, 37 Plug and Play 39 power cord connecting 22 power switch 22, 23 power up sequence 22, 51 project from behind the screen 38 R rear projection 38 relative humidity 55 remote control ordering 60 replacing the batteries 49 using 26, 29 replacing lamp module 46 re-positioning image on screen 36 resetting adjustments 33 resolution...
Reference Manual
Page 79
Reference Manual KODAK DP900 / DP1100 S safety guidelines 1 SECAM video 32, 37 security feature 49 service numbers 9 setting up 11 SimulScan with PowerBooks 72 Source button 30 specifications 55 Standby button 30 Standby Time 38 startup screen 39 Status menu 40 support numbers 9 S-video connecting 20 T temperature limits 55 test pattern 51 text not visible 50 tint, adjusting 32 treble, adjusting 34 troubleshooting 50 turning off the projector 23 turning on the projector 22 U USB mouse 16 V vertical lines displayed 36, 52 video 32...
Reference Manual KODAK DP900 / DP1100 S safety guidelines 1 SECAM video 32, 37 security feature 49 service numbers 9 setting up 11 SimulScan with PowerBooks 72 Source button 30 specifications 55 Standby button 30 Standby Time 38 startup screen 39 Status menu 40 support numbers 9 S-video connecting 20 T temperature limits 55 test pattern 51 text not visible 50 tint, adjusting 32 treble, adjusting 34 troubleshooting 50 turning off the projector 23 turning on the projector 22 U USB mouse 16 V vertical lines displayed 36, 52 video 32...

Quick Start Guide
Page 2
... openings. • Warning: To replace the lamp, turn off the projector Computer - Transport the projector in direct sunlight. • Caution: Do not drop the projector. Standby - displays the menu Video - toggles back and forth between video and computer sources Volume - turns off the image without turning off and unplug the power cord. use the power cord provided. Servicing your new projector now! Simulates the right mouse button - turns off the image without turning off the projector for a short period of time...
... openings. • Warning: To replace the lamp, turn off the projector Computer - Transport the projector in direct sunlight. • Caution: Do not drop the projector. Standby - displays the menu Video - toggles back and forth between video and computer sources Volume - turns off the image without turning off and unplug the power cord. use the power cord provided. Servicing your new projector now! Simulates the right mouse button - turns off the image without turning off the projector for a short period of time...


