User Manual
Page 1
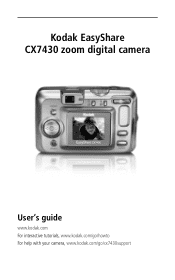
Kodak EasyShare CX7430 zoom digital camera User's guide www.kodak.com For interactive tutorials, www.kodak.com/go/howto For help with your camera, www.kodak.com/go/cx7430support
Kodak EasyShare CX7430 zoom digital camera User's guide www.kodak.com For interactive tutorials, www.kodak.com/go/howto For help with your camera, www.kodak.com/go/cx7430support

User Manual
Page 2
Kodak and EasyShare are simulated. Eastman Kodak Company 343 State Street Rochester, New York 14650 © Eastman Kodak Company, 2003 All screen images are trademarks of Eastman Kodak Company. P/N 6B8807
Kodak and EasyShare are simulated. Eastman Kodak Company 343 State Street Rochester, New York 14650 © Eastman Kodak Company, 2003 All screen images are trademarks of Eastman Kodak Company. P/N 6B8807
User Manual
Page 5
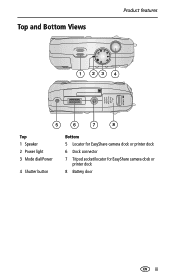
Top and Bottom Views Product features 1 23 4 5 6 7 8 Top 1 Speaker 2 Power light 3 Mode dial/Power 4 Shutter button Bottom 5 Locator for EasyShare camera dock or printer dock 6 Dock connector 7 Tripod socket/locator for EasyShare camera dock or printer dock 8 Battery door iii
Top and Bottom Views Product features 1 23 4 5 6 7 8 Top 1 Speaker 2 Power light 3 Mode dial/Power 4 Shutter button Bottom 5 Locator for EasyShare camera dock or printer dock 6 Dock connector 7 Tripod socket/locator for EasyShare camera dock or printer dock 8 Battery door iii

User Manual
Page 8
... the software first IMPORTANT: Install the software from the Kodak EasyShare software CD before connecting the camera (or dock) to the computer. See the Start Here! 1 Getting started Package contents 4 1 2 5 3 1 Camera with wrist strap 4 USB cable 2 Custom dock insert (for EasyShare 5 Audio/Video cable (for viewing camera dock or printer dock) pictures and videos on television...
... the software first IMPORTANT: Install the software from the Kodak EasyShare software CD before connecting the camera (or dock) to the computer. See the Start Here! 1 Getting started Package contents 4 1 2 5 3 1 Camera with wrist strap 4 USB cable 2 Custom dock insert (for EasyShare 5 Audio/Video cable (for viewing camera dock or printer dock) pictures and videos on television...
User Manual
Page 9
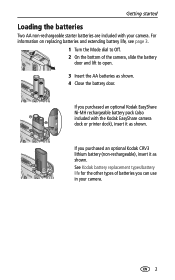
... On the bottom of batteries you purchased an optional Kodak EasyShare Ni-MH rechargeable battery pack (also included with your camera. 2 Getting started Loading the batteries Two AA non-rechargeable starter batteries are included with the Kodak EasyShare camera dock or printer dock), insert it as shown. ...If you can use in your camera. For information on replacing batteries and extending battery life, see page 3. 1 Turn the...
... On the bottom of batteries you purchased an optional Kodak EasyShare Ni-MH rechargeable battery pack (also included with your camera. 2 Getting started Loading the batteries Two AA non-rechargeable starter batteries are included with the Kodak EasyShare camera dock or printer dock), insert it as shown. ...If you can use in your camera. For information on replacing batteries and extending battery life, see page 3. 1 Turn the...
User Manual
Page 10
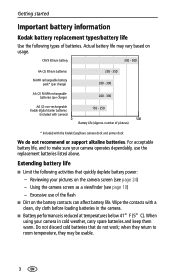
... battery pack* (per charge) 200 - 300 AA (2) Ni-MH rechargeable batteries (per charge) 200 - 300 AA (2) non-rechargeable Kodak digital starter batteries 150 - 250 (included with a clean, dry cloth before loading batteries in cold weather, carry spare batteries and keep them warm...temperature, they return to make sure your camera in the camera. ■ Battery performance is reduced at temperatures below 41° F (5° C). Extending battery life ■ Limit the following types of pictures) * Included with the Kodak EasyShare camera dock and printer dock We do not...
... battery pack* (per charge) 200 - 300 AA (2) Ni-MH rechargeable batteries (per charge) 200 - 300 AA (2) non-rechargeable Kodak digital starter batteries 150 - 250 (included with a clean, dry cloth before loading batteries in cold weather, carry spare batteries and keep them warm...temperature, they return to make sure your camera in the camera. ■ Battery performance is reduced at temperatures below 41° F (5° C). Extending battery life ■ Limit the following types of pictures) * Included with the Kodak EasyShare camera dock and printer dock We do not...

User Manual
Page 11
... your computer, and charges the included Kodak EasyShare Ni-MH rechargeable battery pack. The camera completes operations that are in process. 4 Kodak EasyShare printer dock-powers your camera, makes 4 x 6 prints with the Kodak EasyShare camera dock or printer dock) to power your camera. Getting started Visit www.kodak.com/go/cx7430accessories for: Kodak EasyShare camera dock-powers your camera, transfers pictures to any other position...
... your computer, and charges the included Kodak EasyShare Ni-MH rechargeable battery pack. The camera completes operations that are in process. 4 Kodak EasyShare printer dock-powers your camera, makes 4 x 6 prints with the Kodak EasyShare camera dock or printer dock) to power your camera. Getting started Visit www.kodak.com/go/cx7430accessories for: Kodak EasyShare camera dock-powers your camera, transfers pictures to any other position...
User Manual
Page 12
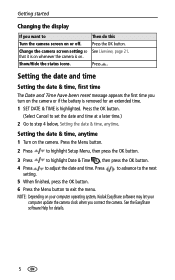
... & time, anytime. NOTE: Depending on your computer operating system, Kodak EasyShare software may let your computer update the camera clock when you turn on or off. Change the camera screen setting so that it is on whenever the camera is highlighted. Show/Hide the status icons. Press . to advance ... details. 5 Getting started Changing the display If you want to exit the menu. Press setting. See the EasyShare software Help for an extended time. 1 SET DATE & TIME is on the camera. Setting the date & time, anytime 1 Turn on . Then do this Press the OK button. Setting...
... & time, anytime. NOTE: Depending on your computer operating system, Kodak EasyShare software may let your computer update the camera clock when you turn on or off. Change the camera screen setting so that it is on whenever the camera is highlighted. Show/Hide the status icons. Press . to advance ... details. 5 Getting started Changing the display If you want to exit the menu. Press setting. See the EasyShare software Help for an extended time. 1 SET DATE & TIME is on the camera. Setting the date & time, anytime 1 Turn on . Then do this Press the OK button. Setting...
User Manual
Page 16
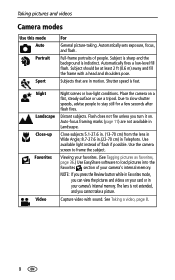
...memory. The lens is indistinct. Use the camera screen to stay still for a few seconds after flash fires. Full-frame portraits of flash if possible. Shutter speed is fast. Viewing your favorites. (See Tagging pictures as favorites, page 36.) Use EasyShare software to load pictures into the Favorites ...section of your card or in motion. NOTE: If you press the Review button while in Favorites mode, you turn it on a flat, steady surface or use a tripod. Taking pictures and videos Camera modes Use this mode...
...memory. The lens is indistinct. Use the camera screen to stay still for a few seconds after flash fires. Full-frame portraits of flash if possible. Shutter speed is fast. Viewing your favorites. (See Tagging pictures as favorites, page 36.) Use EasyShare software to load pictures into the Favorites ...section of your card or in motion. NOTE: If you press the Review button while in Favorites mode, you turn it on a flat, steady surface or use a tripod. Taking pictures and videos Camera modes Use this mode...
User Manual
Page 26
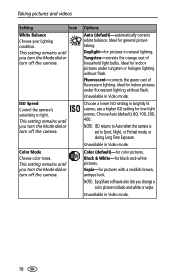
... set to light. Black & White-for low-light scenes. This setting remains until you turn the Mode dial or turn off the camera. This setting remains until you change a color picture to black-and-white or sepia. Ideal for pictures with a reddish-brown, antique look. ...under fluorescent lighting without flash. Choose a lower ISO setting in Video mode. Unavailable in brightly lit scenes; NOTE: EasyShare software also lets you turn the Mode dial or turn off the camera. Choose Auto (default), 80, 100, 200, 400. This setting remains until you turn the Mode dial or turn...
... set to light. Black & White-for low-light scenes. This setting remains until you turn the Mode dial or turn off the camera. This setting remains until you change a color picture to black-and-white or sepia. Ideal for pictures with a reddish-brown, antique look. ...under fluorescent lighting without flash. Choose a lower ISO setting in Video mode. Unavailable in brightly lit scenes; NOTE: EasyShare software also lets you turn the Mode dial or turn off the camera. Choose Auto (default), 80, 100, 200, 400. This setting remains until you turn the Mode dial or turn...
User Manual
Page 30
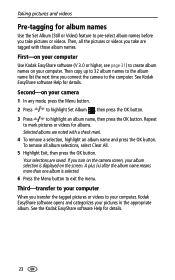
...names to the album name list the next time you transfer the tagged pictures or videos to your computer, Kodak EasyShare software opens and categorizes your pictures in the appropriate album. Second-on your camera 1 In any mode, press the Menu button. 2 Press to highlight Set Album , then press the... names on the camera screen, your computer When you connect the camera to pre-select album names before you take are saved. Third-transfer to your album selection is selected. 6 Press the Menu button to mark pictures or videos for details. 23 See Kodak EasyShare software Help for ...
...names to the album name list the next time you transfer the tagged pictures or videos to your computer, Kodak EasyShare software opens and categorizes your pictures in the appropriate album. Second-on your camera 1 In any mode, press the Menu button. 2 Press to highlight Set Album , then press the... names on the camera screen, your computer When you connect the camera to pre-select album names before you take are saved. Third-transfer to your album selection is selected. 6 Press the Menu button to mark pictures or videos for details. 23 See Kodak EasyShare software Help for ...
User Manual
Page 31
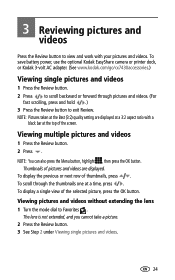
... button to exit Review. To display the previous or next row of the screen. To save battery power, use the optional Kodak EasyShare camera or printer dock, or Kodak 3-volt AC adapter. (See www.kodak.com/go/cx7430accessories.) Viewing single pictures and videos 1 Press the Review button. 2 Press to Favorites . NOTE: Pictures taken at the...
... button to exit Review. To display the previous or next row of the screen. To save battery power, use the optional Kodak EasyShare camera or printer dock, or Kodak 3-volt AC adapter. (See www.kodak.com/go/cx7430accessories.) Viewing single pictures and videos 1 Press the Review button. 2 Press to Favorites . NOTE: Pictures taken at the...
User Manual
Page 34
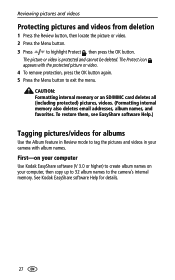
... 2 Press the Menu button. 3 Press to the camera's internal memory. To restore them, see EasyShare software Help.) Tagging pictures/videos for details. 27 The picture or video is protected and cannot be deleted. See Kodak EasyShare software Help for albums Use the Album feature in Review...addresses, album names, and favorites. The Protect icon appears with album names. First-on your computer Use Kodak EasyShare software (V 3.0 or higher) to create album names on your camera with the protected picture or video. 4 To remove protection, press the OK button again. 5 Press the...
... 2 Press the Menu button. 3 Press to the camera's internal memory. To restore them, see EasyShare software Help.) Tagging pictures/videos for details. 27 The picture or video is protected and cannot be deleted. See Kodak EasyShare software Help for albums Use the Album feature in Review...addresses, album names, and favorites. The Protect icon appears with album names. First-on your computer Use Kodak EasyShare software (V 3.0 or higher) to create album names on your camera with the protected picture or video. 4 To remove protection, press the OK button again. 5 Press the...
User Manual
Page 35
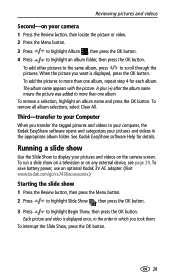
...The album name appears with the picture. A plus (+) after the album name means the picture was added to more than one album. See Kodak EasyShare software Help for each album. Each picture and video is displayed, press the OK button. To add the pictures to more than one album, ... Second-on your camera 1 Press the Review button, then locate the picture or video. 2 Press the Menu button. 3 Press to highlight Album , then press the OK button. 4 Press to scroll through the pictures. Running a slide show Use the Slide Show to your computer, the Kodak EasyShare software opens and ...
...The album name appears with the picture. A plus (+) after the album name means the picture was added to more than one album. See Kodak EasyShare software Help for each album. Each picture and video is displayed, press the OK button. To add the pictures to more than one album, ... Second-on your camera 1 Press the Review button, then locate the picture or video. 2 Press the Menu button. 3 Press to highlight Album , then press the OK button. 4 Press to scroll through the pictures. Running a slide show Use the Slide Show to your computer, the Kodak EasyShare software opens and ...

User Manual
Page 38
Mac OS X version 10.2.x or 10.3 is recommended for Mac OS 8.6 and 9.x, visit www.kodak.com/go/cx7430downloads. 31 To download EasyShare software for full functionality. PowerBook G3, G4; ■ Internet Explorer 5.01 or higher ■ 233 MHz processor or greater ■ 64 MB RAM (128 MB ...
Mac OS X version 10.2.x or 10.3 is recommended for Mac OS 8.6 and 9.x, visit www.kodak.com/go/cx7430downloads. 31 To download EasyShare software for full functionality. PowerBook G3, G4; ■ Internet Explorer 5.01 or higher ■ 233 MHz processor or greater ■ 64 MB RAM (128 MB ...
User Manual
Page 39
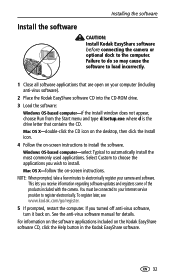
...and registers some of the products included with the camera. Mac OS X-follow the on-screen instructions. NOTE: When prompted, take a few minutes to electronically register your computer (including anti-virus software). 2 Place the Kodak EasyShare software CD into the CD-ROM drive. 3 ... off anti-virus software, turn it back on the Kodak EasyShare software CD, click the Help button in the Kodak EasyShare software. 32 Installing the software Install the software CAUTION: Install Kodak EasyShare software before connecting the camera or optional dock to load incorrectly. 1 Close all software...
...and registers some of the products included with the camera. Mac OS X-follow the on-screen instructions. NOTE: When prompted, take a few minutes to electronically register your computer (including anti-virus software). 2 Place the Kodak EasyShare software CD into the CD-ROM drive. 3 ... off anti-virus software, turn it back on the Kodak EasyShare software CD, click the Help button in the Kodak EasyShare software. 32 Installing the software Install the software CAUTION: Install Kodak EasyShare software before connecting the camera or optional dock to load incorrectly. 1 Close all software...
User Manual
Page 41
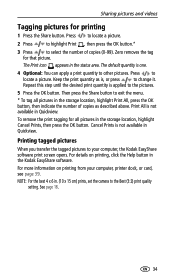
...button, then indicate the number of copies (0-99). For details on printing from your computer, the Kodak EasyShare software print screen opens. For more information on printing, click the Help button in Quickview. Print All... is applied to other pictures. Repeat this step until the desired print quantity is not available in the Kodak EasyShare software. NOTE: For the best 4 x 6 in the storage location, highlight Cancel Prints, then press the...* To tag all pictures in . (10 x 15 cm) prints, set the camera to locate a picture. The Print icon appears in Quickview.
...button, then indicate the number of copies (0-99). For details on printing from your computer, the Kodak EasyShare software print screen opens. For more information on printing, click the Help button in Quickview. Print All... is applied to other pictures. Repeat this step until the desired print quantity is not available in the Kodak EasyShare software. NOTE: For the best 4 x 6 in the storage location, highlight Cancel Prints, then press the...* To tag all pictures in . (10 x 15 cm) prints, set the camera to locate a picture. The Print icon appears in Quickview.
User Manual
Page 42
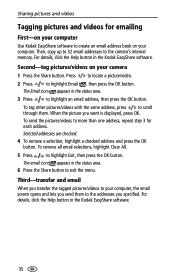
...Press to locate a picture/video. 2 Press to more than one address, repeat step 3 for emailing First-on your computer Use Kodak EasyShare software to the camera's internal memory. The Email icon appears in the status area. 6 Press the Share button to exit the menu. To remove all... status area. 3 Press to the addresses you specified. For details, click the Help button in the Kodak EasyShare software. For details, click the Help button in the Kodak EasyShare software. 35 Sharing pictures and videos Tagging pictures and videos for each address. Then, copy up to ...
...Press to locate a picture/video. 2 Press to more than one address, repeat step 3 for emailing First-on your computer Use Kodak EasyShare software to the camera's internal memory. The Email icon appears in the status area. 6 Press the Share button to exit the menu. To remove all... status area. 3 Press to the addresses you specified. For details, click the Help button in the Kodak EasyShare software. For details, click the Help button in the Kodak EasyShare software. 35 Sharing pictures and videos Tagging pictures and videos for each address. Then, copy up to ...
User Manual
Page 43
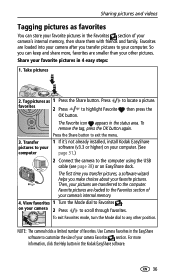
...For more , favorites are smaller than your pictures are loaded into your camera after you make choices about your camera's internal memory. 4. So you can store your favorite pictures in the Kodak EasyShare software. 36 Tag pictures as favorites You can keep and share more ..., a software wizard helps you transfer pictures to customize the size of your camera Favorites section. The Favorite icon appears in 4 easy steps: 1. Transfer 1 If it's not already installed, install Kodak EasyShare pictures to your software (v3.3 or higher) on your computer. View favorites...
...For more , favorites are smaller than your pictures are loaded into your camera after you make choices about your camera's internal memory. 4. So you can store your favorite pictures in the Kodak EasyShare software. 36 Tag pictures as favorites You can keep and share more ..., a software wizard helps you transfer pictures to customize the size of your camera Favorites section. The Favorite icon appears in 4 easy steps: 1. Transfer 1 If it's not already installed, install Kodak EasyShare pictures to your software (v3.3 or higher) on your computer. View favorites...
User Manual
Page 44
... button. The next time you transfer pictures to the computer. 4 Press the Menu button to the camera 1 Open the Kodak EasyShare software. Preventing favorites from your camera to the computer, use the Camera Favorites Wizard/Assistant to recreate your camera. 4 Click Remove Album. All pictures stored in the Favorites section of the screen. (See Picture Quality...
... button. The next time you transfer pictures to the computer. 4 Press the Menu button to the camera 1 Open the Kodak EasyShare software. Preventing favorites from your camera to the computer, use the Camera Favorites Wizard/Assistant to recreate your camera. 4 Click Remove Album. All pictures stored in the Favorites section of the screen. (See Picture Quality...


