
User Manual
Page 6
... 1 Installing the software first 1 Loading the batteries 2 Important battery information 3 Turning the camera on and off 4 Setting the date and time 5 Checking camera and picture status 6 Storing pictures on an SD/MMC card 7 2 Taking pictures and videos 8 Taking a picture 8 Taking a video 8 Camera modes 9 Using the camera screen as a viewfinder 10 Reviewing the picture or video just taken 12 Using optical zoom 13 Using digital zoom 13 Using the flash 14 Putting yourself in the picture 16 Putting yourself in the video 16 Taking a burst series of pictures 17 Changing picture...
... 1 Installing the software first 1 Loading the batteries 2 Important battery information 3 Turning the camera on and off 4 Setting the date and time 5 Checking camera and picture status 6 Storing pictures on an SD/MMC card 7 2 Taking pictures and videos 8 Taking a picture 8 Taking a video 8 Camera modes 9 Using the camera screen as a viewfinder 10 Reviewing the picture or video just taken 12 Using optical zoom 13 Using digital zoom 13 Using the flash 14 Putting yourself in the picture 16 Putting yourself in the video 16 Taking a burst series of pictures 17 Changing picture...

User Manual
Page 7
... 6 Connecting camera to computer 38 Transferring pictures with the USB cable 38 Printing pictures from your computer 39 Ordering prints online 39 Printing from an optional SD/MMC card 39 Printing without a computer 39 7 Troubleshooting 40 Camera problems 40 Camera screen messages 43 Camera ready light status 46 8 Getting help 47 Helpful links 47 Software help 47 Telephone customer support 47 9 Appendix 49 Camera specifications 49 Tips, safety, maintenance 51 Storage capacities 51 Power-saving features 52 Upgrading your software and firmware 52...
... 6 Connecting camera to computer 38 Transferring pictures with the USB cable 38 Printing pictures from your computer 39 Ordering prints online 39 Printing from an optional SD/MMC card 39 Printing without a computer 39 7 Troubleshooting 40 Camera problems 40 Camera screen messages 43 Camera ready light status 46 8 Getting help 47 Helpful links 47 Software help 47 Telephone customer support 47 9 Appendix 49 Camera specifications 49 Tips, safety, maintenance 51 Storage capacities 51 Power-saving features 52 Upgrading your software and firmware 52...
User Manual
Page 12
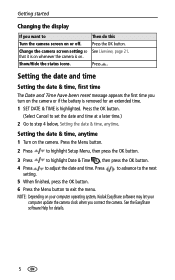
... your computer operating system, Kodak EasyShare software may let your computer update the camera clock when you turn on the camera or if the battery is removed for details. 5 Show/Hide the status icons. Press the Menu button. 2 Press to highlight Setup Menu, then press the OK button. 3 Press to highlight Date & Time , then press the OK button. 4 Press to adjust the date and time. Press setting. See the EasyShare software Help for an extended time. 1 SET DATE & TIME is...
... your computer operating system, Kodak EasyShare software may let your computer update the camera clock when you turn on the camera or if the battery is removed for details. 5 Show/Hide the status icons. Press the Menu button. 2 Press to highlight Setup Menu, then press the OK button. 3 Press to highlight Date & Time , then press the OK button. 4 Press to adjust the date and time. Press setting. See the EasyShare software Help for an extended time. 1 SET DATE & TIME is...
User Manual
Page 15
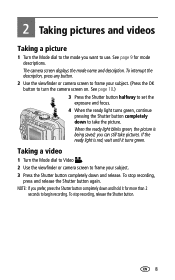
... light blinks green, the picture is red, wait until it for mode descriptions. If the ready light is being saved; See page 10.) 3 Press the Shutter button halfway to set the exposure and focus. 4 When the ready light turns green, continue pressing the Shutter button completely down and hold it turns green. NOTE: If you want to use. To stop recording, release the Shutter button. 8 The camera screen displays the mode name and description. 2 Taking pictures and videos Taking a picture 1 Turn the Mode dial to the mode...
... light blinks green, the picture is red, wait until it for mode descriptions. If the ready light is being saved; See page 10.) 3 Press the Shutter button halfway to set the exposure and focus. 4 When the ready light turns green, continue pressing the Shutter button completely down and hold it turns green. NOTE: If you want to use. To stop recording, release the Shutter button. 8 The camera screen displays the mode name and description. 2 Taking pictures and videos Taking a picture 1 Turn the Mode dial to the mode...
User Manual
Page 16
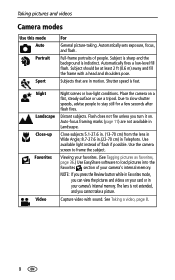
... the Review button while in Favorites mode, you cannot take a picture. Automatically sets exposure, focus, and flash. Night Landscape Close-up Favorites Video Night scenes or low-light conditions. Distant subjects. Auto-focus framing marks (page 11) are in Telephoto. Viewing your favorites. (See Tagging pictures as favorites, page 36.) Use EasyShare software to frame the subject. Automatically fires a low-level fill flash. Taking pictures and videos Camera modes Use this mode Auto Portrait Sport For General picture-taking...
... the Review button while in Favorites mode, you cannot take a picture. Automatically sets exposure, focus, and flash. Night Landscape Close-up Favorites Video Night scenes or low-light conditions. Distant subjects. Auto-focus framing marks (page 11) are in Telephoto. Viewing your favorites. (See Tagging pictures as favorites, page 36.) Use EasyShare software to frame the subject. Automatically fires a low-level fill flash. Taking pictures and videos Camera modes Use this mode Auto Portrait Sport For General picture-taking...

User Manual
Page 20
... picture. (When taking videos, press and release the Shutter button.) Using digital zoom Use digital zoom in printed image quality when using digital zoom. Release the button, then press it again. The camera screen displays the zoomed image and the zoom indicator. 3 Press the Shutter button halfway and hold to set the exposure and focus, then press the rest of the way down to zoom in. IMPORTANT: You may notice a decrease in any still mode to zoom out. The blue slider on , the zoom indicator...
... picture. (When taking videos, press and release the Shutter button.) Using digital zoom Use digital zoom in printed image quality when using digital zoom. Release the button, then press it again. The camera screen displays the zoomed image and the zoom indicator. 3 Press the Shutter button halfway and hold to set the exposure and focus, then press the rest of the way down to zoom in. IMPORTANT: You may notice a decrease in any still mode to zoom out. The blue slider on , the zoom indicator...
User Manual
Page 26
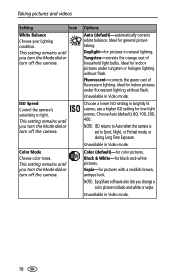
... Video mode. Sepia-for color pictures. ISO Speed Control the camera's sensitivity to Sport, Night, or Portrait mode, or during Long Time Exposure. Choose Auto (default), 80, 100, 200, 400. Color (default)-for pictures with a reddish-brown, antique look. This setting remains until you change a color picture to black-and-white or sepia. Options Auto (default)-automatically corrects white balance. Ideal for indoor pictures under fluorescent lighting without flash. Ideal for low-light scenes. use a higher ISO setting for general picture taking. Black & White-for pictures...
... Video mode. Sepia-for color pictures. ISO Speed Control the camera's sensitivity to Sport, Night, or Portrait mode, or during Long Time Exposure. Choose Auto (default), 80, 100, 200, 400. Color (default)-for pictures with a reddish-brown, antique look. This setting remains until you change a color picture to black-and-white or sepia. Options Auto (default)-automatically corrects white balance. Ideal for indoor pictures under fluorescent lighting without flash. Ideal for low-light scenes. use a higher ISO setting for general picture taking. Black & White-for pictures...
User Manual
Page 27
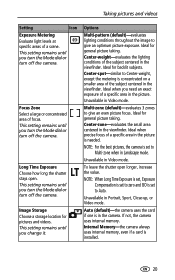
... viewfinder. Internal Memory-the camera always uses internal memory, even if a card is concentrated on a smaller area of the subject centered in the camera. Ideal for pictures and videos. Auto (default)-the camera uses the card if one is set to give an even picture focus. This setting remains until you turn the Mode dial or turn off the camera. To leave the shutter open . Taking pictures and videos Setting Icon Exposure Metering Evaluate light levels at specific areas of focus. Multi-zone (default)-evaluates...
... viewfinder. Internal Memory-the camera always uses internal memory, even if a card is concentrated on a smaller area of the subject centered in the camera. Ideal for pictures and videos. Auto (default)-the camera uses the card if one is set to give an even picture focus. This setting remains until you turn the Mode dial or turn off the camera. To leave the shutter open . Taking pictures and videos Setting Icon Exposure Metering Evaluate light levels at specific areas of focus. Multi-zone (default)-evaluates...
User Manual
Page 33
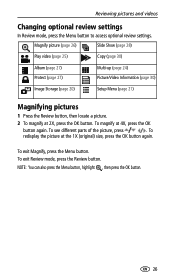
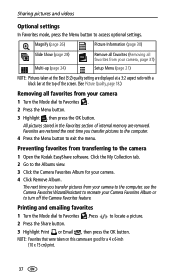
...) size, press the OK button again. Magnify picture (page 26) Slide Show (page 28) Play video (page 25) Copy (page 30) Album (page 27) Protect (page 27) Multi-up (page 24) Picture/Video Information (page 30) Image Storage (page 20) Setup Menu (page 21) Magnifying pictures 1 Press the Review button, then locate a picture. 2 To magnify at 2X, press the OK button. Reviewing pictures and videos Changing optional review settings In Review mode, press the Menu button to...
...) size, press the OK button again. Magnify picture (page 26) Slide Show (page 28) Play video (page 25) Copy (page 30) Album (page 27) Protect (page 27) Multi-up (page 24) Picture/Video Information (page 30) Image Storage (page 20) Setup Menu (page 21) Magnifying pictures 1 Press the Review button, then locate a picture. 2 To magnify at 2X, press the OK button. Reviewing pictures and videos Changing optional review settings In Review mode, press the Menu button to...
User Manual
Page 44
..., use the Camera Favorites Wizard/Assistant to recreate your Camera Favorites Album or to the camera 1 Open the Kodak EasyShare software. Printing and emailing favorites 1 Turn the Mode dial to Favorites .Press to access optional settings. NOTE: Favorites that were taken on this camera are displayed at a 3:2 aspect ratio with a black bar at the top of internal memory are restored the next time you transfer pictures from transferring to turn off the Camera Favorites...
..., use the Camera Favorites Wizard/Assistant to recreate your Camera Favorites Album or to the camera 1 Open the Kodak EasyShare software. Printing and emailing favorites 1 Turn the Mode dial to Favorites .Press to access optional settings. NOTE: Favorites that were taken on this camera are displayed at a 3:2 aspect ratio with a black bar at the top of internal memory are restored the next time you transfer pictures from transferring to turn off the Camera Favorites...

User Manual
Page 47
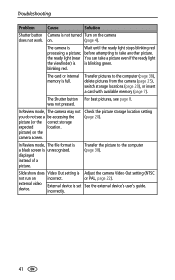
... updates to taking a picture. is operating normally. Ni-MH rechargeable battery pack. Continue up . Picture does not take The camera is exhausted. Picture orientation is available in the EasyShare camera. Retake picture. The camera was blinking. Camera problems Problem Cause Solution Camera does not turn off; decrease the number. The card was removed or the batteries expired while the ready light was Set the Orientation Sensor (page 22). Stored pictures are corrupted. 7 Troubleshooting When you have questions about your camera, start...
... updates to taking a picture. is operating normally. Ni-MH rechargeable battery pack. Continue up . Picture does not take The camera is exhausted. Picture orientation is available in the EasyShare camera. Retake picture. The camera was blinking. Camera problems Problem Cause Solution Camera does not turn off; decrease the number. The card was removed or the batteries expired while the ready light was Set the Orientation Sensor (page 22). Stored pictures are corrupted. 7 Troubleshooting When you have questions about your camera, start...
User Manual
Page 48
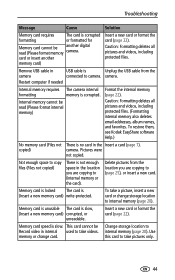
... is blinking green. Troubleshooting Problem Cause Solution Shutter button Camera is not turned Turn on . (page 4). The Shutter button For best pictures, see a be accessing the picture (or the correct storage expected location. on the camera does not work. Transfer pictures to the computer (page 38), delete pictures from the camera (page 25), switch storage locations (page 20), or insert a card with available memory (page 7). device. In Review mode, The file format is a black screen is set See the external device's user's guide.
... is blinking green. Troubleshooting Problem Cause Solution Shutter button Camera is not turned Turn on . (page 4). The Shutter button For best pictures, see a be accessing the picture (or the correct storage expected location. on the camera does not work. Transfer pictures to the computer (page 38), delete pictures from the camera (page 25), switch storage locations (page 20), or insert a card with available memory (page 7). device. In Review mode, The file format is a black screen is set See the external device's user's guide.

User Manual
Page 50
... the ready light glows green, press the Shutter button the rest of files or computer, then format the card or internal folders is inserted or inserted or removed. The camera does not recognize SD/MMC card. Reformat the card (page 22). Caution: Formatting deletes all pictures and videos, including protected files. other directory concern). Auto exposure was too far m) between the camera and the subject; 6.9 away for the flash to the number of the...
... the ready light glows green, press the Shutter button the rest of files or computer, then format the card or internal folders is inserted or inserted or removed. The camera does not recognize SD/MMC card. Reformat the card (page 22). Caution: Formatting deletes all pictures and videos, including protected files. other directory concern). Auto exposure was too far m) between the camera and the subject; 6.9 away for the flash to the number of the...
User Manual
Page 51
card or insert another digital camera. Caution: Formatting deletes all pictures and videos, including protected files. copied) camera. Pictures were not copied. To take a picture, insert a new card or change card. Memory card is unusable The card is corrupted. This card cannot be Change storage location to Record video in camera USB cable is Unplug the USB cable from the location you are copying to (page 25), or insert a new card. camera. Restart computer if needed Internal memory requires The camera internal formatting memory is slow, (Insert a new memory...
card or insert another digital camera. Caution: Formatting deletes all pictures and videos, including protected files. copied) camera. Pictures were not copied. To take a picture, insert a new card or change card. Memory card is unusable The card is corrupted. This card cannot be Change storage location to Record video in camera USB cable is Unplug the USB cable from the location you are copying to (page 25), or insert a new card. camera. Restart computer if needed Internal memory requires The camera internal formatting memory is slow, (Insert a new memory...
User Manual
Page 52
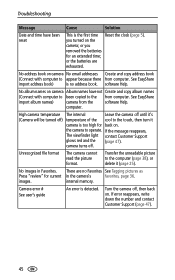
.... Unrecognized file format The camera cannot read the picture format. images. Camera error # See user's guide An error is the first time Reset the clock (page 5). camera turns off , then back on the camera; you removed the batteries for current in Favorites. Turn the camera off . Transfer the unreadable picture to the computer (page 38), or delete it camera is no Favorites See Tagging pictures as Press "review" for an extended time; computer. software Help. No images in the camera's favorites...
.... Unrecognized file format The camera cannot read the picture format. images. Camera error # See user's guide An error is the first time Reset the clock (page 5). camera turns off , then back on the camera; you removed the batteries for current in Favorites. Turn the camera off . Transfer the unreadable picture to the computer (page 38), or delete it camera is no Favorites See Tagging pictures as Press "review" for an extended time; computer. software Help. No images in the camera's favorites...
User Manual
Page 53
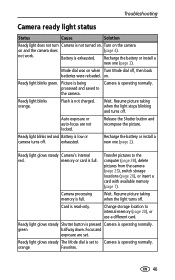
... a card with available memory (page 7). Wait. Wait. Resume picture taking when the light turns off . Ready light blinks red and Battery is low or camera turns off . Recharge the battery or install a new one (page 2). Card is operating normally. Transfer pictures to the camera. Change storage location to Camera is not charged. Focus and exposure are not locked. Ready light glows steady Shutter button is pressed Camera is read-only. Ready light blinks green. Ready light glows steady Camera's internal red. on when Turn Mode dial off . Ready light blinks...
... a card with available memory (page 7). Wait. Wait. Resume picture taking when the light turns off . Ready light blinks red and Battery is low or camera turns off . Recharge the battery or install a new one (page 2). Card is operating normally. Transfer pictures to the camera. Change storage location to Camera is not charged. Focus and exposure are not locked. Ready light glows steady Shutter button is pressed Camera is read-only. Ready light blinks green. Ready light glows steady Camera's internal red. on when Turn Mode dial off . Ready light blinks...
User Manual
Page 54
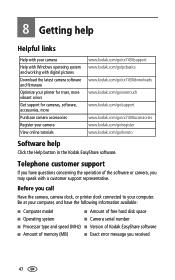
... operation of memory (MB) ■ Exact error message you call Have the camera, camera dock, or printer dock connected to your camera View online tutorials www.kodak.com/go/cx7430support www.kodak.com/go/pcbasics www.kodak.com/go/cx7430downloads www.kodak.com/go/onetouch www.kodak.com/go/support www.kodak.com/go/cx7430accessories www.kodak.com/go/register www.kodak.com/go/howto Software help Helpful links Help with your camera Help with Windows operating system and working...
... operation of memory (MB) ■ Exact error message you call Have the camera, camera dock, or printer dock connected to your camera View online tutorials www.kodak.com/go/cx7430support www.kodak.com/go/pcbasics www.kodak.com/go/cx7430downloads www.kodak.com/go/onetouch www.kodak.com/go/support www.kodak.com/go/cx7430accessories www.kodak.com/go/register www.kodak.com/go/howto Software help Helpful links Help with your camera Help with Windows operating system and working...
User Manual
Page 63
...10 loading batteries, 2 56 See cam- date stamp, 22 DC-in, ii delete button, ii deleting during quickview, 12 from internal memory, 25 from SD/MMC card, 25 protecting pictures, videos, 27 digital zoom, using, 13 displaying slide show, 28 disposal, recycling, 51 dock camera, 4 printer, 4, 39 downloading pictures, 38 E EasyShare software, 31 emailing pictures, videos, 35 error code, 45 exposure compensation, 18 exposure metering, 20 external video device viewing pictures, videos, 29 F favorites, 9 removing, 37 settings, 37 tagging, 36 FCC compliance, 53 firmware, upgrading, 52 flash settings...
...10 loading batteries, 2 56 See cam- date stamp, 22 DC-in, ii delete button, ii deleting during quickview, 12 from internal memory, 25 from SD/MMC card, 25 protecting pictures, videos, 27 digital zoom, using, 13 displaying slide show, 28 disposal, recycling, 51 dock camera, 4 printer, 4, 39 downloading pictures, 38 E EasyShare software, 31 emailing pictures, videos, 35 error code, 45 exposure compensation, 18 exposure metering, 20 external video device viewing pictures, videos, 29 F favorites, 9 removing, 37 settings, 37 tagging, 36 FCC compliance, 53 firmware, upgrading, 52 flash settings...
User Manual
Page 65
... setting album, 21 camera sounds, 21 color mode, 19 date & time, 21 date and time, 5 date stamp, 22 exposure compensation, 18 exposure metering, 20 flash, 14 focus zone, 20 Index image storage, 20 ISO speed, 19 language, 22 liveview, 21 long time exposure, 20 orientation sensor, 22 picture quality, 18 picture taking mode, 9 self timer, 16 video date display, 22 video length, 21 video out, 22 video quality, 18 white balance, 19 setup mode, using, 21 share button, ii, 33 shutoff, auto, 52 shutter problems, 41 self timer delay, 16 sleep mode, 52 slide show continuous...
... setting album, 21 camera sounds, 21 color mode, 19 date & time, 21 date and time, 5 date stamp, 22 exposure compensation, 18 exposure metering, 20 flash, 14 focus zone, 20 Index image storage, 20 ISO speed, 19 language, 22 liveview, 21 long time exposure, 20 orientation sensor, 22 picture quality, 18 picture taking mode, 9 self timer, 16 video date display, 22 video length, 21 video out, 22 video quality, 18 white balance, 19 setup mode, using, 21 share button, ii, 33 shutoff, auto, 52 shutter problems, 41 self timer delay, 16 sleep mode, 52 slide show continuous...
User Manual
Page 66
... USB (universal serial bus) connection location, i transferring pictures, 38 V VCCI compliance, 54 video date display, 22 video length, 21 video out, 22 video quality, 18 videos checking settings, 6, 7 copying, 30 deleting, 25 emailing tagged, 35 protecting, 27 reviewing, 24 storage capacities, 51 transfer to computer, 38 viewing, 24 viewfinder, i, ii using camera screen, 10 viewing picture after taking, 12, 24 magnified, 26 viewing picture, video information, 30 W white balance, 19 wide angle button, ii Windows computers installing software, 32 wrist strap post, i Z zoom button, ii digital...
... USB (universal serial bus) connection location, i transferring pictures, 38 V VCCI compliance, 54 video date display, 22 video length, 21 video out, 22 video quality, 18 videos checking settings, 6, 7 copying, 30 deleting, 25 emailing tagged, 35 protecting, 27 reviewing, 24 storage capacities, 51 transfer to computer, 38 viewing, 24 viewfinder, i, ii using camera screen, 10 viewing picture after taking, 12, 24 magnified, 26 viewing picture, video information, 30 W white balance, 19 wide angle button, ii Windows computers installing software, 32 wrist strap post, i Z zoom button, ii digital...


