
User Manual
Page 1
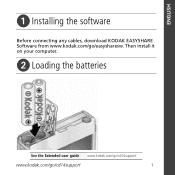
ENGLISH ᕡ Installing the software Before connecting any cables, download KODAK EASYSHARE Software from www.kodak.com/go /cd14support 1 Then install it on your computer. ᕢ Loading the batteries See the Extended user guide www.kodak.com/go/cd14support www.kodak.com/go /easysharesw.
ENGLISH ᕡ Installing the software Before connecting any cables, download KODAK EASYSHARE Software from www.kodak.com/go /cd14support 1 Then install it on your computer. ᕢ Loading the batteries See the Extended user guide www.kodak.com/go/cd14support www.kodak.com/go /easysharesw.
User Manual
Page 2
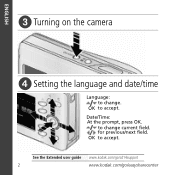
to change . for previous/next field. Date/Time: At the prompt, press OK. ENGLISH ᕣ Turning on the camera ᕤ Setting the language and date/time Language: to change current field. See the Extended user guide www.kodak.com/go/cd14support 2 www.kodak.com/go/easysharecenter OK to accept. OK to accept.
to change . for previous/next field. Date/Time: At the prompt, press OK. ENGLISH ᕣ Turning on the camera ᕤ Setting the language and date/time Language: to change current field. See the Extended user guide www.kodak.com/go/cd14support 2 www.kodak.com/go/easysharecenter OK to accept. OK to accept.

User Manual
Page 3
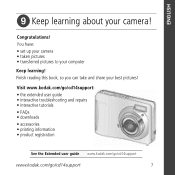
When the framing marks turn green, press the Shutter button completely down. Mode button Framing marks Learn about Auto and other modes See page 10 See the Extended user guide www.kodak.com/go/cd14support www.kodak.com/go/cd14support 3 ENGLISH ᕥ Taking a picture 1 Press the Mode button, then then press OK. to highlight Auto , 2 Press the Shutter button halfway to focus and set exposure.
When the framing marks turn green, press the Shutter button completely down. Mode button Framing marks Learn about Auto and other modes See page 10 See the Extended user guide www.kodak.com/go/cd14support www.kodak.com/go/cd14support 3 ENGLISH ᕥ Taking a picture 1 Press the Mode button, then then press OK. to highlight Auto , 2 Press the Shutter button halfway to focus and set exposure.

User Manual
Page 5
See the Extended user guide Purchase accessories www.kodak.com/go/cd14support www.kodak.com/go/cd14accessories www.kodak.com/go/cd14support 5 ENGLISH ᕧ Transferring pictures/videos 1 Turn off the camera. 2 Connect the KODAK USB Cable, Model U-8 (may be included). 3 Turn on the camera.
See the Extended user guide Purchase accessories www.kodak.com/go/cd14support www.kodak.com/go/cd14accessories www.kodak.com/go/cd14support 5 ENGLISH ᕧ Transferring pictures/videos 1 Turn off the camera. 2 Connect the KODAK USB Cable, Model U-8 (may be included). 3 Turn on the camera.

User Manual
Page 6
... learn nothing else about your camera, learn how to take the best possible pictures and videos Great news! Scroll through a Help topic. Because the more you know your camera. It describes every setting for you become. 1 Press the Menu button , then highlight a menu choice. 2 Press the Info button. Your camera offers a built-in Help system. See the Extended user guide www.kodak.com/go/cd14support 6 www...
... learn nothing else about your camera, learn how to take the best possible pictures and videos Great news! Scroll through a Help topic. Because the more you know your camera. It describes every setting for you become. 1 Press the Menu button , then highlight a menu choice. 2 Press the Info button. Your camera offers a built-in Help system. See the Extended user guide www.kodak.com/go/cd14support 6 www...
User Manual
Page 7
...: • set up your camera • taken pictures • transferred pictures to your best pictures! Visit www.kodak.com/go/cd14support: • the extended user guide • interactive troubleshooting and repairs • interactive tutorials • FAQs • downloads • accessories • printing information • product registration See the Extended user guide www.kodak.com/go/cd14support www.kodak.com/go/cd14support 7 Finish reading this book, so you can take and...
...: • set up your camera • taken pictures • transferred pictures to your best pictures! Visit www.kodak.com/go/cd14support: • the extended user guide • interactive troubleshooting and repairs • interactive tutorials • FAQs • downloads • accessories • printing information • product registration See the Extended user guide www.kodak.com/go/cd14support www.kodak.com/go/cd14support 7 Finish reading this book, so you can take and...
User Manual
Page 10
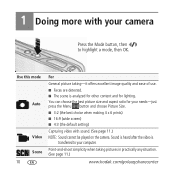
... the Menu button and choose Picture Size. ■ 3:2 (the best choice when making 4 x 6 prints) ■ 16:9 (wide screen) ■ 4:3 (the default setting) Capturing video with your camera Press the Mode button, then to your computer. You can choose the best picture size and aspect ratio for lighting. Point-and-shoot simplicity when taking -it offers excellent image quality and ease of use. ■ Faces are detected. ■ The scene is transferred...
... the Menu button and choose Picture Size. ■ 3:2 (the best choice when making 4 x 6 prints) ■ 16:9 (wide screen) ■ 4:3 (the default setting) Capturing video with your camera Press the Mode button, then to your computer. You can choose the best picture size and aspect ratio for lighting. Point-and-shoot simplicity when taking -it offers excellent image quality and ease of use. ■ Faces are detected. ■ The scene is transferred...

User Manual
Page 11
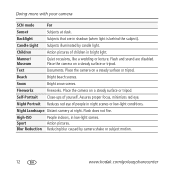
Using Scene (SCN) modes Choose a Scene mode-for great pictures in bright light. Distant scenes. Close range. Doing more with videos, see page 4. To stop recording, press and release the Shutter button again. SCN mode Portrait Landscape Close-up Flower For Full-frame portraits of flash, if possible. NOTE: Sound cannot be played on the camera. Use available light instead of people. to highlight Video 2 Press the Shutter button completely...
Using Scene (SCN) modes Choose a Scene mode-for great pictures in bright light. Distant scenes. Close range. Doing more with videos, see page 4. To stop recording, press and release the Shutter button again. SCN mode Portrait Landscape Close-up Flower For Full-frame portraits of flash, if possible. NOTE: Sound cannot be played on the camera. Use available light instead of people. to highlight Video 2 Press the Shutter button completely...
User Manual
Page 12
...). Fireworks Fireworks. Assures proper focus, minimizes red eye. High-ISO Sport Blur Reduction People indoors, in bright light. Text Documents. Action pictures. Place the camera on a steady surface or tripod. Night Portrait Reduces red eye of children in low-light scenes. Backlight Subjects that are disabled. Place the camera on a steady surface or tripod. Snow Bright snow scenes. Flash does not fire. Beach...
...). Fireworks Fireworks. Assures proper focus, minimizes red eye. High-ISO Sport Blur Reduction People indoors, in bright light. Text Documents. Action pictures. Place the camera on a steady surface or tripod. Night Portrait Reduces red eye of children in low-light scenes. Backlight Subjects that are disabled. Place the camera on a steady surface or tripod. Snow Bright snow scenes. Flash does not fire. Beach...
User Manual
Page 13
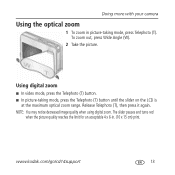
... pauses and turns red when the picture quality reaches the limit for an acceptable 4 x 6-in picture-taking mode, press the Telephoto (T) button until the slider on the LCD is at the maximum optical zoom range. NOTE: You may notice decreased image quality when using digital zoom. To zoom out, press Wide Angle (W). 2 Take the picture. Doing more with your camera Using the optical zoom 1 To zoom in . (10 x 15 cm) print.
... pauses and turns red when the picture quality reaches the limit for an acceptable 4 x 6-in picture-taking mode, press the Telephoto (T) button until the slider on the LCD is at the maximum optical zoom range. NOTE: You may notice decreased image quality when using digital zoom. To zoom out, press Wide Angle (W). 2 Take the picture. Doing more with your camera Using the optical zoom 1 To zoom in . (10 x 15 cm) print.
User Manual
Page 14
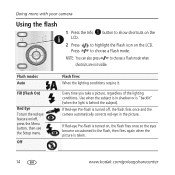
... Red-eye Pre-flash is turned off , press the Menu button, then see the Setup menu. to highlight the Flash icon on the LCD. Doing more with your camera Using the flash 1 Press the Info button to show shortcuts on the LCD. 2 Press Press to choose a Flash mode. If Red-eye Pre-flash is behind the subject). Every time you take a picture, regardless of the lighting conditions. Use when the subject is taken. 14 www.kodak.com...
... Red-eye Pre-flash is turned off , press the Menu button, then see the Setup menu. to highlight the Flash icon on the LCD. Doing more with your camera Using the flash 1 Press the Info button to show shortcuts on the LCD. 2 Press Press to choose a Flash mode. If Red-eye Pre-flash is behind the subject). Every time you take a picture, regardless of the lighting conditions. Use when the subject is taken. 14 www.kodak.com...
User Manual
Page 15
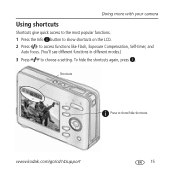
Shortcuts Press to choose a setting. www.kodak.com/go/cd14support 15 To hide the shortcuts again, press . Doing more with your camera Using shortcuts Shortcuts give quick access to the most popular functions. 1 Press the Info button to show shortcuts on the LCD. 2 Press to access functions like Flash, Exposure Compensation, Self-timer, and Auto focus. (You'll see different functions in different modes.) 3 Press to show/hide shortcuts.
Shortcuts Press to choose a setting. www.kodak.com/go/cd14support 15 To hide the shortcuts again, press . Doing more with your camera Using shortcuts Shortcuts give quick access to the most popular functions. 1 Press the Info button to show shortcuts on the LCD. 2 Press to access functions like Flash, Exposure Compensation, Self-timer, and Auto focus. (You'll see different functions in different modes.) 3 Press to show/hide shortcuts.
User Manual
Page 16
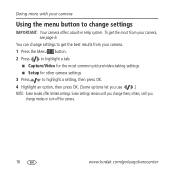
... let you use .) NOTE: Some modes offer limited settings. Some settings remain until you change them; others, until you change settings IMPORTANT: Your camera offers a built-in Help system. You can change settings to get the most from your camera. 1 Press the Menu button. 2 Press to highlight a tab: ■ Capture/Video for the most common picture/video-taking settings ■ Setup for other camera settings 3 Press to change modes or turn off the camera. 16 www.kodak.com...
... let you use .) NOTE: Some modes offer limited settings. Some settings remain until you change them; others, until you change settings IMPORTANT: Your camera offers a built-in Help system. You can change settings to get the most from your camera. 1 Press the Menu button. 2 Press to highlight a tab: ■ Capture/Video for the most common picture/video-taking settings ■ Setup for other camera settings 3 Press to change modes or turn off the camera. 16 www.kodak.com...
User Manual
Page 17
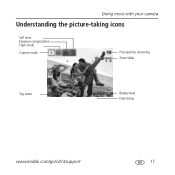
Doing more with your camera Understanding the picture-taking icons Self timer Exposure compensation Flash mode Capture mode Pictures/time remaining Zoom slider Tag name Battery level Date stamp www.kodak.com/go/cd14support 17
Doing more with your camera Understanding the picture-taking icons Self timer Exposure compensation Flash mode Capture mode Pictures/time remaining Zoom slider Tag name Battery level Date stamp www.kodak.com/go/cd14support 17
User Manual
Page 18
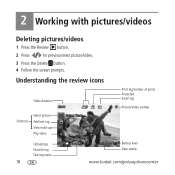
Understanding the review icons Video duration Shortcuts Select picture Add text tag View multi-up Play video Print tag/number of prints Protected Email tag Picture/Video number Upload tag Favorite tag Text tag name 18 Battery level Date stamp www.kodak.com/go/easysharecenter 2 Working with pictures/videos Deleting pictures/videos 1 Press the Review button. 2 Press for previous/next picture/video. 3 Press the Delete button. 4 Follow the screen prompts.
Understanding the review icons Video duration Shortcuts Select picture Add text tag View multi-up Play video Print tag/number of prints Protected Email tag Picture/Video number Upload tag Favorite tag Text tag name 18 Battery level Date stamp www.kodak.com/go/easysharecenter 2 Working with pictures/videos Deleting pictures/videos 1 Press the Review button. 2 Press for previous/next picture/video. 3 Press the Delete button. 4 Follow the screen prompts.
User Manual
Page 19
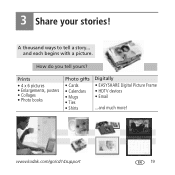
How do you tell yours? www.kodak.com/go/cd14support 19 3 Share your stories! A thousand ways to tell a story... Prints • 4 x 6 pictures • Enlargements, posters • Collages • Photo books Photo gifts • Cards • Calendars • Mugs • Ties • Shirts Digitally • EASYSHARE Digital Picture Frame • HDTV devices • Email ...and much more! and each begins with a picture.
How do you tell yours? www.kodak.com/go/cd14support 19 3 Share your stories! A thousand ways to tell a story... Prints • 4 x 6 pictures • Enlargements, posters • Collages • Photo books Photo gifts • Cards • Calendars • Mugs • Ties • Shirts Digitally • EASYSHARE Digital Picture Frame • HDTV devices • Email ...and much more! and each begins with a picture.
User Manual
Page 21
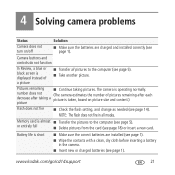
... taking pictures. number does not (The camera estimates the number of a picture ■ Transfer all modes. or entirely full ■ Delete pictures from the card (see page 1). The camera is almost ■ Transfer the pictures to the computer (see page 1). www.kodak.com/go/cd14support 21 NOTE: The flash does not fire in the camera. ■ Insert new or charged batteries (see page 5). ■ Take another picture. Camera buttons and controls do not function In Review...
... taking pictures. number does not (The camera estimates the number of a picture ■ Transfer all modes. or entirely full ■ Delete pictures from the card (see page 1). The camera is almost ■ Transfer the pictures to the computer (see page 1). www.kodak.com/go/cd14support 21 NOTE: The flash does not fire in the camera. ■ Insert new or charged batteries (see page 5). ■ Take another picture. Camera buttons and controls do not function In Review...

User Manual
Page 22
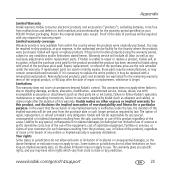
...; Do not disassemble, install backward, or expose batteries to qualified service personnel. The use of time. there are intended for this product; If the LCD breaks, do not touch the glass or liquid. In the unlikely event that battery fluid leaks inside . Otherwise, a battery may result in an airplane, observe all warnings and instructions supplied by Kodak may cause fire...
...; Do not disassemble, install backward, or expose batteries to qualified service personnel. The use of time. there are intended for this product; If the LCD breaks, do not touch the glass or liquid. In the unlikely event that battery fluid leaks inside . Otherwise, a battery may result in an airplane, observe all warnings and instructions supplied by Kodak may cause fire...
User Manual
Page 23
... date of repair or replacement, whichever is ineffective under the warranty. Remanufactured products, parts and materials are warranted for a particular purpose. Limitations This warranty does not cover circumstances beyond Kodak's control. Kodak makes no other rights which vary from the purchase, use items supplied by jurisdiction. Appendix Limited Warranty Kodak warrants Kodak consumer electronic products and accessories ("products"), excluding batteries, to be free...
... date of repair or replacement, whichever is ineffective under the warranty. Remanufactured products, parts and materials are warranted for a particular purpose. Limitations This warranty does not cover circumstances beyond Kodak's control. Kodak makes no other rights which vary from the purchase, use items supplied by jurisdiction. Appendix Limited Warranty Kodak warrants Kodak consumer electronic products and accessories ("products"), excluding batteries, to be free...
User Manual
Page 24
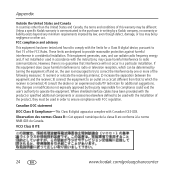
...and, if not installed or used in writing by a Kodak company, no ...installation. Canadian DOC statement DOC Class B Compliance-This Class B digital apparatus complies with the instructions, may be determined by turning the equipment off and on, the user...used in a residential installation. Unless a specific Kodak warranty is communicated to the purchaser in order to ensure compliance with the limits for compliance could void the user's authority to provide reasonable protection against harmful interference in accordance with Canadian ICES-003. These limits are designed to operate...
...and, if not installed or used in writing by a Kodak company, no ...installation. Canadian DOC statement DOC Class B Compliance-This Class B digital apparatus complies with the instructions, may be determined by turning the equipment off and on, the user...used in a residential installation. Unless a specific Kodak warranty is communicated to the purchaser in order to ensure compliance with the limits for compliance could void the user's authority to provide reasonable protection against harmful interference in accordance with Canadian ICES-003. These limits are designed to operate...


