
User Manual
Page 4
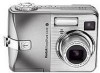
Product features Side View 4 3 2 5 6 78 9 10 11 12 1 13 16 15 14 1 Dock connector 2 Tripod socket 3 LCD screen 4 Viewfinder 5 Ready light 6 Review button 7 Menu button 8 LCD On/Off/Status butt button 9 Delete button 10 Zoom (Wide Angle/Telephoto) 11 4-way controller 12 OK button 13 Slot for optional SD or MMC card 14 USB, A/V Out 15 Share button 16 Battery compartment ii www.kodak.com/go/support
Product features Side View 4 3 2 5 6 78 9 10 11 12 1 13 16 15 14 1 Dock connector 2 Tripod socket 3 LCD screen 4 Viewfinder 5 Ready light 6 Review button 7 Menu button 8 LCD On/Off/Status butt button 9 Delete button 10 Zoom (Wide Angle/Telephoto) 11 4-way controller 12 OK button 13 Slot for optional SD or MMC card 14 USB, A/V Out 15 Share button 16 Battery compartment ii www.kodak.com/go/support

User Manual
Page 10
Taking a video 1 Turn on camera. Ready light 2 Frame your subject in the Viewfinder or LCD screen. To stop recording, press and release the Shutter button again. 4 www.kodak.com/go/support 2 Taking pictures and videos Taking a picture 1 Turn on camera. 2 Frame your subject in the Viewfinder or LCD screen. 3 Press Shutter button halfway to focus and set exposure. 4 When the Ready light turns green, press the button completely down. 3 Press the Shutter button completely down and release.
Taking a video 1 Turn on camera. Ready light 2 Frame your subject in the Viewfinder or LCD screen. To stop recording, press and release the Shutter button again. 4 www.kodak.com/go/support 2 Taking pictures and videos Taking a picture 1 Turn on camera. 2 Frame your subject in the Viewfinder or LCD screen. 3 Press Shutter button halfway to focus and set exposure. 4 When the Ready light turns green, press the button completely down. 3 Press the Shutter button completely down and release.

User Manual
Page 11
... you take a picture or video, the LCD screen displays a Quickview for print. Checking camera and picture status Press the LCD On/Off/Status button to turn off the icons of the active camera or picture settings. To view pictures and videos anytime, see the active camera and picture settings. www.kodak.com/go/support 5 OK to play...
... you take a picture or video, the LCD screen displays a Quickview for print. Checking camera and picture status Press the LCD On/Off/Status button to turn off the icons of the active camera or picture settings. To view pictures and videos anytime, see the active camera and picture settings. www.kodak.com/go/support 5 OK to play...

User Manual
Page 12
... the framing marks turn green, focus is not focusing on foreground subjects, even if the subjects are fixed at Center Wide. 6 www.kodak.com/go/support While the shutter button is pressed halfway: Framing marks Center focus Center wide focus Side focus Center and side focus Left ...right focus 2 If the camera is accomplished. When you use Focus Zone (page 32) and set Center Zone, the framing marks are not centered in Landscape, Fireworks, or Video mode. Taking pictures and videos Using the auto-focus framing marks (pictures) When using the LCD screen as a viewfinder, framing ...
... the framing marks turn green, focus is not focusing on foreground subjects, even if the subjects are fixed at Center Wide. 6 www.kodak.com/go/support While the shutter button is pressed halfway: Framing marks Center focus Center wide focus Side focus Center and side focus Left ...right focus 2 If the camera is accomplished. When you use Focus Zone (page 32) and set Center Zone, the framing marks are not centered in Landscape, Fireworks, or Video mode. Taking pictures and videos Using the auto-focus framing marks (pictures) When using the LCD screen as a viewfinder, framing ...

User Manual
Page 14
... to set the exposure and focus, then press completely down to the subject or 5 in. (13 cm) in . (10 x 15 cm) print. 8 www.kodak.com/go/support The Zoom indicator shows zoom status. 2 Take the picture. The blue slider on the zoom indicator pauses and turns red when the...picture. (When taking videos, press and release the Shutter button.) Using digital zoom Use digital zoom in . Release the button, then press it again. You can change optical zoom before (but not during) video recording. 1 Use the Viewfinder or LCD screen to the optical zoom limit (3X). Combined zoom settings are from 3X...
... to set the exposure and focus, then press completely down to the subject or 5 in. (13 cm) in . (10 x 15 cm) print. 8 www.kodak.com/go/support The Zoom indicator shows zoom status. 2 Take the picture. The blue slider on the zoom indicator pauses and turns red when the...picture. (When taking videos, press and release the Shutter button.) Using digital zoom Use digital zoom in . Release the button, then press it again. You can change optical zoom before (but not during) video recording. 1 Use the Viewfinder or LCD screen to the optical zoom limit (3X). Combined zoom settings are from 3X...

User Manual
Page 15
...ISO 140 Reviewing pictures and videos Press the Review button to view and work with a black bar at night, indoors, or outdoors in the LCD screen. www.kodak.com/go /c340accessories.) NOTE: Pictures taken at the 4.4 MP (3:2) quality setting are displayed at a 4:3 aspect ratio with your pictures and ... at the top of the screen. Press the button repeatedly to beginning (during playback) Next picture/video (during playback) 2 (previous/next) To save battery power, use the optional Kodak EasyShare camera or printer dock, or Kodak 3-volt AC adapter. (See www.kodak.com/go /support 9 To...
...ISO 140 Reviewing pictures and videos Press the Review button to view and work with a black bar at night, indoors, or outdoors in the LCD screen. www.kodak.com/go /c340accessories.) NOTE: Pictures taken at the 4.4 MP (3:2) quality setting are displayed at a 4:3 aspect ratio with your pictures and ... at the top of the screen. Press the button repeatedly to beginning (during playback) Next picture/video (during playback) 2 (previous/next) To save battery power, use the optional Kodak EasyShare camera or printer dock, or Kodak 3-volt AC adapter. (See www.kodak.com/go /support 9 To...

User Manual
Page 30
..., press OK button. Doing more with your camera Running a slide show Use the Slide Show to display your pictures and videos on any external device, see page 25. The interval setting remains until you change it. 24 www.kodak.com/go /c340accessories.) Starting the slide show ...display interval The default interval setting displays each picture for 5 seconds. Each picture and video is displayed once. To run a slide show on a television or on the LCD screen. Changing the slide show 1 Press...
..., press OK button. Doing more with your camera Running a slide show Use the Slide Show to display your pictures and videos on any external device, see page 25. The interval setting remains until you change it. 24 www.kodak.com/go /c340accessories.) Starting the slide show ...display interval The default interval setting displays each picture for 5 seconds. Each picture and video is displayed once. To run a slide show on a television or on the LCD screen. Changing the slide show 1 Press...

User Manual
Page 33
Some of the flash settings may fire only once.) Off Never www.kodak.com/go/support 27 Use when the subject is in shadow or is "backlit" (when the sun is displayed in the LCD screen. In low light, hold the camera steady or use a tripod. Red-eye Once, so the subject's eyes become ... time you take a picture, regardless of the lighting conditions. Flash modes Flash fires Auto When the lighting conditions require it . Doing more with your camera Changing the flash settings Press the Flash button repeatedly to Auto or Red-eye in some of these modes, it becomes the default until you...
Some of the flash settings may fire only once.) Off Never www.kodak.com/go/support 27 Use when the subject is in shadow or is "backlit" (when the sun is displayed in the LCD screen. In low light, hold the camera steady or use a tripod. Red-eye Once, so the subject's eyes become ... time you take a picture, regardless of the lighting conditions. Flash modes Flash fires Auto When the lighting conditions require it . Doing more with your camera Changing the flash settings Press the Flash button repeatedly to Auto or Red-eye in some of these modes, it becomes the default until you...

User Manual
Page 34
... more with sound (see Scene modes, page 29). Auto-focus framing marks (page 6) are f/2.8-f/3.7, Multi-Zone Focus, ISO 80-ISO 160. Use the LCD screen to exaggerate background blur. Full-frame portraits of flash if possible. Shutter speed is fast. Close-up Close subjects 5-27.6 in. (13-70 cm) ... of use. Use this mode Auto For General picture-taking pictures under 8 special conditions (see page 4). 28 www.kodak.com/go/support Subjects that best suits your camera Picture-taking modes Choose the mode that are in motion. Flash does not fire unless you turn it on. Use ...
... more with sound (see Scene modes, page 29). Auto-focus framing marks (page 6) are f/2.8-f/3.7, Multi-Zone Focus, ISO 80-ISO 160. Use the LCD screen to exaggerate background blur. Full-frame portraits of flash if possible. Shutter speed is fast. Close-up Close subjects 5-27.6 in. (13-70 cm) ... of use. Use this mode Auto For General picture-taking pictures under 8 special conditions (see page 4). 28 www.kodak.com/go/support Subjects that best suits your camera Picture-taking modes Choose the mode that are in motion. Flash does not fire unless you turn it on. Use ...

User Manual
Page 43
.... 3 Press to exit the menu. Then copy up to 32 album names to the album name list on your camera the next time you turn on the LCD screen, your computer Use Kodak EasyShare software that came with a check mark. 4 To remove a selection, highlight an album name and press the OK button.... A plus (+) after the album name means more with your camera First-on your album selection is selected. 6 Press ...
.... 3 Press to exit the menu. Then copy up to 32 album names to the album name list on your camera the next time you turn on the LCD screen, your computer Use Kodak EasyShare software that came with a check mark. 4 To remove a selection, highlight an album name and press the OK button.... A plus (+) after the album name means more with your camera First-on your album selection is selected. 6 Press ...

User Manual
Page 51
... take another memory card. Format card in the camera. www.kodak.com/go/support 45 I Delete pictures from the camera (page 14), change image storage location, or insert a new card. freezes with a clean, dry cloth (page 58). Troubleshooting If... almost or entirely full I Turn on LCD screen I Wait until the Ready light glows green before...
... take another memory card. Format card in the camera. www.kodak.com/go/support 45 I Delete pictures from the camera (page 14), change image storage location, or insert a new card. freezes with a clean, dry cloth (page 58). Troubleshooting If... almost or entirely full I Turn on LCD screen I Wait until the Ready light glows green before...

User Manual
Page 64
... dependably, use of pictures) Battery life test method: CIPA (Camera & Imaging Products Association) Memory card used in test: Kodak SD 128 MB memory card We do not recommend or support alkaline batteries. Excessive use the replacement batteries ... the following batteries. For acceptable battery life, and to make sure your pictures on usage. Using the camera LCD screen as a viewfinder (see page 9) - Appendix Battery information Battery life for Kodak C-series digital cameras Use the following activities that quickly deplete battery power: - number of the flash (see page 27) ...
... dependably, use of pictures) Battery life test method: CIPA (Camera & Imaging Products Association) Memory card used in test: Kodak SD 128 MB memory card We do not recommend or support alkaline batteries. Excessive use the replacement batteries ... the following batteries. For acceptable battery life, and to make sure your pictures on usage. Using the camera LCD screen as a viewfinder (see page 9) - Appendix Battery information Battery life for Kodak C-series digital cameras Use the following activities that quickly deplete battery power: - number of the flash (see page 27) ...


