
User Manual
Page 5
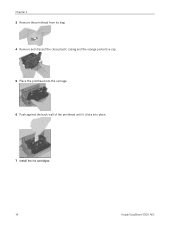
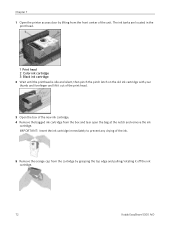
www.kodak.com/go/aiosupport 5 Make sure the orange tape is fragile. a) Lift the printer access door. IMPORTANT: Insert the printhead immediately upon opening sealed bag. b) Remove the printhead from the carriage. 3 Install Printhead IMPORTANT: The printhead is removed from its bag. c) Pull on the orange tab to remove the protective retainer. Handle carefully.
www.kodak.com/go/aiosupport 5 Make sure the orange tape is fragile. a) Lift the printer access door. IMPORTANT: Insert the printhead immediately upon opening sealed bag. b) Remove the printhead from the carriage. 3 Install Printhead IMPORTANT: The printhead is removed from its bag. c) Pull on the orange tab to remove the protective retainer. Handle carefully.

User Manual
Page 6
f) Push firmly against the back wall of the printhead until it clicks into the carriage. e) Place the printhead into place. Tip: The printhead requires a firm push and makes an audible click when locked into place. 6 www.kodak.com/go/aiosupport Insert at the angle shown. Install Printhead d) Carefully remove and discard the black plastic shield and the orange protective cap. IMPORTANT: Do not touch the copper-colored contacts.
f) Push firmly against the back wall of the printhead until it clicks into the carriage. e) Place the printhead into place. Tip: The printhead requires a firm push and makes an audible click when locked into place. 6 www.kodak.com/go/aiosupport Insert at the angle shown. Install Printhead d) Carefully remove and discard the black plastic shield and the orange protective cap. IMPORTANT: Do not touch the copper-colored contacts.

User Manual
Page 7
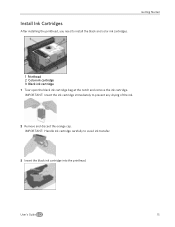
Handle ink cartridges carefully to avoid ink transfer. 10 Black Ink Cartridge c) Insert the black ink cartridge into the printhead. www.kodak.com/go/aiosupport 7 IMPORTANT: Insert ink cartridges immediately upon opening sealed bag. 10 Black Ink Cartridge Black Ink Cartridge 10 b) Carefully remove and discard the orange cap. 4 Install Ink Cartridges a) Remove the black ink cartridge from its bag.
Handle ink cartridges carefully to avoid ink transfer. 10 Black Ink Cartridge c) Insert the black ink cartridge into the printhead. www.kodak.com/go/aiosupport 7 IMPORTANT: Insert ink cartridges immediately upon opening sealed bag. 10 Black Ink Cartridge Black Ink Cartridge 10 b) Carefully remove and discard the orange cap. 4 Install Ink Cartridges a) Remove the black ink cartridge from its bag.

User Guide
Page 11
... cartridge inserted incorrectly. Color ink cartridge not installed. Printhead not installed. Printhead failure. Paper jam during pick. Change color ink cartridge. Color ink cartridge not readable. Calibration sheet needs scanning. Calibration sheet read error. Unit opened when idle. Attention Light Cause No Error. Recoverable Error. Calibration sheet not detected. Back cover removed while printing. Media sensor...
... cartridge inserted incorrectly. Color ink cartridge not installed. Printhead not installed. Printhead failure. Paper jam during pick. Change color ink cartridge. Color ink cartridge not readable. Calibration sheet needs scanning. Calibration sheet read error. Unit opened when idle. Attention Light Cause No Error. Recoverable Error. Calibration sheet not detected. Back cover removed while printing. Media sensor...

User Guide
Page 17
...carriage moves to let you connect and disconnect cables, change the ink cartridges, and remove and load paper. Airborne particles can affect picture quality. Allow enough space on all sides of the EasyShare AiO to a center position. Connect Power RISK OF ELECTRICAL SHOCK Use only the AC...and out of direct sunlight. Place the printer on . 2 Open the printer access door. Install the Printhead The printhead dispenses the ink from the cartridges onto the paper. 1 Make sure the EasyShare AiO is important to the back of dust and debris. User's Guide 13 Avoid areas where ventilation ...
...carriage moves to let you connect and disconnect cables, change the ink cartridges, and remove and load paper. Airborne particles can affect picture quality. Allow enough space on all sides of the EasyShare AiO to a center position. Connect Power RISK OF ELECTRICAL SHOCK Use only the AC...and out of direct sunlight. Place the printer on . 2 Open the printer access door. Install the Printhead The printhead dispenses the ink from the cartridges onto the paper. 1 Make sure the EasyShare AiO is important to the back of dust and debris. User's Guide 13 Avoid areas where ventilation ...
User Guide
Page 18
Chapter 2 3 Remove the printhead from its bag. 4 Remove and discard the clear plastic casing and the orange protective cap. 5 Place the printhead into the carriage. 6 Push against the back wall of the printhead until it clicks into place. 7 Install the ink cartridges. 14 Kodak EasyShare 5300 AiO
Chapter 2 3 Remove the printhead from its bag. 4 Remove and discard the clear plastic casing and the orange protective cap. 5 Place the printhead into the carriage. 6 Push against the back wall of the printhead until it clicks into place. 7 Install the ink cartridges. 14 Kodak EasyShare 5300 AiO
User Guide
Page 19
User's Guide 15 Install Ink Cartridges After installing the printhead, you need to prevent any drying of the ink. 2 Remove and discard the orange cap. IMPORTANT: Insert the ink cartridge immediately to install the black and color ink cartridges. IMPORTANT: Handle ink cartridge carefully to avoid ink transfer. 3 Insert the black ink cartridge into the printhead. Getting Started 1 Printhead 2 Color ink cartridge 3 Black ink cartridge 1 Tear open the black ink cartridge bag at the notch and remove the ink cartridge.
User's Guide 15 Install Ink Cartridges After installing the printhead, you need to prevent any drying of the ink. 2 Remove and discard the orange cap. IMPORTANT: Insert the ink cartridge immediately to install the black and color ink cartridges. IMPORTANT: Handle ink cartridge carefully to avoid ink transfer. 3 Insert the black ink cartridge into the printhead. Getting Started 1 Printhead 2 Color ink cartridge 3 Black ink cartridge 1 Tear open the black ink cartridge bag at the notch and remove the ink cartridge.
User Guide
Page 20
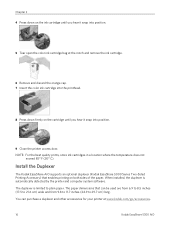
... your printer at the notch and remove the ink cartridge. 6 Remove and discard the orange cap. 7 Insert the color ink cartridge into the printhead. 8 Press down on the ink cartridge until you hear it snap into position. 5 Tear open the color ink cartridge bag at www.kodak.com/go/accessories. 16 Kodak EasyShare 5300 AiO Chapter 2 4 Press down firmly...
... your printer at the notch and remove the ink cartridge. 6 Remove and discard the orange cap. 7 Insert the color ink cartridge into the printhead. 8 Press down on the ink cartridge until you hear it snap into position. 5 Tear open the color ink cartridge bag at www.kodak.com/go/accessories. 16 Kodak EasyShare 5300 AiO Chapter 2 4 Press down firmly...
User Guide
Page 73
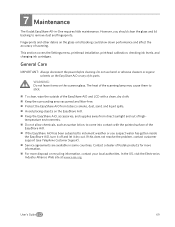
...spills. „ Avoid placing objects on the EasyShare AiO or any of Kodak products for more information. „ For more disposal or recycling information, contact your local authorities. This section covers the Settings menu, printhead installation, printhead calibration, checking ink levels, and changing ink ...remove dust and fingerprints. However, you suspect water has gotten inside the EasyShare AiO, turn it off and let it dry out. If this does not resolve the problem, contact customer support (see Telephone Customer Support). „ Service agreements are available in -One...
...spills. „ Avoid placing objects on the EasyShare AiO or any of Kodak products for more information. „ For more disposal or recycling information, contact your local authorities. This section covers the Settings menu, printhead installation, printhead calibration, checking ink levels, and changing ink ...remove dust and fingerprints. However, you suspect water has gotten inside the EasyShare AiO, turn it off and let it dry out. If this does not resolve the problem, contact customer support (see Telephone Customer Support). „ Service agreements are available in -One...
User Guide
Page 76
... orange cap from the cartridge by lifting from the front center of the new ink cartridge. 4 Remove the bagged ink cartridge from the box and tear open the bag at the notch and remove the ink cartridge. Chapter 7 1 Open the printer access door by grasping the top edge and pulling/... the unit. The ink tanks are located in the print head. 1 Print head 2 Color ink cartridge 3 Black ink cartridge 2 Wait until the printhead is idle and silent, then pinch the pinch latch on the old ink cartridge with your thumb and forefinger and lift it off the ink cartridge. 72 Kodak EasyShare 5300 AiO
... orange cap from the cartridge by lifting from the front center of the new ink cartridge. 4 Remove the bagged ink cartridge from the box and tear open the bag at the notch and remove the ink cartridge. Chapter 7 1 Open the printer access door by grasping the top edge and pulling/... the unit. The ink tanks are located in the print head. 1 Print head 2 Color ink cartridge 3 Black ink cartridge 2 Wait until the printhead is idle and silent, then pinch the pinch latch on the old ink cartridge with your thumb and forefinger and lift it off the ink cartridge. 72 Kodak EasyShare 5300 AiO

User Guide
Page 79
Remove both ink cartridges. 4 Unlatch the printhead by pressing the button in the upper-left corner of the print head. User's Guide 75 Maintenance 3 Wait until the printhead is idle and silent, then pinch the pinch latch on the ink cartridge with your thumb and forefinger and lift it out of the carriage. 5 Remove the old printhead. 6 Remove the printhead from its bag. 7 Remove and discard the clear plastic casing and the orange protective cap.
Remove both ink cartridges. 4 Unlatch the printhead by pressing the button in the upper-left corner of the print head. User's Guide 75 Maintenance 3 Wait until the printhead is idle and silent, then pinch the pinch latch on the ink cartridge with your thumb and forefinger and lift it out of the carriage. 5 Remove the old printhead. 6 Remove the printhead from its bag. 7 Remove and discard the clear plastic casing and the orange protective cap.
User Guide
Page 89
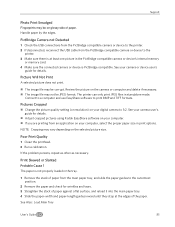
... the connected camera or device is at the edges of paper. Poor Print Quality 1 Clean the printhead. 2 Run a calibration. See Also: Load Main Tray User's Guide 85 NOTE: Cropping may ...tray. 4 Slide the paper-width and paper-length guides inward until they stop at least one picture in standalone mode. Picture Will Not Print A selected picture does not print. „...tray. 1 Remove the stack of paper from the PictBridge compatible camera or device to the outermost position. 2 Remove the paper and check for details. „ Adjust cropped pictures using Kodak EasyShare software on ...
... the connected camera or device is at the edges of paper. Poor Print Quality 1 Clean the printhead. 2 Run a calibration. See Also: Load Main Tray User's Guide 85 NOTE: Cropping may ...tray. 4 Slide the paper-width and paper-length guides inward until they stop at least one picture in standalone mode. Picture Will Not Print A selected picture does not print. „...tray. 1 Remove the stack of paper from the PictBridge compatible camera or device to the outermost position. 2 Remove the paper and check for details. „ Adjust cropped pictures using Kodak EasyShare software on ...


