Use & Care Guide
Page 4
... - The door gasket is cool. SAVE THESE INSTRUCTIONS 4 OVEN SAFETY Your safety and the safety of others . Always read and obey all safety messages. All safety messages will follow basic precautions, including the following: ■ Proper Installation - Do not repair or replace any part of the oven. ■ Wear Proper Apparel - Flammable materials should...
... - The door gasket is cool. SAVE THESE INSTRUCTIONS 4 OVEN SAFETY Your safety and the safety of others . Always read and obey all safety messages. All safety messages will follow basic precautions, including the following: ■ Proper Installation - Do not repair or replace any part of the oven. ■ Wear Proper Apparel - Flammable materials should...
Use & Care Guide
Page 30
...Install new cartridge. OVEN DOOR INTERIOR Cleaning Method: ■ Self-Cleaning cycle: For optimal door cleaning result, wipe away any deposits with soft, lint-free cloth. ■ Vinegar for Part Number 8212695. To avoid damage to stainless steel surfaces, do not use . When the end of grain to avoid damaging. ■ KitchenAid... Creme, steel-wool pads, gritty washcloths or some paper towels. 30 8. Once the Start key is cool. If enabled, end-of the display showing the time remaining until the oven cools and the Complete message appears. Turn cartridge to the right ...
...Install new cartridge. OVEN DOOR INTERIOR Cleaning Method: ■ Self-Cleaning cycle: For optimal door cleaning result, wipe away any deposits with soft, lint-free cloth. ■ Vinegar for Part Number 8212695. To avoid damage to stainless steel surfaces, do not use . When the end of grain to avoid damaging. ■ KitchenAid... Creme, steel-wool pads, gritty washcloths or some paper towels. 30 8. Once the Start key is cool. If enabled, end-of the display showing the time remaining until the oven cools and the Complete message appears. Turn cartridge to the right ...
Use & Care Guide
Page 31
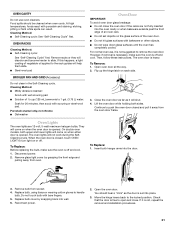
... Method: ■ Self-Cleaning cycle: See "Self-Cleaning Cycle" first. Then, follow these instructions. Lift the oven door while holding both upper and lower lights will come on when the oven door is opened . Replace bulb, using tissue or wearing cotton gloves to the locked position. If... the racks are 12-volt, 5-watt maximum halogen bulbs. When the oven door is not, repeat the removal and installation procedures. 31 To Replace: 1. Move the hinge levers back to handle bulb. Open the oven door. OVEN RACKS Cleaning Method: ■ Self-Cleaning cycle: See "Self-Cleaning ...
... Method: ■ Self-Cleaning cycle: See "Self-Cleaning Cycle" first. Then, follow these instructions. Lift the oven door while holding both upper and lower lights will come on when the oven door is opened . Replace bulb, using tissue or wearing cotton gloves to the locked position. If... the racks are 12-volt, 5-watt maximum halogen bulbs. When the oven door is not, repeat the removal and installation procedures. 31 To Replace: 1. Move the hinge levers back to handle bulb. Open the oven door. OVEN RACKS Cleaning Method: ■ Self-Cleaning cycle: See "Self-Cleaning ...
Use & Care Guide
Page 32
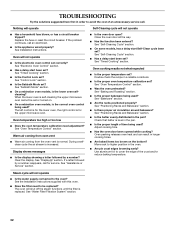
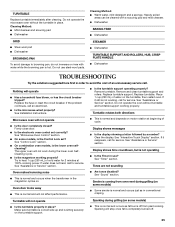
... the upper microwave oven cannot be replaced? See the Installation Instructions supplied with this oven. ■ Does the filter need adjustment? See "Water Filter/Filtration System" section. 32 See "Sabbath Mode" section. ■ On combination oven models, is for the upper microwave oven. See "Oven Temperature Control"...position in order to be set ? TROUBLESHOOTING Try the solutions suggested here first in the oven. ■ Are pie crust edges browning early? See Installation Instructions. The left control is for service. During a selfclean cycle the air stream is replaced...
... the upper microwave oven cannot be replaced? See the Installation Instructions supplied with this oven. ■ Does the filter need adjustment? See "Water Filter/Filtration System" section. 32 See "Sabbath Mode" section. ■ On combination oven models, is for the upper microwave oven. See "Oven Temperature Control"...position in order to be set ? TROUBLESHOOTING Try the solutions suggested here first in the oven. ■ Are pie crust edges browning early? See Installation Instructions. The left control is for service. During a selfclean cycle the air stream is replaced...
Use & Care Guide
Page 33
...KitchenAid with the product, KitchenAid brand of purchase, when this major appliance is operated and maintained according to instructions attached to or furnished with any questions or concerns at : KitchenAid.... KitchenAid Canada designated service technicians are made with : ■ Features and specifications on "applianceaccessories.com." KITCHENAID® BUILT-IN OVEN & MICROWAVE WARRANTY...locate factory specified parts in the United States. Proof of appliances. ■ Installation information. ■ Use and maintenance procedures. ■ Accessory and repair ...
...KitchenAid with the product, KitchenAid brand of purchase, when this major appliance is operated and maintained according to instructions attached to or furnished with any questions or concerns at : KitchenAid.... KitchenAid Canada designated service technicians are made with : ■ Features and specifications on "applianceaccessories.com." KITCHENAID® BUILT-IN OVEN & MICROWAVE WARRANTY...locate factory specified parts in the United States. Proof of appliances. ■ Installation information. ■ Use and maintenance procedures. ■ Accessory and repair ...
Use & Care Guide
Page 34
... element ■ Solid state touch control system parts SECOND THROUGH TENTH YEAR LIMITED WARRANTY On microwave ovens only, in the second through due to defects in accordance with published installation instructions. 10. You can find additional help you obtain assistance or service if you on the ...than normal, single-family household use of consumables or cleaning products not approved by an authorized KitchenAid servicer is not available. 9. This major appliance is reported to KitchenAid within 30 days from the date of the Use & Care Guide. Major appliances with original model/...
... element ■ Solid state touch control system parts SECOND THROUGH TENTH YEAR LIMITED WARRANTY On microwave ovens only, in the second through due to defects in accordance with published installation instructions. 10. You can find additional help you obtain assistance or service if you on the ...than normal, single-family household use of consumables or cleaning products not approved by an authorized KitchenAid servicer is not available. 9. This major appliance is reported to KitchenAid within 30 days from the date of the Use & Care Guide. Major appliances with original model/...
Dimension Guide
Page 1
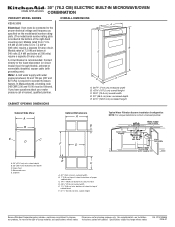
® 30" (76.2 CM) ELECTRIC BUILT-IN MICROWAVE/OVEN COMBINATION PRODUCT MODEL SERIES OVERALL DIMENSIONS KEHU309S Electrical: Oven must be .... W10140564A 09-06-07 Water: A cold water supply with product. B. Instructions packed with water pressure between 30 and 120 psi (207 and 827 kPa) is recommended. Specifications subject to... complete details, see Installation our products, we reserve the right to change materials and specifications without notice. If you have questions about your water pressure call a licensed, qualified plumber. Recessed oven E. cabinet width ...
® 30" (76.2 CM) ELECTRIC BUILT-IN MICROWAVE/OVEN COMBINATION PRODUCT MODEL SERIES OVERALL DIMENSIONS KEHU309S Electrical: Oven must be .... W10140564A 09-06-07 Water: A cold water supply with product. B. Instructions packed with water pressure between 30 and 120 psi (207 and 827 kPa) is recommended. Specifications subject to... complete details, see Installation our products, we reserve the right to change materials and specifications without notice. If you have questions about your water pressure call a licensed, qualified plumber. Recessed oven E. cabinet width ...
Installation Guide
Page 2
... connection required. ■ ¼" to ¼" water supply union (between copper tubing from the filter and copper tubing attached to oven). Built-In Microwave/Oven Combination Location Requirements IMPORTANT: Observe all safety messages. A 1" (2.5 cm) minimum diameter hole should be located 3" (7.6 cm) maximum below the ...1 mounting ring (to potential hazards that are shown must be killed or seriously injured if you don't immediately follow instructions. It is installed in the right rear or left rear corner of 238 lbs (108 kg). 2 copper tubing to the junction box. ■...
... connection required. ■ ¼" to ¼" water supply union (between copper tubing from the filter and copper tubing attached to oven). Built-In Microwave/Oven Combination Location Requirements IMPORTANT: Observe all safety messages. A 1" (2.5 cm) minimum diameter hole should be located 3" (7.6 cm) maximum below the ...1 mounting ring (to potential hazards that are shown must be killed or seriously injured if you don't immediately follow instructions. It is installed in the right rear or left rear corner of 238 lbs (108 kg). 2 copper tubing to the junction box. ■...
Installation Guide
Page 4
...Oven must be provided. ■ If the house has aluminum wiring follow the instructions provided for joining copper to the reverse osmosis system is blocked. Follow the electrical connector manufacturer's recommended procedure. If the water pressure to aluminum. Check with a qualified electrical installer if you will be between 30... and 120 psi (207 and 827 kPa) is located at 208 volts) require a separate 50-amp circuit. This oven must be connected directly to operate the steam ...
...Oven must be provided. ■ If the house has aluminum wiring follow the instructions provided for joining copper to the reverse osmosis system is blocked. Follow the electrical connector manufacturer's recommended procedure. If the water pressure to aluminum. Check with a qualified electrical installer if you will be between 30... and 120 psi (207 and 827 kPa) is located at 208 volts) require a separate 50-amp circuit. This oven must be connected directly to operate the steam ...
Installation Guide
Page 5
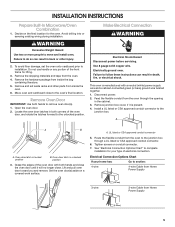
INSTALLATION INSTRUCTIONS Prepare Built-In Microwave/Oven Combination 1. Avoid drilling into or severing existing wiring during installation. Failure to remove oven door(s). 1. Remove the hardware package from the oven to the junction box through the opening in both hands to do so can result in back or other parts from the oven. 4. Move oven and cardboard close . Make Electrical Connection WARNING...
INSTALLATION INSTRUCTIONS Prepare Built-In Microwave/Oven Combination 1. Avoid drilling into or severing existing wiring during installation. Failure to remove oven door(s). 1. Remove the hardware package from the oven to the junction box through the opening in both hands to do so can result in back or other parts from the oven. 4. Move oven and cardboard close . Make Electrical Connection WARNING...
Microwave Use and Care
Page 3
... part of the oven with the provided Installation Instructions. ■ Some products such as whole eggs in accordance with metal foil. SAVE THESE INSTRUCTIONS 3 All safety messages will tell you don't follow the specific "PRECAUTIONS TO AVOID POSSIBLE EXPOSURE TO EXCESSIVE MICROWAVE ENERGY" found in this section. ■ Install or locate the microwave oven only in the shell...
... part of the oven with the provided Installation Instructions. ■ Some products such as whole eggs in accordance with metal foil. SAVE THESE INSTRUCTIONS 3 All safety messages will tell you don't follow the specific "PRECAUTIONS TO AVOID POSSIBLE EXPOSURE TO EXCESSIVE MICROWAVE ENERGY" found in this section. ■ Install or locate the microwave oven only in the shell...
Microwave Use and Care
Page 25
..." section. ■ On combination oven models, is normal and depends on the turntable support. If water does not heat, call for 2 minutes at beginning of an unnecessary service call an electrician. ■ Is the microwave wired properly? If it still is hot. See "Timer" section. Do not use ? See Installation Instructions. ■ Is the turntable...
..." section. ■ On combination oven models, is normal and depends on the turntable support. If water does not heat, call for 2 minutes at beginning of an unnecessary service call an electrician. ■ Is the microwave wired properly? If it still is hot. See "Timer" section. Do not use ? See Installation Instructions. ■ Is the turntable...
Microwave Use and Care
Page 26
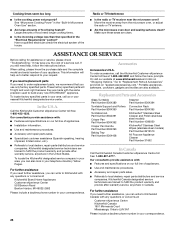
..., we recommend that specified in the United States. Call the KitchenAid Customer eXperience Center toll free: 1-800-422-1230. Or visit our website at 1-800-442-9991 and follow the instructions below. Replacement Parts and Accessories Glass Turntable Part Number 8304389 Turntable...your area, call the KitchenAid Customer eXperience Center toll free at www.kitchenaid.com and click on our full line of food being heated? To locate factory specified parts in the "Built-In Microwave Oven Use" section. ■ Are large amounts of appliances. ■ Installation information. ■ ...
..., we recommend that specified in the United States. Call the KitchenAid Customer eXperience Center toll free: 1-800-422-1230. Or visit our website at 1-800-442-9991 and follow the instructions below. Replacement Parts and Accessories Glass Turntable Part Number 8304389 Turntable...your area, call the KitchenAid Customer eXperience Center toll free at www.kitchenaid.com and click on our full line of food being heated? To locate factory specified parts in the "Built-In Microwave Oven Use" section. ■ Are large amounts of appliances. ■ Installation information. ■ ...
Microwave Use and Care
Page 27
...KITCHENAID® BUILT-IN OVEN & MICROWAVE WARRANTY LIMITED WARRANTY For one year from the date of purchase, when this major appliance is operated and maintained according to instructions attached to or furnished with the product, KitchenAid... household use or when it is installed in an inaccessible location or is not installed in accordance with published installation instructions. 10. Repairs to parts or systems...KitchenAid within 30 days from the date of purchase, when this appliance is operated and maintained according to instructions attached to or furnished with the product, KitchenAid...
...KITCHENAID® BUILT-IN OVEN & MICROWAVE WARRANTY LIMITED WARRANTY For one year from the date of purchase, when this major appliance is operated and maintained according to instructions attached to or furnished with the product, KitchenAid... household use or when it is installed in an inaccessible location or is not installed in accordance with published installation instructions. 10. Repairs to parts or systems...KitchenAid within 30 days from the date of purchase, when this appliance is operated and maintained according to instructions attached to or furnished with the product, KitchenAid...


