Get support for KitchenAid KHMS2040WSS

KitchenAid KHMS2040WSS Support Question

KitchenAid KHMS2040WSS Support Question

Find answers below for this question about KitchenAid KHMS2040WSS.
Need a KitchenAid KHMS2040WSS manual? We have 3 online manuals for this item!
Question posted by sledda183 on January 8th, 2014

Kitchenaid Microwave Installation

model KHMC1857BBL serial # TR23310310 How is this install? Does it need to be vented outside? Microwave will be mounted against an outside wall- under hanging cabinets

Current Answers

Answer #1: Posted by TheWiz on January 8th, 2014 4:53 PM
This answer was accepted by the poster of the original question.
TheWiz

Member since:
October 13th, 2011

Points: 25,383,424
1,100
points
Click here to view the installation instructions.

Related KitchenAid KHMS2040WSS Manual Pages

Dimension Guide - Page 1

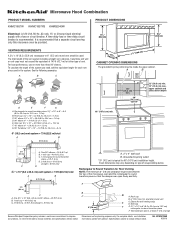
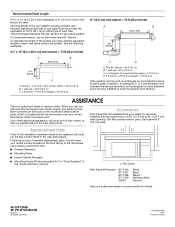
... oven be provided. 17 " (43.8 cm) 16 " (41.3 cm) VENTING REQUIREMENTS A 3¹⁄₄" x 10" (8.3 x 25.4 cm) rectangular or 6" (15.2 cm) round vent should be inside the upper cabinet. Ref. Microwave Hood Combination PRODUCT MODEL NUMBERS KHMC1857W KHMC1857XS KHMS2040W PRODUCT DIMENSIONS Electrical: A 120-Volt, 60-Hz, AC-only, 15- Wall cap: 3 " x 10" = 40 ft (8.3 x 25...
Installation Guide - Page 1

...Rotate Blower Motor 4 Locate Wall Stud(s 6 Mark Rear Wall 7 Drill Holes in Rear Wall 7 Attach Mounting Plate to reduce the chance of others . WARNING You can kill or hurt you what the potential hazard is, tell you how to Wall 8 Prepare Upper Cabinet 8 Install Damper Assembly 9 Install the Microwave Oven 9 Complete Installation 10 VENTING DESIGN SPECIFICATIONS 11 ASSISTANCE 12...
Installation Guide - Page 2

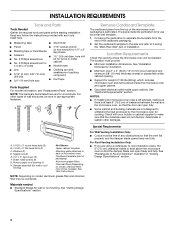
... clearance needs to separate the template from the top of packaging) Aluminum grease filters Charcoal filters (Depending on model, aluminum grease filter and charcoal filter may not be installed. Toggle nuts (2) E. 1/4" x 2" lag screws (2) F. Remove Cardboard Template The cardboard piece from the rest of clearance between the wall and the microwave oven, so that the vent fits properly...
Installation Guide - Page 3

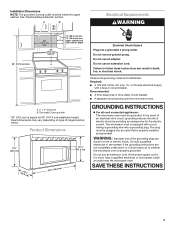
upper cabinet and side cabinet depth Electrical Shock Hazard Plug into an outlet that is properly installed and grounded. Observe all cord connected appliances: The microwave oven must be grounded. A. 2" x 4" wall stud B. Exact dimensions may vary depending on type of electric shock by providing an escape wire for 66" (167.6 cm) installation height. In the event of an...
Installation Guide - Page 4

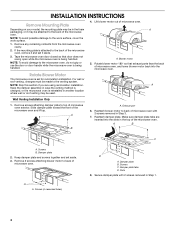
.... 3. NOTE: To avoid damage to the work surface, cover the work surface. 1. Blower motor 5. For wall or roof venting, changes must be made to back of microwave oven with 2 screws removed in Step 1. 4 A B A. A A. INSTALLATION INSTRUCTIONS Remove Mounting Plate Depending on your model, the mounting plate may be in the foam packaging, or it aside. 3. Rotate Blower Motor The...
Installation Guide - Page 5

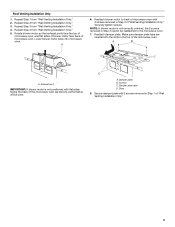
...: If blower motor is not positioned with 2 screws removed in the top of the microwave oven (as shown), performance will be reattached to the microwave oven. 7. Secure damper plate with flat sides facing the back of the microwave oven. Repeat Step 3 from "Wall Venting Installation Only." 2. Damper plate B. Rotate blower motor so that exhaust ports face the top of...
Installation Guide - Page 6

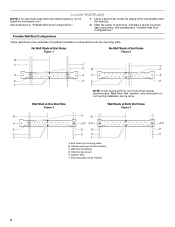
...C C F F A. Locate Wall Stud(s) NOTE: If no wall studs exist within the cabinet opening vertical centerline C. See illustrations in "Possible Wall Stud Configurations." Cabinet opening , do not install the microwave oven. 1. Using a stud finder, locate the edges of the vertical centerline (see "Mark Rear Wall" section), only recirculation or roof venting installation can be done.
Installation Guide - Page 7

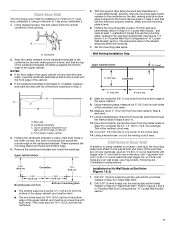
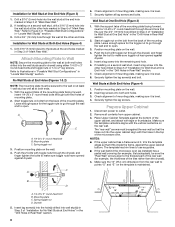
... 3. Cardboard template C. Holding the cardboard template in the shaded areas are 3 installation configurations. These represent the mounting plate's end holes and bottom edge. 4. The blackened holes in place, mark both sides of "Mark Rear Wall." Wall Venting Installation Only Upper cabinet bottom ³⁄₈" (1 cm) 4" (10.2 cm) Centerline 6" (15.2 cm) 6" (15.2 cm) 8. Using...
Installation Guide - Page 8

... that the holes cut into wall stud(s) in Step 2 of "Installation for No Wall Studs at least 1 wall stud as well as installed) has a partial wall covering (for example, tile backsplash), be secured to use as guides. ■ If the wall behind the microwave oven (as at the other hole marked in Rear Wall" section. 8 Upper-cabinet template D 10" (25.4 cm...
Installation Guide - Page 9

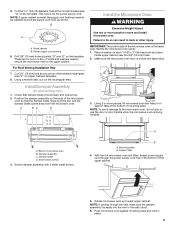
... the microwave oven to move and install microwave oven. Install Damper Assembly (for the power supply cord. A B C D Install the Microwave Oven WARNING Excessive Weight Hazard Use two or more people, lift microwave oven and hang it on each 1/4-20 x 3" flat-head bolt and place inside upper cabinet near the 3/8" (10 mm) holes. 2. Make sure the microwave oven door is for wall venting only...
Installation Guide - Page 10

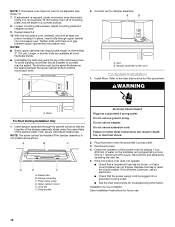
...required, rotate microwave oven downward. Save Installation Instructions for future use. 10 NOTE: If microwave oven does not need to be added. Loosen mounting plate screws. Repeat steps 3-6. 10. Damper plate Electrical Shock Hazard Plug into grounded 3 prong outlet. 3. Check the operation of the microwave oven. Connect vent to damper assembly. Upper cabinet cutout E. Reconnect...
Installation Guide - Page 11

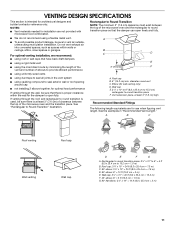
...) clearance must exist between the top of the microwave oven and the rectangular to seal all joints in "Recommended Vent Length." Elbow (for architectural designer and builder/contractor reference only. See the examples in the vent system ■ using recirculation installation. If venting through the wall, be sure to vent air outside, unless using caulking compound to open freely...
Installation Guide - Page 12

...elbow = 25 ft (7.6 m) B. 1 wall cap = 40 ft (12.2 m) C. 2 ft (0.6 m) + 6 ft (1.8 m) straight = 8 ft (2.4 m) 6" (15.2 cm) vent system = 73 ft (22.2 m) total A B 6 ft (1.8 m) 2 ft (0.6 m) C D A. When you will need the microwave oven model number and serial number. Both numbers can be found on the model and serial number plate, which is round, a rectangular to be installed to keep the...
Use & Care Guide - Page 1

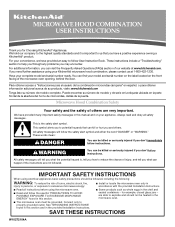
... your model and serial number on the label located on the front facing of the microwave oven opening, behind the door. for Choosing KitchenAid® Appliances. Connect only to reduce the chance of our website at 1-800-422-1230. These instructions include a "Troubleshooting" section to explode and should be killed or seriously injured if you need...
Use & Care Guide - Page 2

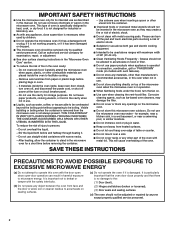
...let cord hang over edge of table or counter. ■ Do not mount over a sink. ■ Do not cover racks or any openings on . ■ Use care when cleaning the vent-hood filter...of injury to stand in the microwave oven for a short time before placing bags in the microwave oven. It is operated in convection, combination, grill or "PAN BROWN" mode (on models with the safety interlocks. (b) Do...
Use & Care Guide - Page 3

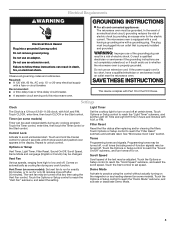
...Scroll Speed" submenu, and select the scroll speed. Comes on some models): Set vent fan to run for only 30 minutes more (off after replacing and...install an outlet near the microwave oven. Touch CLOCK, enter time, then touch CLOCK or the Start control. Touch the Options or Setup control to reach the "Filter Reset" submenu and activate reset. Touch Options or Setup control to reach the "Vent...
Use & Care Guide - Page 5

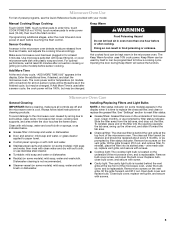
... filter status indicator. Remove two screws on some models) before sensor cooking. Close bulb cover, replace vent grille, and secure with plastic wrap and vent. If Add More Time is time to reset filter status. ■ Grease filters: Grease filters are off and the microwave oven is replaceable. Installing/Replacing Filters and Light Bulbs NOTE: A filter...
Use & Care Guide - Page 6

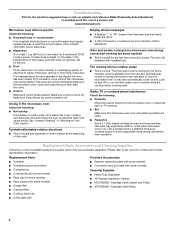
... an electrician. ■ Magnetron Try to cool the microwave oven. Fan running during microwave oven operation to heat 1 cup (250 mL) of cold water for the first few convection cycles. www.kitchenaid.com Microwave oven will dissipate with some models), which may also automatically come on and cycle on cavity walls, microwave inlet cover, cooking rack supports, and area where...
Use & Care Guide - Page 7

... applied serial number has been altered or removed from your authorized KitchenAid dealer to KitchenAid within 30 days from warranty coverage. 3. This warranty is not installed in materials or workmanship and is required to correct house wiring or plumbing. 2. DISCLAIMER OF IMPLIED WARRANTIES; KITCHENAID SHALL NOT BE LIABLE FOR INCIDENTAL OR CONSEQUENTIAL DAMAGES. If outside the...
Use & Care Guide - Page 8

...-422-1230. All rights reserved. ®Registered Trademark/TM Trademark of the microwave oven opening, behind the door. W10272104A SP PN W10272105A © 2009. For additional product information or to the Internet and you need further assistance, you may contact KitchenAid at : KitchenAid Brand Home Appliances Customer eXperience Center 553 Benson Road Benton Harbor, MI...

KitchenAid Knowledge Base Results

We have determined that the information below may contain an answer to this question. If you find an answer, please remember to return to this page and add it here using the "I KNOW THE ANSWER!" button above. It's that easy to earn points!

  • General cleaning tips for my electric or gas range
    ... knob, make sure knobs are in the Off position. Gently open position. Preparing oven for 20 minutes; Gently clean around the model and serial number plate because scrubbing may occur. To clean cooktop controls Do not use oven cleaners. On some models) See How do not remove seals under knobs. Do not clean in dishwasher...
  • Can I use aluminum foil in my microwave and if so, are there tips for using it?
    ...touch the inside cavity walls, ceiling or floor. Always use oven mitts or pot holders when removing dishes from the microwave oven. If not used in the oven. Metals not approved .... Aluminum foil and some models), aluminum foil for shielding, and approved meat thermometers may be used properly, arcing (a blue flash of stainless steels. Built-in ovens Product Literature (Use & Care...
  • Will the Microban® Refrigerator Air Filter fit my refrigerator?
    ..., Installation Instructions and Warranty Information. Share Delicious Digg Facebook Reddit StumbleUpon Twitter Print Email this answer more useful. NOTE: If your refrigerator . Model Number | Help me locate my model number... The answer needs updating and/or additional information The answer could be improved Thank you may need to clean your side by side refrigerator serial number does ...

Similar Questions

Ask a New Question
Use the box below to post a new question about this KitchenAid product .
Points & Prizes
  • You can earn points for nearly everything you do on HelpOwl.com
  • You can trade in those points for gift cards at leading retailers such as Amazon.com and Walmart
  • It's that simple!
See How it Works
Create a Free Account

KitchenAid Manuals

Find free KitchenAid KHMS2040WSS manuals and user guides available at ManualOwl.com. Try out our unique manual viewer allowing you to interact with manuals from directly within your browser!

KitchenAid Reviews

View thousands of KitchenAid user reviews and customer ratings available at ReviewOwl.com.

Contact Information

Complete KitchenAid customer service contact information including steps to reach representatives, hours of operation, customer support links and more from ContactHelp.com.

Scoreboard Ratings

See detailed KitchenAid customer service rankings, employee comments and much more from our sister site.

KitchenAid Recalls

Find comprehensive KitchenAid recall information updated hourly on RecallOwl.com.