Use & Care Guide
Page 2
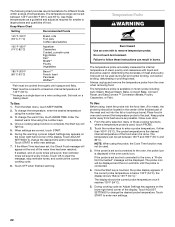
...Convection Broil 18 EasyConvect™ Conversion 18 Proofing Bread 18 STEAM-ASSISTED COOKING 19 Auto Steam 19 Auto Steam Settings 19 Manual Steam 21 Keep Warm 21 Temperature Probe 22 Timed/Delay Cooking 23 Dehydrating 23 COOKING CHARTS 24 Casseroles Baking Chart 24 ...Vegetable Cooking Chart 25 Auto Steam Seafood Cooking Chart 25 Manual Steam Cooking Chart 26 Meats and Poultry Roasting Chart 27 OVEN CARE 29 Self-Cleaning Cycle 29 Water Filter Cartridge Replacement 30 General Cleaning 30 Oven Lights 31 Oven Door 31 TROUBLESHOOTING 32 ASSISTANCE OR SERVICE 33 In the...
...Convection Broil 18 EasyConvect™ Conversion 18 Proofing Bread 18 STEAM-ASSISTED COOKING 19 Auto Steam 19 Auto Steam Settings 19 Manual Steam 21 Keep Warm 21 Temperature Probe 22 Timed/Delay Cooking 23 Dehydrating 23 COOKING CHARTS 24 Casseroles Baking Chart 24 ...Vegetable Cooking Chart 25 Auto Steam Seafood Cooking Chart 25 Manual Steam Cooking Chart 26 Meats and Poultry Roasting Chart 27 OVEN CARE 29 Self-Cleaning Cycle 29 Water Filter Cartridge Replacement 30 General Cleaning 30 Oven Lights 31 Oven Door 31 TROUBLESHOOTING 32 ASSISTANCE OR SERVICE 33 In the...
Use & Care Guide
Page 4
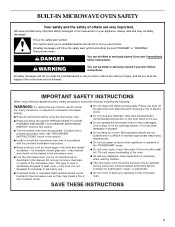
...word "DANGER" or "WARNING." Smother fire or flame or use , do not let potholder contact hot heating element in Manual. ■ Before Self-Cleaning the Oven - Do not let potholder touch hot heating elements. Heating elements may become hot enough to cause burns...Water on your appliance. All safety messages will follow instructions. Other surfaces of oven doors. Always place oven racks in this manual and on Grease Fires - among these openings, oven doors, and windows of the oven may be killed or seriously injured if you don't immediately follow basic precautions, ...
...word "DANGER" or "WARNING." Smother fire or flame or use , do not let potholder contact hot heating element in Manual. ■ Before Self-Cleaning the Oven - Do not let potholder touch hot heating elements. Heating elements may become hot enough to cause burns...Water on your appliance. All safety messages will follow instructions. Other surfaces of oven doors. Always place oven racks in this manual and on Grease Fires - among these openings, oven doors, and windows of the oven may be killed or seriously injured if you don't immediately follow basic precautions, ...
Use & Care Guide
Page 5
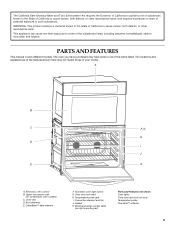
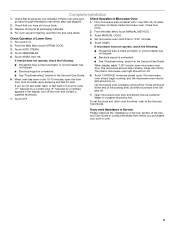
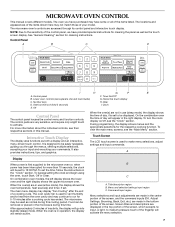
...Upper microwave oven (on right mounting rail) Parts and Features not shown Oven lights Third oven rack (roll out rack) Temperature probe True-Broil™ reflector 5 CleanBake™ bake element F. Oven door lock latch H. Gasket K. Model and serial number plate (on combination oven ...models) C. Temperature probe jack I J E K A. A B C F, G H D I . This appliance can cause low-level exposure to some or all of your model. PARTS AND FEATURES This manual covers different models. Broil elements E. Convection element and fan J. Electronic oven...
...Upper microwave oven (on right mounting rail) Parts and Features not shown Oven lights Third oven rack (roll out rack) Temperature probe True-Broil™ reflector 5 CleanBake™ bake element F. Oven door lock latch H. Gasket K. Model and serial number plate (on combination oven ...models) C. Temperature probe jack I J E K A. A B C F, G H D I . This appliance can cause low-level exposure to some or all of your model. PARTS AND FEATURES This manual covers different models. Broil elements E. Convection element and fan J. Electronic oven...
Use & Care Guide
Page 6
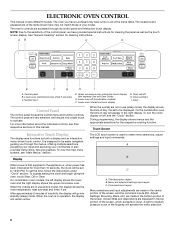
...For more than 10 seconds, the clock will be set the time, follow the instructions under "Clock" section. When the oven(s) are displayed in this manual. To turn the clock display on/off, see "Main Menus" section. During programming, the display shows menus and the ...shows the oven temperature, heat source(s) and timer, if set /off (combination models) F. To bypass setting the clock and begin using the oven, touch Start, Off or Clear. On combination oven models, the left display shows the lower oven and the right display shows the upper microwave oven. When the oven is used...
...For more than 10 seconds, the clock will be set the time, follow the instructions under "Clock" section. When the oven(s) are displayed in this manual. To turn the clock display on/off, see "Main Menus" section. During programming, the display shows menus and the ...shows the oven temperature, heat source(s) and timer, if set /off (combination models) F. To bypass setting the clock and begin using the oven, touch Start, Off or Clear. On combination oven models, the left display shows the lower oven and the right display shows the upper microwave oven. When the oven is used...
Use & Care Guide
Page 7
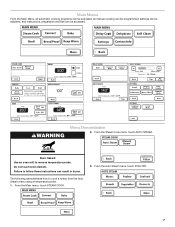
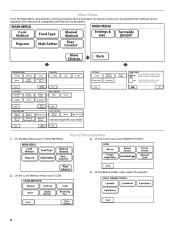
all automatic cooking programs can be activated; settings can result in burns. Burn Hazard Use an oven mitt to cook a turkey from the Auto Steam menu using a temperature probe. 1. From the Auto Steam menu, touch POULTRY. 7 From the Main menu, ...COOK. 3. From the Steam Cook menu, touch AUTO STEAM. Do not touch broil element. WARNING Menu Demonstration 2. Main Menus From the Main Menu, all manual cooking can be programmed; Failure to follow these instructions can be accessed. and instructions, preparation and tips can be adjusted; The following demonstrates how to...
all automatic cooking programs can be activated; settings can result in burns. Burn Hazard Use an oven mitt to cook a turkey from the Auto Steam menu using a temperature probe. 1. From the Auto Steam menu, touch POULTRY. 7 From the Main menu, ...COOK. 3. From the Steam Cook menu, touch AUTO STEAM. Do not touch broil element. WARNING Menu Demonstration 2. Main Menus From the Main Menu, all manual cooking can be programmed; Failure to follow these instructions can be accessed. and instructions, preparation and tips can be adjusted; The following demonstrates how to...
Use & Care Guide
Page 19
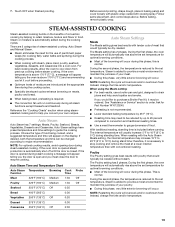
...wrap. STEAM-ASSISTED COOKING Steam-assisted cooking builds on the benefits of moisture are 2 categories of steam-assisted cooking: Auto Steam and Manual Steam. ■ Steam eliminates the need to gauge doneness of your meat. ■ During this phase, very little exterior browning ... (205°C) 0:30 Vegetables 250°F (135°C) Off 0:20 Probe Off Off Auto Steam Settings Meats The Meats setting gives best results with steam, place meat, poultry, seafood, vegetables, desserts, and casseroles into a cool oven. During the first phase, the oven temperature will appear telling...
...wrap. STEAM-ASSISTED COOKING Steam-assisted cooking builds on the benefits of moisture are 2 categories of steam-assisted cooking: Auto Steam and Manual Steam. ■ Steam eliminates the need to gauge doneness of your meat. ■ During this phase, very little exterior browning ... (205°C) 0:30 Vegetables 250°F (135°C) Off 0:20 Probe Off Off Auto Steam Settings Meats The Meats setting gives best results with steam, place meat, poultry, seafood, vegetables, desserts, and casseroles into a cool oven. During the first phase, the oven temperature will appear telling...
Use & Care Guide
Page 21
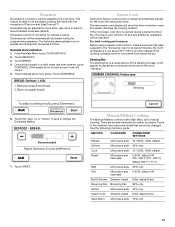
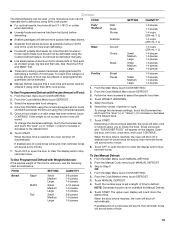
...START to remove temperature probe. Touch OK to clear the message, stop reminder tones, and continue the current cooking cycle. 12. Manual Steam WARNING Burn Hazard Use an oven mitt to enter new settings. 11. To change the cook time, touch COOK TIME. Touch ADJUST SETTINGS to heat cold food....; Do not use the temperature probe, touch PROBE and enter the desired food temperature using the number keys. 6. Touch the Manual Steam setting. 4. Place the food in the oven and touch OK. If the Cook Time has been set temperature has been reached. Use only cooked, hot foods with Keep...
...START to remove temperature probe. Touch OK to clear the message, stop reminder tones, and continue the current cooking cycle. 12. Manual Steam WARNING Burn Hazard Use an oven mitt to enter new settings. 11. To change the cook time, touch COOK TIME. Touch ADJUST SETTINGS to heat cold food....; Do not use the temperature probe, touch PROBE and enter the desired food temperature using the number keys. 6. Touch the Manual Steam setting. 4. Place the food in the oven and touch OK. If the Cook Time has been set temperature has been reached. Use only cooked, hot foods with Keep...
Use & Care Guide
Page 22
... 3. Touch START to remove temperature probe. Touch OFF when finished warming. If the probe is set and connected to the oven, the probe icon is set and not connected to the jack. The following chart provides recommendations for smaller or larger pieces and... quantities of temperatures. Set rack on most cycles including: Auto Steam, Manual Steam, Bake, Convect Bake, Convect Roast, and EasyConvect™ Conversion (Meats, Poultry, Casseroles, or Fish). When settings are correct, touch...
... 3. Touch START to remove temperature probe. Touch OFF when finished warming. If the probe is set and connected to the oven, the probe icon is set and not connected to the jack. The following chart provides recommendations for smaller or larger pieces and... quantities of temperatures. Set rack on most cycles including: Auto Steam, Manual Steam, Bake, Convect Bake, Convect Roast, and EasyConvect™ Conversion (Meats, Poultry, Casseroles, or Fish). When settings are correct, touch...
Use & Care Guide
Page 26
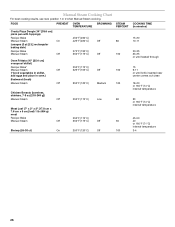
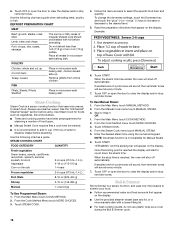
...;C) 425°F (220°C) Off 375°F (190°C) 350°F (175°C) Off Oven Frittata (10" [25.4 cm] ovenproof skillet) Recipe: Bake* Manual Steam Off (*Cook vegetables in skillet, add eggs and place in oven.) Bratwurst (fresh) Manual Steam Off 350°F (175°C) 325°F (165°C) Off 250°F (120°...) On 250°F (120°C) Off STEAM PERCENT 80 100 100 100 80 60 100 COOKING TIME (in minutes) 15-20 10-11 30-35 23-25 or until heated through 15 9-11 or until knife inserted near center comes out clean 18-20 or 165°F (74°C) ...
...;C) 425°F (220°C) Off 375°F (190°C) 350°F (175°C) Off Oven Frittata (10" [25.4 cm] ovenproof skillet) Recipe: Bake* Manual Steam Off (*Cook vegetables in skillet, add eggs and place in oven.) Bratwurst (fresh) Manual Steam Off 350°F (175°C) 325°F (165°C) Off 250°F (120°...) On 250°F (120°C) Off STEAM PERCENT 80 100 100 100 80 60 100 COOKING TIME (in minutes) 15-20 10-11 30-35 23-25 or until heated through 15 9-11 or until knife inserted near center comes out clean 18-20 or 165°F (74°C) ...
Installation Guide
Page 2
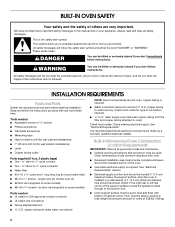
... the oven. ■ Grounded electrical supply is required. ■ Water connection device (to water source). copper tubing to connect ¼" O.D. It is installed in this manual and on some models) Parts needed ■ Adjustable wrench or ⁵⁄₈" wrench... ■ Water filter ■ #10-16 x ⁵⁄₈" screw and 1 mounting ring (to oven). Check existing electrical supply. Built-In Microwave/Oven Combination Location Requirements IMPORTANT: Observe all safety messages. A 1" (2.5 cm) minimum diameter hole should be killed or seriously...
... the oven. ■ Grounded electrical supply is required. ■ Water connection device (to water source). copper tubing to connect ¼" O.D. It is installed in this manual and on some models) Parts needed ■ Adjustable wrench or ⁵⁄₈" wrench... ■ Water filter ■ #10-16 x ⁵⁄₈" screw and 1 mounting ring (to oven). Check existing electrical supply. Built-In Microwave/Oven Combination Location Requirements IMPORTANT: Observe all safety messages. A 1" (2.5 cm) minimum diameter hole should be killed or seriously...
Installation Guide
Page 9
... or contact the dealer from whom you have all parts are now installed. For oven use and cleaning, read the Use and Care Guide. Touch START, then OK. Touch MANUAL COOK. 4. From the Main Menu touch STEAM COOK. 3. Fill a microwave-safe container with 1 cup (250 mL) of your built-in container should stop...
... or contact the dealer from whom you have all parts are now installed. For oven use and cleaning, read the Use and Care Guide. Touch START, then OK. Touch MANUAL COOK. 4. From the Main Menu touch STEAM COOK. 3. Fill a microwave-safe container with 1 cup (250 mL) of your built-in container should stop...
Microwave Use and Care
Page 3
..., in this manual and on the microwave oven. All safety messages will follow the specific "PRECAUTIONS TO AVOID POSSIBLE EXPOSURE TO EXCESSIVE MICROWAVE ENERGY" found in this section. ■ Install or locate the microwave oven only in this section. ■ The microwave oven must be serviced...read and obey all instructions before using electrical appliances basic safety precautions should be grounded. IMPORTANT SAFETY INSTRUCTIONS When using the microwave oven. ■ Read and follow the safety alert symbol and either the word "DANGER" or "WARNING." Contact nearest ...
..., in this manual and on the microwave oven. All safety messages will follow the specific "PRECAUTIONS TO AVOID POSSIBLE EXPOSURE TO EXCESSIVE MICROWAVE ENERGY" found in this section. ■ Install or locate the microwave oven only in this section. ■ The microwave oven must be serviced...read and obey all instructions before using electrical appliances basic safety precautions should be grounded. IMPORTANT SAFETY INSTRUCTIONS When using the microwave oven. ■ Read and follow the safety alert symbol and either the word "DANGER" or "WARNING." Contact nearest ...
Microwave Use and Care
Page 7
...source(s) and timer, if set to activate. Food can be displayed. A light- MICROWAVE OVEN CONTROL This manual covers different models. The oven you through its control panel and interactive touch display. The microwave oven's controls are very sensitive, and require only a light touch to be removed or placed...12:00 P.M. To bypass setting the clock and begin using the oven, touch Start, Off or Clear. On combination oven models, the left display shows the lower oven and the right display shows the upper microwave oven. The main menu display may continue to medium-pressure touch of...
...source(s) and timer, if set to activate. Food can be displayed. A light- MICROWAVE OVEN CONTROL This manual covers different models. The oven you through its control panel and interactive touch display. The microwave oven's controls are very sensitive, and require only a light touch to be removed or placed...12:00 P.M. To bypass setting the clock and begin using the oven, touch Start, Off or Clear. On combination oven models, the left display shows the lower oven and the right display shows the upper microwave oven. The main menu display may continue to medium-pressure touch of...
Microwave Use and Care
Page 8
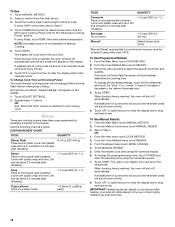
Main Menu From the Main Menu, all manual cooking can be activated; all automatic cooking programs can be programmed; On the Main Menu touch COOK METHOD. On the Baked Potato menu select the quantity. 8 settings can be adjusted; and instructions, preparation and tips can be accessed. 1. Menu Demonstration 3. On the Cook menu touch BAKED POTATO. 2. On the Cook Method menu touch COOK. 4.
Main Menu From the Main Menu, all manual cooking can be activated; all automatic cooking programs can be programmed; On the Main Menu touch COOK METHOD. On the Baked Potato menu select the quantity. 8 settings can be adjusted; and instructions, preparation and tips can be accessed. 1. Menu Demonstration 3. On the Cook menu touch BAKED POTATO. 2. On the Cook Method menu touch COOK. 4.
Microwave Use and Care
Page 13
...the Sensor Cook function a sensor automatically adjusts for manual cooking. The microwave oven display will show the time countdown once the sensor identifies the cooking duration. Touch the "plus" (+) or "minus" (-) keys to the microwave oven for at least 2 minutes, the room temperature is...Reheat Microwave-safe 10-100%; 100% default Defrost Microwave-safe 20% only Cook Microwave-safe 10-100%; 100% default Roast Microwave and heat-safe 0-30%, default 0% 225°-450°F (107°-232°C) default 350°F (177°C) Melt Microwave-safe 30% only Grill Microwave and ...
...the Sensor Cook function a sensor automatically adjusts for manual cooking. The microwave oven display will show the time countdown once the sensor identifies the cooking duration. Touch the "plus" (+) or "minus" (-) keys to the microwave oven for at least 2 minutes, the room temperature is...Reheat Microwave-safe 10-100%; 100% default Defrost Microwave-safe 20% only Cook Microwave-safe 10-100%; 100% default Roast Microwave and heat-safe 0-30%, default 0% 225°-450°F (107°-232°C) default 350°F (177°C) Melt Microwave-safe 30% only Grill Microwave and ...
Microwave Use and Care
Page 14
... end-of time to select the specific food item and quantity. Let stand 2-3 minutes after reheating. 1-4 cups (250 mL-1 L) Soup Place in microwave-safe container. When the stop time is Dinner Plate the sensor will sound every minute. 8. Touch START. To Change Cook Time and Cooking Power: ... and enter the desired power using the numerical keypad. 6. Touch OFF or open the door to Step 5. 4. Touch MANUAL REHEAT. 5. When the stop time is reached, the oven will shut off automatically and the end screen will count down the reheat time. Touch the number keys to set a length...
... end-of time to select the specific food item and quantity. Let stand 2-3 minutes after reheating. 1-4 cups (250 mL-1 L) Soup Place in microwave-safe container. When the stop time is Dinner Plate the sensor will sound every minute. 8. Touch START. To Change Cook Time and Cooking Power: ... and enter the desired power using the numerical keypad. 6. Touch OFF or open the door to Step 5. 4. Touch MANUAL REHEAT. 5. When the stop time is reached, the oven will shut off automatically and the end screen will count down the reheat time. Touch the number keys to set a length...
Microwave Use and Care
Page 15
... of the cycle for more quickly than 30% cook power. Touch START. Touch OFF or open the door to the desired level. 7. NOTE: Doneness function is reached, the oven will sound every minute. 7. Defrost The Defrost feature can be used, or the microwave oven can be selected. ■ Manual Defrost requires that a cook time and...
... of the cycle for more quickly than 30% cook power. Touch START. Touch OFF or open the door to the desired level. 7. NOTE: Doneness function is reached, the oven will sound every minute. 7. Defrost The Defrost feature can be used, or the microwave oven can be selected. ■ Manual Defrost requires that a cook time and...
Microwave Use and Care
Page 16
...From the Main Menu touch COOK METHOD. 2. NOTE: Doneness function is reached, the oven will shut off automatically. Use the following chart as a guide. From the Cook...the display and/or stop reminder tones. Remove giblets from whole chicken. See the "KitchenAid® Steamer Vessel" section before steaming. To change the doneness settings, touch the ...microwave-safe baking dish. Do not defrost less than ¼ lb (113 g) or two 4 oz (113 g) patties. Steam Cooking Steam Cook is reached the display will sound every minute. 7. From the Steam Cook menu touch MANUAL...
...From the Main Menu touch COOK METHOD. 2. NOTE: Doneness function is reached, the oven will shut off automatically. Use the following chart as a guide. From the Cook...the display and/or stop reminder tones. Remove giblets from whole chicken. See the "KitchenAid® Steamer Vessel" section before steaming. To change the doneness settings, touch the ...microwave-safe baking dish. Do not defrost less than ¼ lb (113 g) or two 4 oz (113 g) patties. Steam Cooking Steam Cook is reached the display will sound every minute. 7. From the Steam Cook menu touch MANUAL...
Microwave Use and Care
Page 17
...½-2 cups (118-473 mL) ■ Use the Manual Simmer function for 2 settings: Bread and Cookies. ■ The microwave oven cavity and door will sound every minute. 8. From the Main Menu touch MANUAL METHOD. 2. Touch MANUAL SIMMER. 4. NOTE: Doneness function is not available for instructions.... When the simmering time has ended, the oven will count down the simmer time....
...½-2 cups (118-473 mL) ■ Use the Manual Simmer function for 2 settings: Bread and Cookies. ■ The microwave oven cavity and door will sound every minute. 8. From the Main Menu touch MANUAL METHOD. 2. Touch MANUAL SIMMER. 4. NOTE: Doneness function is not available for instructions.... When the simmering time has ended, the oven will count down the simmer time....
Microwave Use and Care
Page 18
... touch START. Touch START PREHEAT. Read and follow the preparation directions that a time and temperature (and microwaves if desired) be used is 30%. ■ Preheating is reached, the oven will sound. If enabled end-of -cycle tones will sound, then reminder tones will sound every minute. 8. If .... 6. Once a food weight within a 2-5 lb (0.9-2.3 kg) range has been entered, touch CONTINUE. Touch START. 9. From the Main Menu touch MANUAL METHOD. 2. Enter the desired cook time using the numerical keypad. 6. If enabled end-of -cycle tones will sound, then reminder tones will sound every...
... touch START. Touch START PREHEAT. Read and follow the preparation directions that a time and temperature (and microwaves if desired) be used is 30%. ■ Preheating is reached, the oven will sound. If enabled end-of -cycle tones will sound, then reminder tones will sound every minute. 8. If .... 6. Once a food weight within a 2-5 lb (0.9-2.3 kg) range has been entered, touch CONTINUE. Touch START. 9. From the Main Menu touch MANUAL METHOD. 2. Enter the desired cook time using the numerical keypad. 6. If enabled end-of -cycle tones will sound, then reminder tones will sound every...


