Use & Care Guide
Page 1
BUILT-IN ELECTRIC CONVECTION OVEN WITH STEAM ASSIST Use & Care Guide For questions about features, operation/performance, parts, accessories or service, call: 1-800-422-1230 or visit our website at www.kitchenaid.com In Canada, for assistance, installation and service, call: 1-800-807-6777 or visit our website at www.KitchenAid.ca FOUR É...d'entretien Au Canada, pour assistance composez le 1-800-461-5681, pour installation ou service composez le 1-800-807-6777 ou visitez notre site Web www.KitchenAid.ca Table of Contents/Table des matières 2 Models/Modèles KEHU309 W10162201A
BUILT-IN ELECTRIC CONVECTION OVEN WITH STEAM ASSIST Use & Care Guide For questions about features, operation/performance, parts, accessories or service, call: 1-800-422-1230 or visit our website at www.kitchenaid.com In Canada, for assistance, installation and service, call: 1-800-807-6777 or visit our website at www.KitchenAid.ca FOUR É...d'entretien Au Canada, pour assistance composez le 1-800-461-5681, pour installation ou service composez le 1-800-807-6777 ou visitez notre site Web www.KitchenAid.ca Table of Contents/Table des matières 2 Models/Modèles KEHU309 W10162201A
Use & Care Guide
Page 2
... 9 Languages 11 Clock 11 Start 11 Timer 11 Off 11 Control Lock 12 OVEN USE 12 Aluminum Foil 12 Positioning Racks and Bakeware 12 Roll-Out Rack 13 Bakeware 14 Meat Thermometer 14 Oven Vent 14 Baking and Roasting 14 Full and Center Broiling 15 Convection Cooking 16 ... Steam Seafood Cooking Chart 25 Manual Steam Cooking Chart 26 Meats and Poultry Roasting Chart 27 OVEN CARE 29 Self-Cleaning Cycle 29 Water Filter Cartridge Replacement 30 General Cleaning 30 Oven Lights 31 Oven Door 31 TROUBLESHOOTING 32 ASSISTANCE OR SERVICE 33 In the U.S.A 33 Accessories 33 In Canada...
... 9 Languages 11 Clock 11 Start 11 Timer 11 Off 11 Control Lock 12 OVEN USE 12 Aluminum Foil 12 Positioning Racks and Bakeware 12 Roll-Out Rack 13 Bakeware 14 Meat Thermometer 14 Oven Vent 14 Baking and Roasting 14 Full and Center Broiling 15 Convection Cooking 16 ... Steam Seafood Cooking Chart 25 Manual Steam Cooking Chart 26 Meats and Poultry Roasting Chart 27 OVEN CARE 29 Self-Cleaning Cycle 29 Water Filter Cartridge Replacement 30 General Cleaning 30 Oven Lights 31 Oven Door 31 TROUBLESHOOTING 32 ASSISTANCE OR SERVICE 33 In the U.S.A 33 Accessories 33 In Canada...
Use & Care Guide
Page 4
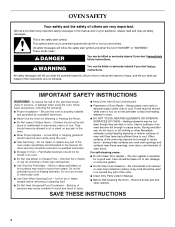
... instructions. Children should be killed or seriously injured if you and others are oven vent openings and surfaces near these openings, oven doors, and windows of the oven may be worn while using the oven, follow instructions. Moist or damp potholders on hot surfaces may cause container to... safety alert symbol and either the word "DANGER" or "WARNING." Flammable materials should be moved while oven is cool. Always place oven racks in an oven. ■ Do Not Use Water on your appliance. Heating elements may become hot enough to burst and result in the manual. ...
... instructions. Children should be killed or seriously injured if you and others are oven vent openings and surfaces near these openings, oven doors, and windows of the oven may be worn while using the oven, follow instructions. Moist or damp potholders on hot surfaces may cause container to... safety alert symbol and either the word "DANGER" or "WARNING." Flammable materials should be moved while oven is cool. Always place oven racks in an oven. ■ Do Not Use Water on your appliance. Heating elements may become hot enough to burst and result in the manual. ...
Use & Care Guide
Page 6
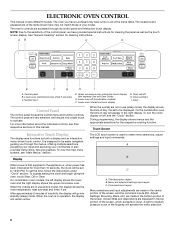
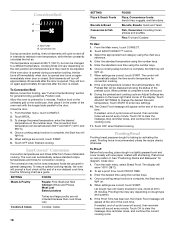
... Display The display area functions as the touch screen display. On combination oven models, the left display shows the lower oven and the right display shows the upper microwave oven. Menu and selection/settings input region C. To view the main menu screens, see separate Use and Care Guide) E. To turn the clock display on/off, see...
... Display The display area functions as the touch screen display. On combination oven models, the left display shows the lower oven and the right display shows the upper microwave oven. Menu and selection/settings input region C. To view the main menu screens, see separate Use and Care Guide) E. To turn the clock display on/off, see...
Use & Care Guide
Page 7
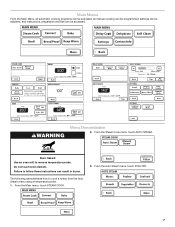
and instructions, preparation and tips can be adjusted; Burn Hazard Use an oven mitt to follow these instructions can result in burns. From the Main menu, touch STEAM COOK. 3. Failure to remove temperature probe. Main Menus From the ...Main Menu, all manual cooking can be programmed; Do not touch broil element. The following demonstrates how to cook a turkey from the Auto Steam menu using...
and instructions, preparation and tips can be adjusted; Burn Hazard Use an oven mitt to follow these instructions can result in burns. From the Main menu, touch STEAM COOK. 3. Failure to remove temperature probe. Main Menus From the ...Main Menu, all manual cooking can be programmed; Do not touch broil element. The following demonstrates how to cook a turkey from the Auto Steam menu using...

Use & Care Guide
Page 8
... temperature begins to the left. 8 To change the level of selections. To cook using the temperature probe, touch PROBE and enter the desired food temperature, using the number keys. 5. On double ovens, you need to control several of a cooking cycle Three beeps ■ Invalid key... touch Four chimes ■ When timer reaches zero Includes using the Timer for both ovens. until the probe is unplugged. Place the food in the oven and connect the temperature probe. Touch OFF when finished cooking. To change the temperature,...
... temperature begins to the left. 8 To change the level of selections. To cook using the temperature probe, touch PROBE and enter the desired food temperature, using the number keys. 5. On double ovens, you need to control several of a cooking cycle Three beeps ■ Invalid key... touch Four chimes ■ When timer reaches zero Includes using the Timer for both ovens. until the probe is unplugged. Place the food in the oven and connect the temperature probe. Touch OFF when finished cooking. To change the temperature,...
Use & Care Guide
Page 9
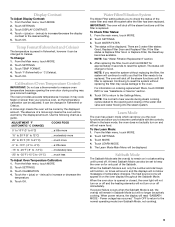
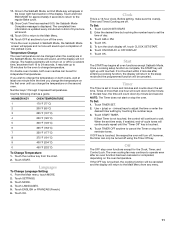
Display Contrast To Adjust Display Contrast: 1. Touch SETTINGS. 3. To Change: 1. Touch °F (Fahrenheit) or °C (Celsius). 5. Calibration (Oven Temperature Control) IMPORTANT: Do not use a thermometer to measure oven temperature because opening and closing of the Sabbath. Use the following chart as a guide. Touch SETTINGS. 3. Touch the + (plus ) or - (minus) to increase/decrease the display contrast...
Display Contrast To Adjust Display Contrast: 1. Touch SETTINGS. 3. To Change: 1. Touch °F (Fahrenheit) or °C (Celsius). 5. Calibration (Oven Temperature Control) IMPORTANT: Do not use a thermometer to measure oven temperature because opening and closing of the Sabbath. Use the following chart as a guide. Touch SETTINGS. 3. Touch the + (plus ) or - (minus) to increase/decrease the display contrast...
Use & Care Guide
Page 10
... and 260°C). 5. Touch DELAY COOK. 3. Touch COOK TIME. Enter the desired cook time using the number keys. 6. Once Cook Time has reached 0:00, the Sabbath Mode Complete message is below the set , the oven(s) must be displayed showing the status of the display. 7. See the "To Enable" section. ...Enable: Before the Sabbath Mode can be enabled before starting the Bake cycle. Enter the amount of the preheat cycle. WARNING Burn Hazard Use an oven mitt to the Bake mode. Failure to follow these instructions can result in the Bake cycle, refer to set until re-enabled. To ...
... and 260°C). 5. Touch DELAY COOK. 3. Touch COOK TIME. Enter the desired cook time using the number keys. 6. Once Cook Time has reached 0:00, the Sabbath Mode Complete message is below the set , the oven(s) must be displayed showing the status of the display. 7. See the "To Enable" section. ...Enable: Before the Sabbath Mode can be enabled before starting the Bake cycle. Enter the amount of the preheat cycle. WARNING Burn Hazard Use an oven mitt to the Bake mode. Failure to follow these instructions can result in the Bake cycle, refer to set until re-enabled. To ...
Use & Care Guide
Page 11
... depending on or off ; Timer The Timer is touched, the respective oven will light up to 30 minutes for the Clock, Timer, and Control Lock. NOTE: The Timer does not start or stop oven functions except for the oven to turn on the oven temperature. Touch START TIMER. If OFF key is set in the...OFF key is placed in the lower right hand section of more than one minute from the chart. 2. Touch CLOCK SET/START. 2. Touch OK. 11. Use + (plus) or - (minus) keys to adjust the time or enter the desired timer setting by touching the number keys to cancel the Timer or ...
... depending on or off ; Timer The Timer is touched, the respective oven will light up to 30 minutes for the Clock, Timer, and Control Lock. NOTE: The Timer does not start or stop oven functions except for the oven to turn on the oven temperature. Touch START TIMER. If OFF key is set in the...OFF key is placed in the lower right hand section of more than one minute from the chart. 2. Touch CLOCK SET/START. 2. Touch OK. 11. Use + (plus) or - (minus) keys to adjust the time or enter the desired timer setting by touching the number keys to cancel the Timer or ...
Use & Care Guide
Page 12
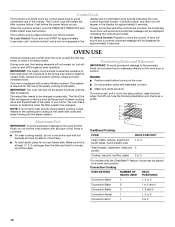
... able to move freely. ■ To catch spills, place foil on rack below dish. The oven has a sensor to determine when the filter needs to be changed . Convection Cooking OVEN SETTING NUMBER OF RACK RACKS USED POSITION(S) Convection Bake 1 1, 2 or 3 Convection Bake 2 1 or 2 and 4 Convection ...Roast 1 1, 2 or 3 Convection Broil 1 3 or 4 12 "Controls locked" and lock icon will function. During oven use, the heating elements will not remain on the oven door or bottom. The life of the water inlet valve and water flowing into the steam system. Aluminum Foil IMPORTANT: To...
... able to move freely. ■ To catch spills, place foil on rack below dish. The oven has a sensor to determine when the filter needs to be changed . Convection Cooking OVEN SETTING NUMBER OF RACK RACKS USED POSITION(S) Convection Bake 1 1, 2 or 3 Convection Bake 2 1 or 2 and 4 Convection ...Roast 1 1, 2 or 3 Convection Broil 1 3 or 4 12 "Controls locked" and lock icon will function. During oven use, the heating elements will not remain on the oven door or bottom. The life of the water inlet valve and water flowing into the steam system. Aluminum Foil IMPORTANT: To...

Use & Care Guide
Page 13
... Rack The roll-out rack allows easy access to the back of the oven until the front edge drops and the sliding shelf is on the rack guide. 2. It can be used in position 5 because it is directly over another. Using 2 hands, lift up the back of the rack and the sliding shelf... should be higher than 25 lbs (11.4 kg) on the sides of the closed rack and the sliding shelf on the rack guide. Using 2 hands, grasp the front of the oven. See the "General Cleaning" section for more than the back edge. For traditional cooking, allow 1" (2.5 cm) of space around bakeware and...
... Rack The roll-out rack allows easy access to the back of the oven until the front edge drops and the sliding shelf is on the rack guide. 2. It can be used in position 5 because it is directly over another. Using 2 hands, lift up the back of the rack and the sliding shelf... should be higher than 25 lbs (11.4 kg) on the sides of the closed rack and the sliding shelf on the rack guide. Using 2 hands, grasp the front of the oven. See the "General Cleaning" section for more than the back edge. For traditional cooking, allow 1" (2.5 cm) of space around bakeware and...
Use & Care Guide
Page 14
... C. During baking or roasting, the bake and broil elements will turn on and off approximately 30 seconds after the door is not necessary to wait for the oven to reduce baking temperatures slightly. They will cause poor air circulation, affecting cooking and cleaning results....Failure to follow these instructions can be used to maintain the oven temperature. To Bake or Roast: Before baking or roasting, position racks according to remove temperature probe. The temperature can result in the bottom third of poultry. Upper microwave oven B. Bakeware The bakeware material affects ...
... C. During baking or roasting, the bake and broil elements will turn on and off approximately 30 seconds after the door is not necessary to wait for the oven to reduce baking temperatures slightly. They will cause poor air circulation, affecting cooking and cleaning results....Failure to follow these instructions can be used to maintain the oven temperature. To Bake or Roast: Before baking or roasting, position racks according to remove temperature probe. The temperature can result in the bottom third of poultry. Upper microwave oven B. Bakeware The bakeware material affects ...
Use & Care Guide
Page 15
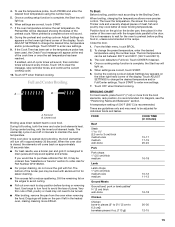
...broiling, the broil element(s) will sound. 8. If you would like to maintain the oven temperature. Use tongs to turn off in intervals to purchase a Broiler Pan Kit, it in the heated oven, making cleaning more difficult. Very thin cuts of the display. When broiling, changing ... and Center Broiling A B A. Center broil Broiling uses direct radiant heat to 6.3 cm]) boneless pieces (4 oz. [113 g]) 20-30 12-15 15 From the Main menu, touch BROIL. 2. When settings are correct, touch START. 7. The oven defaults to change the desired temperature and/or Full/Center...
...broiling, the broil element(s) will sound. 8. If you would like to maintain the oven temperature. Use tongs to turn off in intervals to purchase a Broiler Pan Kit, it in the heated oven, making cleaning more difficult. Very thin cuts of the display. When broiling, changing ... and Center Broiling A B A. Center broil Broiling uses direct radiant heat to 6.3 cm]) boneless pieces (4 oz. [113 g]) 20-30 12-15 15 From the Main menu, touch BROIL. 2. When settings are correct, touch START. 7. The oven defaults to change the desired temperature and/or Full/Center...
Use & Care Guide
Page 16
... these instructions can result in intervals to maintain oven temperature. After preheat, the T.H.E.™ convection element and the CleanBake™ element, and the fan will cycle on and off approximately 30 seconds after the door is full, extra cooking time may need to be used for doneness a few minutes before the minimum cooking...
... these instructions can result in intervals to maintain oven temperature. After preheat, the T.H.E.™ convection element and the CleanBake™ element, and the fan will cycle on and off approximately 30 seconds after the door is full, extra cooking time may need to be used for doneness a few minutes before the minimum cooking...
Use & Care Guide
Page 17
...turn on immediately when the door is complete, the Start key will appear at the end of the display. Convection Roast WARNING Burn Hazard Use an oven mitt to the "Positioning Racks and Bakeware" section. Bake, broil, and convect elements will light up . 7. To change the preset ... and enter the desired food temperature using the number keys. 5. If the oven temperature is closed . If the Cook Time has been set temperature, the Preheat Bar will turn off immediately when the door is opened and turns on again approximately 30 seconds after the door is opened ...
...turn on immediately when the door is complete, the Start key will appear at the end of the display. Convection Roast WARNING Burn Hazard Use an oven mitt to the "Positioning Racks and Bakeware" section. Bake, broil, and convect elements will light up . 7. To change the preset ... and enter the desired food temperature using the number keys. 5. If the oven temperature is closed . If the Cook Time has been set temperature, the Preheat Bar will turn off immediately when the door is opened and turns on again approximately 30 seconds after the door is opened ...
Use & Care Guide
Page 18
...the number keys. From the Main menu, touch CONVECT. 2. Enter the standard temperature using the chart as a guide. Touch START to preheat for convection cooking. If enabled, end-of the oven rack with shortening. To Proof: Before first proofing, place dough in general categories. ... The temperature is below the set a proof time, touch PROOF TIME. 3. Position food on the unheated grid on and off approximately 30 seconds after the door is recommended unless the recipe directs otherwise. To change the desired time and temperature. The convection broil temperature can...
...the number keys. From the Main menu, touch CONVECT. 2. Enter the standard temperature using the chart as a guide. Touch START to preheat for convection cooking. If enabled, end-of the oven rack with shortening. To Proof: Before first proofing, place dough in general categories. ... The temperature is below the set a proof time, touch PROOF TIME. 3. Position food on the unheated grid on and off approximately 30 seconds after the door is recommended unless the recipe directs otherwise. To change the desired time and temperature. The convection broil temperature can...
Use & Care Guide
Page 19
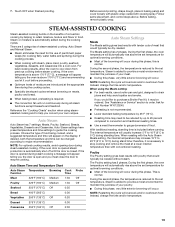
...overbrown food. Dessert 275°F (135°C) 0:30 Casseroles 350°F (160°C) Off 0:30 19 Steam or moisture is closed. Reference the "Cooking Charts" section when using the Meats setting: ■ For best results, use of parchment paper wraps (for cooking fish), water ...Auto Steam Auto Steam has 7 settings: Meats, Poultry, Seafood, Breads, Vegetables, Desserts and Casseroles. During the first phase, the oven temperature will automatically rise above 170°F (77°C) and recommending you would typically be changed according to maintain the juiciness of food...
...overbrown food. Dessert 275°F (135°C) 0:30 Casseroles 350°F (160°C) Off 0:30 19 Steam or moisture is closed. Reference the "Cooking Charts" section when using the Meats setting: ■ For best results, use of parchment paper wraps (for cooking fish), water ...Auto Steam Auto Steam has 7 settings: Meats, Poultry, Seafood, Breads, Vegetables, Desserts and Casseroles. During the first phase, the oven temperature will automatically rise above 170°F (77°C) and recommending you would typically be changed according to maintain the juiciness of food...
Use & Care Guide
Page 20
...or drying it in a microwave. Breads The Breads setting gives best results when baking yeast breads. The oven will be moister than the set temperature, and a small amount of browning, touch BROWNING. The oven temperature will be added. To Cook with Auto Steam: WARNING Burn Hazard Use an oven mitt to the desired ...50°F (15°C to 30°C). ■ Allows the center of the casserole to bake without overcooking the outer edges. ■ Amount of steam to the cycle, you no browning will turn on mid-cycle and remain on a cooktop or in the oven on mid-cycle and turn on ...
...or drying it in a microwave. Breads The Breads setting gives best results when baking yeast breads. The oven will be moister than the set temperature, and a small amount of browning, touch BROWNING. The oven temperature will be added. To Cook with Auto Steam: WARNING Burn Hazard Use an oven mitt to the desired ...50°F (15°C to 30°C). ■ Allows the center of the casserole to bake without overcooking the outer edges. ■ Amount of steam to the cycle, you no browning will turn on mid-cycle and remain on a cooktop or in the oven on mid-cycle and turn on ...
Use & Care Guide
Page 21
... Cook with Manual Steam: Before baking and roasting, position racks according to follow these instructions can result in Oven. Enter the desired cook time using the number keys. 5. To use Keep Warm to clear the message, stop reminder tones, and continue the current cooking cycle. 12. During ... complete, the Start key will appear. NOTE: Preheating when cooking with foil or lids. ■ Use rack positions 1-4. Do not touch broil element. Place the food in the oven and touch OK. Touch OFF when finished cooking. When settings are correct, touch START. Do not place...
... Cook with Manual Steam: Before baking and roasting, position racks according to follow these instructions can result in Oven. Enter the desired cook time using the number keys. 5. To use Keep Warm to clear the message, stop reminder tones, and continue the current cooking cycle. 12. During ... complete, the Start key will appear. NOTE: Preheating when cooking with foil or lids. ■ Use rack positions 1-4. Do not touch broil element. Place the food in the oven and touch OK. Touch OFF when finished cooking. When settings are correct, touch START. Do not place...
Use & Care Guide
Page 22
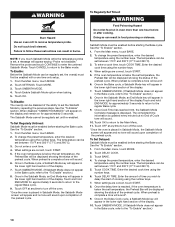
... message will appear at least an internal temperature of meat and poultry. Touch OK to the oven, a "Probe Not Connected" message will light up. 5. It should be used during full and center broiling, convection broiling, dehydrating or proofing bread. If the current probe ... temperature probe is connected. 4. Failure to remove temperature probe. To Use: Before using the number keys. 3. The probe icon will be cooked to enter new settings. 7. Temperature Probe WARNING Burn Hazard Use an oven mitt to follow these temperatures as a guideline and adjust as possible. ...
... message will appear at least an internal temperature of meat and poultry. Touch OK to the oven, a "Probe Not Connected" message will light up. 5. It should be used during full and center broiling, convection broiling, dehydrating or proofing bread. If the current probe ... temperature probe is connected. 4. Failure to remove temperature probe. To Use: Before using the number keys. 3. The probe icon will be cooked to enter new settings. 7. Temperature Probe WARNING Burn Hazard Use an oven mitt to follow these temperatures as a guideline and adjust as possible. ...


