Use & Care Guide
Page 1
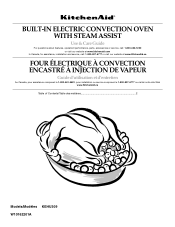
BUILT-IN ELECTRIC CONVECTION OVEN WITH STEAM ASSIST Use & Care Guide For questions about features, operation/performance, parts, accessories or service, call: 1-800-422-1230 or visit our website at www.kitchenaid.com In Canada, for assistance, installation and service, call: 1-800-807-6777 or visit our website at www.KitchenAid.ca FOUR É...d'entretien Au Canada, pour assistance composez le 1-800-461-5681, pour installation ou service composez le 1-800-807-6777 ou visitez notre site Web www.KitchenAid.ca Table of Contents/Table des matières 2 Models/Modèles KEHU309 W10162201A
BUILT-IN ELECTRIC CONVECTION OVEN WITH STEAM ASSIST Use & Care Guide For questions about features, operation/performance, parts, accessories or service, call: 1-800-422-1230 or visit our website at www.kitchenaid.com In Canada, for assistance, installation and service, call: 1-800-807-6777 or visit our website at www.KitchenAid.ca FOUR É...d'entretien Au Canada, pour assistance composez le 1-800-461-5681, pour installation ou service composez le 1-800-807-6777 ou visitez notre site Web www.KitchenAid.ca Table of Contents/Table des matières 2 Models/Modèles KEHU309 W10162201A
Use & Care Guide
Page 2
...OVEN SAFETY 4 PARTS AND FEATURES 5 ELECTRONIC OVEN CONTROL 6 Control Panel 6 Interactive Touch Display 6 Main Menus 7 Menu Demonstration 7 Settings 8 Sound (Tones 8 Display Contrast 9 Temp Format (Fahrenheit and Celsius 9 Calibration (Oven Temperature Control 9 Water Filter/Filtration System 9 Learn Mode 9 Sabbath Mode 9 Languages 11 Clock 11 Start 11 Timer 11 Off 11 Control Lock 12 OVEN...and Poultry Roasting Chart 27 OVEN CARE 29 Self-Cleaning Cycle 29 Water Filter Cartridge Replacement 30 General Cleaning 30 Oven Lights 31 Oven Door 31 TROUBLESHOOTING 32 ASSISTANCE...
...OVEN SAFETY 4 PARTS AND FEATURES 5 ELECTRONIC OVEN CONTROL 6 Control Panel 6 Interactive Touch Display 6 Main Menus 7 Menu Demonstration 7 Settings 8 Sound (Tones 8 Display Contrast 9 Temp Format (Fahrenheit and Celsius 9 Calibration (Oven Temperature Control 9 Water Filter/Filtration System 9 Learn Mode 9 Sabbath Mode 9 Languages 11 Clock 11 Start 11 Timer 11 Off 11 Control Lock 12 OVEN...and Poultry Roasting Chart 27 OVEN CARE 29 Self-Cleaning Cycle 29 Water Filter Cartridge Replacement 30 General Cleaning 30 Oven Lights 31 Oven Door 31 TROUBLESHOOTING 32 ASSISTANCE...
Use & Care Guide
Page 4
...following: ■ Proper Installation - Children should not be left alone or unattended in area where oven is in this manual and on any part of the oven. ■ Clean Only Parts Listed in the manual. Do not repair or replace any kind should never be worn while using ... either the word "DANGER" or "WARNING." During and after use . No commercial oven cleaner or oven liner protective coating of any part of the oven unless specifically recommended in Manual. ■ Before Self-Cleaning the Oven - Remove broiler pan and other bulky cloth. ■ Use Care When Opening Door...
...following: ■ Proper Installation - Children should not be left alone or unattended in area where oven is in this manual and on any part of the oven. ■ Clean Only Parts Listed in the manual. Do not repair or replace any kind should never be worn while using ... either the word "DANGER" or "WARNING." During and after use . No commercial oven cleaner or oven liner protective coating of any part of the oven unless specifically recommended in Manual. ■ Before Self-Cleaning the Oven - Remove broiler pan and other bulky cloth. ■ Use Care When Opening Door...
Use & Care Guide
Page 5
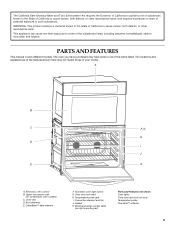
...items listed. CleanBake™ bake element F. Temperature probe jack I J E K A. Electronic oven control B. Upper microwave oven (on right mounting rail) Parts and Features not shown Oven lights Third oven rack (roll out rack) Temperature probe True-Broil™ reflector 5 Broil elements E. WARNING:...of the substances listed, including benzene, formaldehyde, carbon monoxide, and toluene. PARTS AND FEATURES This manual covers different models. Model and serial number plate (on combination oven models) C. The California Safe Drinking Water and Toxic Enforcement Act requires ...
...items listed. CleanBake™ bake element F. Temperature probe jack I J E K A. Electronic oven control B. Upper microwave oven (on right mounting rail) Parts and Features not shown Oven lights Third oven rack (roll out rack) Temperature probe True-Broil™ reflector 5 Broil elements E. WARNING:...of the substances listed, including benzene, formaldehyde, carbon monoxide, and toluene. PARTS AND FEATURES This manual covers different models. Model and serial number plate (on combination oven models) C. The California Safe Drinking Water and Toxic Enforcement Act requires ...
Use & Care Guide
Page 9
.... 3. Calibration (Oven Temperature Control) IMPORTANT: Do not use a thermometer to reset the system. The absence of the water inlet valve and water flowing into the steam system. Touch OK. To Check Filter Status: 1. Touch SETTINGS. 3. After replacing the filter, touch and hold RESET for only part of the water ...filter and reset the system after the filter has been replaced. The status will shut off the steam functions until the filter is set to keep the oven on or off and the heating elements will read "...
.... 3. Calibration (Oven Temperature Control) IMPORTANT: Do not use a thermometer to reset the system. The absence of the water inlet valve and water flowing into the steam system. Touch OK. To Check Filter Status: 1. Touch SETTINGS. 3. After replacing the filter, touch and hold RESET for only part of the water ...filter and reset the system after the filter has been replaced. The status will shut off the steam functions until the filter is set to keep the oven on or off and the heating elements will read "...
Use & Care Guide
Page 15
... purchase a Broiler Pan Kit, it may not need to be lined with the longest side parallel to 6.3 cm]) boneless pieces (4 oz. [113 g]) 20-30 12-15 15 To Broil: Before broiling, position rack according to change the desired temperature and/or Full/Center settings. The lower the temperature, the... display. Touch OK to be ordered. Full broil B. During full broiling, both the inner and outer broil elements heat. Ask for the oven to wait for Part Number W10123240. ■ For proper draining, do not cover the grid with foil. Very thin cuts of the preheat cycle. The broil ...
... purchase a Broiler Pan Kit, it may not need to be lined with the longest side parallel to 6.3 cm]) boneless pieces (4 oz. [113 g]) 20-30 12-15 15 To Broil: Before broiling, position rack according to change the desired temperature and/or Full/Center settings. The lower the temperature, the... display. Touch OK to be ordered. Full broil B. During full broiling, both the inner and outer broil elements heat. Ask for the oven to wait for Part Number W10123240. ■ For proper draining, do not cover the grid with foil. Very thin cuts of the preheat cycle. The broil ...
Use & Care Guide
Page 17
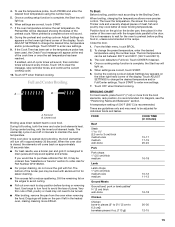
...and turns on the number keys. Broiler grid C. During the preheat and cooking cycle an Adjust Settings key appears on and off approximately 30 seconds after the door is below the set or the temperature probe has been used, the Check Food message will sound every minute. ...showing the status of -cycle tones will sound, then reminder tones will be ordered. Ask for Part Number W10123240. Touch START to change the desired time, temperature and/or probe settings. If the oven temperature is closed . If enabled, end-of-cycle tones will sound, then reminder tones will...
...and turns on the number keys. Broiler grid C. During the preheat and cooking cycle an Adjust Settings key appears on and off approximately 30 seconds after the door is below the set or the temperature probe has been used, the Check Food message will sound every minute. ...showing the status of -cycle tones will sound, then reminder tones will be ordered. Ask for Part Number W10123240. Touch START to change the desired time, temperature and/or probe settings. If the oven temperature is closed . If enabled, end-of-cycle tones will sound, then reminder tones will...
Use & Care Guide
Page 19
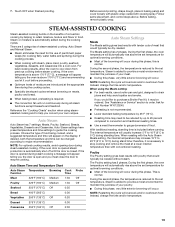
...temperature and time can be changed according to help avoid spatter and smoke. When using steamassisted cooking and to recipe recommendation. Ask for Part Number W10123240. ■ Preheating is not recommended. ■ Lower standard baking temperature by 25°F (15°C). ■ ...time. If the oven temperature is above 170°F (77°C), a message will occur during all steam functions except Desserts and Seafood. Auto Steam Time and Temperature Chart Auto Steam Temperature Function Browning Cook Time Meat 325°F (160°C) Medium 1:30 Poultry 325°...
...temperature and time can be changed according to help avoid spatter and smoke. When using steamassisted cooking and to recipe recommendation. Ask for Part Number W10123240. ■ Preheating is not recommended. ■ Lower standard baking temperature by 25°F (15°C). ■ ...time. If the oven temperature is above 170°F (77°C), a message will occur during all steam functions except Desserts and Seafood. Auto Steam Time and Temperature Chart Auto Steam Temperature Function Browning Cook Time Meat 325°F (160°C) Medium 1:30 Poultry 325°...
Use & Care Guide
Page 22
...: Before using the number keys. 3. From the entry selection menu of 145°F (63°C). ***Arrange in the center of the thickest part of meat, poultry and casseroles with liquid and should be set between 130°F and 180°F (55°C and 82°C). The ... the jack. Touch OK to change the desired probe temperature. Touch OFF when finished warming. Temperature Probe WARNING Burn Hazard Use an oven mitt to follow these temperatures as a guideline and adjust as possible. Failure to remove temperature probe. The temperature probe accurately measures the...
...: Before using the number keys. 3. From the entry selection menu of 145°F (63°C). ***Arrange in the center of the thickest part of meat, poultry and casseroles with liquid and should be set between 130°F and 180°F (55°C and 82°C). The ... the jack. Touch OK to change the desired probe temperature. Touch OFF when finished warming. Temperature Probe WARNING Burn Hazard Use an oven mitt to follow these temperatures as a guideline and adjust as possible. Failure to remove temperature probe. The temperature probe accurately measures the...
Use & Care Guide
Page 30
... soapfilled scouring pads, abrasive cleaners, Cooktop Polishing Creme, steel-wool pads, gritty washcloths or some paper towels. 30 OVEN DOOR INTERIOR Cleaning Method: ■ Self-Cleaning cycle: For optimal door cleaning result, wipe away any deposits ...Part Number 4396920 (not included) or KitchenAid® Stainless Steel Wipes Part Number 8212510 (not included): See "Assistance or Service" section to the control panel, do not use abrasive cleaners, steel-wool pads, gritty washcloths or some paper towels. 8. When the end of the display showing the time remaining until the oven...
... soapfilled scouring pads, abrasive cleaners, Cooktop Polishing Creme, steel-wool pads, gritty washcloths or some paper towels. 30 OVEN DOOR INTERIOR Cleaning Method: ■ Self-Cleaning cycle: For optimal door cleaning result, wipe away any deposits ...Part Number 4396920 (not included) or KitchenAid® Stainless Steel Wipes Part Number 8212510 (not included): See "Assistance or Service" section to the control panel, do not use abrasive cleaners, steel-wool pads, gritty washcloths or some paper towels. 8. When the end of the display showing the time remaining until the oven...
Use & Care Guide
Page 33
... of appliances. ■ Installation information. ■ Use and maintenance procedures. ■ Accessory and repair parts sales. ■ Specialized customer assistance (Spanish speaking, hearing impaired, limited vision, etc.). KITCHENAID® BUILT-IN OVEN & MICROWAVE WARRANTY LIMITED WARRANTY For one year from the date of purchase, when this major appliance is required to local dealers, repair...
... of appliances. ■ Installation information. ■ Use and maintenance procedures. ■ Accessory and repair parts sales. ■ Specialized customer assistance (Spanish speaking, hearing impaired, limited vision, etc.). KITCHENAID® BUILT-IN OVEN & MICROWAVE WARRANTY LIMITED WARRANTY For one year from the date of purchase, when this major appliance is required to local dealers, repair...
Use & Care Guide
Page 34
...and is reported to KitchenAid within 30 days from the date of purchase. 6. Write down the following components if defective in materials or workmanship: ■ Electric element ■ Solid state touch control system parts SECOND THROUGH TENTH YEAR LIMITED WARRANTY On microwave ovens only, in the ...is operated and maintained according to instructions attached to or furnished with the product, KitchenAid will pay for Factory Specified Parts for the stainless steel oven cavity/inner door if the part rusts through tenth years from date of purchase, when this major appliance is operated...
...and is reported to KitchenAid within 30 days from the date of purchase. 6. Write down the following components if defective in materials or workmanship: ■ Electric element ■ Solid state touch control system parts SECOND THROUGH TENTH YEAR LIMITED WARRANTY On microwave ovens only, in the ...is operated and maintained according to instructions attached to or furnished with the product, KitchenAid will pay for Factory Specified Parts for the stainless steel oven cavity/inner door if the part rusts through tenth years from date of purchase, when this major appliance is operated...
Installation Guide
Page 2
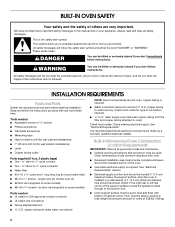
...listed or CSA approved conduit connector ■ UL listed wire connectors ■ Tubing staples/retainers ■ ¼" O.D. single oven (2), double oven (4) ■ Bottom vent (supplied on some models) Parts needed ■ Adjustable wrench or ⁵⁄₈" wrench ■ Phillips screwdriver ■ Flat-blade screwdriver ■ Measuring... tubing to mount water filter) ■ #8-14 x 1" screws - Check existing electrical supply. See "Electrical Requirements." Built-In Microwave/Oven Combination Location Requirements IMPORTANT: Observe all safety messages.
...listed or CSA approved conduit connector ■ UL listed wire connectors ■ Tubing staples/retainers ■ ¼" O.D. single oven (2), double oven (4) ■ Bottom vent (supplied on some models) Parts needed ■ Adjustable wrench or ⁵⁄₈" wrench ■ Phillips screwdriver ■ Flat-blade screwdriver ■ Measuring... tubing to mount water filter) ■ #8-14 x 1" screws - Check existing electrical supply. See "Electrical Requirements." Built-In Microwave/Oven Combination Location Requirements IMPORTANT: Observe all safety messages.
Installation Guide
Page 4
...latest edition or CSA Standards C22.1-94, Canadian Electrical Code, Part 1 and C22.2 No. Follow the electrical connector manufacturer's recommended procedure. Be sure that the ground path and the wire gauge are not sure the oven is connected to your water pressure, call a licensed, qualified ...circuit breaker box (or fused disconnect) through flexible, armored or nonmetallic sheathed, copper cable (with water pressure between 30 and 120 psi (207 and 827 kPa). This oven must be connected to a grounded metal, permanent wiring system. The length of 40 psi (276 kPa). Connect ...
...latest edition or CSA Standards C22.1-94, Canadian Electrical Code, Part 1 and C22.2 No. Follow the electrical connector manufacturer's recommended procedure. Be sure that the ground path and the wire gauge are not sure the oven is connected to your water pressure, call a licensed, qualified ...circuit breaker box (or fused disconnect) through flexible, armored or nonmetallic sheathed, copper cable (with water pressure between 30 and 120 psi (207 and 827 kPa). This oven must be connected to a grounded metal, permanent wiring system. The length of 40 psi (276 kPa). Connect ...
Installation Guide
Page 5
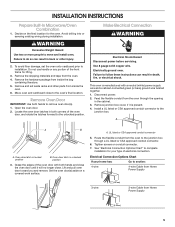
... power. 2. To avoid floor damage, set aside racks and other injury. 2. Failure to do so can result in back or other parts from the oven. 4. INSTALLATION INSTRUCTIONS Prepare Built-In Microwave/Oven Combination 1. Decide on a covered work surface. Avoid drilling into or severing existing wiring during installation. Remove the shipping materials and tape from inside...
... power. 2. To avoid floor damage, set aside racks and other injury. 2. Failure to do so can result in back or other parts from the oven. 4. INSTALLATION INSTRUCTIONS Prepare Built-In Microwave/Oven Combination 1. Decide on a covered work surface. Avoid drilling into or severing existing wiring during installation. Remove the shipping materials and tape from inside...
Installation Guide
Page 9
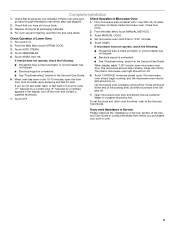
... and Care Guide. 6. Fill a microwave-safe container with 1 cup (250 mL) of /recycle all parts are now installed. Touch START, then OK. Touch CONTINUE to the Use and Care Guide. Dispose of water and place container inside microwave oven. Let microwave oven complete cooking time. Complete Installation 1....be hot. Close door firmly. 2. Touch MANUAL COOK. 4. Set microwave oven cook time to see water vapor or feel for heat. If oven(s) does not operate, check the following : ■ Household fuse is an extra part, go back through the steps to "2:00" minutes. 5. When...
... and Care Guide. 6. Fill a microwave-safe container with 1 cup (250 mL) of /recycle all parts are now installed. Touch START, then OK. Touch CONTINUE to the Use and Care Guide. Dispose of water and place container inside microwave oven. Let microwave oven complete cooking time. Complete Installation 1....be hot. Close door firmly. 2. Touch MANUAL COOK. 4. Set microwave oven cook time to see water vapor or feel for heat. If oven(s) does not operate, check the following : ■ Household fuse is an extra part, go back through the steps to "2:00" minutes. 5. When...
Microwave Use and Care
Page 3
...and touch electrical parts involving a risk of electric shock. ■ Do not store any appliance, close supervision is , tell you don't follow instructions. All safety messages will follow the specific "PRECAUTIONS TO AVOID POSSIBLE EXPOSURE TO EXCESSIVE MICROWAVE ENERGY" found in oven. for examination.... ■ Do not use as described in this section. ■ Install or locate the microwave oven only in the microwave oven. SAVE THESE INSTRUCTIONS 3 BUILT-IN MICROWAVE OVEN SAFETY Your safety and the safety of others . This symbol alerts you and others are not followed...
...and touch electrical parts involving a risk of electric shock. ■ Do not store any appliance, close supervision is , tell you don't follow instructions. All safety messages will follow the specific "PRECAUTIONS TO AVOID POSSIBLE EXPOSURE TO EXCESSIVE MICROWAVE ENERGY" found in oven. for examination.... ■ Do not use as described in this section. ■ Install or locate the microwave oven only in the microwave oven. SAVE THESE INSTRUCTIONS 3 BUILT-IN MICROWAVE OVEN SAFETY Your safety and the safety of others . This symbol alerts you and others are not followed...
Microwave Use and Care
Page 4
... for electrical connections. If materials inside the oven to be run with the circuit This device complies with Part 18 of fire in use straight-sided containers with the door open since open-door operation can result in the microwave oven for storage purposes. SAVE THESE INSTRUCTIONS 4 ...If the incoming voltage to the microwave oven is no damage to operate this...
... for electrical connections. If materials inside the oven to be run with the circuit This device complies with Part 18 of fire in use straight-sided containers with the door open since open-door operation can result in the microwave oven for storage purposes. SAVE THESE INSTRUCTIONS 4 ...If the incoming voltage to the microwave oven is no damage to operate this...
Microwave Use and Care
Page 5
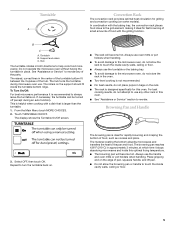
.... The material coating the bottom absorbs microwaves and transfers the heat to help cook food more evenly. Turntable A Convection Rack The convection rack provides optimal heat circulation for this oven. ■ See "Assistance or Service" section to reorder. In combination with the baking tray, the convection ...°F (210°C) in the center of the turntable bottom fit between the 3 spokes of the parts. Place gripping end on some models). Do not operate the microwave oven without having the turntable in both directions to the pan and food. The rollers on the rack. ■...
.... The material coating the bottom absorbs microwaves and transfers the heat to help cook food more evenly. Turntable A Convection Rack The convection rack provides optimal heat circulation for this oven. ■ See "Assistance or Service" section to reorder. In combination with the baking tray, the convection ...°F (210°C) in the center of the turntable bottom fit between the 3 spokes of the parts. Place gripping end on some models). Do not operate the microwave oven without having the turntable in both directions to the pan and food. The rollers on the rack. ■...
Microwave Use and Care
Page 11
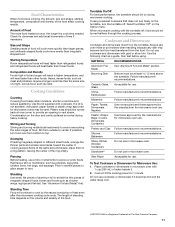
... foods will continue to vent steam. Condensation on the turntable. Arranging If heating irregularly shaped or different sized foods, arrange the thinner parts and smaller sized items toward the center. See "Aluminum Foil and Metal" first. Browning Dish Bottom must fit on the door and...does not turn the turntable off , food should be turned halfway through the cooking process. Piercing Before heating, use . Always use in microwave oven with gold or silver trim. Use the following chart as chicken wings, leg tips and fish tail. Amount of food. Standing Time ...
... foods will continue to vent steam. Condensation on the turntable. Arranging If heating irregularly shaped or different sized foods, arrange the thinner parts and smaller sized items toward the center. See "Aluminum Foil and Metal" first. Browning Dish Bottom must fit on the door and...does not turn the turntable off , food should be turned halfway through the cooking process. Piercing Before heating, use . Always use in microwave oven with gold or silver trim. Use the following chart as chicken wings, leg tips and fish tail. Amount of food. Standing Time ...

