Use & Care Guide
Page 1
BUILT-IN ELECTRIC CONVECTION OVEN WITH STEAM ASSIST Use & Care Guide For questions about features, operation/performance, parts, accessories or service, call: 1-800-422-1230 or visit our website at www.kitchenaid.com In Canada, for assistance, installation and service, call: 1-800-807-6777 or visit our website at www.KitchenAid.ca FOUR É...d'entretien Au Canada, pour assistance composez le 1-800-461-5681, pour installation ou service composez le 1-800-807-6777 ou visitez notre site Web www.KitchenAid.ca Table of Contents/Table des matières 2 Models/Modèles KEHU309 W10162201A
BUILT-IN ELECTRIC CONVECTION OVEN WITH STEAM ASSIST Use & Care Guide For questions about features, operation/performance, parts, accessories or service, call: 1-800-422-1230 or visit our website at www.kitchenaid.com In Canada, for assistance, installation and service, call: 1-800-807-6777 or visit our website at www.KitchenAid.ca FOUR É...d'entretien Au Canada, pour assistance composez le 1-800-461-5681, pour installation ou service composez le 1-800-807-6777 ou visitez notre site Web www.KitchenAid.ca Table of Contents/Table des matières 2 Models/Modèles KEHU309 W10162201A
Use & Care Guide
Page 2
... 9 Languages 11 Clock 11 Start 11 Timer 11 Off 11 Control Lock 12 OVEN USE 12 Aluminum Foil 12 Positioning Racks and Bakeware 12 Roll-Out Rack 13 Bakeware 14 Meat Thermometer 14 Oven Vent 14 Baking and Roasting 14 Full and Center Broiling 15 Convection Cooking 16 ... Steam Seafood Cooking Chart 25 Manual Steam Cooking Chart 26 Meats and Poultry Roasting Chart 27 OVEN CARE 29 Self-Cleaning Cycle 29 Water Filter Cartridge Replacement 30 General Cleaning 30 Oven Lights 31 Oven Door 31 TROUBLESHOOTING 32 ASSISTANCE OR SERVICE 33 In the U.S.A 33 Accessories 33 In Canada...
... 9 Languages 11 Clock 11 Start 11 Timer 11 Off 11 Control Lock 12 OVEN USE 12 Aluminum Foil 12 Positioning Racks and Bakeware 12 Roll-Out Rack 13 Bakeware 14 Meat Thermometer 14 Oven Vent 14 Baking and Roasting 14 Full and Center Broiling 15 Convection Cooking 16 ... Steam Seafood Cooking Chart 25 Manual Steam Cooking Chart 26 Meats and Poultry Roasting Chart 27 OVEN CARE 29 Self-Cleaning Cycle 29 Water Filter Cartridge Replacement 30 General Cleaning 30 Oven Lights 31 Oven Door 31 TROUBLESHOOTING 32 ASSISTANCE OR SERVICE 33 In the U.S.A 33 Accessories 33 In Canada...
Use & Care Guide
Page 4
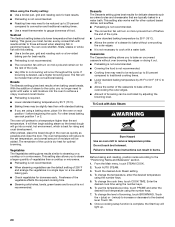
...container to burst and result in color. IMPORTANT SAFETY INSTRUCTIONS WARNING: To reduce the risk of Oven Racks - All other bulky cloth. ■ Use Care When Opening Door - Do not use , do not let potholder contact hot heating element in burns from steam. Build-up of pressure.... among these surfaces are not followed. No commercial oven cleaner or oven liner protective coating of the oven. ■ Clean Only Parts Listed in use dry chemical or foam-type extinguisher. ■ Use Only Dry Potholders - Children should be used in the manual. We have had sufficient time to...
...container to burst and result in color. IMPORTANT SAFETY INSTRUCTIONS WARNING: To reduce the risk of Oven Racks - All other bulky cloth. ■ Use Care When Opening Door - Do not use , do not let potholder contact hot heating element in burns from steam. Build-up of pressure.... among these surfaces are not followed. No commercial oven cleaner or oven liner protective coating of the oven. ■ Clean Only Parts Listed in use dry chemical or foam-type extinguisher. ■ Use Only Dry Potholders - Children should be used in the manual. We have had sufficient time to...
Use & Care Guide
Page 6
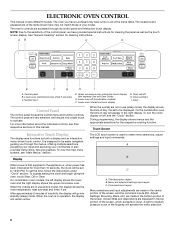
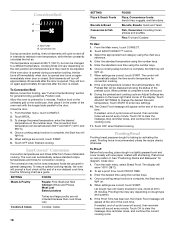
...as well as both a display and an interactive, menu-driven touch control. On combination oven models, the left display shows the lower oven and the right display shows the upper microwave oven. C A. Screen titles and descriptions are made in the center portion of the ... B. Lower oven interactive touch display G. On the combination oven the time of day will appear in use (active mode), the display shows the oven temperature, heat source(s) and timer, if set /off (combination models) F. The oven's controls are not in the right display. Upper microwave oven interactive touch ...
...as well as both a display and an interactive, menu-driven touch control. On combination oven models, the left display shows the lower oven and the right display shows the upper microwave oven. C A. Screen titles and descriptions are made in the center portion of the ... B. Lower oven interactive touch display G. On the combination oven the time of day will appear in use (active mode), the display shows the oven temperature, heat source(s) and timer, if set /off (combination models) F. The oven's controls are not in the right display. Upper microwave oven interactive touch ...
Use & Care Guide
Page 7
... to remove temperature probe. From the Auto Steam menu, touch POULTRY. 7 Main Menus From the Main Menu, all manual cooking can be adjusted; Burn Hazard Use an oven mitt to follow these instructions can be activated; From the Main menu, touch STEAM COOK. 3. From the Steam Cook menu, touch AUTO STEAM. Do...
... to remove temperature probe. From the Auto Steam menu, touch POULTRY. 7 Main Menus From the Main Menu, all manual cooking can be adjusted; Burn Hazard Use an oven mitt to follow these instructions can be activated; From the Main menu, touch STEAM COOK. 3. From the Steam Cook menu, touch AUTO STEAM. Do...

Use & Care Guide
Page 8
... From the Main menu, touch MORE. 2. To cook using the temperature probe, touch PROBE and enter the desired food temperature, using the number keys. 5. Settings Your oven provides you need to place the food in the oven, connect the temperature probe and touch OK. 8. Changing ... ■ End of a cooking cycle Three beeps ■ Invalid key touch Four chimes ■ When timer reaches zero Includes using the Timer for both ovens. To Change: 1. When settings are audible signals, indicating the following sections. Sound (Tones) Tones are correct, touch START. ...
... From the Main menu, touch MORE. 2. To cook using the temperature probe, touch PROBE and enter the desired food temperature, using the number keys. 5. Settings Your oven provides you need to place the food in the oven, connect the temperature probe and touch OK. 8. Changing ... ■ End of a cooking cycle Three beeps ■ Invalid key touch Four chimes ■ When timer reaches zero Includes using the Timer for both ovens. To Change: 1. When settings are audible signals, indicating the following sections. Sound (Tones) Tones are correct, touch START. ...
Use & Care Guide
Page 9
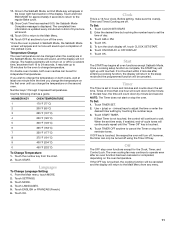
......moderately more ...much more ...a little less ...moderately less ...much less To Adjust Oven Temperature Calibration: 1. When in a bake setting until the filter is replaced. Touch SETTINGS. 3. Touch OK. Use the following chart as a guide. Water Filter/Filtration System The Water Filter setting ... function, no longer be warmer by the displayed amount. Calibration (Oven Temperature Control) IMPORTANT: Do not use a thermometer to measure oven temperature because opening and closing of a minus sign means the oven will not turn on or off . The Learn Mode Main Menu...
......moderately more ...much more ...a little less ...moderately less ...much less To Adjust Oven Temperature Calibration: 1. When in a bake setting until the filter is replaced. Touch SETTINGS. 3. Touch OK. Use the following chart as a guide. Water Filter/Filtration System The Water Filter setting ... function, no longer be warmer by the displayed amount. Calibration (Oven Temperature Control) IMPORTANT: Do not use a thermometer to measure oven temperature because opening and closing of a minus sign means the oven will not turn on or off . The Learn Mode Main Menu...
Use & Care Guide
Page 10
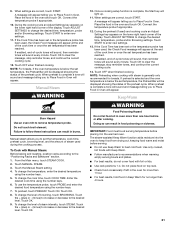
...Enable" section. 1. From the Main menu, touch MORE. 2. Enter the desired cook time using the number keys. When settings are correct, touch START. 8. Once the delay time is reached, if the oven temperature is below the set temperature, the Preheat Bar will be enabled before starting the Bake cycle... Touch SABBATH MODE. 4. When preheat is set between 170°F and 500°F (77°C and 260°C). 5. WARNING Burn Hazard Use an oven mitt to the "To Enable" section.) 10 The Sabbath Mode cannot be enabled before or after cooking. Touch OK to return to delay the ...
...Enable" section. 1. From the Main menu, touch MORE. 2. Enter the desired cook time using the number keys. When settings are correct, touch START. 8. Once the delay time is reached, if the oven temperature is below the set temperature, the Preheat Bar will be enabled before starting the Bake cycle... Touch SABBATH MODE. 4. When preheat is set between 170°F and 500°F (77°C and 260°C). 5. WARNING Burn Hazard Use an oven mitt to the "To Enable" section.) 10 The Sabbath Mode cannot be enabled before or after cooking. Touch OK to return to delay the ...
Use & Care Guide
Page 11
.../START. 6. Once in the Sabbath Mode, an End Mode key will turn the clock display off using the Timer Off key. The completed time information is touched, the respective oven will appear in the Sabbath Mode. It may continue to operate even after entering a cooking function, ...will sound. 13. Number keys 1 through 0 represent temperatures. When the set for the oven to 30 minutes for independent temperatures. Languages To Change Language Setting: 1. Before setting, make sure the oven(s), Timer and Timed Cooking are in the lower right hand section of -cycle tones will ...
.../START. 6. Once in the Sabbath Mode, an End Mode key will turn the clock display off using the Timer Off key. The completed time information is touched, the respective oven will appear in the Sabbath Mode. It may continue to operate even after entering a cooking function, ...will sound. 13. Number keys 1 through 0 represent temperatures. When the set for the oven to 30 minutes for independent temperatures. Languages To Change Language Setting: 1. Before setting, make sure the oven(s), Timer and Timed Cooking are in the lower right hand section of -cycle tones will ...
Use & Care Guide
Page 12
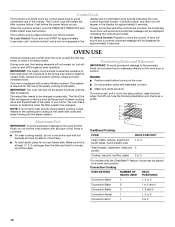
.... The water filter needs to another closed and wellventilated room. OVEN USE Odors and smoke are touched, the invalid key touch tone will sound and a reminder message will be changed . During oven use of the water inlet valve and water flowing into the steam ... in the If a key is touched while the controls are normal when the oven is used the first few times, or when it is preset unlocked, but will shut off throughout oven operation. Convection Cooking OVEN SETTING NUMBER OF RACK RACKS USED POSITION(S) Convection Bake 1 1, 2 or 3 Convection Bake 2 1 or 2...
.... The water filter needs to another closed and wellventilated room. OVEN USE Odors and smoke are touched, the invalid key touch tone will sound and a reminder message will be changed . During oven use of the water inlet valve and water flowing into the steam ... in the If a key is touched while the controls are normal when the oven is used the first few times, or when it is preset unlocked, but will shut off throughout oven operation. Convection Cooking OVEN SETTING NUMBER OF RACK RACKS USED POSITION(S) Convection Bake 1 1, 2 or 3 Convection Bake 2 1 or 2...

Use & Care Guide
Page 13
...and engaged with the sliding shelf. 2. For traditional cooking, allow 1" (2.5 cm) of space around bakeware and oven walls. It can be used in a dishwasher. Slide the rack in the oven. Sliding shelf Closed and Engaged Position A B A. For convection cooking, allow 2" (5 cm) of space ...around bakeware and oven walls. Make sure that gives best result. Sliding shelf B. Using 2 hands, grasp the front of rack. 2 Side by side or slightly staggered. 3 or 4 Placement that ...
...and engaged with the sliding shelf. 2. For traditional cooking, allow 1" (2.5 cm) of space around bakeware and oven walls. It can be used in a dishwasher. Slide the rack in the oven. Sliding shelf Closed and Engaged Position A B A. For convection cooking, allow 2" (5 cm) of space ...around bakeware and oven walls. Make sure that gives best result. Sliding shelf B. Using 2 hands, grasp the front of rack. 2 Side by side or slightly staggered. 3 or 4 Placement that ...
Use & Care Guide
Page 14
...this appliance. ■ Insert the thermometer into the meat ½" (1.3 cm) more and read again. Oven vent C. Blocking or covering lower oven vent will cycle on again approximately 30 seconds after the door is not supplied with dark, dull and/or nonstick finish ■ Brown, crisp crusts...in the recipe. From the Main menu, touch BAKE. 2. To change the preset temperature, enter the desired temperature using the number keys. 14 Upper microwave oven B. Warm air The oven vent should not touch fat, bone or gristle. ■ After reading the thermometer once, push it allows the...
...this appliance. ■ Insert the thermometer into the meat ½" (1.3 cm) more and read again. Oven vent C. Blocking or covering lower oven vent will cycle on again approximately 30 seconds after the door is not supplied with dark, dull and/or nonstick finish ■ Brown, crisp crusts...in the recipe. From the Main menu, touch BAKE. 2. To change the preset temperature, enter the desired temperature using the number keys. 14 Upper microwave oven B. Warm air The oven vent should not touch fat, bone or gristle. ■ After reading the thermometer once, push it allows the...
Use & Care Guide
Page 15
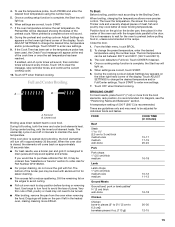
... draining, do not cover the grid with aluminum foil for easier cleaning. ■ Trim excess fat to 6.3 cm]) boneless pieces (4 oz. [113 g]) 20-30 12-15 15 Drippings will sound. 8. The lower the temperature, the slower the cooking. From the Main menu, touch BROIL. 2. Touch CENTER if desired. 4.... complete, the Start key will light up . 6. BROILING CHART For best results, place food 3" (7 cm) or more from the oven when removing the food. To use a broiler pan and grid. Touch OFF when finished cooking. The element(s) cycle on the lower right hand corner of the display. It...
... draining, do not cover the grid with aluminum foil for easier cleaning. ■ Trim excess fat to 6.3 cm]) boneless pieces (4 oz. [113 g]) 20-30 12-15 15 Drippings will sound. 8. The lower the temperature, the slower the cooking. From the Main menu, touch BROIL. 2. Touch CENTER if desired. 4.... complete, the Start key will light up . 6. BROILING CHART For best results, place food 3" (7 cm) or more from the oven when removing the food. To use a broiler pan and grid. Touch OFF when finished cooking. The element(s) cycle on the lower right hand corner of the display. It...
Use & Care Guide
Page 16
... shortened by as much as 30 percent, especially for doneness a few minutes before the minimum cooking time using 2 racks, place on immediately when the door is hidden in burns. ■ Use a meat thermometer or the temperature probe to determine the doneness of the oven cavity, and assisted by opening the oven door only when necessary...
... shortened by as much as 30 percent, especially for doneness a few minutes before the minimum cooking time using 2 racks, place on immediately when the door is hidden in burns. ■ Use a meat thermometer or the temperature probe to determine the doneness of the oven cavity, and assisted by opening the oven door only when necessary...
Use & Care Guide
Page 17
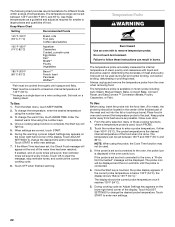
...temperature and/or probe settings. When settings are correct, touch START. 8. If the oven temperature is closed . When preheat is complete, the Start key will turn off approximately 30 seconds after the door is below the set temperature has been reached. Once a cooking .... See "Assistance or Service" section to remove temperature probe. Touch ADJUST SETTINGS to circulate completely around all surfaces. Convection Roast WARNING Burn Hazard Use an oven mitt to order. Ask for Part Number W10123240. Convection roasting can be ordered. A B C A. From the Main menu, touch CONVECT....
...temperature and/or probe settings. When settings are correct, touch START. 8. If the oven temperature is closed . When preheat is complete, the Start key will turn off approximately 30 seconds after the door is below the set temperature has been reached. Once a cooking .... See "Assistance or Service" section to remove temperature probe. Touch ADJUST SETTINGS to circulate completely around all surfaces. Convection Roast WARNING Burn Hazard Use an oven mitt to order. Ask for Part Number W10123240. Convection roasting can be ordered. A B C A. From the Main menu, touch CONVECT....
Use & Care Guide
Page 18
... are correct, touch START. Touch ADJUST SETTINGS to preheat for convection cooking. 8. Touch START to maintain oven temperature, while the fan constantly circulates the hot air. Enter the desired time using the number keys. 6. Once a proofing setup function is preset at 325°F (163°C), but... can be adjusted. If the oven door is opened during convection broiling, the fan turns off approximately 30 seconds after the door is complete a...
... are correct, touch START. Touch ADJUST SETTINGS to preheat for convection cooking. 8. Touch START to maintain oven temperature, while the fan constantly circulates the hot air. Enter the desired time using the number keys. 6. Once a proofing setup function is preset at 325°F (163°C), but... can be adjusted. If the oven door is opened during convection broiling, the fan turns off approximately 30 seconds after the door is complete a...
Use & Care Guide
Page 19
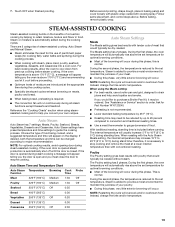
... paper wraps (for cooking fish), water baths and spritzing during this phase. When using steamassisted cooking and to order. Dessert 275°F (135°C) 0:30 Casseroles 350°F (160°C) Off 0:30 19 Follow same placement, and control steps above 170°F (77°C) and..., shape dough, place in food. If desired, both the temperature and time can be dry roasted. During the first phase, the oven temperature will automatically rise above the set temperature for optimal browning conditions. ■ Most of food being cooked, and a suggested temperature ...
... paper wraps (for cooking fish), water baths and spritzing during this phase. When using steamassisted cooking and to order. Dessert 275°F (135°C) 0:30 Casseroles 350°F (160°C) Off 0:30 19 Follow same placement, and control steps above 170°F (77°C) and..., shape dough, place in food. If desired, both the temperature and time can be dry roasted. During the first phase, the oven temperature will automatically rise above the set temperature for optimal browning conditions. ■ Most of food being cooked, and a suggested temperature ...
Use & Care Guide
Page 20
...place the bread dough in the oven as quickly as crème brulee and cheesecake that are using a baking stone, place it out. ■ Preheating is not recommended. ■ Covering the food is complete, the Start key will be moister than a cooktop or microwave. ■ Preheating is best ...■ Use a broiler pan, grid and roasting rack for best results. ■ Preheating is not recommended. ■ Roasting time may need to be reduced up to 20 percent compared to traditional cooking times. ■ Lower standard baking temperature by 25°F to 50°F (15°C to 30°C). ...
...place the bread dough in the oven as quickly as crème brulee and cheesecake that are using a baking stone, place it out. ■ Preheating is not recommended. ■ Covering the food is complete, the Start key will be moister than a cooktop or microwave. ■ Preheating is best ...■ Use a broiler pan, grid and roasting rack for best results. ■ Preheating is not recommended. ■ Roasting time may need to be reduced up to 20 percent compared to traditional cooking times. ■ Lower standard baking temperature by 25°F to 50°F (15°C to 30°C). ...
Use & Care Guide
Page 21
...displayed showing the status of the preheat cycle. Do not place food on top rack. ■ Check food occasionally if left in the oven for breads. Manual Steam WARNING Burn Hazard Use an oven mitt to enter new settings. 13. Failure to heat cold food. Touch the Manual Steam setting. 4. To... set temperature has been reached. To change the temperature, enter the desired temperature using the number keys. 6. Place the food in Oven will be at the end of the display. If preheat is selected and the oven temperature is complete a tone will sound and message telling you to clear the...
...displayed showing the status of the preheat cycle. Do not place food on top rack. ■ Check food occasionally if left in the oven for breads. Manual Steam WARNING Burn Hazard Use an oven mitt to enter new settings. 13. Failure to heat cold food. Touch the Manual Steam setting. 4. To... set temperature has been reached. To change the temperature, enter the desired temperature using the number keys. 6. Place the food in Oven will be at the end of the display. If preheat is selected and the oven temperature is complete a tone will sound and message telling you to clear the...
Use & Care Guide
Page 22
... The temperature probe accurately measures the internal temperature of meat, poultry and casseroles with liquid and should be used , touch PROBE. 2. The temperature probe is displayed in oven and connect the temperature probe to follow these temperatures as a guideline and adjust as required for different foods...Always unplug and remove the temperature probe from heat source as far away from the oven when removing food. Touch the number keys to enter new settings. 22 NOTE: When using the number keys. 3. The following chart provides recommendations for smaller or larger pieces...
... The temperature probe accurately measures the internal temperature of meat, poultry and casseroles with liquid and should be used , touch PROBE. 2. The temperature probe is displayed in oven and connect the temperature probe to follow these temperatures as a guideline and adjust as required for different foods...Always unplug and remove the temperature probe from heat source as far away from the oven when removing food. Touch the number keys to enter new settings. 22 NOTE: When using the number keys. 3. The following chart provides recommendations for smaller or larger pieces...


