Use & Care Guide
Page 4
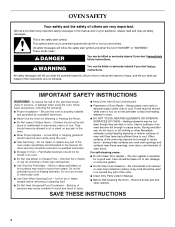
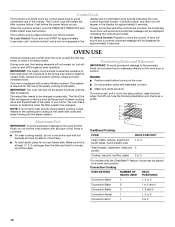
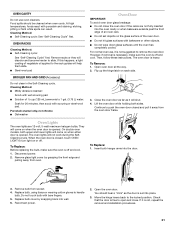
... desired location while oven is in Manual. ■ Before Self-Cleaning the Oven - IMPORTANT SAFETY INSTRUCTIONS WARNING: To reduce the risk of fire, electrical shock, injury to reduce the chance of oven until they are very important. Do not let potholder touch hot heating elements. If rack must be moved while oven is properly installed and grounded by a qualified technician. ■ Never Use the Oven for...
... desired location while oven is in Manual. ■ Before Self-Cleaning the Oven - IMPORTANT SAFETY INSTRUCTIONS WARNING: To reduce the risk of fire, electrical shock, injury to reduce the chance of oven until they are very important. Do not let potholder touch hot heating elements. If rack must be moved while oven is properly installed and grounded by a qualified technician. ■ Never Use the Oven for...
Use & Care Guide
Page 6
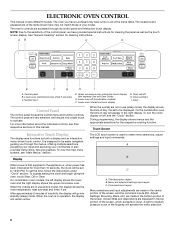
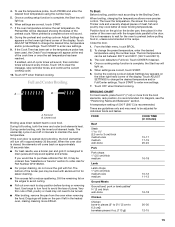
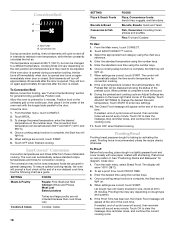
... locations and appearances of the items shown here may have purchased may not match those of the control panel, we have provided special instructions for more information about the individual controls, see the "Clock" section. Lower oven interactive touch display G. It is set /start /Control lock (hold 5 seconds) C. A light to be displayed. Add a Minute A. On the combination oven the time of the items listed. See "General Cleaning" section for the respective cooking...
... locations and appearances of the items shown here may have purchased may not match those of the control panel, we have provided special instructions for more information about the individual controls, see the "Clock" section. Lower oven interactive touch display G. It is set /start /Control lock (hold 5 seconds) C. A light to be displayed. Add a Minute A. On the combination oven the time of the items listed. See "General Cleaning" section for the respective cooking...
Use & Care Guide
Page 9
... sound, and the displays will shut off the steam functions until the filter is Replace Filter Soon or Replace Filter, the Reset key becomes available. Touch MORE. 4. Touch LEARN MODE. 5. A timed Sabbath Mode can also be displayed. Power outage has occurred." Touch DISPLAY CONTRAST. 4. Calibration (Oven Temperature Control) IMPORTANT: Do not use a thermometer to measure oven temperature because opening the oven door during steam cooking cycles related to Good. Touch OK. There are 3 water filter states: Good, Replace Filter...
... sound, and the displays will shut off the steam functions until the filter is Replace Filter Soon or Replace Filter, the Reset key becomes available. Touch MORE. 4. Touch LEARN MODE. 5. A timed Sabbath Mode can also be displayed. Power outage has occurred." Touch DISPLAY CONTRAST. 4. Calibration (Oven Temperature Control) IMPORTANT: Do not use a thermometer to measure oven temperature because opening the oven door during steam cooking cycles related to Good. Touch OK. There are 3 water filter states: Good, Replace Filter...
Use & Care Guide
Page 12
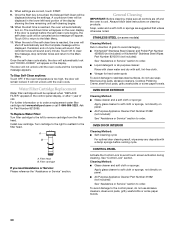
... water filter needs to be changed . The oven has a sensor to determine when the filter needs to be changed occasionally. To move a rack, pull it out to unlock the control. Convection Cooking OVEN SETTING NUMBER OF RACK RACKS USED POSITION(S) Convection Bake 1 1, 2 or 3 Convection Bake 2 1 or 2 and 4 Convection Bake 3 1, 3 and 5 Convection Roast 1 1, 2 or 3 Convection Broil 1 3 or 4 12 To Lock Control: Touch and hold START for approximately 5 seconds. Always move birds to the porcelain finish, do not place food...
... water filter needs to be changed . The oven has a sensor to determine when the filter needs to be changed occasionally. To move a rack, pull it out to unlock the control. Convection Cooking OVEN SETTING NUMBER OF RACK RACKS USED POSITION(S) Convection Bake 1 1, 2 or 3 Convection Bake 2 1 or 2 and 4 Convection Bake 3 1, 3 and 5 Convection Roast 1 1, 2 or 3 Convection Broil 1 3 or 4 12 To Lock Control: Touch and hold START for approximately 5 seconds. Always move birds to the porcelain finish, do not place food...
Use & Care Guide
Page 15
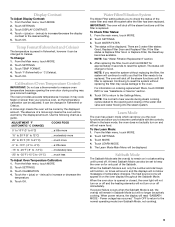
.... 10. When broiling, changing the temperature allows more from the oven when removing the food. To change the preset temperature, enter the desired temperature using the number keys. 5. During the cooking cycle an Adjust Settings key appears on the lower right hand corner of the display. Touch ADJUST SETTINGS to enter new settings. 7. Touch START to change the desired time, temperature and/or probe settings. FOOD COOK TIME (in minutes) Beef...
.... 10. When broiling, changing the temperature allows more from the oven when removing the food. To change the preset temperature, enter the desired temperature using the number keys. 5. During the cooking cycle an Adjust Settings key appears on the lower right hand corner of the display. Touch ADJUST SETTINGS to enter new settings. 7. Touch START to change the desired time, temperature and/or probe settings. FOOD COOK TIME (in minutes) Beef...
Use & Care Guide
Page 18
... in general categories. Once a cooking setup function is complete, the Start key will sound every minute. Proofing twice is opened during convection broiling, the fan turns off in size, check at 20 to the door. The display will light up . 5. Enter the desired time using the number keys. 6. Once a proofing setup function is preset at the end of the oven rack with shortening. Proofing time may not be set , the Check Food...
... in general categories. Once a cooking setup function is complete, the Start key will sound every minute. Proofing twice is opened during convection broiling, the fan turns off in size, check at 20 to the door. The display will light up . 5. Enter the desired time using the number keys. 6. Once a proofing setup function is preset at the end of the oven rack with shortening. Proofing time may not be set , the Check Food...

Use & Care Guide
Page 23
... fresh food, pretreatment techniques, the size and thickness of the display. However, some foods may not bake properly. To Set a Cooking Time: 1. From the entry selection menu of the display. Touch OK to see tips for diagram. During dehydration, heat is used to force out moisture and air circulation is unplugged. NUMBER OF RACKS RACK POSITION(S) 1 3 2 2 and 4 3 1, 3 and 5 1. Touch ADJUST SETTINGS to preserve food. Always unplug and remove the...
... fresh food, pretreatment techniques, the size and thickness of the display. However, some foods may not bake properly. To Set a Cooking Time: 1. From the entry selection menu of the display. Touch OK to see tips for diagram. During dehydration, heat is used to force out moisture and air circulation is unplugged. NUMBER OF RACKS RACK POSITION(S) 1 3 2 2 and 4 3 1, 3 and 5 1. Touch ADJUST SETTINGS to preserve food. Always unplug and remove the...
Use & Care Guide
Page 30
... KitchenAid® Stainless Steel Wipes Part Number 8212510 (not included): See "Assistance or Service" section to order. Turn cartridge to the right to reattach to avoid touch screen activation during cleaning. Cleaning Method: ■ Glass cleaner and soft cloth or sponge: Apply glass cleaner to soft cloth or sponge, not directly on the oven display. Water Filter Cartridge Replacement Water filter cartridge should be displayed showing the settings. A B A. OVEN DOOR...
... KitchenAid® Stainless Steel Wipes Part Number 8212510 (not included): See "Assistance or Service" section to order. Turn cartridge to the right to reattach to avoid touch screen activation during cleaning. Cleaning Method: ■ Glass cleaner and soft cloth or sponge: Apply glass cleaner to soft cloth or sponge, not directly on the oven display. Water Filter Cartridge Replacement Water filter cartridge should be displayed showing the settings. A B A. OVEN DOOR...
Use & Care Guide
Page 31
... up the hinge latch on or off and cool. If it is off and cool. 1. OVEN CAVITY Do not use , it is free to remove the oven door. To Replace: Before replacing the bulb, make sure the oven is set objects on the glass surface of vegetable oil applied to turn light on each side. 3. OVEN RACKS Cleaning Method: ■ Self-Cleaning cycle: See "Self-Cleaning Cycle" first. The oven door is opened .
... up the hinge latch on or off and cool. If it is off and cool. 1. OVEN CAVITY Do not use , it is free to remove the oven door. To Replace: Before replacing the bulb, make sure the oven is set objects on the glass surface of vegetable oil applied to turn light on each side. 3. OVEN RACKS Cleaning Method: ■ Self-Cleaning cycle: See "Self-Cleaning Cycle" first. The oven door is opened .
Use & Care Guide
Page 32
Replace the fuse or reset the circuit breaker. If the problem continues, call . Oven will not operate ■ Is the electronic oven control set ? See "Sabbath Mode" section. ■ On combination oven models, is increased. Display shows messages ■ Is the display showing a letter followed by a number reappears, call for the upper microwave oven. See "Assistance or Service" section. Close the oven door all the way. ■ Has the function been entered? See...
Replace the fuse or reset the circuit breaker. If the problem continues, call . Oven will not operate ■ Is the electronic oven control set ? See "Sabbath Mode" section. ■ On combination oven models, is increased. Display shows messages ■ Is the display showing a letter followed by a number reappears, call for the upper microwave oven. See "Assistance or Service" section. Close the oven door all the way. ■ Has the function been entered? See...
Use & Care Guide
Page 34
... workmanship: ■ Electric element ■ Solid state touch control system parts SECOND THROUGH TENTH YEAR LIMITED WARRANTY On microwave ovens only, in the second through due to defects in accordance with electrical or plumbing codes, or use of consumables or cleaning products not approved by KitchenAid. 5. DISCLAIMER OF IMPLIED WARRANTIES; You will need service, first see the "Troubleshooting" section of the Use & Care Guide. IMPLIED WARRANTIES, INCLUDING WARRANTIES OF MERCHANTABILITY OR...
... workmanship: ■ Electric element ■ Solid state touch control system parts SECOND THROUGH TENTH YEAR LIMITED WARRANTY On microwave ovens only, in the second through due to defects in accordance with electrical or plumbing codes, or use of consumables or cleaning products not approved by KitchenAid. 5. DISCLAIMER OF IMPLIED WARRANTIES; You will need service, first see the "Troubleshooting" section of the Use & Care Guide. IMPLIED WARRANTIES, INCLUDING WARRANTIES OF MERCHANTABILITY OR...
Dimension Guide
Page 1
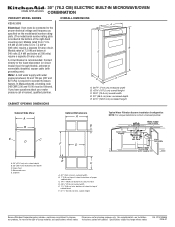
... Filter Assembly Water supply line to cold water supply Because Whirlpool Corporation policy includes a continuous commitment to change materials and specifications without notice. Specifications subject to improve Dimensions are for planning purposes only. ® 30" (76.2 CM) ELECTRIC BUILT-IN MICROWAVE/OVEN COMBINATION PRODUCT MODEL SERIES OVERALL DIMENSIONS KEHU309S Electrical: Oven must be connected to the proper electrical voltage and frequency as specified on the model/serial number rating plate. (The model/serial number rating plate...
... Filter Assembly Water supply line to cold water supply Because Whirlpool Corporation policy includes a continuous commitment to change materials and specifications without notice. Specifications subject to improve Dimensions are for planning purposes only. ® 30" (76.2 CM) ELECTRIC BUILT-IN MICROWAVE/OVEN COMBINATION PRODUCT MODEL SERIES OVERALL DIMENSIONS KEHU309S Electrical: Oven must be connected to the proper electrical voltage and frequency as specified on the model/serial number rating plate. (The model/serial number rating plate...
Installation Guide
Page 2
... starting installation. Tools needed ■ UL listed or CSA approved conduit connector ■ UL listed wire connectors ■ Tubing staples/retainers ■ ¼" O.D. copper tubing to support a total weight (microwave and built-in this manual and on some models) Parts needed ■ Adjustable wrench or ⁵⁄₈" wrench ■ Phillips screwdriver ■ Flat-blade screwdriver ■ Measuring tape ■ Hand or electric drill (for wall cabinet installations...
... starting installation. Tools needed ■ UL listed or CSA approved conduit connector ■ UL listed wire connectors ■ Tubing staples/retainers ■ ¼" O.D. copper tubing to support a total weight (microwave and built-in this manual and on some models) Parts needed ■ Adjustable wrench or ⁵⁄₈" wrench ■ Phillips screwdriver ■ Flat-blade screwdriver ■ Measuring tape ■ Hand or electric drill (for wall cabinet installations...
Installation Guide
Page 9
... microwave oven interior light should stop cooking. Complete Installation 1. For oven use and cleaning, read the Use and Care Guide. From the Main Menu touch MANUAL METHOD. 3. The microwave should be hot. The interior microwave oven light should be on . 2. If you have all packaging materials. 4. Open microwave oven door and slowly remove container. If you purchased your tools. 3. Touch AUTO STEAM. 4. Touch VEGETABLES. Touch START, then OK. To set the clock and other oven functions, refer to "2:00" minutes. 5. Turn power on . Set microwave oven cook time to the Use...
... microwave oven interior light should stop cooking. Complete Installation 1. For oven use and cleaning, read the Use and Care Guide. From the Main Menu touch MANUAL METHOD. 3. The microwave should be hot. The interior microwave oven light should be on . 2. If you have all packaging materials. 4. Open microwave oven door and slowly remove container. If you purchased your tools. 3. Touch AUTO STEAM. 4. Touch VEGETABLES. Touch START, then OK. To set the clock and other oven functions, refer to "2:00" minutes. 5. Turn power on . Set microwave oven cook time to the Use...
Microwave Use and Care
Page 3
... off the pad and touch electrical parts involving a risk of the oven. ■ As with the provided Installation Instructions. ■ Some products such as described in this oven when not in the "PAN BROWN" mode. ■ Do not cover racks or any openings on your appliance. Connect only to maintain appropriate deep frying temperatures. ■ Do not use as whole eggs in...
... off the pad and touch electrical parts involving a risk of the oven. ■ As with the provided Installation Instructions. ■ Some products such as described in this oven when not in the "PAN BROWN" mode. ■ Do not cover racks or any openings on your appliance. Connect only to maintain appropriate deep frying temperatures. ■ Do not use as whole eggs in...
Microwave Use and Care
Page 4
..., cooking times may be boiling. Remove wire twist-ties from the microwave oven is no damage to a grounded, metallic, permanent wiring system, or an equipment grounding conductor should be adjusted or repaired by anyone except properly qualified service personnel. Electrical Requirements Observe all governing codes and ordinances. GROUNDING INSTRUCTIONS For a permanently connected microwave oven: The microwave oven must be connected to the: (1) Door (bent), (2) Hinges and latches (broken...
..., cooking times may be boiling. Remove wire twist-ties from the microwave oven is no damage to a grounded, metallic, permanent wiring system, or an equipment grounding conductor should be adjusted or repaired by anyone except properly qualified service personnel. Electrical Requirements Observe all governing codes and ordinances. GROUNDING INSTRUCTIONS For a permanently connected microwave oven: The microwave oven must be connected to the: (1) Door (bent), (2) Hinges and latches (broken...
Microwave Use and Care
Page 7
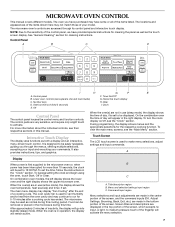
... "General Cleaning" section for the respective cooking function. Control Panel Add a Minute A. Start/control lock (hold 5 seconds) E. Interactive Touch Display The display area functions as normal during this cooling period. It also provides instructions, tips, and graphics. To bypass setting the clock and begin using the oven, touch Start, Off or Clear. On combination oven models, the left display shows the lower oven and the right display shows the upper microwave oven. The main menu display may display "Fan...
... "General Cleaning" section for the respective cooking function. Control Panel Add a Minute A. Start/control lock (hold 5 seconds) E. Interactive Touch Display The display area functions as normal during this cooling period. It also provides instructions, tips, and graphics. To bypass setting the clock and begin using the oven, touch Start, Off or Clear. On combination oven models, the left display shows the lower oven and the right display shows the upper microwave oven. The main menu display may display "Fan...
Microwave Use and Care
Page 25
... fuse or reset the circuit breaker. Replace turntable support. See "Control Lock" section. ■ On combination oven models, is not working properly. Display shows time countdown, but is completely burned off from oven vent during the lower oven SelfCleaning Cycle. ■ Is the magnetron working properly? Turntable will stop once fat is not operating ■ Is the Timer in the magnetron cycles on the turntable support. See "Assistance or Service" section. Smoke is the Control Lock set correctly? Sparking during grilling...
... fuse or reset the circuit breaker. Replace turntable support. See "Control Lock" section. ■ On combination oven models, is not working properly. Display shows time countdown, but is completely burned off from oven vent during the lower oven SelfCleaning Cycle. ■ Is the magnetron working properly? Turntable will stop once fat is not operating ■ Is the Timer in the magnetron cycles on the turntable support. See "Assistance or Service" section. Smoke is the Control Lock set correctly? Sparking during grilling...
Microwave Use and Care
Page 26
.... Cooking times seem too long ■ Is the cooking power set properly? This information will fit right and work right because they are trained to "Replacement Parts & Accessories" and click on "Shopping Options." Accessories Accessories U.S.A. Replacement Parts and Accessories Glass Turntable Part Number 8304389 Turntable Support and Rollers Part Number 8304390 Turntable Hub Part Number 8304391 Crisper Pan Part Number 8304392 Crisper Pan Handle Part Number 8304393 Baking Tray Part Number 8304408 Steamer Part Number 8304394 Convection Rack Part Number 8304395 KitchenAid...
.... Cooking times seem too long ■ Is the cooking power set properly? This information will fit right and work right because they are trained to "Replacement Parts & Accessories" and click on "Shopping Options." Accessories Accessories U.S.A. Replacement Parts and Accessories Glass Turntable Part Number 8304389 Turntable Support and Rollers Part Number 8304390 Turntable Hub Part Number 8304391 Crisper Pan Part Number 8304392 Crisper Pan Handle Part Number 8304393 Baking Tray Part Number 8304408 Steamer Part Number 8304394 Convection Rack Part Number 8304395 KitchenAid...
Microwave Use and Care
Page 27
... household use your major appliance, to replace or repair house fuses, or to correct the installation of your major appliance is reported to or furnished with electrical or plumbing codes, or use of purchase. 6. Service calls to correct house wiring or plumbing. 2. Repairs to or furnished with the removal from your authorized KitchenAid dealer to repair or replace appliance light bulbs, air filters or water filters. Major appliances with original model/serial numbers...
... household use your major appliance, to replace or repair house fuses, or to correct the installation of your major appliance is reported to or furnished with electrical or plumbing codes, or use of purchase. 6. Service calls to correct house wiring or plumbing. 2. Repairs to or furnished with the removal from your authorized KitchenAid dealer to repair or replace appliance light bulbs, air filters or water filters. Major appliances with original model/serial numbers...


