Use & Care Guide
Page 9
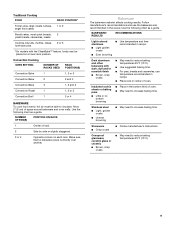
... baking pans ■ Little or no bakeware piece is directly over another. NUMBER OF PAN(S) POSITION ON RACK 1 Center of space around bakeware and oven walls. Convection Cooking OVEN SETTING NUMBER OF RACKS USED RACK POSITION(S) Convection Bake 1 1, 2 or 3 Convection Bake 2 2 and 4 Convection Bake 3 1, 3 and 5 ...Light colored aluminum ■ Light golden crusts ■ Even browning ■ Use temperature and time recommended in center of oven. ■ May need to increase baking time. Use the following chart as a guide. Dark aluminum and other bakeware with...
... baking pans ■ Little or no bakeware piece is directly over another. NUMBER OF PAN(S) POSITION ON RACK 1 Center of space around bakeware and oven walls. Convection Cooking OVEN SETTING NUMBER OF RACKS USED RACK POSITION(S) Convection Bake 1 1, 2 or 3 Convection Bake 2 2 and 4 Convection Bake 3 1, 3 and 5 ...Light colored aluminum ■ Light golden crusts ■ Even browning ■ Use temperature and time recommended in center of oven. ■ May need to increase baking time. Use the following chart as a guide. Dark aluminum and other bakeware with...
Use & Care Guide
Page 21
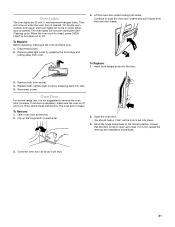
... all the way. 2. Ensure that the door is heavy. If it is off . They will come on when either door is set into wall. 5. On double oven models, both sides. Replace bulb, replace bulb cover by grasping the front edge and pulling away from socket. 4. You should hear a "click... are 12-volt, 5-watt maximum halogen bulbs. Remove glass light cover by snapping back into place. 3. Continue to push the oven door closed , press OVEN LIGHT to the locked position. To Replace: 1. Insert both hanger arms into the door. 3. Reconnect power. To Remove: 1. Flip up the ...
... all the way. 2. Ensure that the door is heavy. If it is off . They will come on when either door is set into wall. 5. On double oven models, both sides. Replace bulb, replace bulb cover by grasping the front edge and pulling away from socket. 4. You should hear a "click... are 12-volt, 5-watt maximum halogen bulbs. Remove glass light cover by snapping back into place. 3. Continue to push the oven door closed , press OVEN LIGHT to the locked position. To Replace: 1. Insert both hanger arms into the door. 3. Reconnect power. To Remove: 1. Flip up the ...
Installation Guide
Page 2
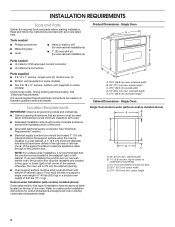
...instructions provided with cooktop installed above ) A B E D C A. 24" (61 cm) min. bottom vent (supplied on rear wall behind oven, the junction box must be solid, level and flush with oven. ■ Recessed installation area must provide complete enclosure around the recessed ...this type of installation have been drilled in a wall cabinet. overall height C. 23³⁄₄" (60.3 cm) overall width D. 23" (58.4 cm) max. Single Oven Single Oven Undercounter (without cooktop installed above ): Ovens approved for wall cabinet installations) Parts needed ■ UL listed ...
...instructions provided with cooktop installed above ) A B E D C A. 24" (61 cm) min. bottom vent (supplied on rear wall behind oven, the junction box must be solid, level and flush with oven. ■ Recessed installation area must provide complete enclosure around the recessed ...this type of installation have been drilled in a wall cabinet. overall height C. 23³⁄₄" (60.3 cm) overall width D. 23" (58.4 cm) max. Single Oven Single Oven Undercounter (without cooktop installed above ): Ovens approved for wall cabinet installations) Parts needed ■ UL listed ...


