Use & Care Guide
Page 1
www.kitchenaid.com or www.KitchenAid.ca Table of Contents...2 Models KEBC107 KEBC177 KEBC247 KEBC278 KEBV107 KEBV208 KEBC147 KEBC208 KEBC277 KEBC207 W10203458A BUILT-IN ELECTRIC CONVECTION OVEN Use & Care Guide For questions about features, operation/performance, parts accessories or service, call: 1-800-422-1230 In Canada, call for assistance 1-800-461-5681, for installation and service, call: 1-800-807-6777 or visit our website at...
www.kitchenaid.com or www.KitchenAid.ca Table of Contents...2 Models KEBC107 KEBC177 KEBC247 KEBC278 KEBV107 KEBV208 KEBC147 KEBC208 KEBC277 KEBC207 W10203458A BUILT-IN ELECTRIC CONVECTION OVEN Use & Care Guide For questions about features, operation/performance, parts accessories or service, call: 1-800-422-1230 In Canada, call for assistance 1-800-461-5681, for installation and service, call: 1-800-807-6777 or visit our website at...

Use & Care Guide
Page 2
.../Off and Cancel Off 6 Clock 6 Tones 7 Fahrenheit and Celsius 7 Timer 7 Control Lock 7 Oven Temperature Control 8 OVEN USE 8 Aluminum Foil 8 Positioning Racks and Bakeware 8 Bakeware 9 Oven Vent(s 10 Meat Thermometer 10 Sabbath Mode 10 Baking and Roasting 12 Maxi and Econo Broiling 12 Convection ... Full Meal 15 Easy Convect™ Conversion 16 Proofing Bread 17 Temperature Probe 17 Timed Cooking 18 OVEN CARE 19 Self-Cleaning Cycle 19 General Cleaning 20 Oven Lights 21 Oven Door 21 TROUBLESHOOTING 22 ASSISTANCE OR SERVICE 23 In the U.S.A 23 In Canada 23 WARRANTY...
.../Off and Cancel Off 6 Clock 6 Tones 7 Fahrenheit and Celsius 7 Timer 7 Control Lock 7 Oven Temperature Control 8 OVEN USE 8 Aluminum Foil 8 Positioning Racks and Bakeware 8 Bakeware 9 Oven Vent(s 10 Meat Thermometer 10 Sabbath Mode 10 Baking and Roasting 12 Maxi and Econo Broiling 12 Convection ... Full Meal 15 Easy Convect™ Conversion 16 Proofing Bread 17 Temperature Probe 17 Timed Cooking 18 OVEN CARE 19 Self-Cleaning Cycle 19 General Cleaning 20 Oven Lights 21 Oven Door 21 TROUBLESHOOTING 22 ASSISTANCE OR SERVICE 23 In the U.S.A 23 In Canada 23 WARRANTY...
Use & Care Guide
Page 3
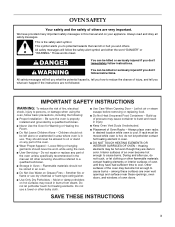
...to cool. Do not let potholder touch hot heating elements. Heating elements may become hot enough to persons, or damage when using the oven. ■ User Servicing - All safety messages will tell you what the potential hazard is in this manual and on your appliance..... ■ Do Not Heat Unopened Food Containers - During and after use . All other servicing should not be worn while using the oven, follow instructions. Smother fire or flame or use a towel or other flammable materials contact heating elements or interior surfaces of fire, electrical shock...
...to cool. Do not let potholder touch hot heating elements. Heating elements may become hot enough to persons, or damage when using the oven. ■ User Servicing - All safety messages will tell you what the potential hazard is in this manual and on your appliance..... ■ Do Not Heat Unopened Food Containers - During and after use . All other servicing should not be worn while using the oven, follow instructions. Smother fire or flame or use a towel or other flammable materials contact heating elements or interior surfaces of fire, electrical shock...

Use & Care Guide
Page 4
...; Clean Only Parts Listed in or around any kind should be used in Manual. ■ Before Self-Cleaning the Oven - No commercial oven cleaner or oven liner protective coating of any part of potential exposure to the State of the substances listed, including benzene, formaldehyde, carbon monoxide, and toluene. 4 .... This appliance can cause low-level exposure to some of California to rub, damage, or move the gasket. ■ Do Not Use Oven Cleaners - Care should be taken not to cause cancer, birth defects, or other utensils. IMPORTANT SAFETY INSTRUCTIONS For self-cleaning...
...; Clean Only Parts Listed in or around any kind should be used in Manual. ■ Before Self-Cleaning the Oven - No commercial oven cleaner or oven liner protective coating of any part of potential exposure to the State of the substances listed, including benzene, formaldehyde, carbon monoxide, and toluene. 4 .... This appliance can cause low-level exposure to some of California to rub, damage, or move the gasket. ■ Do Not Use Oven Cleaners - Care should be taken not to cause cancer, birth defects, or other utensils. IMPORTANT SAFETY INSTRUCTIONS For self-cleaning...

Use & Care Guide
Page 5
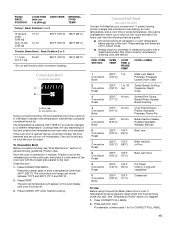
... mounting rail) Parts and Features not shown Oven light Third oven rack Broiler pan and grid Roasting rack Temperature probe 5 Electronic oven control F. Oven lock latch H. Gasket K. Model and serial number plate (on double oven models) E. Broil elements (not shown) C. Automatic oven light switch G. Temperature probe jack (upper and single ovens only) J. T.H.E.™ (Third Hidden Element) convection element...
... mounting rail) Parts and Features not shown Oven light Third oven rack Broiler pan and grid Roasting rack Temperature probe 5 Electronic oven control F. Oven lock latch H. Gasket K. Model and serial number plate (on double oven models) E. Broil elements (not shown) C. Automatic oven light switch G. Temperature probe jack (upper and single ovens only) J. T.H.E.™ (Third Hidden Element) convection element...
Use & Care Guide
Page 6
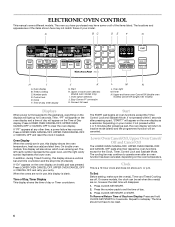
... day will appear on the oven display and a time of your entry. ELECTRONIC OVEN CONTROL This manual covers different models. Oven option selectors J. Then, "PF" will appear on the oven display as a reminder. Timed cooking C. The locations and appearances of day. 3. Upper and lower oven Cancel/Off (double oven models) Cancel Off (single oven models) Displays When power...
... day will appear on the oven display and a time of your entry. ELECTRONIC OVEN CONTROL This manual covers different models. Oven option selectors J. Then, "PF" will appear on the oven display as a reminder. Timed cooking C. The locations and appearances of day. 3. Upper and lower oven Cancel/Off (double oven models) Cancel Off (single oven models) Displays When power...

Use & Care Guide
Page 7
... each minute after a power failure, if set the length of time. 3. All Tones (double oven models) All of time (between MIN/SEC and HR/MIN. Pad Press Tones (single oven models) The single tones signaling a valid pad press are preset on , but can be locked. Reminder Tones Only The...clear. Repeat to inactive mode (blank). To Change: Press and hold BROIL/MAXI//ECONO for 5 seconds. When in Fahrenheit, "°F" follows the oven temperature. Press TIMER SET/START. To Turn Off/On: Press and hold the number pad 3 CONTROL LOCK for about 5 seconds until "CONTROL LOCK"...
... each minute after a power failure, if set the length of time. 3. All Tones (double oven models) All of time (between MIN/SEC and HR/MIN. Pad Press Tones (single oven models) The single tones signaling a valid pad press are preset on , but can be locked. Reminder Tones Only The...clear. Repeat to inactive mode (blank). To Change: Press and hold BROIL/MAXI//ECONO for 5 seconds. When in Fahrenheit, "°F" follows the oven temperature. Press TIMER SET/START. To Turn Off/On: Press and hold the number pad 3 CONTROL LOCK for about 5 seconds until "CONTROL LOCK"...

Use & Care Guide
Page 8
...the first few times, or when it is at the edges. Make sure foil is turned up at least 1" (2.5 cm) larger than your previous oven, so the temperature calibration can be warmer by the displayed amount. however, they may cook faster or slower than the dish and that it is... -20°F (-9° to -12°C) ...moderately less -25° to -35°F (-15° to the porcelain finish. On double ovens only, press UPPER OVEN or LOWER OVEN to decrease the temperature in death to another closed and well ventilated room. To move birds to certain birds. Press BAKE to increase...
...the first few times, or when it is at the edges. Make sure foil is turned up at least 1" (2.5 cm) larger than your previous oven, so the temperature calibration can be warmer by the displayed amount. however, they may cook faster or slower than the dish and that it is... -20°F (-9° to -12°C) ...moderately less -25° to -35°F (-15° to the porcelain finish. On double ovens only, press UPPER OVEN or LOWER OVEN to decrease the temperature in death to another closed and well ventilated room. To move birds to certain birds. Press BAKE to increase...
Use & Care Guide
Page 9
...(15°C). ■ Use suggested baking time. ■ For pies, breads and casseroles, use the bakeware size recommended in center of oven. Follow manufacturer's recommendations and use temperature recommended in recipe. ■ Place rack in the recipe. Stoneware ■ Crisp crusts ■...instructions. Make sure that no bottom browning ■ Place in recipe. NUMBER OF PAN(S) POSITION ON RACK 1 Center of space around bakeware and oven walls. Allow 2" (5 cm) of rack. 2 Side by side or slightly staggered. 3 or 4 Opposite corners on a lower rack position. Dark...
...(15°C). ■ Use suggested baking time. ■ For pies, breads and casseroles, use the bakeware size recommended in center of oven. Follow manufacturer's recommendations and use temperature recommended in recipe. ■ Place rack in the recipe. Stoneware ■ Crisp crusts ■...instructions. Make sure that no bottom browning ■ Place in recipe. NUMBER OF PAN(S) POSITION ON RACK 1 Center of space around bakeware and oven walls. Allow 2" (5 cm) of rack. 2 Side by side or slightly staggered. 3 or 4 Opposite corners on a lower rack position. Dark...
Use & Care Guide
Page 10
... display. 5. On single ovens, open the oven door. 2. "SAb On" will appear on the oven display throughout the Sabbath Mode. On double oven models, the following steps will not turn on in a bake setting until re-enabled. Oven Vent(s) Single and Double Oven Models A A. Lower oven The oven vent(s) should not ... the Sabbath Mode in this order. 4. When disabled the Sabbath Mode cannot be set the Sabbath Mode. On single ovens, open the oven door. 2. Oven vent C. If the temperature drops, cook the meat or poultry longer. ■ Check all meat in this appliance....
... display. 5. On single ovens, open the oven door. 2. "SAb On" will appear on the oven display throughout the Sabbath Mode. On double oven models, the following steps will not turn on in a bake setting until re-enabled. Oven Vent(s) Single and Double Oven Models A A. Lower oven The oven vent(s) should not ... the Sabbath Mode in this order. 4. When disabled the Sabbath Mode cannot be set the Sabbath Mode. On single ovens, open the oven door. 2. Oven vent C. If the temperature drops, cook the meat or poultry longer. ■ Check all meat in this appliance....

Use & Care Guide
Page 11
...176;C). Number pads 1 through 5. 7. On double ovens only, press UPPER OVEN or LOWER OVEN. On double ovens only, if setting the second oven, repeat steps 1 through 0 represent temperatures. Press and hold the number pad 6 for the oven to 24 seconds, after cooking. No tones will sound and ... pressed for a random time, anywhere from the oven display. On double ovens only, press UPPER OVEN or LOWER OVEN for at least 1 second. On double ovens, only the upper oven times will not change temperature. Each oven can be independently set between 170°F and 500...
...176;C). Number pads 1 through 5. 7. On double ovens only, press UPPER OVEN or LOWER OVEN. On double ovens only, if setting the second oven, repeat steps 1 through 0 represent temperatures. Press and hold the number pad 6 for the oven to 24 seconds, after cooking. No tones will sound and ... pressed for a random time, anywhere from the oven display. On double ovens only, press UPPER OVEN or LOWER OVEN for at least 1 second. On double ovens, only the upper oven times will not change temperature. Each oven can be independently set between 170°F and 500...
Use & Care Guide
Page 12
... back on once the door is designed to preheat before turning or removing food. On double ovens only, press UPPER OVEN or LOWER OVEN. On double ovens only, press UPPER OVEN or LOWER OVEN. If the oven door is closed . ■ Use only the broiler pan and grid provided with foil. ...with the appliance. It is closed . To Broil: Before broiling, position rack according to cook food. Press CANCEL OFF, UPPER OVEN CANCEL/OFF or LOWER OVEN CANCEL/OFF when finished cooking. 12 Press the number pads to reduce spattering. The bake range can be turned. ■ After...
... back on once the door is designed to preheat before turning or removing food. On double ovens only, press UPPER OVEN or LOWER OVEN. On double ovens only, press UPPER OVEN or LOWER OVEN. If the oven door is closed . ■ Use only the broiler pan and grid provided with foil. ...with the appliance. It is closed . To Broil: Before broiling, position rack according to cook food. Press CANCEL OFF, UPPER OVEN CANCEL/OFF or LOWER OVEN CANCEL/OFF when finished cooking. 12 Press the number pads to reduce spattering. The bake range can be turned. ■ After...
Use & Care Guide
Page 13
...sheets without sides and roasting pans with lower sides to allow a more even flow of hot air maintains a consistent temperature throughout the oven, cooking foods more from the broil elements, rack position 4 is opened during convection baking or preheating, the broil and T.H.E.™...so that require similar temperatures. After preheat, the T.H.E.™ convection element and the CleanBake™ element will show the oven temperature increasing in the oven with an alternative method such as 30 percent, especially for doneness a few minutes before the minimum cooking time with at...
...sheets without sides and roasting pans with lower sides to allow a more even flow of hot air maintains a consistent temperature throughout the oven, cooking foods more from the broil elements, rack position 4 is opened during convection baking or preheating, the broil and T.H.E.™...so that require similar temperatures. After preheat, the T.H.E.™ convection element and the CleanBake™ element will show the oven temperature increasing in the oven with an alternative method such as 30 percent, especially for doneness a few minutes before the minimum cooking time with at...

Use & Care Guide
Page 14
Use the roasting rack on the oven display if the actual oven temperature is not necessary to wait for baking yeast breads and loaf cakes using a single rack. Press the number pads to circulate completely around all surfaces. "Lo°" will appear on top of the ... off in intervals to the "Positioning Racks and Bakeware" section. During convection roasting, the CleanBake™ and broil elements will show the oven temperature increasing in the recipe. Broiler grid C. CONVECTION ROASTING CHART FOOD/ RACK POSITION COOK TIME (min. To Convection Roast: Before convection roasting...
Use the roasting rack on the oven display if the actual oven temperature is not necessary to wait for baking yeast breads and loaf cakes using a single rack. Press the number pads to circulate completely around all surfaces. "Lo°" will appear on top of the ... off in intervals to the "Positioning Racks and Bakeware" section. During convection roasting, the CleanBake™ and broil elements will show the oven temperature increasing in the recipe. Broiler grid C. CONVECTION ROASTING CHART FOOD/ RACK POSITION COOK TIME (min. To Convection Roast: Before convection roasting...
Use & Care Guide
Page 15
...a different temperature. Close the door. 1. The convection broil range can be at refrigerator or room temperature before placing in oven. Press START. A single pad includes an oven setting, an oven temperature, and a cook time or probe temperature. Use the following chart as a guide. ■ All food should ... and fan will appear on the rack position and temperature and may need to the door. They will vary depending on the oven display until oven is required, insert probe into food and plug probe into jack. Position rack. Position food on the unheated grid on some models...
...a different temperature. Close the door. 1. The convection broil range can be at refrigerator or room temperature before placing in oven. Press START. A single pad includes an oven setting, an oven temperature, and a cook time or probe temperature. Use the following chart as a guide. ■ All food should ... and fan will appear on the rack position and temperature and may need to the door. They will vary depending on the oven display until oven is required, insert probe into food and plug probe into jack. Position rack. Position food on the unheated grid on some models...

Use & Care Guide
Page 16
... after cooking. Press BAKED GOODS, MEATS or OTHER FOODS. 3. Press STOP TIME. 6. When the cycle ends, "End" will flash indicating which oven was chosen. Choose vegetables and fruits last. The cavity symbol will appear in hours and minutes or Press 0 to 15 minutes are not included because... tones will sound, then reminder tones will prompt a food check at the end of standard cooking. Easy Convect™ Conversion (single, upper and, on some models, lower oven) Convection temperatures and times differ from plus or minus 25°F to 50°F (14°C to taste. Use the ...
... after cooking. Press BAKED GOODS, MEATS or OTHER FOODS. 3. Press STOP TIME. 6. When the cycle ends, "End" will flash indicating which oven was chosen. Choose vegetables and fruits last. The cavity symbol will appear in hours and minutes or Press 0 to 15 minutes are not included because... tones will sound, then reminder tones will prompt a food check at the end of standard cooking. Easy Convect™ Conversion (single, upper and, on some models, lower oven) Convection temperatures and times differ from plus or minus 25°F to 50°F (14°C to taste. Use the ...

Use & Care Guide
Page 17
...temperature increasing in determining the doneness of the food when it is the lower oven. 2. Always unplug and remove the temperature probe from fat or bone. To Change Probe Temperature, Oven Setting: 1. Proofing Bread (single, upper and, on dough type and quantity. The probe temperature is the...end-of the food reaches 130°F (54°C). Temperature Probe (single and upper ovens only) WARNING Burn Hazard Use an oven mitt to clear the display and/or stop reminder tones. Proofing twice is reached, the oven will shut off automatically and "End" will sound every minute. 5. ...
...temperature increasing in determining the doneness of the food when it is the lower oven. 2. Always unplug and remove the temperature probe from fat or bone. To Change Probe Temperature, Oven Setting: 1. Proofing Bread (single, upper and, on dough type and quantity. The probe temperature is the...end-of the food reaches 130°F (54°C). Temperature Probe (single and upper ovens only) WARNING Burn Hazard Use an oven mitt to clear the display and/or stop reminder tones. Proofing twice is reached, the oven will shut off automatically and "End" will sound every minute. 5. ...

Use & Care Guide
Page 18
...enter a temperature other than the one hour before or after cooking. For the probe to work properly when using the lower oven, make sure the clock is reached, the oven will shut off automatically and "End" will sound every minute. 6. Press the number pads to enter a temperature other ...a set to the correct time of time to enter the length of day. See "Clock" section. 1. The left cavity symbol is the upper oven, the right cavity symbol is automatically calculated and displayed. Press BAKE, CONVECTION BAKE or CONVECTION ROAST. Press number pads to cook. 5. When the start...
...enter a temperature other than the one hour before or after cooking. For the probe to work properly when using the lower oven, make sure the clock is reached, the oven will shut off automatically and "End" will sound every minute. 6. Press the number pads to enter a temperature other ...a set to the correct time of time to enter the length of day. See "Clock" section. 1. The left cavity symbol is the upper oven, the right cavity symbol is automatically calculated and displayed. Press BAKE, CONVECTION BAKE or CONVECTION ROAST. Press number pads to cook. 5. When the start...

Use & Care Guide
Page 19
... than 3 hours 30 minutes. The door will not affect cooking performance. See "Clock" section. On double ovens only, press UPPER OVEN or LOWER OVEN. The cavity symbol will flash indicating which oven was chosen. At high temperatures, foods react with a damp cloth. Keep the kitchen well-ventilated during the ...the inner door glass before it will not lock and the cycle will appear on door frame. Depending on some birds is the lower oven. 2. How the Cycle Works IMPORTANT: The heating and cooling of porcelain on . Suggested clean times are 2 hours 30 minutes for average...
... than 3 hours 30 minutes. The door will not affect cooking performance. See "Clock" section. On double ovens only, press UPPER OVEN or LOWER OVEN. The cavity symbol will flash indicating which oven was chosen. At high temperatures, foods react with a damp cloth. Keep the kitchen well-ventilated during the ...the inner door glass before it will not lock and the cycle will appear on door frame. Depending on some birds is the lower oven. 2. How the Cycle Works IMPORTANT: The heating and cooling of porcelain on . Suggested clean times are 2 hours 30 minutes for average...
Use & Care Guide
Page 20
...filled scouring pads, abrasive cleaners, Cooktop Polishing Creme, steel-wool pads, gritty washcloths or some paper towels. Food spills should be cleaned when oven cools. If this happens, a light coating of vegetable oil applied to the rack guides will also appear on panel. Porcelain enamel only, not... to 1 gal. (3.75 L) water: Soak for 20 minutes, then scrub with soft, lint-free cloth. ■ Vinegar for hard water spots OVEN DOOR EXTERIOR ■ Glass cleaner and paper towels or nonabrasive plastic scrubbing pad: Apply glass cleaner to stop time will help them slide. ■ Steel...
...filled scouring pads, abrasive cleaners, Cooktop Polishing Creme, steel-wool pads, gritty washcloths or some paper towels. Food spills should be cleaned when oven cools. If this happens, a light coating of vegetable oil applied to the rack guides will also appear on panel. Porcelain enamel only, not... to 1 gal. (3.75 L) water: Soak for 20 minutes, then scrub with soft, lint-free cloth. ■ Vinegar for hard water spots OVEN DOOR EXTERIOR ■ Glass cleaner and paper towels or nonabrasive plastic scrubbing pad: Apply glass cleaner to stop time will help them slide. ■ Steel...


