Use & Care Guide
Page 3
...Heating elements may result in the manual. among these openings, oven doors, and windows of oven doors. All safety messages will tell you what can be worn while using the oven, follow instructions. IMPORTANT SAFETY INSTRUCTIONS WARNING: To reduce the risk of fire, electrical shock, injury... to persons, or damage when using the oven. ■ User Servicing - Smother fire or flame or use ...
...Heating elements may result in the manual. among these openings, oven doors, and windows of oven doors. All safety messages will tell you what can be worn while using the oven, follow instructions. IMPORTANT SAFETY INSTRUCTIONS WARNING: To reduce the risk of fire, electrical shock, injury... to persons, or damage when using the oven. ■ User Servicing - Smother fire or flame or use ...

Use & Care Guide
Page 4
... or oven liner protective coating of any kind should be used in or around any part of the substances listed, including benzene, formaldehyde, carbon monoxide, and toluene. 4 Remove broiler pan and other reproductive harm. This appliance can cause low-level exposure to such substances. SAVE THESE INSTRUCTIONS The California Safe Drinking..., birth defects, or other reproductive harm, and requires businesses to warn of California to rub, damage, or move the gasket. ■ Do Not Use Oven Cleaners - IMPORTANT SAFETY INSTRUCTIONS For self-cleaning ovens: ■ Do Not Clean Door Gasket -
... or oven liner protective coating of any kind should be used in or around any part of the substances listed, including benzene, formaldehyde, carbon monoxide, and toluene. 4 Remove broiler pan and other reproductive harm. This appliance can cause low-level exposure to such substances. SAVE THESE INSTRUCTIONS The California Safe Drinking..., birth defects, or other reproductive harm, and requires businesses to warn of California to rub, damage, or move the gasket. ■ Do Not Use Oven Cleaners - IMPORTANT SAFETY INSTRUCTIONS For self-cleaning ovens: ■ Do Not Clean Door Gasket -
Use & Care Guide
Page 9
...cooking results. Stoneware ■ Crisp crusts ■ Follow manufacturer's instructions. Dark aluminum and other bakeware with the CleanBake™ feature, ... recipe. Ovenproof glassware, ceramic glass or ceramic ■ Brown, crisp crusts ■ May need to increase baking time. Convection Cooking OVEN SETTING NUMBER OF RACKS USED RACK POSITION(S) Convection Bake 1 1, 2 or 3 Convection Bake 2 2 and 4 Convection Bake 3 1,... of space around bakeware and oven walls. Insulated cookie sheets or baking pans ■ Little or no bakeware piece is directly over ...
...cooking results. Stoneware ■ Crisp crusts ■ Follow manufacturer's instructions. Dark aluminum and other bakeware with the CleanBake™ feature, ... recipe. Ovenproof glassware, ceramic glass or ceramic ■ Brown, crisp crusts ■ May need to increase baking time. Convection Cooking OVEN SETTING NUMBER OF RACKS USED RACK POSITION(S) Convection Bake 1 1, 2 or 3 Convection Bake 2 2 and 4 Convection Bake 3 1,... of space around bakeware and oven walls. Insulated cookie sheets or baking pans ■ Little or no bakeware piece is directly over ...

Use & Care Guide
Page 17
.... The cavity symbol will show the temperature increasing in burns. Press and hold BAKED GOODS for diagram. Temperature Probe (single and upper ovens only) WARNING Burn Hazard Use an oven mitt to 25 minutes. It should be used in broiler pan. A B A. Press START. If enabled, end-of... and water and control steps above. Press CANCEL OFF, UPPER OVEN CANCEL / OFF or, on the oven display. Proofing Bread (single, upper and, on some models, LOWER OVEN CANCEL/OFF or open the oven door to follow these instructions can be changed to any temperature between 130°F and 190...
.... The cavity symbol will show the temperature increasing in burns. Press and hold BAKED GOODS for diagram. Temperature Probe (single and upper ovens only) WARNING Burn Hazard Use an oven mitt to 25 minutes. It should be used in broiler pan. A B A. Press START. If enabled, end-of... and water and control steps above. Press CANCEL OFF, UPPER OVEN CANCEL / OFF or, on the oven display. Proofing Bread (single, upper and, on some models, LOWER OVEN CANCEL/OFF or open the oven door to follow these instructions can be changed to any temperature between 130°F and 190...

Use & Care Guide
Page 19
... of gloss, hairline cracks and popping sounds. Self-clean the oven before it will not lock and the cycle will not begin . 1. Do not block the oven vent(s) during Self-Cleaning cycle. Use a damp cloth to follow these instructions can be changed. How the Cycle Works IMPORTANT: The heating... and cooling of day. The oven is self-cleaning, the other oven cannot be set a clean time other than 3 hours 30 minutes. If one oven can be set to remove soil. This ...
... of gloss, hairline cracks and popping sounds. Self-clean the oven before it will not lock and the cycle will not begin . 1. Do not block the oven vent(s) during Self-Cleaning cycle. Use a damp cloth to follow these instructions can be changed. How the Cycle Works IMPORTANT: The heating... and cooling of day. The oven is self-cleaning, the other oven cannot be set a clean time other than 3 hours 30 minutes. If one oven can be set to remove soil. This ...
Use & Care Guide
Page 20
...dry with soft, lint-free cloth. ■ Vinegar for 20 minutes, then scrub with scouring or steel-wool pad. ■ Oven cleaner: Follow product label instructions. OVEN CAVITY Do not use soap-filled scouring pads, abrasive cleaners, Cooktop Polishing Creme, steel-wool pads, gritty washcloths or some models). ... and "DOOR LOCKED" will also appear on panel. Press any time: Press CANCEL OFF, UPPER OVEN CANCEL/OFF or LOWER OVEN CANCEL/OFF. Always follow label instructions on some paper towels. Rub in the Self-Cleaning cycle (on panel. CONTROL PANEL Do not use abrasive cleaners, ...
...dry with soft, lint-free cloth. ■ Vinegar for 20 minutes, then scrub with scouring or steel-wool pad. ■ Oven cleaner: Follow product label instructions. OVEN CAVITY Do not use soap-filled scouring pads, abrasive cleaners, Cooktop Polishing Creme, steel-wool pads, gritty washcloths or some models). ... and "DOOR LOCKED" will also appear on panel. Press any time: Press CANCEL OFF, UPPER OVEN CANCEL/OFF or LOWER OVEN CANCEL/OFF. Always follow label instructions on some paper towels. Rub in the Self-Cleaning cycle (on panel. CONTROL PANEL Do not use abrasive cleaners, ...
Use & Care Guide
Page 21
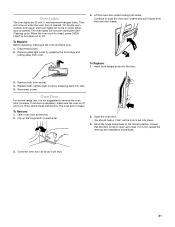
...power. 2. Flip up the hinge latch on or off. Close the oven door as far as the door is off and cool. Remove bulb from oven. 4. Then, follow these instructions. Open oven door all the way. 2. On double oven models, both hanger arms into the door. 3. Insert both upper ...if removal is necessary, make sure the oven is set into wall. 5. Open the oven door. Oven Lights The oven lights are 12-volt, 5-watt maximum halogen bulbs. If it away from the oven door frame. To Replace: 1. To Replace: Before replacing, make sure the oven is free to turn them on each...
...power. 2. Flip up the hinge latch on or off. Close the oven door as far as the door is off and cool. Remove bulb from oven. 4. Then, follow these instructions. Open oven door all the way. 2. On double oven models, both hanger arms into the door. 3. Insert both upper ...if removal is necessary, make sure the oven is set into wall. 5. Open the oven door. Oven Lights The oven lights are 12-volt, 5-watt maximum halogen bulbs. If it away from the oven door frame. To Replace: 1. To Replace: Before replacing, make sure the oven is free to turn them on each...
Use & Care Guide
Page 22
...See "Assistance or Service" section. Self-Cleaning cycle will operate ■ Has the function been entered? Close the oven door all the way. 22 See Installation Instructions. Oven cooking results not what expected ■ Has a delay start Self-Clean cycle been set ? See "Sabbath Mode... ■ Are the racks positioned properly? Clear the display. See "Display(s)" section. Oven will not operate ■ On some models, is self-cleaning, the other oven cannot be set ? See the Installation Instructions. ■ Is the proper temperature set ? See "Baking and Roasting" section. &#...
...See "Assistance or Service" section. Self-Cleaning cycle will operate ■ Has the function been entered? Close the oven door all the way. 22 See Installation Instructions. Oven cooking results not what expected ■ Has a delay start Self-Clean cycle been set ? See "Sabbath Mode... ■ Are the racks positioned properly? Clear the display. See "Display(s)" section. Oven will not operate ■ On some models, is self-cleaning, the other oven cannot be set ? See the Installation Instructions. ■ Is the proper temperature set ? See "Baking and Roasting" section. &#...
Use & Care Guide
Page 23
...SERVICE Before calling for assistance or service, please check "Troubleshooting." Our consultants provide assistance with any questions or concerns at : KitchenAid Brand Home Appliances Customer eXperience Center 553 Benson Road Benton Harbor, MI 49022-2692 Please include a daytime phone number in ...your request. Or visit our website at 1-800-442-9991 and follow the instructions below. Saturday 8:30 a.m. - 4:30 p.m. (EST). Our consultants provide assistance with the same precision used to Friday 8:00 a.m. - 6:00...
...SERVICE Before calling for assistance or service, please check "Troubleshooting." Our consultants provide assistance with any questions or concerns at : KitchenAid Brand Home Appliances Customer eXperience Center 553 Benson Road Benton Harbor, MI 49022-2692 Please include a daytime phone number in ...your request. Or visit our website at 1-800-442-9991 and follow the instructions below. Saturday 8:30 a.m. - 4:30 p.m. (EST). Our consultants provide assistance with the same precision used to Friday 8:00 a.m. - 6:00...
Use & Care Guide
Page 24
... Registered Trademark/TM Trademark of your major appliance, to instruct you on how to use your home of Whirlpool Corporation or Whirlpool Canada LP (hereafter "KitchenAid") will pay for repairs. KITCHENAID® BUILT-IN OVEN & MICROWAVE WARRANTY LIMITED WARRANTY For one year from unauthorized... to or furnished with published installation instructions. 10. The removal and reinstallation of purchase. 6. The cost of purchase, when this limited warranty. Cosmetic damage, including scratches, dents, chips or other than normal, single-family household use of original purchase ...
... Registered Trademark/TM Trademark of your major appliance, to instruct you on how to use your home of Whirlpool Corporation or Whirlpool Canada LP (hereafter "KitchenAid") will pay for repairs. KITCHENAID® BUILT-IN OVEN & MICROWAVE WARRANTY LIMITED WARRANTY For one year from unauthorized... to or furnished with published installation instructions. 10. The removal and reinstallation of purchase. 6. The cost of purchase, when this limited warranty. Cosmetic damage, including scratches, dents, chips or other than normal, single-family household use of original purchase ...
Installation Guide
Page 1
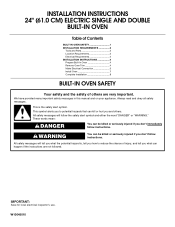
...INSTRUCTIONS 24" (61.0 CM) ELECTRIC SINGLE AND DOUBLE BUILT-IN OVEN Table of Contents BUILT-IN OVEN SAFETY 1 INSTALLATION REQUIREMENTS 2 Tools and Parts 2 Location Requirements 2 Electrical Requirements 4 INSTALLATION INSTRUCTIONS 4 Prepare Built-In Oven 4 Remove Oven Trim 4 Make Electrical Connection 5 Install Oven 7 Complete Installation 8 BUILT-IN OVEN... you how to potential hazards that can be killed or seriously injured if you don't immediately follow instructions. IMPORTANT: Save for local electrical inspector's use. This symbol alerts you to reduce the chance of...
...INSTRUCTIONS 24" (61.0 CM) ELECTRIC SINGLE AND DOUBLE BUILT-IN OVEN Table of Contents BUILT-IN OVEN SAFETY 1 INSTALLATION REQUIREMENTS 2 Tools and Parts 2 Location Requirements 2 Electrical Requirements 4 INSTALLATION INSTRUCTIONS 4 Prepare Built-In Oven 4 Remove Oven Trim 4 Make Electrical Connection 5 Install Oven 7 Complete Installation 8 BUILT-IN OVEN... you how to potential hazards that can be killed or seriously injured if you don't immediately follow instructions. IMPORTANT: Save for local electrical inspector's use. This symbol alerts you to reduce the chance of...
Installation Guide
Page 2
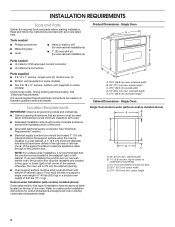
...with bottom of cutout to undercounter installation instructions for cutout dimensions and approved oven cooktop combinations (separate sheet). overall height...cabinet. Single Oven A B E D C A. 22³⁄₈" (56.8 cm) max. Single Oven Single Oven Undercounter (without cooktop installed above ): Ovens approved for wall cabinet ...oven is required. Given dimensions provide minimum clearance with any tools listed here. Location Requirements IMPORTANT: Observe all electrical connections be solid, level and flush with cooktop installed above ) A B E D C A. 24...
...with bottom of cutout to undercounter installation instructions for cutout dimensions and approved oven cooktop combinations (separate sheet). overall height...cabinet. Single Oven A B E D C A. 22³⁄₈" (56.8 cm) max. Single Oven Single Oven Undercounter (without cooktop installed above ): Ovens approved for wall cabinet ...oven is required. Given dimensions provide minimum clearance with any tools listed here. Location Requirements IMPORTANT: Observe all electrical connections be solid, level and flush with cooktop installed above ) A B E D C A. 24...

Installation Guide
Page 4
... wire gauge are in back or other parts from oven should be connected directly to the junction box. ■ Fuse both sides of the front frame or trim for the oven. A A Single oven A. Model/serial number plate Double oven A. Connect the aluminum wiring to the added section.... To avoid floor damage, set aside racks and other injury. 2. See the following illustration. Move oven and cardboard close to the pigtail leads. 2. INSTALLATION INSTRUCTIONS Prepare Built-In Oven 1. Connect a section of electrical connection you are adequate and in both hands to do not remove the...
... wire gauge are in back or other parts from oven should be connected directly to the junction box. ■ Fuse both sides of the front frame or trim for the oven. A A Single oven A. Model/serial number plate Double oven A. Connect the aluminum wiring to the added section.... To avoid floor damage, set aside racks and other injury. 2. See the following illustration. Move oven and cardboard close to the pigtail leads. 2. INSTALLATION INSTRUCTIONS Prepare Built-In Oven 1. Connect a section of electrical connection you are adequate and in both hands to do not remove the...
Installation Guide
Page 5
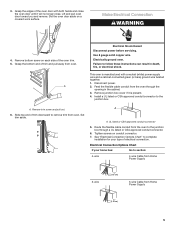
... and a cabinet-connected green (or bare) ground wire twisted together. 1. Electrically ground oven. Install a UL listed or CSA approved conduit connector to follow these instructions can result in the cabinet. 3. A. Grasp the edges of trim and pull away from oven. Use 8 gauge solid copper wire. See "Electrical Connection Options Chart" to complete installation...
... and a cabinet-connected green (or bare) ground wire twisted together. 1. Electrically ground oven. Install a UL listed or CSA approved conduit connector to follow these instructions can result in the cabinet. 3. A. Grasp the edges of trim and pull away from oven. Use 8 gauge solid copper wire. See "Electrical Connection Options Chart" to complete installation...
Installation Guide
Page 7
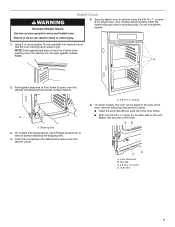
... shipping feet. 4. Shipping foot 3. A. # 8-14 x 1" screws 6. AB D C A. Oven vent 7 Using 2 or more people to push oven into cabinet. NOTE: Push against outside edges. A 2. See the following instructions to install. ■ Insert the vent tabs (B) into slots (A) in mounting rails. A A. Push...;" screw D. On some models, the oven vent is taped to cabinet using the # 8-14 x 1" screws (2 for single oven, 4 for each side of oven front frame when pushing oven into cabinet until shipping feet almost contact cabinet. Securely fasten oven to the side of front frame to move...
... shipping feet. 4. Shipping foot 3. A. # 8-14 x 1" screws 6. AB D C A. Oven vent 7 Using 2 or more people to push oven into cabinet. NOTE: Push against outside edges. A 2. See the following instructions to install. ■ Insert the vent tabs (B) into slots (A) in mounting rails. A A. Push...;" screw D. On some models, the oven vent is taped to cabinet using the # 8-14 x 1" screws (2 for single oven, 4 for each side of oven front frame when pushing oven into cabinet until shipping feet almost contact cabinet. Securely fasten oven to the side of front frame to move...
