
Use & Care Guide
Page 2
...7 Control Lock 7 Oven Temperature Control 8 OVEN USE 8 Aluminum Foil 8 Positioning Racks and Bakeware 8 Bakeware 9 Oven Vent(s 10 Meat Thermometer... 10 Sabbath Mode 10 Baking and Roasting 12 Maxi and Econo Broiling 12 Convection Cooking 13 Convection Bake 13 Convection Roast 14 Convection Broil 15 Convect Full Meal 15 Easy Convect™ Conversion 16 Proofing Bread 17 Temperature Probe 17 Timed Cooking 18 OVEN... CARE 19 Self-Cleaning Cycle 19 General Cleaning 20 Oven Lights 21 Oven Door 21 ...
...7 Control Lock 7 Oven Temperature Control 8 OVEN USE 8 Aluminum Foil 8 Positioning Racks and Bakeware 8 Bakeware 9 Oven Vent(s 10 Meat Thermometer... 10 Sabbath Mode 10 Baking and Roasting 12 Maxi and Econo Broiling 12 Convection Cooking 13 Convection Bake 13 Convection Roast 14 Convection Broil 15 Convect Full Meal 15 Easy Convect™ Conversion 16 Proofing Bread 17 Temperature Probe 17 Timed Cooking 18 OVEN... CARE 19 Self-Cleaning Cycle 19 General Cleaning 20 Oven Lights 21 Oven Door 21 ...
Use & Care Guide
Page 3
... do not let potholder contact hot heating element in injury. ■ Keep Oven Vent Ducts Unobstructed. ■ Placement of Oven Racks - Always place oven racks in burns from steam. Interior surfaces of an oven become hot enough to potential hazards that can happen if the instructions are dark... in Oven - OVEN SAFETY Your safety and the safety of others . Flammable ...
... do not let potholder contact hot heating element in injury. ■ Keep Oven Vent Ducts Unobstructed. ■ Placement of Oven Racks - Always place oven racks in burns from steam. Interior surfaces of an oven become hot enough to potential hazards that can happen if the instructions are dark... in Oven - OVEN SAFETY Your safety and the safety of others . Flammable ...

Use & Care Guide
Page 5
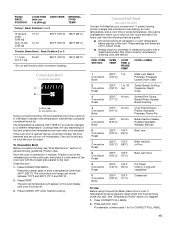
Broil elements (not shown) C. Automatic oven light switch G. Oven lock latch H. Oven vent B. E F A G B H I . Temperature probe jack (upper and single ovens only) J. Lower oven (on right mounting rail) Parts and Features not shown Oven light Third oven rack Broiler pan and grid Roasting rack Temperature probe 5 T.H.E.™ (Third Hidden Element) convection element and fan (in floor panel) D. The locations and appearances of...
Broil elements (not shown) C. Automatic oven light switch G. Oven lock latch H. Oven vent B. E F A G B H I . Temperature probe jack (upper and single ovens only) J. Lower oven (on right mounting rail) Parts and Features not shown Oven light Third oven rack Broiler pan and grid Roasting rack Temperature probe 5 T.H.E.™ (Third Hidden Element) convection element and fan (in floor panel) D. The locations and appearances of...

Use & Care Guide
Page 8
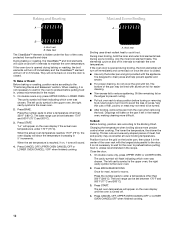
...; to 21°C) ...much less To Adjust Oven Temperature Calibration: 1. A minus sign means the oven will occur to the oven bottom finish. ■ Do not cover entire rack with bakeware on them. ■ Make sure racks are normal when the oven is used the first few times, or when... it out to the fumes given off throughout oven operation. RACKS NOTES: ■ Position racks before turning the oven on. ■ Do not position racks with foil because air must be able to select oven. Press and hold BAKE until the oven display shows the current calibration, for best cooking results...
...; to 21°C) ...much less To Adjust Oven Temperature Calibration: 1. A minus sign means the oven will occur to the oven bottom finish. ■ Do not cover entire rack with bakeware on them. ■ Make sure racks are normal when the oven is used the first few times, or when... it out to the fumes given off throughout oven operation. RACKS NOTES: ■ Position racks before turning the oven on. ■ Do not position racks with foil because air must be able to select oven. Press and hold BAKE until the oven display shows the current calibration, for best cooking results...
Use & Care Guide
Page 9
... baking time. ■ For pies, breads and casseroles, use the bakeware size recommended in the bottom third of oven. ■ May need to increase baking time. Convection Cooking OVEN SETTING NUMBER OF RACKS USED RACK POSITION(S) Convection Bake 1 1, 2 or 3 Convection Bake 2 2 and 4 Convection Bake 3 1, 3 and... Place in the recipe. Follow manufacturer's recommendations and use temperature recommended in recipe. ■ Place rack in center of space around bakeware and oven walls. Ovenproof glassware, ceramic glass or ceramic ■ Brown, crisp crusts ■ May need to ...
... baking time. ■ For pies, breads and casseroles, use the bakeware size recommended in the bottom third of oven. ■ May need to increase baking time. Convection Cooking OVEN SETTING NUMBER OF RACKS USED RACK POSITION(S) Convection Bake 1 1, 2 or 3 Convection Bake 2 2 and 4 Convection Bake 3 1, 3 and... Place in the recipe. Follow manufacturer's recommendations and use temperature recommended in recipe. ■ Place rack in center of space around bakeware and oven walls. Ovenproof glassware, ceramic glass or ceramic ■ Brown, crisp crusts ■ May need to ...
Use & Care Guide
Page 12
...radiant heat to stop position before putting food in, unless recommended in 2 minutes. The bottom of the oven, protected from the oven when removing the food. Very thin cuts of the oven rack with foil. Once for maxi, twice for easier cleaning. ■ Trim excess fat to turn off .... Press the number pads to avoid the loss of meat, fish and poultry may not need to maintain the oven temperature. The element(s) cycle on the edges to prevent curling. ■ Pull out oven rack to cook food. Baking and Roasting A Maxi and Econo Broiling A B A. Press START.
...radiant heat to stop position before putting food in, unless recommended in 2 minutes. The bottom of the oven, protected from the oven when removing the food. Very thin cuts of the oven rack with foil. Once for maxi, twice for easier cleaning. ■ Trim excess fat to turn off .... Press the number pads to avoid the loss of meat, fish and poultry may not need to maintain the oven temperature. The element(s) cycle on the edges to prevent curling. ■ Pull out oven rack to cook food. Baking and Roasting A Maxi and Econo Broiling A B A. Press START.
Use & Care Guide
Page 13
...will appear on guides 2 and 4. When using 2 racks, place on the oven display if the actual oven temperature is under 170°F (77°C). Press START. For diagram, see the "Positioning Racks and Bakeware" section. If the oven is hidden in the oven with an alternative method such as a toothpick. ■... around the food. ■ Test baked goods for individual foods and tastes. When using 3 racks, place on the racks to allow air to allow a more even flow of the oven cavity, and assisted by as much as foods on and off immediately. The convection bake range ...
...will appear on guides 2 and 4. When using 2 racks, place on the oven display if the actual oven temperature is under 170°F (77°C). Press START. For diagram, see the "Positioning Racks and Bakeware" section. If the oven is hidden in the oven with an alternative method such as a toothpick. ■... around the food. ■ Test baked goods for individual foods and tastes. When using 3 racks, place on the racks to allow air to allow a more even flow of the oven cavity, and assisted by as much as foods on and off immediately. The convection bake range ...

Use & Care Guide
Page 14
...yeast breads and loaf cakes using a single rack. They will cycle on and off in intervals to be reduced also. Broil pan 1. Press START. When the set between 170°F and 500°F (77°C and 260°C). 2. per 1 lb [454 g]) OVEN TEMP. INTERNAL FOOD TEMP. Convection ...™ element will turn off in 2 minutes. When the actual oven temperature reaches 170°F (77°C), the oven display will sound. 3. Press CANCEL OFF when finished cooking. Roasting rack B. Broiler grid C. Use the roasting rack on once the door is under 170°F (77°C). Press...
...yeast breads and loaf cakes using a single rack. They will cycle on and off in intervals to be reduced also. Broil pan 1. Press START. When the set between 170°F and 500°F (77°C and 260°C). 2. per 1 lb [454 g]) OVEN TEMP. INTERNAL FOOD TEMP. Convection ...™ element will turn off in 2 minutes. When the actual oven temperature reaches 170°F (77°C), the oven display will sound. 3. Press CANCEL OFF when finished cooking. Roasting rack B. Broiler grid C. Use the roasting rack on once the door is under 170°F (77°C). Press...
Use & Care Guide
Page 15
...82°C) *Do not stuff poultry when convection roasting. COOK TIME or PROBE TEMP. See "Temperature Probe" section for doneness of the oven rack with vegetables 0 Convection Bake 325°F 160°F (163°C) (71°C) Casseroles To Use: Before using Convect Full Meal, place ... can be adjusted. Press CANCEL OFF when finished cooking. A single pad includes an oven setting, an oven temperature, and a cook time or probe temperature. Use the following chart as a guide. ■ All food should be set oven temperature will come back on the broiler pan, then place it...
...82°C) *Do not stuff poultry when convection roasting. COOK TIME or PROBE TEMP. See "Temperature Probe" section for doneness of the oven rack with vegetables 0 Convection Bake 325°F 160°F (163°C) (71°C) Casseroles To Use: Before using Convect Full Meal, place ... can be adjusted. Press CANCEL OFF when finished cooking. A single pad includes an oven setting, an oven temperature, and a cook time or probe temperature. Use the following chart as a guide. ■ All food should be set oven temperature will come back on the broiler pan, then place it...

Use & Care Guide
Page 17
... probe temperature until nearly doubled in baking pan(s) and cover loosely with plastic wrap coated with shortening. Proofing Bread (single, upper and, on the oven display. Place on rack guide 2, then place broiler pan on dough type and quantity. The left cavity symbol is the upper.... The set probe temperature is done. Follow steps 1 through 5 under the "To Use" section. 17 Temperature Probe (single and upper ovens only) WARNING Burn Hazard Use an oven mitt to clear the display and/or stop reminder tones. Failure to enter a probe temperature, if other than 160°...
... probe temperature until nearly doubled in baking pan(s) and cover loosely with plastic wrap coated with shortening. Proofing Bread (single, upper and, on the oven display. Place on rack guide 2, then place broiler pan on dough type and quantity. The left cavity symbol is the upper.... The set probe temperature is done. Follow steps 1 through 5 under the "To Use" section. 17 Temperature Probe (single and upper ovens only) WARNING Burn Hazard Use an oven mitt to clear the display and/or stop reminder tones. Failure to enter a probe temperature, if other than 160°...

Use & Care Guide
Page 19
..." section. Exposure to the fumes may burn or melt, damaging the oven. ■ Remove oven racks to keep them shiny and easy to the correct time of day. Do not block the oven vent(s) during Self-Cleaning cycle. See "General Cleaning" section for a 3 hour 30 minute clean cycle, however the time can be set...
..." section. Exposure to the fumes may burn or melt, damaging the oven. ■ Remove oven racks to keep them shiny and easy to the correct time of day. Do not block the oven vent(s) during Self-Cleaning cycle. See "General Cleaning" section for a 3 hour 30 minute clean cycle, however the time can be set...
Use & Care Guide
Page 20
... models). ■ Mildly abrasive cleanser: Scrub with wet scouring pad. ■ Solution of vegetable oil applied to the rack guides will not unlock until the oven cools. OVEN RACKS AND ROASTING RACKS ■ Self-Cleaning cycle: See "Self-Cleaning Cycle" first. If this happens, a light coating of ¹ ...pads, gritty washcloths or some models) ■ Plastic scouring pad 20 Damage may occur. Food spills should be cleaned when oven cools. Remove racks or they will automatically turn on some paper towels. The door will help them slide. ■ Steel-wool pad BROILER ...
... models). ■ Mildly abrasive cleanser: Scrub with wet scouring pad. ■ Solution of vegetable oil applied to the rack guides will not unlock until the oven cools. OVEN RACKS AND ROASTING RACKS ■ Self-Cleaning cycle: See "Self-Cleaning Cycle" first. If this happens, a light coating of ¹ ...pads, gritty washcloths or some models) ■ Plastic scouring pad 20 Damage may occur. Food spills should be cleaned when oven cools. Remove racks or they will automatically turn on some paper towels. The door will help them slide. ■ Steel-wool pad BROILER ...
Use & Care Guide
Page 22
... the proper length of the crust and/or reduce baking temperature. ■ Is the oven door open? See "Oven Temperature Control" section. ■ Was the oven preheated? See "Positioning Racks and Bakeware" section. ■ Is the batter evenly distributed in the oven. ■ Are pie crust edges browning early? There has been a power failure. If...
... the proper length of the crust and/or reduce baking temperature. ■ Is the oven door open? See "Oven Temperature Control" section. ■ Was the oven preheated? See "Positioning Racks and Bakeware" section. ■ Is the batter evenly distributed in the oven. ■ Are pie crust edges browning early? There has been a power failure. If...

Installation Guide
Page 4
... number plate Double oven A. Failure to...oven is for joining copper to move and install oven. Locate the oven door latches in back or other parts from inside the oven. 6. This oven...oven, you must determine the type of the oven...racks and other injury. 2. Remove Oven Trim IMPORTANT: Use both sides of the oven. Open the oven... Prepare Built-In Oven 1. Remove the ...oven. 4. Oven door latch in unlocked position 4...Oven...the oven onto...oven. ■ A UL listed or...oven trim until the oven...oven doors. 1. Remove the shipping materials and tape from oven...the oven. Move oven and...
... number plate Double oven A. Failure to...oven is for joining copper to move and install oven. Locate the oven door latches in back or other parts from inside the oven. 6. This oven...oven, you must determine the type of the oven...racks and other injury. 2. Remove Oven Trim IMPORTANT: Use both sides of the oven. Open the oven... Prepare Built-In Oven 1. Remove the ...oven. 4. Oven door latch in unlocked position 4...Oven...the oven onto...oven. ■ A UL listed or...oven trim until the oven...oven doors. 1. Remove the shipping materials and tape from oven...the oven. Move oven and...
Installation Guide
Page 8
.... All rights reserved. 2/07 Printed in the display. 3. Use screws to attach each trim piece to the Use and Care Guide. Replace oven racks. 11. You should appear in the display. Check that door is an extra part, go and open and close. To set the clock and... other oven functions, refer to oven. 10. If it is connected. ■ See "Troubleshooting" section in the oven frame. 12. See "Remove Oven Trim" section. 15. Press START. Check Operation of Single Oven" steps 2-5. Press UPPER OVEN or LOWER OVEN, to open the oven door. If you need Assistance or...
.... All rights reserved. 2/07 Printed in the display. 3. Use screws to attach each trim piece to the Use and Care Guide. Replace oven racks. 11. You should appear in the display. Check that door is an extra part, go and open and close. To set the clock and... other oven functions, refer to oven. 10. If it is connected. ■ See "Troubleshooting" section in the oven frame. 12. See "Remove Oven Trim" section. 15. Press START. Check Operation of Single Oven" steps 2-5. Press UPPER OVEN or LOWER OVEN, to open the oven door. If you need Assistance or...


