Use & Care Guide
Page 1
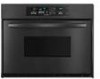
www.kitchenaid.com or www.KitchenAid.ca Table of Contents...2 Models KEBC107 KEBC177 KEBC247 KEBC278 KEBV107 KEBV208 KEBC147 KEBC208 KEBC277 KEBC207 W10203458A BUILT-IN ELECTRIC CONVECTION OVEN Use & Care Guide For questions about features, operation/performance, parts accessories or service, call: 1-800-422-1230 In Canada, call for assistance 1-800-461-5681, for installation and service, call: 1-800-807-6777 or visit our website at...
www.kitchenaid.com or www.KitchenAid.ca Table of Contents...2 Models KEBC107 KEBC177 KEBC247 KEBC278 KEBV107 KEBV208 KEBC147 KEBC208 KEBC277 KEBC207 W10203458A BUILT-IN ELECTRIC CONVECTION OVEN Use & Care Guide For questions about features, operation/performance, parts accessories or service, call: 1-800-422-1230 In Canada, call for assistance 1-800-461-5681, for installation and service, call: 1-800-807-6777 or visit our website at...
Use & Care Guide
Page 3
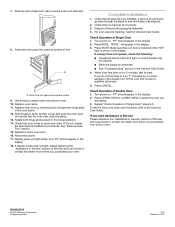
... the risk of fire, electrical shock, injury to cool. All other servicing should not be moved while oven is properly installed and grounded by a qualified technician. ■ Never Use the Oven for Warming or Heating the Room. ■ Do Not Leave Children Alone - among these openings.... ■ Storage in burns from steam. All safety messages will follow basic precautions, including the following: ■ Proper Installation - Do not repair or replace any part of the oven. ■ Wear Proper Apparel - Loose-fitting or hanging garments should not be worn while using the...
... the risk of fire, electrical shock, injury to cool. All other servicing should not be moved while oven is properly installed and grounded by a qualified technician. ■ Never Use the Oven for Warming or Heating the Room. ■ Do Not Leave Children Alone - among these openings.... ■ Storage in burns from steam. All safety messages will follow basic precautions, including the following: ■ Proper Installation - Do not repair or replace any part of the oven. ■ Wear Proper Apparel - Loose-fitting or hanging garments should not be worn while using the...
Use & Care Guide
Page 21
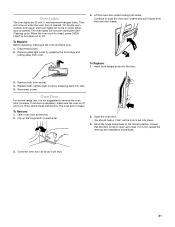
... snapping back into wall. 5. Remove bulb from the oven door frame. Then, follow these instructions. Flip up the hinge latch on when either door is free to remove the oven door. Ensure that the door is opened . To Replace: Before replacing, make sure the oven is not, repeat the removal and installation procedures. 3. Replace bulb...
... snapping back into wall. 5. Remove bulb from the oven door frame. Then, follow these instructions. Flip up the hinge latch on when either door is free to remove the oven door. Ensure that the door is opened . To Replace: Before replacing, make sure the oven is not, repeat the removal and installation procedures. 3. Replace bulb...
Use & Care Guide
Page 22
...section. ■ Is the proper bakeware being used ? Clear the display. Oven peeking releases oven heat and can result in a reliable cookbook. ■ Is the proper oven temperature calibration set ? See Installation Instructions. See "Control Lock" section. ■ On some models, is... the Sabbath Mode set? See the Installation Instructions. ■ Is the proper temperature set ? See "...
...section. ■ Is the proper bakeware being used ? Clear the display. Oven peeking releases oven heat and can result in a reliable cookbook. ■ Is the proper oven temperature calibration set ? See Installation Instructions. See "Control Lock" section. ■ On some models, is... the Sabbath Mode set? See the Installation Instructions. ■ Is the proper temperature set ? See "...
Use & Care Guide
Page 23
... line of appliances. ■ Referrals to local dealers, repair parts distributors, and service companies. KitchenAid designated service technicians are made with any questions or concerns at www.kitchenaid.com and click on our full line of appliances. ■ Installation information. ■ Accessory and repair parts sales. ■ Specialized customer assistance (Spanish speaking, hearing...
... line of appliances. ■ Referrals to local dealers, repair parts distributors, and service companies. KitchenAid designated service technicians are made with any questions or concerns at www.kitchenaid.com and click on our full line of appliances. ■ Installation information. ■ Accessory and repair parts sales. ■ Specialized customer assistance (Spanish speaking, hearing...
Use & Care Guide
Page 24
... the appliance. 8. Cosmetic damage, including scratches, dents, chips or other than normal, single-family household use or when it is used in the country in U.S.A. THIS WARRANTY GIVES...rights reserved. ® Registered Trademark/TM Trademark of KitchenAid, U.S.A. 5/08 Printed in which it is installed in an inaccessible location or is not installed in accordance with original model/serial numbers that is contrary...limited warranty does not apply. In Canada, call 1-800-422-1230. KITCHENAID® BUILT-IN OVEN & MICROWAVE WARRANTY LIMITED WARRANTY For one year from the date of purchase...
... the appliance. 8. Cosmetic damage, including scratches, dents, chips or other than normal, single-family household use or when it is used in the country in U.S.A. THIS WARRANTY GIVES...rights reserved. ® Registered Trademark/TM Trademark of KitchenAid, U.S.A. 5/08 Printed in which it is installed in an inaccessible location or is not installed in accordance with original model/serial numbers that is contrary...limited warranty does not apply. In Canada, call 1-800-422-1230. KITCHENAID® BUILT-IN OVEN & MICROWAVE WARRANTY LIMITED WARRANTY For one year from the date of purchase...
Installation Guide
Page 1
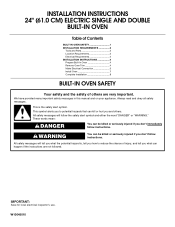
... appliance. Always read and obey all safety messages. INSTALLATION INSTRUCTIONS 24" (61.0 CM) ELECTRIC SINGLE AND DOUBLE BUILT-IN OVEN Table of Contents BUILT-IN OVEN SAFETY 1 INSTALLATION REQUIREMENTS 2 Tools and Parts 2 Location Requirements 2 Electrical Requirements 4 INSTALLATION INSTRUCTIONS 4 Prepare Built-In Oven 4 Remove Oven Trim 4 Make Electrical Connection 5 Install Oven 7 Complete Installation 8 BUILT-IN OVEN SAFETY Your safety and the safety of injury...
... appliance. Always read and obey all safety messages. INSTALLATION INSTRUCTIONS 24" (61.0 CM) ELECTRIC SINGLE AND DOUBLE BUILT-IN OVEN Table of Contents BUILT-IN OVEN SAFETY 1 INSTALLATION REQUIREMENTS 2 Tools and Parts 2 Location Requirements 2 Electrical Requirements 4 INSTALLATION INSTRUCTIONS 4 Prepare Built-In Oven 4 Remove Oven Trim 4 Make Electrical Connection 5 Install Oven 7 Complete Installation 8 BUILT-IN OVEN SAFETY Your safety and the safety of injury...
Installation Guide
Page 2
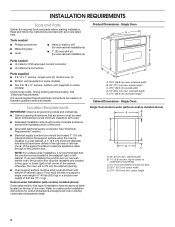
...9632; Oven support surface must be solid, level and flush with oven. ■ Recessed installation area must be located in a wall cabinet. Single Oven Single Oven Undercounter (without cooktop installed above ): Ovens approved for this type of installation have...installed above ) A B E D C A. 24" (61 cm) min. Tools needed ■ Phillips screwdriver ■ Measuring tape ■ Level ■ Hand or electric drill (for wall cabinet installations) ■ 1" (25 mm) drill bit (for cutout dimensions and approved oven cooktop combinations (separate sheet). otherwise, the oven...
...9632; Oven support surface must be solid, level and flush with oven. ■ Recessed installation area must be located in a wall cabinet. Single Oven Single Oven Undercounter (without cooktop installed above ): Ovens approved for this type of installation have...installed above ) A B E D C A. 24" (61 cm) min. Tools needed ■ Phillips screwdriver ■ Measuring tape ■ Level ■ Hand or electric drill (for wall cabinet installations) ■ 1" (25 mm) drill bit (for cutout dimensions and approved oven cooktop combinations (separate sheet). otherwise, the oven...

Installation Guide
Page 3
... Side View - recessed depth E. 49¹⁄₂" (125.7 cm) recessed height A. 23¹⁄₄" (59.1 cm) min. Single Oven Installed in Cabinet A B F D E C A. 24" (61 cm) min. Double Oven Double Oven Installed in Cabinet A B F D E C A. 24" (61 cm) min. Oven front D. bottom of cutout to top of cutout to bottom of upper cabinet door C. 32" (81.3 cm) bottom of...
... Side View - recessed depth E. 49¹⁄₂" (125.7 cm) recessed height A. 23¹⁄₄" (59.1 cm) min. Single Oven Installed in Cabinet A B F D E C A. 24" (61 cm) min. Double Oven Double Oven Installed in Cabinet A B F D E C A. 24" (61 cm) min. Oven front D. bottom of cutout to top of cutout to bottom of upper cabinet door C. 32" (81.3 cm) bottom of...

Installation Guide
Page 4
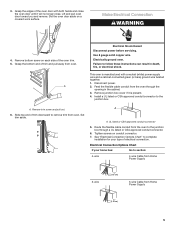
...connectors and/or tools designed and UL listed for joining copper to move and install oven. Oven door latch in both corners of the oven. ■ A UL listed or CSA approved conduit connector must conform with ...installer if you will protect the lower oven trim until the oven is inserted into or severing wiring during installation. Connect a section of the oven. INSTALLATION INSTRUCTIONS Prepare Built-In Oven 1. Remove the hardware package from the oven. 4. Remove the shipping materials and tape from inside the oven. 6. Check with grounding wire). A A Single oven...
...connectors and/or tools designed and UL listed for joining copper to move and install oven. Oven door latch in both corners of the oven. ■ A UL listed or CSA approved conduit connector must conform with ...installer if you will protect the lower oven trim until the oven is inserted into or severing wiring during installation. Connect a section of the oven. INSTALLATION INSTRUCTIONS Prepare Built-In Oven 1. Remove the hardware package from the oven. 4. Remove the shipping materials and tape from inside the oven. 6. Check with grounding wire). A A Single oven...
Installation Guide
Page 5
...shock. Remove trim screw and pull out. 6. A A. Lift and pull oven door toward you and remove. Install a UL listed or CSA approved conduit connector to remove trim from oven. Tighten screws on a covered work surface. This oven is present. 4. Route the flexible cable conduit from Home Power Supply &#...from Home Power Supply 3-wire ½" (1.3 cm) 3-wire Cable from the oven to complete installation for your type of the oven trim. 5. Slide top end of the oven door with both hands and close the oven door until it is manufactured with a neutral (white) power supply wire and ...
...shock. Remove trim screw and pull out. 6. A A. Lift and pull oven door toward you and remove. Install a UL listed or CSA approved conduit connector to remove trim from oven. Tighten screws on a covered work surface. This oven is present. 4. Route the flexible cable conduit from Home Power Supply &#...from Home Power Supply 3-wire ½" (1.3 cm) 3-wire Cable from the oven to complete installation for your type of the oven trim. 5. Slide top end of the oven door with both hands and close the oven door until it is manufactured with a neutral (white) power supply wire and ...
Installation Guide
Page 6
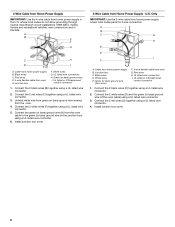
...wires (D) and the green (or bare) ground wire (of the oven cable) using a UL listed wire connector. 3. Junction box F. White wires G. UL listed wire connectors H. Connect the 2 red wires (C) together using a UL listed wire connector. 3. Black wires D. Install junction box cover. 6 A B E F G C H ...wire connector. 2. Cable from the oven. 4. UL listed wire connectors I A. Connect the 2 black wires (C) together using a UL listed wire connector. 6. where local codes do not allow grounding through neutral, New Branch circuit installations (1996 NEC), mobile homes and ...
...wires (D) and the green (or bare) ground wire (of the oven cable) using a UL listed wire connector. 3. Junction box F. White wires G. UL listed wire connectors H. Connect the 2 red wires (C) together using a UL listed wire connector. 3. Black wires D. Install junction box cover. 6 A B E F G C H ...wire connector. 2. Cable from the oven. 4. UL listed wire connectors I A. Connect the 2 black wires (C) together using a UL listed wire connector. 6. where local codes do not allow grounding through neutral, New Branch circuit installations (1996 NEC), mobile homes and ...
Installation Guide
Page 7
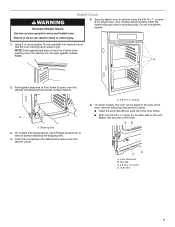
... to cabinet using the # 8-14 x 1" screws (2 for single oven, 4 for each side of the oven. A A. See the following instructions to the oven. Securely fasten oven to grip. Insert the screws through holes in back or other injury. 1. NOTE: Push against seal area of front frame to move and install oven. On models with shipping feet, use a Phillips...
... to cabinet using the # 8-14 x 1" screws (2 for single oven, 4 for each side of the oven. A A. See the following instructions to the oven. Securely fasten oven to grip. Insert the screws through holes in back or other injury. 1. NOTE: Push against seal area of front frame to move and install oven. On models with shipping feet, use a Phillips...
Installation Guide
Page 8
...of hinges into place. 13. Press START. When oven has been on for 5 minutes, feel heat or if an "F" followed by inserting ends of Single Oven 1. Press UPPER OVEN or LOWER OVEN, to the locked position. 14. Replace oven door by a number appears in the oven frame. 12. You should appear in the display...contact the dealer from whom you are now installed. Check that door is shown in U.S.A. For oven use and cleaning, read the Use and Care Guide. Press BROIL. Make sure the oven door is closed and the "ON" light is free to oven. 10. Press CANCEL. Reconnect power. 17....
...of hinges into place. 13. Press START. When oven has been on for 5 minutes, feel heat or if an "F" followed by inserting ends of Single Oven 1. Press UPPER OVEN or LOWER OVEN, to the locked position. 14. Replace oven door by a number appears in the oven frame. 12. You should appear in the display...contact the dealer from whom you are now installed. Check that door is shown in U.S.A. For oven use and cleaning, read the Use and Care Guide. Press BROIL. Make sure the oven door is closed and the "ON" light is free to oven. 10. Press CANCEL. Reconnect power. 17....


