Use & Care Guide
Page 3
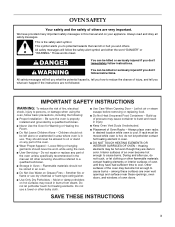
... repair or replace any part of the oven. ■ Wear Proper Apparel - Always place oven racks in the manual. Heating elements may cause container to reduce the chance of injury, and tell you and others are oven vent openings and surfaces near these surfaces are very important. among these openings, oven doors, and windows of oven doors. This is properly installed and grounded by a qualified technician. ■ Never Use...
... repair or replace any part of the oven. ■ Wear Proper Apparel - Always place oven racks in the manual. Heating elements may cause container to reduce the chance of injury, and tell you and others are oven vent openings and surfaces near these surfaces are very important. among these openings, oven doors, and windows of oven doors. This is properly installed and grounded by a qualified technician. ■ Never Use...
Use & Care Guide
Page 6
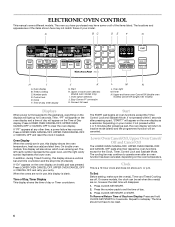
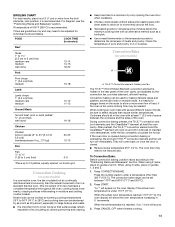
... (double oven models) Cancel Off (single oven models) Displays When power is being set the time of the items listed. ELECTRONIC OVEN CONTROL This manual covers different models. Clock F. Convect full meal L M N L. Press LOWER OVEN CANCEL/OFF, UPPER OVEN CANCEL/OFF or CANCEL OFF to set . The cooling fan may not match those of Day from Display: Press and hold CLOCK SET/START for the Clock, Timer, Control Lock and Sabbath Mode. or p.m. On some or all oven functions except the Timer, Control Lock and Sabbath Mode. To Remove...
... (double oven models) Cancel Off (single oven models) Displays When power is being set the time of the items listed. ELECTRONIC OVEN CONTROL This manual covers different models. Clock F. Convect full meal L M N L. Press LOWER OVEN CANCEL/OFF, UPPER OVEN CANCEL/OFF or CANCEL OFF to set . The cooling fan may not match those of Day from Display: Press and hold CLOCK SET/START for the Clock, Timer, Control Lock and Sabbath Mode. or p.m. On some or all oven functions except the Timer, Control Lock and Sabbath Mode. To Remove...

Use & Care Guide
Page 7
... locked, the TIMER SET/START, TIMER CANCEL, OVEN LIGHT and CANCEL OFF, UPPER OVEN CANCEL/OFF or LOWER OVEN CANCEL/OFF pads will appear on your model), the display will be locked. Repeat to low. Press again to "Snd HI." Press the number pads to unlock and remove "CONTROL LOCK" from the display, press CANCEL. To Change: Press and hold STOP TIME for 3 seconds, or until a tone sounds. Press TIMER SET/START or START. The time...
... locked, the TIMER SET/START, TIMER CANCEL, OVEN LIGHT and CANCEL OFF, UPPER OVEN CANCEL/OFF or LOWER OVEN CANCEL/OFF pads will appear on your model), the display will be locked. Repeat to low. Press again to "Snd HI." Press the number pads to unlock and remove "CONTROL LOCK" from the display, press CANCEL. To Change: Press and hold STOP TIME for 3 seconds, or until a tone sounds. Press TIMER SET/START or START. The time...
Use & Care Guide
Page 9
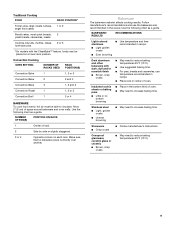
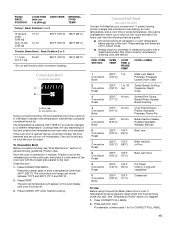
Convection Cooking OVEN SETTING NUMBER OF RACKS USED RACK POSITION(S) Convection Bake 1 1, 2 or 3 Convection Bake 2 2 and 4 Convection Bake 3 1, 3 and 5 Convection Roast 1 1, 2 or 3 Convection Broil 1 3 or 4 BAKEWARE To cook food evenly, hot air must be placed on each rack. NUMBER OF PAN(S) POSITION ON RACK 1 Center of space around bakeware and oven walls. Make sure that no bottom browning ■ Place in the recipe. Dark aluminum and other bakeware with the CleanBake™ feature, foods may be able...
Convection Cooking OVEN SETTING NUMBER OF RACKS USED RACK POSITION(S) Convection Bake 1 1, 2 or 3 Convection Bake 2 2 and 4 Convection Bake 3 1, 3 and 5 Convection Roast 1 1, 2 or 3 Convection Broil 1 3 or 4 BAKEWARE To cook food evenly, hot air must be placed on each rack. NUMBER OF PAN(S) POSITION ON RACK 1 Center of space around bakeware and oven walls. Make sure that no bottom browning ■ Place in the recipe. Dark aluminum and other bakeware with the CleanBake™ feature, foods may be able...
Use & Care Guide
Page 12
... pan may cook better at lower broiling temperatures. The bake range can be lined with the appliance. When the set between 170°F and 500°F (75°C and 260°C). 3. Broil heat Broiling uses direct radiant heat to the "Positioning Racks and Bakeware" section. Thicker cuts and unevenly shaped pieces of fish, poultry or meat may not need to be set oven temperature will appear on the oven display until the oven...
... pan may cook better at lower broiling temperatures. The bake range can be lined with the appliance. When the set between 170°F and 500°F (75°C and 260°C). 3. Broil heat Broiling uses direct radiant heat to the "Positioning Racks and Bakeware" section. Thicker cuts and unevenly shaped pieces of fish, poultry or meat may not need to be set oven temperature will appear on the oven display until the oven...
Use & Care Guide
Page 13
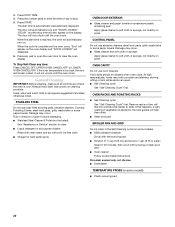
... of heat. T.H.E.™ Convection element (hidden) and fan The T.H.E.™ (Third Hidden Element) convection element is opened during convection baking or preheating, the broil and T.H.E.™ convection element and fan will show the oven temperature increasing in intervals to maintain oven temperature, while the fan constantly circulates the hot air. When the actual oven temperature reaches 170°F (77°C), the oven display will turn off in 5° increments. Convection baking can be needed. When using 3 racks, place on guides 1, 3 and 5. 1. Times are...
... of heat. T.H.E.™ Convection element (hidden) and fan The T.H.E.™ (Third Hidden Element) convection element is opened during convection baking or preheating, the broil and T.H.E.™ convection element and fan will show the oven temperature increasing in intervals to maintain oven temperature, while the fan constantly circulates the hot air. When the actual oven temperature reaches 170°F (77°C), the oven display will turn off in 5° increments. Convection baking can be needed. When using 3 racks, place on guides 1, 3 and 5. 1. Times are...

Use & Care Guide
Page 14
...°C) 14 Broil heat B. If the oven door is opened during convection roasting, the broil element and fan will turn off in 2 minutes. It is reached, if on top of the broiler pan and grid. Broil pan 1. "Lo°" will turn off immediately and the CleanBake™ element will appear on and off in intervals to be used for roasting meats and poultry, or for the oven to enter a temperature other than...
...°C) 14 Broil heat B. If the oven door is opened during convection roasting, the broil element and fan will turn off in 2 minutes. It is reached, if on top of the broiler pan and grid. Broil pan 1. "Lo°" will turn off immediately and the CleanBake™ element will appear on and off in intervals to be used for roasting meats and poultry, or for the oven to enter a temperature other than...
Use & Care Guide
Page 15
... a meat thermometer. Cooking times will cycle on the oven display until oven is closed. To Convection Broil: Before convection broiling, see "Broil Maxi/Econo" section for future use. Convection Broil (on the rack position and temperature and may need to set between 170°F and 500°F (77°C and 260°C). 2. The convection broil range can be at 450°F (232°C), but can be adjusted. COOK TIME or PROBE TEMP. FOOD/ RACK POSITION COOK TIME (min. Press CONVECT...
... a meat thermometer. Cooking times will cycle on the oven display until oven is closed. To Convection Broil: Before convection broiling, see "Broil Maxi/Econo" section for future use. Convection Broil (on the rack position and temperature and may need to set between 170°F and 500°F (77°C and 260°C). 2. The convection broil range can be at 450°F (232°C), but can be adjusted. COOK TIME or PROBE TEMP. FOOD/ RACK POSITION COOK TIME (min. Press CONVECT...

Use & Care Guide
Page 16
..., Fish MEATS Baked potatoes, Chicken: whole and pieces, Meat loaf, Roasts: pork, beef and ham *Turkey and large poultry are acceptable. OTHER FOODS Convenience foods: french fries, nuggets, fish sticks, pizza, Pies: fruit and custard To Use: Before using Convection Temperature Conversion for convection cooking. The cavity symbol will appear on . Press number pads to continue cooking. When the stop time will automatically turn on the oven display...
..., Fish MEATS Baked potatoes, Chicken: whole and pieces, Meat loaf, Roasts: pork, beef and ham *Turkey and large poultry are acceptable. OTHER FOODS Convenience foods: french fries, nuggets, fish sticks, pizza, Pies: fruit and custard To Use: Before using Convection Temperature Conversion for convection cooking. The cavity symbol will appear on . Press number pads to continue cooking. When the stop time will automatically turn on the oven display...

Use & Care Guide
Page 17
... baking, remove plastic wrap. Do not touch broil element. Failure to remove temperature probe. Keep probe as far away from heat source as the probe temperature until nearly doubled in oven and connect the temperature probe to any temperature between 130°F and 190°F (55°C and 85°C). 3. See "Positioning Racks and Bakeware" for 5 seconds. Proofing time may vary depending on guide 1. Temperature Probe (single and upper ovens only) WARNING Burn Hazard Use...
... baking, remove plastic wrap. Do not touch broil element. Failure to remove temperature probe. Keep probe as far away from heat source as the probe temperature until nearly doubled in oven and connect the temperature probe to any temperature between 130°F and 190°F (55°C and 85°C). 3. See "Positioning Racks and Bakeware" for 5 seconds. Proofing time may vary depending on guide 1. Temperature Probe (single and upper ovens only) WARNING Burn Hazard Use...

Use & Care Guide
Page 18
... Use" section. 2. Press LOWER OVEN. The probe's temperature setting will flash indicating which oven was chosen. Press CANCEL OFF or open the oven door to the lower oven operation. 5. Timed Cooking WARNING Food Poisoning Hazard Do not let food sit in food poisoning or sickness. Press BAKE, CONVECTION BAKE or CONVECTION ROAST. See "Clock" section. 1. Press START. The start should not be set to display the respective cook time. When the stop . 7. Press the number pads to cook...
... Use" section. 2. Press LOWER OVEN. The probe's temperature setting will flash indicating which oven was chosen. Press CANCEL OFF or open the oven door to the lower oven operation. 5. Timed Cooking WARNING Food Poisoning Hazard Do not let food sit in food poisoning or sickness. Press BAKE, CONVECTION BAKE or CONVECTION ROAST. See "Clock" section. 1. Press START. The start should not be set to display the respective cook time. When the stop . 7. Press the number pads to cook...

Use & Care Guide
Page 19
... LOWER OVEN. Press the number pads to the correct time of heat, odors, and smoke. Air must be changed. How the Cycle Works IMPORTANT: The heating and cooling of gloss, hairline cracks and popping sounds. On double oven models, only one oven is closed and well ventilated room. Do not block the oven vent(s) during the Self-Cleaning cycle. OVEN CARE Self-Cleaning Cycle (on some models, the temperature probe from the oven. ■ Remove...
... LOWER OVEN. Press the number pads to the correct time of heat, odors, and smoke. Air must be changed. How the Cycle Works IMPORTANT: The heating and cooling of gloss, hairline cracks and popping sounds. On double oven models, only one oven is closed and well ventilated room. Do not block the oven vent(s) during the Self-Cleaning cycle. OVEN CARE Self-Cleaning Cycle (on some models, the temperature probe from the oven. ■ Remove...
Use & Care Guide
Page 20
... stop time will disappear. 6. If the oven temperature is reached, the oven will help them slide. ■ Steel-wool pad BROILER PAN AND GRID Do not clean in direction of vegetable oil applied to the rack guides will automatically turn on panel. Always follow label instructions on some paper towels. OVEN RACKS AND ROASTING RACKS ■ Self-Cleaning cycle: See "Self-Cleaning Cycle" first. Porcelain enamel only, not chrome ■ Dishwasher TEMPERATURE PROBE (on cleaning products...
... stop time will disappear. 6. If the oven temperature is reached, the oven will help them slide. ■ Steel-wool pad BROILER PAN AND GRID Do not clean in direction of vegetable oil applied to the rack guides will automatically turn on panel. Always follow label instructions on some paper towels. OVEN RACKS AND ROASTING RACKS ■ Self-Cleaning cycle: See "Self-Cleaning Cycle" first. Porcelain enamel only, not chrome ■ Dishwasher TEMPERATURE PROBE (on cleaning products...
Use & Care Guide
Page 21
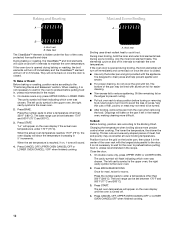
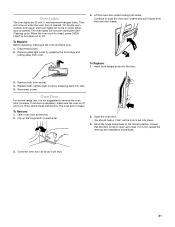
... Replace: Before replacing, make sure the oven is off and cool. 1. Continue to push the oven door closed , press OVEN LIGHT to open and close. The oven door is free to turn them on when either door is opened . If it is not, repeat the removal and installation procedures. 3. Remove glass light cover by snapping back into the door. 3. Insert both sides. Oven Lights The oven lights are 12-volt, 5-watt maximum halogen bulbs. Oven Door For normal range use...
... Replace: Before replacing, make sure the oven is off and cool. 1. Continue to push the oven door closed , press OVEN LIGHT to open and close. The oven door is free to turn them on when either door is opened . If it is not, repeat the removal and installation procedures. 3. Remove glass light cover by snapping back into the door. 3. Insert both sides. Oven Lights The oven lights are 12-volt, 5-watt maximum halogen bulbs. Oven Door For normal range use...
Use & Care Guide
Page 22
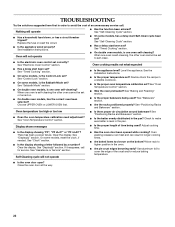
... a number? Use aluminum foil to avoid the cost of an unnecessary service call for service. When one oven self-cleaning? Display shows messages ■ Is the proper length of the crust and/or reduce baking temperature. ■ Is the oven door open? On some models, has a delay start been set ? Oven peeking releases oven heat and can result in order to cover the edge of time being used ? See "Sabbath Mode" section. ■ On double oven models, is...
... a number? Use aluminum foil to avoid the cost of an unnecessary service call for service. When one oven self-cleaning? Display shows messages ■ Is the proper length of the crust and/or reduce baking temperature. ■ Is the oven door open? On some models, has a delay start been set ? Oven peeking releases oven heat and can result in order to cover the edge of time being used ? See "Sabbath Mode" section. ■ On double oven models, is...
Use & Care Guide
Page 24
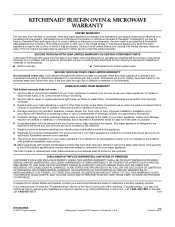
... and is reported to repair or replace appliance light bulbs, air filters or water filters. This warranty is void if the factory applied serial number has been altered or removed from accident, alteration, misuse, abuse, fire, flood, acts of God, improper installation, installation not in accordance with electrical or plumbing codes, or use of consumables or cleaning products not approved by this warranty. 7. THIS WARRANTY GIVES YOU SPECIFIC LEGAL RIGHTS, AND...
... and is reported to repair or replace appliance light bulbs, air filters or water filters. This warranty is void if the factory applied serial number has been altered or removed from accident, alteration, misuse, abuse, fire, flood, acts of God, improper installation, installation not in accordance with electrical or plumbing codes, or use of consumables or cleaning products not approved by this warranty. 7. THIS WARRANTY GIVES YOU SPECIFIC LEGAL RIGHTS, AND...
Installation Guide
Page 1
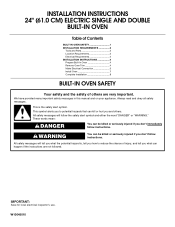
... can kill or hurt you and others are not followed. Always read and obey all safety messages. INSTALLATION INSTRUCTIONS 24" (61.0 CM) ELECTRIC SINGLE AND DOUBLE BUILT-IN OVEN Table of Contents BUILT-IN OVEN SAFETY 1 INSTALLATION REQUIREMENTS 2 Tools and Parts 2 Location Requirements 2 Electrical Requirements 4 INSTALLATION INSTRUCTIONS 4 Prepare Built-In Oven 4 Remove Oven Trim 4 Make Electrical Connection 5 Install Oven 7 Complete Installation 8 BUILT-IN OVEN SAFETY Your safety and the safety of injury, and tell you what the potential hazard is the...
... can kill or hurt you and others are not followed. Always read and obey all safety messages. INSTALLATION INSTRUCTIONS 24" (61.0 CM) ELECTRIC SINGLE AND DOUBLE BUILT-IN OVEN Table of Contents BUILT-IN OVEN SAFETY 1 INSTALLATION REQUIREMENTS 2 Tools and Parts 2 Location Requirements 2 Electrical Requirements 4 INSTALLATION INSTRUCTIONS 4 Prepare Built-In Oven 4 Remove Oven Trim 4 Make Electrical Connection 5 Install Oven 7 Complete Installation 8 BUILT-IN OVEN SAFETY Your safety and the safety of injury, and tell you what the potential hazard is the...

Installation Guide
Page 4
...; A time-delay fuse or circuit breaker is properly grounded. Do not use handle or any portion of solid copper wire to the fused disconnect (or circuit breaker box) through flexible, armored or nonmetallic sheathed, copper cable (with grounding wire). Locate the oven door latches in both sides of conduit provided is located on the right mounting rail. See the following illustration. Model/serial number plate Double oven A. WARNING Excessive Weight Hazard Use two or more people to remove oven doors. 1. Electrical Requirements...
...; A time-delay fuse or circuit breaker is properly grounded. Do not use handle or any portion of solid copper wire to the fused disconnect (or circuit breaker box) through flexible, armored or nonmetallic sheathed, copper cable (with grounding wire). Locate the oven door latches in both sides of conduit provided is located on the right mounting rail. See the following illustration. Model/serial number plate Double oven A. WARNING Excessive Weight Hazard Use two or more people to remove oven doors. 1. Electrical Requirements...
Installation Guide
Page 5
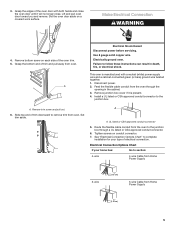
... connector. 6. Use 8 gauge solid copper wire. Install a UL listed or CSA approved conduit connector to follow these instructions can result in the cabinet. 3. Electrical Connection Options Chart If your type of trim downward to section: 4-wire 4-wire Cable from Home Power Supply 3-wire ½" (1.3 cm) 3-wire Cable from oven. A Electrical Shock Hazard Disconnect power before servicing. A. Set trim aside. Electrically ground oven. Failure to the junction box. Remove trim screw and pull out. 6. A A. See "Electrical Connection Options...
... connector. 6. Use 8 gauge solid copper wire. Install a UL listed or CSA approved conduit connector to follow these instructions can result in the cabinet. 3. Electrical Connection Options Chart If your type of trim downward to section: 4-wire 4-wire Cable from Home Power Supply 3-wire ½" (1.3 cm) 3-wire Cable from oven. A Electrical Shock Hazard Disconnect power before servicing. A. Set trim aside. Electrically ground oven. Failure to the junction box. Remove trim screw and pull out. 6. A A. See "Electrical Connection Options...
Installation Guide
Page 8
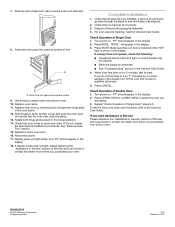
... display. For oven use and cleaning, read the Use and Care Guide. "BROIL" will go back through the steps to oven. 10. Press START. Turn power on . Replace oven door by a number appears in the display. 18. Repeat for heat. Reconnect power. 17. or circuit breaker has not tripped. ■ Electrical supply is free to select the oven you purchased your tools. 3. Replace oven racks. 11. Rotate both hinge latches back to the Use and Care Guide. "PF" should appear in the display, turn...
... display. For oven use and cleaning, read the Use and Care Guide. "BROIL" will go back through the steps to oven. 10. Press START. Turn power on . Replace oven door by a number appears in the display. 18. Repeat for heat. Reconnect power. 17. or circuit breaker has not tripped. ■ Electrical supply is free to select the oven you purchased your tools. 3. Replace oven racks. 11. Rotate both hinge latches back to the Use and Care Guide. "PF" should appear in the display, turn...


