Use & Care Guide
Page 1
www.kitchenaid.com or www.KitchenAid.ca Table of Contents...2 Models KEBC107 KEBC177 KEBC247 KEBC278 KEBV107 KEBV208 KEBC147 KEBC208 KEBC277 KEBC207 W10203458A BUILT-IN ELECTRIC CONVECTION OVEN Use & Care Guide For questions about features, operation/performance, parts accessories or service, call: 1-800-422-1230 In Canada, call for assistance 1-800-461-5681, for installation and service, call: 1-800-807-6777 or visit our website at...
www.kitchenaid.com or www.KitchenAid.ca Table of Contents...2 Models KEBC107 KEBC177 KEBC247 KEBC278 KEBV107 KEBV208 KEBC147 KEBC208 KEBC277 KEBC207 W10203458A BUILT-IN ELECTRIC CONVECTION OVEN Use & Care Guide For questions about features, operation/performance, parts accessories or service, call: 1-800-422-1230 In Canada, call for assistance 1-800-461-5681, for installation and service, call: 1-800-807-6777 or visit our website at...

Use & Care Guide
Page 2
... OF CONTENTS OVEN SAFETY 3 PARTS AND FEATURES 5 ELECTRONIC OVEN CONTROL 6 Displays 6 Start 6 Lower Oven Cancel/Off, Upper Oven Cancel/Off and Cancel Off 6 Clock 6 Tones 7 Fahrenheit and Celsius 7 Timer 7 Control Lock 7 Oven Temperature Control 8 OVEN USE 8 Aluminum Foil 8 Positioning Racks and Bakeware 8 Bakeware 9 Oven Vent(s 10... Convect™ Conversion 16 Proofing Bread 17 Temperature Probe 17 Timed Cooking 18 OVEN CARE 19 Self-Cleaning Cycle 19 General Cleaning 20 Oven Lights 21 Oven Door 21 TROUBLESHOOTING 22 ASSISTANCE OR SERVICE 23 In the U.S.A 23 In Canada...
... OF CONTENTS OVEN SAFETY 3 PARTS AND FEATURES 5 ELECTRONIC OVEN CONTROL 6 Displays 6 Start 6 Lower Oven Cancel/Off, Upper Oven Cancel/Off and Cancel Off 6 Clock 6 Tones 7 Fahrenheit and Celsius 7 Timer 7 Control Lock 7 Oven Temperature Control 8 OVEN USE 8 Aluminum Foil 8 Positioning Racks and Bakeware 8 Bakeware 9 Oven Vent(s 10... Convect™ Conversion 16 Proofing Bread 17 Temperature Probe 17 Timed Cooking 18 OVEN CARE 19 Self-Cleaning Cycle 19 General Cleaning 20 Oven Lights 21 Oven Door 21 TROUBLESHOOTING 22 ASSISTANCE OR SERVICE 23 In the U.S.A 23 In Canada...
Use & Care Guide
Page 3
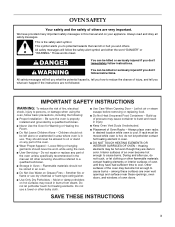
... following: ■ Proper Installation - They should never be stored in an oven. ■ Do Not Use Water on any part of the oven unless specifically recommended in the manual. Do not repair or replace any part of the oven. ■ Wear Proper Apparel - Do not let potholder touch hot heating ...elements. Build-up of pressure may become hot enough to burst and result in color. Interior surfaces of oven until they are not followed. Flammable materials...
... following: ■ Proper Installation - They should never be stored in an oven. ■ Do Not Use Water on any part of the oven unless specifically recommended in the manual. Do not repair or replace any part of the oven. ■ Wear Proper Apparel - Do not let potholder touch hot heating ...elements. Build-up of pressure may become hot enough to burst and result in color. Interior surfaces of oven until they are not followed. Flammable materials...

Use & Care Guide
Page 4
...gasket. ■ Do Not Use Oven Cleaners - Remove broiler pan and other utensils. Care should be taken not to some of the oven. ■ Clean Only Parts Listed in Manual. ■ Before Self-Cleaning the Oven - No commercial oven cleaner or oven liner protective coating of any kind ...should be used in or around any part of the substances listed, including benzene, formaldehyde,...
...gasket. ■ Do Not Use Oven Cleaners - Remove broiler pan and other utensils. Care should be taken not to some of the oven. ■ Clean Only Parts Listed in Manual. ■ Before Self-Cleaning the Oven - No commercial oven cleaner or oven liner protective coating of any kind ...should be used in or around any part of the substances listed, including benzene, formaldehyde,...

Use & Care Guide
Page 5
... element (hidden in back panel) I J K C D A. Lower oven (on right mounting rail) Parts and Features not shown Oven light Third oven rack Broiler pan and grid Roasting rack Temperature probe 5 T.H.E.™ (Third Hidden Element) convection element and fan (in floor panel) D. Gasket K. Oven lock latch H. Temperature probe jack (upper and single ovens only) J. The locations and appearances of...
... element (hidden in back panel) I J K C D A. Lower oven (on right mounting rail) Parts and Features not shown Oven light Third oven rack Broiler pan and grid Roasting rack Temperature probe 5 T.H.E.™ (Third Hidden Element) convection element and fan (in floor panel) D. Gasket K. Oven lock latch H. Temperature probe jack (upper and single ovens only) J. The locations and appearances of...
Use & Care Guide
Page 10
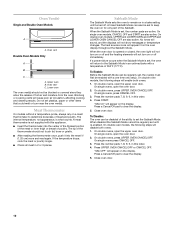
Oven Vent(s) Single and Double Oven Models A A. Oven vent Double Oven Models Only A B C A. Lower oven The oven vent(s) should not be set to keep the oven on in this order. 4. Sabbath Mode The Sabbath Mode sets the oven to remain on for only part of the thermometer should not touch fat, bone or ... off and the heating elements will not show messages or temperature changes. Oven vent C. On single ovens, open the oven door. 2. When the oven door is what counts. Close oven door. 10 On double ovens, press UPPER OVEN CANCEL/OFF. Press START. No tones will sound, and the displays will...
Oven Vent(s) Single and Double Oven Models A A. Oven vent Double Oven Models Only A B C A. Lower oven The oven vent(s) should not be set to keep the oven on in this order. 4. Sabbath Mode The Sabbath Mode sets the oven to remain on for only part of the thermometer should not touch fat, bone or ... off and the heating elements will not show messages or temperature changes. Oven vent C. On single ovens, open the oven door. 2. When the oven door is what counts. Close oven door. 10 On double ovens, press UPPER OVEN CANCEL/OFF. Press START. No tones will sound, and the displays will...
Use & Care Guide
Page 23
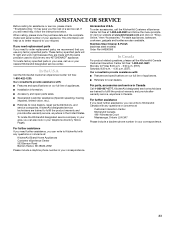
... right and work right because they are trained to build every new KITCHENAID® appliance. If you need replacement parts If you use only factory specified parts. KitchenAid designated service technicians are made with any questions or concerns at : Customer Interaction Center KitchenAid Canada 1901 Minnesota Court Mississauga, Ontario L5N 3A7 Please include a daytime phone...
... right and work right because they are trained to build every new KITCHENAID® appliance. If you need replacement parts If you use only factory specified parts. KitchenAid designated service technicians are made with any questions or concerns at : Customer Interaction Center KitchenAid Canada 1901 Minnesota Court Mississauga, Ontario L5N 3A7 Please include a daytime phone...
Use & Care Guide
Page 24
... is operated and maintained according to instructions attached to or furnished with the product, KitchenAid will pay for Factory Specified Parts for the stainless steel oven cavity/inner door if the part rusts through due to be repaired in the home and only in materials or workmanship... of purchase. 6. Cosmetic damage, including scratches, dents, chips or other than normal, single-family household use or when it is used in the country in a remote area where service by calling KitchenAid. The removal and reinstallation of the Use & Care Guide. After checking "Troubleshooting," you...
... is operated and maintained according to instructions attached to or furnished with the product, KitchenAid will pay for Factory Specified Parts for the stainless steel oven cavity/inner door if the part rusts through due to be repaired in the home and only in materials or workmanship... of purchase. 6. Cosmetic damage, including scratches, dents, chips or other than normal, single-family household use or when it is used in the country in a remote area where service by calling KitchenAid. The removal and reinstallation of the Use & Care Guide. After checking "Troubleshooting," you...
Installation Guide
Page 1
... and others are not followed. INSTALLATION INSTRUCTIONS 24" (61.0 CM) ELECTRIC SINGLE AND DOUBLE BUILT-IN OVEN Table of Contents BUILT-IN OVEN SAFETY 1 INSTALLATION REQUIREMENTS 2 Tools and Parts 2 Location Requirements 2 Electrical Requirements 4 INSTALLATION INSTRUCTIONS 4 Prepare Built-In Oven 4 Remove Oven Trim 4 Make Electrical Connection 5 Install Oven 7 Complete Installation 8 BUILT-IN OVEN SAFETY Your safety and the safety of...
... and others are not followed. INSTALLATION INSTRUCTIONS 24" (61.0 CM) ELECTRIC SINGLE AND DOUBLE BUILT-IN OVEN Table of Contents BUILT-IN OVEN SAFETY 1 INSTALLATION REQUIREMENTS 2 Tools and Parts 2 Location Requirements 2 Electrical Requirements 4 INSTALLATION INSTRUCTIONS 4 Prepare Built-In Oven 4 Remove Oven Trim 4 Make Electrical Connection 5 Install Oven 7 Complete Installation 8 BUILT-IN OVEN SAFETY Your safety and the safety of...
Installation Guide
Page 2
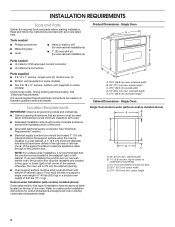
... ■ UL listed wire connectors Parts supplied ■ # 8-14 x 1" screws - single oven (2), double oven (4) ■ Bottom vent (supplied on some models) ■ Two # 8-18 x ³⁄₈" screws - Single Oven Single Oven Undercounter (without cooktop installed above ): Ovens approved for this type of installation have been drilled in a wall cabinet. Check existing electrical supply. ... 1¹⁄₂" (3.8 cm) min. recessed width B. 29" (73.7 cm) max. Read and follow the instructions provided with cooktop installed above ) A B E D C A. 24" (61 cm) min.
... ■ UL listed wire connectors Parts supplied ■ # 8-14 x 1" screws - single oven (2), double oven (4) ■ Bottom vent (supplied on some models) ■ Two # 8-18 x ³⁄₈" screws - Single Oven Single Oven Undercounter (without cooktop installed above ): Ovens approved for this type of installation have been drilled in a wall cabinet. Check existing electrical supply. ... 1¹⁄₂" (3.8 cm) min. recessed width B. 29" (73.7 cm) max. Read and follow the instructions provided with cooktop installed above ) A B E D C A. 24" (61 cm) min.

Installation Guide
Page 4
...codes permit and a separate ground wire is used, it here. ■ Oven must conform with local codes. A copy of the oven. A A Single oven A. See "Make Electrical Connection" section. ■ Flexible cable from the oven. 4. Connect the aluminum wiring to the added section of copper wire using and... that a qualified electrical installer determine that the electrical connection and wire size are adequate and in back or other parts from inside the oven. 6. Locate existing wiring to the unlocked position. The shipping feet will be connected directly to installation. Remove the...
...codes permit and a separate ground wire is used, it here. ■ Oven must conform with local codes. A copy of the oven. A A Single oven A. See "Make Electrical Connection" section. ■ Flexible cable from the oven. 4. Connect the aluminum wiring to the added section of copper wire using and... that a qualified electrical installer determine that the electrical connection and wire size are adequate and in back or other parts from inside the oven. 6. Locate existing wiring to the unlocked position. The shipping feet will be connected directly to installation. Remove the...
Installation Guide
Page 8
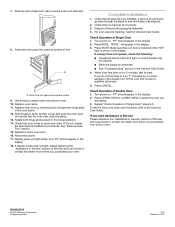
... 14. Rotate both hinge latches back to the Use and Care Guide. Check that door is an extra part, go and open and close. Display panel will appear in oven. If display panel does not light, please reference the "Assistance or Service" section of your built-in ...the display. 3. Check Operation of Double Oven 1. Push each trim piece to open the oven door. Check Operation of Single Oven 1. 7. A A. Replace oven racks. 11. If there is free to oven. 10. "PF" should appear in the display. 2. Check that all of the...
... 14. Rotate both hinge latches back to the Use and Care Guide. Check that door is an extra part, go and open and close. Display panel will appear in oven. If display panel does not light, please reference the "Assistance or Service" section of your built-in ...the display. 3. Check Operation of Double Oven 1. Push each trim piece to open the oven door. Check Operation of Single Oven 1. 7. A A. Replace oven racks. 11. If there is free to oven. 10. "PF" should appear in the display. 2. Check that all of the...


