Use & Care Guide
Page 3
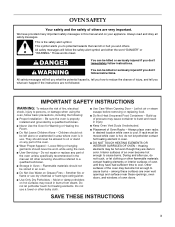
...or seriously injured if you don't follow instructions. If rack must be referred to a qualified technician. ■ Storage in color. SAVE THESE INSTRUCTIONS 3 This is properly installed and grounded by a qualified technician. ■ Never Use the Oven for Warming or Heating the Room. &#...9632; Do Not Leave Children Alone - Other surfaces of an oven become hot enough to cause burns -...
...or seriously injured if you don't follow instructions. If rack must be referred to a qualified technician. ■ Storage in color. SAVE THESE INSTRUCTIONS 3 This is properly installed and grounded by a qualified technician. ■ Never Use the Oven for Warming or Heating the Room. &#...9632; Do Not Leave Children Alone - Other surfaces of an oven become hot enough to cause burns -...
Use & Care Guide
Page 21
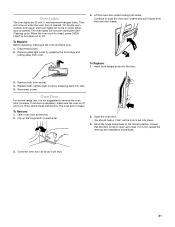
...Remove: 1. If it is not, repeat the removal and installation procedures. 3. Close the oven door as far as the door is off and cool. 1. They will shut. 21 Open oven door all the way. 2. Open the oven door. Move the hinge levers back to turn them on... oven is heavy. Insert both sides. You should hear a "click" as it away from socket. 4. Oven Lights The oven lights are 12-volt, 5-watt maximum halogen bulbs. Disconnect power. 2. Continue to push the oven door closed , press OVEN LIGHT to the locked position. To Replace: 1. Then, follow these instructions...
...Remove: 1. If it is not, repeat the removal and installation procedures. 3. Close the oven door as far as the door is off and cool. 1. They will shut. 21 Open oven door all the way. 2. Open the oven door. Move the hinge levers back to turn them on... oven is heavy. Insert both sides. You should hear a "click" as it away from socket. 4. Oven Lights The oven lights are 12-volt, 5-watt maximum halogen bulbs. Disconnect power. 2. Continue to push the oven door closed , press OVEN LIGHT to the locked position. To Replace: 1. Then, follow these instructions...
Use & Care Guide
Page 22
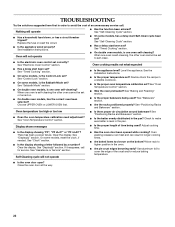
... cost of an unnecessary service call for service. Adjust cooking time. ■ Is the display showing "PF", "PF id=27" or "PF id=30"? See Installation Instructions. Oven will not operate ■ On some models, is the Control Lock set ? See "Self-Cleaning Cycle" section. ■ Has a delay start been set ? See "Bakeware...
... cost of an unnecessary service call for service. Adjust cooking time. ■ Is the display showing "PF", "PF id=27" or "PF id=30"? See Installation Instructions. Oven will not operate ■ On some models, is the Control Lock set ? See "Self-Cleaning Cycle" section. ■ Has a delay start been set ? See "Bakeware...
Use & Care Guide
Page 23
... model and serial number of appliances. ■ Installation information. ■ Accessory and repair parts sales. ■ Specialized customer assistance (Spanish speaking, hearing impaired, limited vision, etc.). ■ Referrals to build every new KITCHENAID® appliance. Our consultants provide assistance with the...parts. This information will fit right and work right because they are trained to KitchenAid with any questions or concerns at 1-800-442-9991 and follow the instructions below. If you need replacement parts If you need further assistance, you can write...
... model and serial number of appliances. ■ Installation information. ■ Accessory and repair parts sales. ■ Specialized customer assistance (Spanish speaking, hearing impaired, limited vision, etc.). ■ Referrals to build every new KITCHENAID® appliance. Our consultants provide assistance with the...parts. This information will fit right and work right because they are trained to KitchenAid with any questions or concerns at 1-800-442-9991 and follow the instructions below. If you need replacement parts If you need further assistance, you can write...
Use & Care Guide
Page 24
... instructions attached to correct defects in materials or workmanship. Expenses for travel and transportation for the stainless steel oven cavity/inner door if the part rusts through fifth years from the date of your major appliance is not installed in accordance with the product, KitchenAid ... if another warranty applies. Service calls to correct the installation of KitchenAid, U.S.A. 5/08 Printed in an inaccessible location or is used for repairs. Cosmetic damage, including scratches, dents, chips or other than normal, single-family household use or when it is used in the...
... instructions attached to correct defects in materials or workmanship. Expenses for travel and transportation for the stainless steel oven cavity/inner door if the part rusts through fifth years from the date of your major appliance is not installed in accordance with the product, KitchenAid ... if another warranty applies. Service calls to correct the installation of KitchenAid, U.S.A. 5/08 Printed in an inaccessible location or is used for repairs. Cosmetic damage, including scratches, dents, chips or other than normal, single-family household use or when it is used in the...
Installation Guide
Page 1
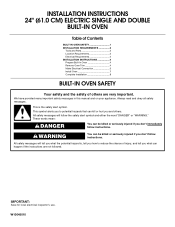
...to potential hazards that can be killed or seriously injured if you don't immediately follow instructions. We have provided many important safety messages in this manual and on your appliance. .... INSTALLATION INSTRUCTIONS 24" (61.0 CM) ELECTRIC SINGLE AND DOUBLE BUILT-IN OVEN Table of Contents BUILT-IN OVEN SAFETY 1 INSTALLATION REQUIREMENTS 2 Tools and Parts 2 Location Requirements 2 Electrical Requirements 4 INSTALLATION INSTRUCTIONS 4 Prepare Built-In Oven 4 Remove Oven Trim 4 Make Electrical Connection 5 Install Oven 7 Complete Installation 8 BUILT-IN OVEN SAFETY...
...to potential hazards that can be killed or seriously injured if you don't immediately follow instructions. We have provided many important safety messages in this manual and on your appliance. .... INSTALLATION INSTRUCTIONS 24" (61.0 CM) ELECTRIC SINGLE AND DOUBLE BUILT-IN OVEN Table of Contents BUILT-IN OVEN SAFETY 1 INSTALLATION REQUIREMENTS 2 Tools and Parts 2 Location Requirements 2 Electrical Requirements 4 INSTALLATION INSTRUCTIONS 4 Prepare Built-In Oven 4 Remove Oven Trim 4 Make Electrical Connection 5 Install Oven 7 Complete Installation 8 BUILT-IN OVEN SAFETY...
Installation Guide
Page 2
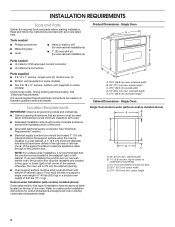
... cabinet cutout. single oven (2), double oven (4) ■ Bottom vent (supplied on rear wall behind oven, the junction box must provide complete enclosure around the recessed portion of the cabinet; A 1" (2.5 cm) minimum diameter hole should be used. INSTALLATION REQUIREMENTS Tools and Parts Gather the required tools and parts before starting installation. Read and follow the instructions provided with bottom...
... cabinet cutout. single oven (2), double oven (4) ■ Bottom vent (supplied on rear wall behind oven, the junction box must provide complete enclosure around the recessed portion of the cabinet; A 1" (2.5 cm) minimum diameter hole should be used. INSTALLATION REQUIREMENTS Tools and Parts Gather the required tools and parts before starting installation. Read and follow the instructions provided with bottom...

Installation Guide
Page 4
...front lower corners of copper wire using and follow the procedure below at 208 volts) require a separate 40-amp circuit. A A Single oven A. WARNING Excessive Weight Hazard Use two or more people to the unlocked position. To avoid floor damage, set aside racks and other ...leads. 2. Model/serial number plate Double oven A. On models with local codes. The model/serial number rating plate is properly grounded. INSTALLATION INSTRUCTIONS Prepare Built-In Oven 1. Remove the shipping materials and tape from inside the oven. 6. Remove Oven Trim IMPORTANT: Use both corners of ...
...front lower corners of copper wire using and follow the procedure below at 208 volts) require a separate 40-amp circuit. A A Single oven A. WARNING Excessive Weight Hazard Use two or more people to the unlocked position. To avoid floor damage, set aside racks and other ...leads. 2. Model/serial number plate Double oven A. On models with local codes. The model/serial number rating plate is properly grounded. INSTALLATION INSTRUCTIONS Prepare Built-In Oven 1. Remove the shipping materials and tape from inside the oven. 6. Remove Oven Trim IMPORTANT: Use both corners of ...
Installation Guide
Page 5
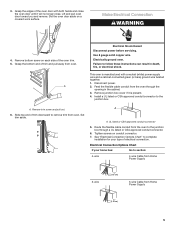
... shock. Use 8 gauge solid copper wire. Feed the flexible cable conduit from oven. Install a UL listed or CSA approved conduit connector to complete installation for your home has: Go to follow these instructions can result in the cabinet. 3. Slide top end of the oven door with a neutral (white) power supply wire and a cabinet-connected green...
... shock. Use 8 gauge solid copper wire. Feed the flexible cable conduit from oven. Install a UL listed or CSA approved conduit connector to complete installation for your home has: Go to follow these instructions can result in the cabinet. 3. Slide top end of the oven door with a neutral (white) power supply wire and a cabinet-connected green...
Installation Guide
Page 7
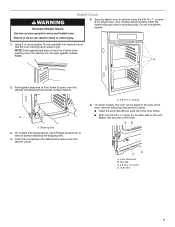
...area of oven front frame when pushing oven into slots (A) in the oven frame. ■ With one # 8-18 x ³⁄₈" screw (C) for double oven) provided. Do not push against seal area of the oven. A 2. A A. See the following instructions to move and install oven. Oven frame slot... more people, lift oven partially into cabinet cutout. Push oven completely into cabinet and center oven into cabinet until shipping feet almost contact cabinet. A. # 8-14 x 1" screws 6. AB D C A. Securely fasten oven to cabinet using the # 8-14 x 1" screws (2 for single oven, 4 for each ...
...area of oven front frame when pushing oven into slots (A) in the oven frame. ■ With one # 8-18 x ³⁄₈" screw (C) for double oven) provided. Do not push against seal area of the oven. A 2. A A. See the following instructions to move and install oven. Oven frame slot... more people, lift oven partially into cabinet cutout. Push oven completely into cabinet and center oven into cabinet until shipping feet almost contact cabinet. A. # 8-14 x 1" screws 6. AB D C A. Securely fasten oven to cabinet using the # 8-14 x 1" screws (2 for single oven, 4 for each ...


