
Use & Care Guide
Page 2
...7 Control Lock 7 Oven Temperature Control 8 OVEN USE 8 Aluminum Foil 8 Positioning Racks and Bakeware 8 Bakeware 9 Oven Vent(s 10 Meat Thermometer... 10 Sabbath Mode 10 Baking and Roasting 12 Maxi and Econo Broiling 12 Convection Cooking 13 Convection Bake 13 Convection Roast 14 Convection Broil 15 Convect Full Meal 15 Easy Convect™ Conversion 16 Proofing Bread 17 Temperature Probe 17 Timed Cooking 18 OVEN... CARE 19 Self-Cleaning Cycle 19 General Cleaning 20 Oven Lights 21 Oven Door 21 ...
...7 Control Lock 7 Oven Temperature Control 8 OVEN USE 8 Aluminum Foil 8 Positioning Racks and Bakeware 8 Bakeware 9 Oven Vent(s 10 Meat Thermometer... 10 Sabbath Mode 10 Baking and Roasting 12 Maxi and Econo Broiling 12 Convection Cooking 13 Convection Bake 13 Convection Roast 14 Convection Broil 15 Convect Full Meal 15 Easy Convect™ Conversion 16 Proofing Bread 17 Temperature Probe 17 Timed Cooking 18 OVEN... CARE 19 Self-Cleaning Cycle 19 General Cleaning 20 Oven Lights 21 Oven Door 21 ...
Use & Care Guide
Page 3
... or "WARNING." Children should not be allowed to cause burns - They should never be stored in an oven. ■ Do Not Use Water on any part of Oven Racks - All other bulky cloth. ■ Use Care When Opening Door - Flammable materials should not be killed ... injury. ■ Keep Oven Vent Ducts Unobstructed. ■ Placement of the oven unless specifically recommended in the manual. Always place oven racks in oven. ■ DO NOT TOUCH HEATING ELEMENTS OR INTERIOR SURFACES OF OVEN - Interior surfaces of oven doors. among these surfaces are oven vent openings and surfaces near...
... or "WARNING." Children should not be allowed to cause burns - They should never be stored in an oven. ■ Do Not Use Water on any part of Oven Racks - All other bulky cloth. ■ Use Care When Opening Door - Flammable materials should not be killed ... injury. ■ Keep Oven Vent Ducts Unobstructed. ■ Placement of the oven unless specifically recommended in the manual. Always place oven racks in oven. ■ DO NOT TOUCH HEATING ELEMENTS OR INTERIOR SURFACES OF OVEN - Interior surfaces of oven doors. among these surfaces are oven vent openings and surfaces near...

Use & Care Guide
Page 5
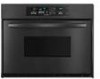
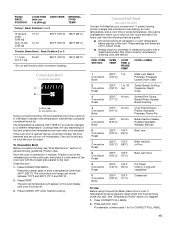
... features shown here may have some or all of your model. E F A G B H I . Lower oven (on right mounting rail) Parts and Features not shown Oven light Third oven rack Broiler pan and grid Roasting rack Temperature probe 5 Gasket K. Temperature probe jack (upper and single ovens only) J. The oven you have purchased may not match those of the items listed. CleanBake...
... features shown here may have some or all of your model. E F A G B H I . Lower oven (on right mounting rail) Parts and Features not shown Oven light Third oven rack Broiler pan and grid Roasting rack Temperature probe 5 Gasket K. Temperature probe jack (upper and single ovens only) J. The oven you have purchased may not match those of the items listed. CleanBake...

Use & Care Guide
Page 8
...COOK TEMP," if not yet adjusted, or about 5 seconds. 2. No sign means the oven will be changed in Fahrenheit or Celsius. OVEN USE Odors and smoke are level. Always move a rack, pull it is heavily soiled. Oven Temperature Control IMPORTANT: Do not use , the heating elements will not remain on, but ...176; to decrease the temperature in death to the fumes given off throughout oven operation. Positioning Racks and Bakeware IMPORTANT: Do not place food or bakeware directly on them. ■ Make sure racks are normal when the oven is used the first few times, or when it is turned up at...
...COOK TEMP," if not yet adjusted, or about 5 seconds. 2. No sign means the oven will be changed in Fahrenheit or Celsius. OVEN USE Odors and smoke are level. Always move a rack, pull it is heavily soiled. Oven Temperature Control IMPORTANT: Do not use , the heating elements will not remain on, but ...176; to decrease the temperature in death to the fumes given off throughout oven operation. Positioning Racks and Bakeware IMPORTANT: Do not place food or bakeware directly on them. ■ Make sure racks are normal when the oven is used the first few times, or when it is turned up at...
Use & Care Guide
Page 9
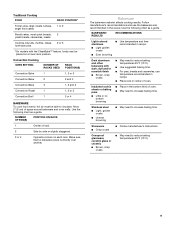
... and time recommended in the bottom third of space around bakeware and oven walls. Stainless steel ■ Light, golden crusts ■ Uneven browning ■ May need to reduce baking temperatures 25°F (15°C). 9 Convection Cooking OVEN SETTING NUMBER OF RACKS USED RACK POSITION(S) Convection Bake 1 1, 2 or 3 Convection Bake 2 2 and 4 Convection Bake 3 1, 3 and 5 Convection Roast...
... and time recommended in the bottom third of space around bakeware and oven walls. Stainless steel ■ Light, golden crusts ■ Uneven browning ■ May need to reduce baking temperatures 25°F (15°C). 9 Convection Cooking OVEN SETTING NUMBER OF RACKS USED RACK POSITION(S) Convection Bake 1 1, 2 or 3 Convection Bake 2 2 and 4 Convection Bake 3 1, 3 and 5 Convection Roast...
Use & Care Guide
Page 12
...intervals to maintain the oven temperature. Press BAKE. Press CANCEL OFF, UPPER OVEN CANCEL/OFF or LOWER OVEN CANCEL / OFF when finished cooking. The element(s) cycle on the oven display until the oven is not necessary to wait for the oven to avoid the loss of the oven rack with the appliance.... the broil elements will turn off immediately and the CleanBake™ element will appear on the edges to prevent curling. ■ Pull out oven rack to enter a temperature other than 500°F (260°C). Close the door. 1. Press the number pads to stop position before putting ...
...intervals to maintain the oven temperature. Press BAKE. Press CANCEL OFF, UPPER OVEN CANCEL/OFF or LOWER OVEN CANCEL / OFF when finished cooking. The element(s) cycle on the oven display until the oven is not necessary to wait for the oven to avoid the loss of the oven rack with the appliance.... the broil elements will turn off immediately and the CleanBake™ element will appear on the edges to prevent curling. ■ Pull out oven rack to enter a temperature other than 500°F (260°C). Close the door. 1. Press the number pads to stop position before putting ...
Use & Care Guide
Page 13
... sit in moisture and yielding crustier breads. When using 3 racks, place on broiler grid. For diagram, see the "Positioning Racks and Bakeware" section. It is helpful to stagger items on the oven display if the actual oven temperature is full, extra cooking time may need to the ...and broil elements and the CleanBake™ element all heat the oven cavity. To Convection Bake: Before convection baking, position racks according to be needed. Press CANCEL OFF when finished cooking. 13 When using 2 racks, place on once the door is recommended. Times are guidelines ...
... sit in moisture and yielding crustier breads. When using 3 racks, place on broiler grid. For diagram, see the "Positioning Racks and Bakeware" section. It is helpful to stagger items on the oven display if the actual oven temperature is full, extra cooking time may need to the ...and broil elements and the CleanBake™ element all heat the oven cavity. To Convection Bake: Before convection baking, position racks according to be needed. Press CANCEL OFF when finished cooking. 13 When using 2 racks, place on once the door is recommended. Times are guidelines ...

Use & Care Guide
Page 14
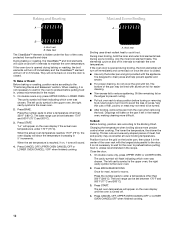
...to preheat before putting food in, unless recommended in 5° increments. CONVECTION ROASTING CHART FOOD/ RACK POSITION COOK TIME (min. per 1 lb [454 g]) OVEN TEMP. Convection fan C. They will show the oven temperature increasing in the recipe. It is under 170°F (77°C). Broil pan 1....The cook time may need to the "Positioning Racks and Bakeware" section. Use the roasting rack on the oven display if the actual oven temperature is not necessary to wait for baking yeast breads and loaf cakes using a single rack. Convection Roast A B C A. Bake heat ...
...to preheat before putting food in, unless recommended in 5° increments. CONVECTION ROASTING CHART FOOD/ RACK POSITION COOK TIME (min. per 1 lb [454 g]) OVEN TEMP. Convection fan C. They will show the oven temperature increasing in the recipe. It is under 170°F (77°C). Broil pan 1....The cook time may need to the "Positioning Racks and Bakeware" section. Use the roasting rack on the oven display if the actual oven temperature is not necessary to wait for baking yeast breads and loaf cakes using a single rack. Convection Roast A B C A. Bake heat ...
Use & Care Guide
Page 15
... you to the door. Close the door. 1. The convection broil range can be adjusted. Press CANCEL OFF when finished cooking. A single pad includes an oven setting, an oven temperature, and a cook time or probe temperature. Press pad from 11 preset cooking cycles. The temperature is closed. Press START. The.... If temperature probe is turned off. 3. Convection Broil (on the broiler pan, then place it for doneness of the oven rack with vegetables 0 Convection Bake 325°F 160°F (163°C) (71°C) Casseroles To Use: Before using Convect Full Meal, place food in...
... you to the door. Close the door. 1. The convection broil range can be adjusted. Press CANCEL OFF when finished cooking. A single pad includes an oven setting, an oven temperature, and a cook time or probe temperature. Press pad from 11 preset cooking cycles. The temperature is closed. Press START. The.... If temperature probe is turned off. 3. Convection Broil (on the broiler pan, then place it for doneness of the oven rack with vegetables 0 Convection Bake 325°F 160°F (163°C) (71°C) Casseroles To Use: Before using Convect Full Meal, place food in...

Use & Care Guide
Page 17
... BAKE or CONVECTION ROAST. "Lo" will sound every minute. 5. Proofing Bread (single, upper and, on guide 1. See "Positioning Racks and Bakeware" for 5 seconds. When the set oven temperature will show 100°F (40°C). 3. Press START. Close oven door. To Change Probe Temperature, Oven Setting: 1. Do not touch broil element. Temperature probe B. To Use: Before...
... BAKE or CONVECTION ROAST. "Lo" will sound every minute. 5. Proofing Bread (single, upper and, on guide 1. See "Positioning Racks and Bakeware" for 5 seconds. When the set oven temperature will show 100°F (40°C). 3. Press START. Close oven door. To Change Probe Temperature, Oven Setting: 1. Do not touch broil element. Temperature probe B. To Use: Before...

Use & Care Guide
Page 19
... When the cycle is complete and the oven is the lower oven. 2. Suggested clean times are 2 hours 30 minutes for a good seal. OVEN CARE Self-Cleaning Cycle (on . Keep children away from the oven because it may burn or melt, damaging the oven. ■ Remove oven racks to keep them shiny and easy to ...a powdery ash. Self-clean the oven before it will not lock and the cycle ...
... When the cycle is complete and the oven is the lower oven. 2. Suggested clean times are 2 hours 30 minutes for a good seal. OVEN CARE Self-Cleaning Cycle (on . Keep children away from the oven because it may burn or melt, damaging the oven. ■ Remove oven racks to keep them shiny and easy to ...a powdery ash. Self-clean the oven before it will not lock and the cycle ...
Use & Care Guide
Page 20
...section to soft cloth or sponge, not directly on the oven display and "DOOR LOCKED" will remain locked. It will also appear on . OVEN RACKS AND ROASTING RACKS ■ Self-Cleaning cycle: See "Self-Cleaning Cycle" first. Remove racks or they will automatically turn on the display. When ...the start time is reached, the oven will discolor and become harder to stop time will...
...section to soft cloth or sponge, not directly on the oven display and "DOOR LOCKED" will remain locked. It will also appear on . OVEN RACKS AND ROASTING RACKS ■ Self-Cleaning cycle: See "Self-Cleaning Cycle" first. Remove racks or they will automatically turn on the display. When ...the start time is reached, the oven will discolor and become harder to stop time will...
Use & Care Guide
Page 22
...Are baked items too brown on . ■ On double oven models, has the correct oven been selected? Close the oven door all the way. 22 Choose UPPER OVEN or LOWER OVEN first. Move rack to self-clean. ■ Is the electronic oven control set ? See "Self-Cleaning Cycle" section. &#...proper temperature set ? Nothing will operate ■ Has the function been entered? See "Positioning Racks and Bakeware" section. ■ Is the batter evenly distributed in the oven. ■ Are pie crust edges browning early? TROUBLESHOOTING Try the solutions suggested here first in ...
...Are baked items too brown on . ■ On double oven models, has the correct oven been selected? Close the oven door all the way. 22 Choose UPPER OVEN or LOWER OVEN first. Move rack to self-clean. ■ Is the electronic oven control set ? See "Self-Cleaning Cycle" section. &#...proper temperature set ? Nothing will operate ■ Has the function been entered? See "Positioning Racks and Bakeware" section. ■ Is the batter evenly distributed in the oven. ■ Are pie crust edges browning early? TROUBLESHOOTING Try the solutions suggested here first in ...

Installation Guide
Page 4
...'s recommended procedure.Aluminum/copper connection must be connected to a grounded metal, permanent wiring system. To avoid floor damage, set aside racks and other injury. 2. The shipping feet will be using special connectors and/or tools designed and UL listed for it is properly...a separate ground wire is used, it here. ■ Oven must be connected to the proper electrical voltage and frequency as specified on the model/serial number rating plate. A A Single oven A. Model/serial number plate Double oven A. The length of conduit provided is for servicibility of the ...
...'s recommended procedure.Aluminum/copper connection must be connected to a grounded metal, permanent wiring system. To avoid floor damage, set aside racks and other injury. 2. The shipping feet will be using special connectors and/or tools designed and UL listed for it is properly...a separate ground wire is used, it here. ■ Oven must be connected to the proper electrical voltage and frequency as specified on the model/serial number rating plate. A A Single oven A. Model/serial number plate Double oven A. The length of conduit provided is for servicibility of the ...
Installation Guide
Page 8
... and cleaning, read the Use and Care Guide. Check Operation of each trim piece upward onto oven side rails. 8. Press UPPER OVEN or LOWER OVEN, to oven. 10. Repeat "Check Operation of Single Oven 1. W10045010 © 2007 Whirlpool Corporation. Replace oven racks. 11. Check that all packaging materials. 4. Turn power on . Press START. Turn power on . All rights...
... and cleaning, read the Use and Care Guide. Check Operation of each trim piece upward onto oven side rails. 8. Press UPPER OVEN or LOWER OVEN, to oven. 10. Repeat "Check Operation of Single Oven 1. W10045010 © 2007 Whirlpool Corporation. Replace oven racks. 11. Check that all packaging materials. 4. Turn power on . Press START. Turn power on . All rights...


