Instruction Manual
Page 2
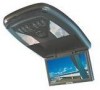
...about this and other Kenwood products, visit the Kenwood Corporation Web site at: www.kenwoodeurope.com Table of the LZH-70W's features and capabilities. Your LZH-70W console lets rear-seat passengers enjoy audio/video entertainment from its 7" diagonal LCD screen and wired &...switch 4 Dome lights 4 Screen release button 4 LCD screen 4 Auxiliary audio/video input 4 Wired headphone jacks 4 Remote Control Functions 5 Power button 5 Mute button 5 Source button 5 Menu button 5 Volume control buttons 5 Dimmer button 5 Installing Batteries in the Remote Control 5 Basic Console Operation...
...about this and other Kenwood products, visit the Kenwood Corporation Web site at: www.kenwoodeurope.com Table of the LZH-70W's features and capabilities. Your LZH-70W console lets rear-seat passengers enjoy audio/video entertainment from its 7" diagonal LCD screen and wired &...switch 4 Dome lights 4 Screen release button 4 LCD screen 4 Auxiliary audio/video input 4 Wired headphone jacks 4 Remote Control Functions 5 Power button 5 Mute button 5 Source button 5 Menu button 5 Volume control buttons 5 Dimmer button 5 Installing Batteries in the Remote Control 5 Basic Console Operation...
Instruction Manual
Page 3
... too much dust or the possibility of water splashing. • Do not subject the monitor unit to excessive shock, as they are 18 gauge (AWG18) or thicker to prevent ... may scratch the screen. LZH-70W Instruction Manual 3 The liquid crystal fluid may become dirty or damaged. This Product is securely installed. CAUTION To prevent damage to the LZH-70W, take the following precautions...Kenwood dealer. RESETTING THE MICROPROCESSOR If the unit does not seem to be dangerous to your body or clothing, wash it contains glass parts. • Do not touch the liquid crystal fluid if the LCD...
... too much dust or the possibility of water splashing. • Do not subject the monitor unit to excessive shock, as they are 18 gauge (AWG18) or thicker to prevent ... may scratch the screen. LZH-70W Instruction Manual 3 The liquid crystal fluid may become dirty or damaged. This Product is securely installed. CAUTION To prevent damage to the LZH-70W, take the following precautions...Kenwood dealer. RESETTING THE MICROPROCESSOR If the unit does not seem to be dangerous to your body or clothing, wash it contains glass parts. • Do not touch the liquid crystal fluid if the LCD...
Instruction Manual
Page 5
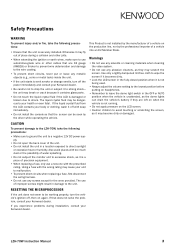
...the lights to turn on and off with the vehicle's interior lighting, and the OFF position will automatically turn the lights on. Install two AAA batteries with the LZH-70W.) • When the MENU button is displaying a picture, adjust the viewing angle and Dimmer control to optimise the picture quality... A/V Input lets you connect optional A/V equipment, such as on the dashboard. Installing Batteries in the ON position, as shown above . 2. The power will prevent the lights from the screen to reduce the LCD screen's brightness for use of an RCA Y-cable to connect to both batteries ...
...the lights to turn on and off with the vehicle's interior lighting, and the OFF position will automatically turn the lights on. Install two AAA batteries with the LZH-70W.) • When the MENU button is displaying a picture, adjust the viewing angle and Dimmer control to optimise the picture quality... A/V Input lets you connect optional A/V equipment, such as on the dashboard. Installing Batteries in the ON position, as shown above . 2. The power will prevent the lights from the screen to reduce the LCD screen's brightness for use of an RCA Y-cable to connect to both batteries ...
Instruction Manual
Page 6
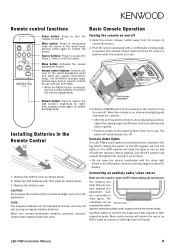
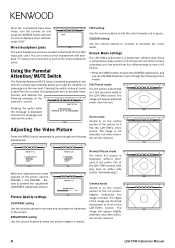
... at the time the console was installed) allows you to get the attention of passengers in on the console's screen: MUTE ON Pressing the switch while the message is stretched so it fills the LZH-70W's entire screen. Since a conventional video picture (4:3 format) will be reduced. 6 LZH-70W Instruction Manual buttons to perform the adjustment... to cycle through the following screen modes: Full Picture mode The 4:3 picture is displayed removes the message and restores the audio. Screen Mode settings The LZH-70W's LCD screen is a widescreen (16:9) format.
... at the time the console was installed) allows you to get the attention of passengers in on the console's screen: MUTE ON Pressing the switch while the message is stretched so it fills the LZH-70W's entire screen. Since a conventional video picture (4:3 format) will be reduced. 6 LZH-70W Instruction Manual buttons to perform the adjustment... to cycle through the following screen modes: Full Picture mode The 4:3 picture is displayed removes the message and restores the audio. Screen Mode settings The LZH-70W's LCD screen is a widescreen (16:9) format.
Installation Manual
Page 1
LZH-70W OVERHEAD CONSOLE WITH 7" LCD SCREEN 7 page 2-7 INSTALLATION MANUAL CONSOLE DE PLAFOND AVEC ÉCRAN ACL À DIAGONALE 7" 7 page 8-13 MANUEL D'INSTALLATION OVERHEAD-KONSOLE MIT 7"-DIAGONAL-LCD-BILDSCHIRM 7 Seite 14-19 INSTALLATION-HANDBUCH PLAFONDCONSOLE MET 7" DIAGONAAL LCD-SCHERM 7 blz 20-25 INSTALLATIE HANDLEIDING CONSOLLE SOVRATESTA CON DISPLAY LCD DIAGONALE A 7 POLLICI 7 pagina 26-31 MANUALE DI INSTALLAZIONE CONSOLA DE TECHO...
LZH-70W OVERHEAD CONSOLE WITH 7" LCD SCREEN 7 page 2-7 INSTALLATION MANUAL CONSOLE DE PLAFOND AVEC ÉCRAN ACL À DIAGONALE 7" 7 page 8-13 MANUEL D'INSTALLATION OVERHEAD-KONSOLE MIT 7"-DIAGONAL-LCD-BILDSCHIRM 7 Seite 14-19 INSTALLATION-HANDBUCH PLAFONDCONSOLE MET 7" DIAGONAAL LCD-SCHERM 7 blz 20-25 INSTALLATIE HANDLEIDING CONSOLLE SOVRATESTA CON DISPLAY LCD DIAGONALE A 7 POLLICI 7 pagina 26-31 MANUALE DI INSTALLAZIONE CONSOLA DE TECHO...
Installation Manual
Page 2
...; It is the responsibility of the purchaser and installer to comply with all applicable laws and regulations governing the installation and use of this product. • Kenwood disclaims all liability for any property damage or personal injury that the installation of this and other Kenwood products, visit the Kenwood Corporation Web site at: www.kenwood.com 2 LZH-70W Installation Instructions
...; It is the responsibility of the purchaser and installer to comply with all applicable laws and regulations governing the installation and use of this product. • Kenwood disclaims all liability for any property damage or personal injury that the installation of this and other Kenwood products, visit the Kenwood Corporation Web site at: www.kenwood.com 2 LZH-70W Installation Instructions
Installation Manual
Page 3
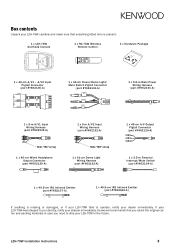
.... LZH-70W Installation Instructions 3 Box contents Unpack your dealer immediately. If your LZH-70W was shipped to you need to operate, notify your LZH-70W carefully and make sure that you retain the original carton and packing materials in case you directly, notify your LZH-70W in the future. Kenwood recommends that everything listed here is present: 1 x LZH-70W Overhead Console 1 x RC-70W...
.... LZH-70W Installation Instructions 3 Box contents Unpack your dealer immediately. If your LZH-70W was shipped to you need to operate, notify your LZH-70W carefully and make sure that you retain the original carton and packing materials in case you directly, notify your LZH-70W in the future. Kenwood recommends that everything listed here is present: 1 x LZH-70W Overhead Console 1 x RC-70W...
Installation Manual
Page 4
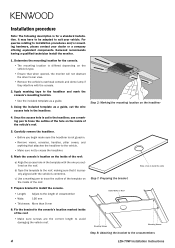
...mounting hardware, please contact your vehicle. Installation procedure Note: The following description is for the console. • The mounting location is differed depending on the vehicle's type. • Ensure that when opened, the monitor will not obstruct the driver's rear... Apply masking tape to crease the headliner. 6. Using the included template as a guide. 3. Kenwood recommends having a qualified technician install the monitor. 1. Once the access hole is not glued-in the headliner. It may have to be adapted to the crossmembers 4 LZH-70W Installation Instructions
...mounting hardware, please contact your vehicle. Installation procedure Note: The following description is for the console. • The mounting location is differed depending on the vehicle's type. • Ensure that when opened, the monitor will not obstruct the driver's rear... Apply masking tape to crease the headliner. 6. Using the included template as a guide. 3. Kenwood recommends having a qualified technician install the monitor. 1. Once the access hole is not glued-in the headliner. It may have to be adapted to the crossmembers 4 LZH-70W Installation Instructions
Installation Manual
Page 5
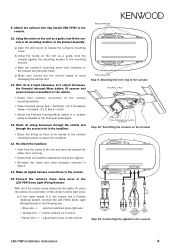
...harnesses through the vehicle and through the access hole in Step 5. 14. Connect the vehicle's dome lamp wires to the console LZH-70W Installation Instructions 5 Connect the LZH-70W's Dome Light Wiring Harness in its mounting location on the roof as a guide, hold the console against the mounting bracket ... connections to the vehicle. • Route their multipin connectors to the console 12. Using the marks on the bracket assembly: a) Open the LCD screen to the console. Re-attach the headliner. • Start from the centre of a volt meter on the vehicle's dome light wires:...
...harnesses through the vehicle and through the access hole in Step 5. 14. Connect the vehicle's dome lamp wires to the console LZH-70W Installation Instructions 5 Connect the LZH-70W's Dome Light Wiring Harness in its mounting location on the roof as a guide, hold the console against the mounting bracket ... connections to the vehicle. • Route their multipin connectors to the console 12. Using the marks on the bracket assembly: a) Open the LCD screen to the console. Re-attach the headliner. • Start from the centre of a volt meter on the vehicle's dome light wires:...
Installation Manual
Page 6
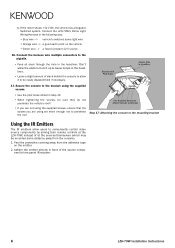
... you are short enough not to conveniently control video source components by aiming their remote controls at the LZH-70W, instead of the source component's front-panel IR receiver. 6 LZH-70W Installation Instructions Adhere the emitter directly in the headliner; Secure the console to the bracket using are using the...mounted some distance away from the adhesive tape on the vehicle • Green wire --> a fused constant 12 V source 16. Connect the LZH-70W's Dome Light Wiring Harness in Step 10. • When tightening the screws, be easily disassembled if necessary. 17.
... you are short enough not to conveniently control video source components by aiming their remote controls at the LZH-70W, instead of the source component's front-panel IR receiver. 6 LZH-70W Installation Instructions Adhere the emitter directly in the headliner; Secure the console to the bracket using are using the...mounted some distance away from the adhesive tape on the vehicle • Green wire --> a fused constant 12 V source 16. Connect the LZH-70W's Dome Light Wiring Harness in Step 10. • When tightening the screws, be easily disassembled if necessary. 17.

Installation Manual
Page 7
LZH-70W Installation Instructions 7
LZH-70W Installation Instructions 7


