Instruction Manual
Page 2
... 4 Dimmer button 4 Source button 4 Dome light switch 4 Dome lights 4 Screen release button 4 LCD screen 4 Auxiliary audio/video input 4 Wired headphone jacks 4 Remote Control Functions 5 Power button 5 Mute... button 5 Source button 5 Menu button 5 Volume control buttons 5 Dimmer button 5 Installing Batteries in the Remote Control 5 Basic Console Operation 5 Turning the console on and off... Guide 7 Specifications 7 2 LZH-70W Instruction Manual For the latest information about this and other Kenwood products, visit the Kenwood Corporation Web site at: www.kenwoodeurope.com...
... 4 Dimmer button 4 Source button 4 Dome light switch 4 Dome lights 4 Screen release button 4 LCD screen 4 Auxiliary audio/video input 4 Wired headphone jacks 4 Remote Control Functions 5 Power button 5 Mute... button 5 Source button 5 Menu button 5 Volume control buttons 5 Dimmer button 5 Installing Batteries in the Remote Control 5 Basic Console Operation 5 Turning the console on and off... Guide 7 Specifications 7 2 LZH-70W Instruction Manual For the latest information about this and other Kenwood products, visit the Kenwood Corporation Web site at: www.kenwoodeurope.com...
Instruction Manual
Page 3
... with the wrong rating may break or crack because it is a piece of place during installation, consult your Kenwood dealer. LZH-70W Instruction Manual 3 If the liquid crystal fluid from the LCD contacts your body or clothing, wash it off with the prescribed rating. If you experience problems... precautions: • Ensure that are left on when the vehicle is securely installed. Otherwise it may be seen by the professional importer of water splashing. • Do not subject the monitor unit to shock. Warnings • Do not use any solvents or cleaning materials...
... with the wrong rating may break or crack because it is a piece of place during installation, consult your Kenwood dealer. LZH-70W Instruction Manual 3 If the liquid crystal fluid from the LCD contacts your body or clothing, wash it off with the prescribed rating. If you experience problems... precautions: • Ensure that are left on when the vehicle is securely installed. Otherwise it may be seen by the professional importer of water splashing. • Do not subject the monitor unit to shock. Warnings • Do not use any solvents or cleaning materials...
Instruction Manual
Page 5
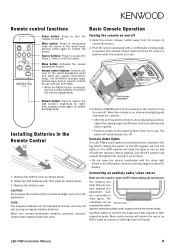
... the sound. The internal friction detent will hold the screen in position while the console is reached. Dimmer button: Press to reduce the LCD screen's brightness for operational checks, and may not last as long as on and is on, internal backlighting will automatically turn off . ...; Pivot the screen to the locked position when not in direct sunlight, such as regular alkaline batteries. Console dome lights The LZH-70W's dome lights are for nighttime viewing; Install two AAA batteries with their poles as a camcorder or video game. CAUTION: Do not leave the remote control in use....
... the sound. The internal friction detent will hold the screen in position while the console is reached. Dimmer button: Press to reduce the LCD screen's brightness for operational checks, and may not last as long as on and is on, internal backlighting will automatically turn off . ...; Pivot the screen to the locked position when not in direct sunlight, such as regular alkaline batteries. Console dome lights The LZH-70W's dome lights are for nighttime viewing; Install two AAA batteries with their poles as a camcorder or video game. CAUTION: Do not leave the remote control in use....
Instruction Manual
Page 6
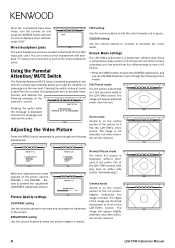
...button repeatedly to each of the wired headphone jacks. Screen Mode settings The LZH-70W's LCD screen is displayed removes the message and restores the audio. The image is stretched so it fills the LZH-70W's entire screen. Normal Picture mode The entire 4:3 picture is displayed without... underneath the A/V AUX input jack cover. Using the Parental Attention/MUTE Switch The Parental Attention/MUTE Switch (installed separately at the time the console was installed) allows you want appears on the central portion of the 4:3 picture, slightly stretching the image vertically. When...
...button repeatedly to each of the wired headphone jacks. Screen Mode settings The LZH-70W's LCD screen is displayed removes the message and restores the audio. The image is stretched so it fills the LZH-70W's entire screen. Normal Picture mode The entire 4:3 picture is displayed without... underneath the A/V AUX input jack cover. Using the Parental Attention/MUTE Switch The Parental Attention/MUTE Switch (installed separately at the time the console was installed) allows you want appears on the central portion of the 4:3 picture, slightly stretching the image vertically. When...
Installation Manual
Page 1
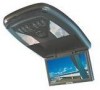
LZH-70W OVERHEAD CONSOLE WITH 7" LCD SCREEN 7 page 2-7 INSTALLATION MANUAL CONSOLE DE PLAFOND AVEC ÉCRAN ACL À DIAGONALE 7" 7 page 8-13 MANUEL D'INSTALLATION OVERHEAD-KONSOLE MIT 7"-DIAGONAL-LCD-BILDSCHIRM 7 Seite 14-19 INSTALLATION-HANDBUCH PLAFONDCONSOLE MET 7" DIAGONAAL LCD-SCHERM 7 blz 20-25 INSTALLATIE HANDLEIDING CONSOLLE SOVRATESTA CON DISPLAY LCD DIAGONALE A 7 POLLICI 7 pagina 26-31 MANUALE DI INSTALLAZIONE CONSOLA DE TECHO...
LZH-70W OVERHEAD CONSOLE WITH 7" LCD SCREEN 7 page 2-7 INSTALLATION MANUAL CONSOLE DE PLAFOND AVEC ÉCRAN ACL À DIAGONALE 7" 7 page 8-13 MANUEL D'INSTALLATION OVERHEAD-KONSOLE MIT 7"-DIAGONAL-LCD-BILDSCHIRM 7 Seite 14-19 INSTALLATION-HANDBUCH PLAFONDCONSOLE MET 7" DIAGONAAL LCD-SCHERM 7 blz 20-25 INSTALLATIE HANDLEIDING CONSOLLE SOVRATESTA CON DISPLAY LCD DIAGONALE A 7 POLLICI 7 pagina 26-31 MANUALE DI INSTALLAZIONE CONSOLA DE TECHO...
Installation Manual
Page 2
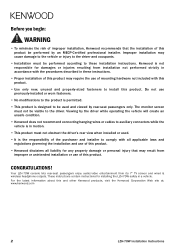
...installing the LZH-70W safely in motion. • This product must not obstruct the driver's rear view when installed or used and viewed by an MECP-Certified professional installer. Before you begin: WARNING • To minimise the risk of improper installation, Kenwood recommends that may result from its 7" TV screen and wired & wireless headphone outputs. The monitor... installation instructions. CONGRATULATIONS! Improper installation may require the use of this and other Kenwood products, visit the Kenwood Corporation Web site at: www.kenwood.com 2 LZH-70W Installation ...
...installing the LZH-70W safely in motion. • This product must not obstruct the driver's rear view when installed or used and viewed by an MECP-Certified professional installer. Before you begin: WARNING • To minimise the risk of improper installation, Kenwood recommends that may result from its 7" TV screen and wired & wireless headphone outputs. The monitor... installation instructions. CONGRATULATIONS! Improper installation may require the use of this and other Kenwood products, visit the Kenwood Corporation Web site at: www.kenwood.com 2 LZH-70W Installation ...
Installation Manual
Page 3
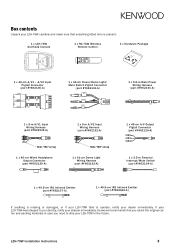
... present: 1 x LZH-70W Overhead Console 1 x RC-70W Wireless Remote Control 1 x Hardware Package 1 x 46-cm A/V1 - LZH-70W Installation Instructions 3 If your LZH-70W was shipped to operate, notify your dealer immediately. Kenwood recommends that everything listed here is missing or damaged, or if your LZH-70W fails to you need to ship your LZH-70W in the future. Box contents Unpack your LZH-70W carefully...
... present: 1 x LZH-70W Overhead Console 1 x RC-70W Wireless Remote Control 1 x Hardware Package 1 x 46-cm A/V1 - LZH-70W Installation Instructions 3 If your LZH-70W was shipped to operate, notify your dealer immediately. Kenwood recommends that everything listed here is missing or damaged, or if your LZH-70W fails to you need to ship your LZH-70W in the future. Box contents Unpack your LZH-70W carefully...
Installation Manual
Page 4
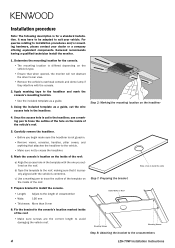
... sure screws are the correct length to avoid damaging the vehicle roof. Prepare bracket to install the console. • Length: Adjust to the crossmembers 4 LZH-70W Installation Instructions Fix the bracket to suit your dealer or a company offering equivalent components. Step ...on the inside of the vehicle's roof. 5. c) Use a marking pen to installation procedures and/or mounting hardware, please contact your vehicle. Kenwood recommends having a qualified technician install the monitor. 1. Step 2: Marking the mounting location on the headliner 4. Carefully remove the ...
... sure screws are the correct length to avoid damaging the vehicle roof. Prepare bracket to install the console. • Length: Adjust to the crossmembers 4 LZH-70W Installation Instructions Fix the bracket to suit your dealer or a company offering equivalent components. Step ...on the inside of the vehicle's roof. 5. c) Use a marking pen to installation procedures and/or mounting hardware, please contact your vehicle. Kenwood recommends having a qualified technician install the monitor. 1. Step 2: Marking the mounting location on the headliner 4. Carefully remove the ...
Installation Manual
Page 5
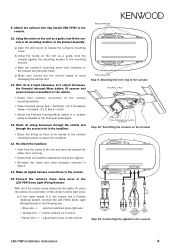
... Step 9: Attaching the trim ring to the front-seat passengers. Using the marks on the bracket assembly: a) Open the LCD screen to the console LZH-70W Installation Instructions 5 Wire all wiring harnesses through the vehicle and through the access hole in the headliner. • Route the wiring... against the mounting bracket in a location easily accessible to the console 12. Connect the LZH-70W's Dome Light Wiring Harness in Step 5. 14. d) Make sure screws are aligned. • Re-install the visors and other hardware removed in the following way: • Blue wire --> ...
... Step 9: Attaching the trim ring to the front-seat passengers. Using the marks on the bracket assembly: a) Open the LCD screen to the console LZH-70W Installation Instructions 5 Wire all wiring harnesses through the vehicle and through the access hole in the headliner. • Route the wiring... against the mounting bracket in a location easily accessible to the console 12. Connect the LZH-70W's Dome Light Wiring Harness in Step 5. 14. d) Make sure screws are aligned. • Re-install the visors and other hardware removed in the following way: • Blue wire --> ...
Installation Manual
Page 6
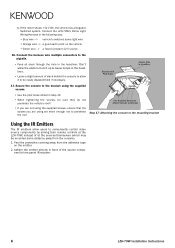
... bracket Using the IR Emitters The IR emitters allow it to penetrate the roof. Connect the LZH-70W's Dome Light Wiring Harness in front of at the LZH-70W, instead of the source component's front-panel IR receiver. 6 LZH-70W Installation Instructions Connect the harness wire multipin connectors to conveniently control video source components by aiming their...
... bracket Using the IR Emitters The IR emitters allow it to penetrate the roof. Connect the LZH-70W's Dome Light Wiring Harness in front of at the LZH-70W, instead of the source component's front-panel IR receiver. 6 LZH-70W Installation Instructions Connect the harness wire multipin connectors to conveniently control video source components by aiming their...

Installation Manual
Page 7
LZH-70W Installation Instructions 7
LZH-70W Installation Instructions 7


