
Instruction Manual
Page 1
... this instruction manual. Model KOS-L702 Serial number US Residence Only Register Online Register your records Record the serial number, found on the back of the unit, in the space provided below. For your Kenwood product at www.Kenwoodusa.com © B64-3528-00/00 (WV) KOS-L702 WIDE TOUCH SCREEN MONITOR 7 page 2-11 INSTRUCTION MANUAL MONITEUR ECRAN LARGE TACTILE 7 page 12-21 MODE D'EMPLOI WIDE TOUCH SCREEN MONITOR...
... this instruction manual. Model KOS-L702 Serial number US Residence Only Register Online Register your records Record the serial number, found on the back of the unit, in the space provided below. For your Kenwood product at www.Kenwoodusa.com © B64-3528-00/00 (WV) KOS-L702 WIDE TOUCH SCREEN MONITOR 7 page 2-11 INSTRUCTION MANUAL MONITEUR ECRAN LARGE TACTILE 7 page 12-21 MODE D'EMPLOI WIDE TOUCH SCREEN MONITOR...
Instruction Manual
Page 2
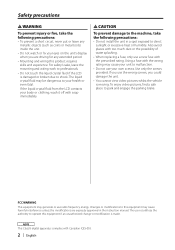
... the LCD is moving. If you use radio frequency energy. Changes or modifications to this equipment may be dangerous to operate this equipment if an unauthorized change or modification is made. Safety precautions 2 WARNING To prevent injury or fire, take the following precautions: • To prevent a short circuit, never put or leave any extended period. • Mounting and wiring...
... the LCD is moving. If you use radio frequency energy. Changes or modifications to this equipment may be dangerous to operate this equipment if an unauthorized change or modification is made. Safety precautions 2 WARNING To prevent injury or fire, take the following precautions: • To prevent a short circuit, never put or leave any extended period. • Mounting and wiring...

Instruction Manual
Page 3
... its mechanical parts. A/V controller you can control from what appears on the display on our health and the environment. Information on the display may differ from the KOS-L702 (As of March, 2007): KOS-V500, KOS-V1000 • The illustrations of Old Electrical and Electronic Equipment (applicable for EU countries that they work with a hard cloth or using the monitor for details...
... its mechanical parts. A/V controller you can control from what appears on the display on our health and the environment. Information on the display may differ from the KOS-L702 (As of March, 2007): KOS-V500, KOS-V1000 • The illustrations of Old Electrical and Electronic Equipment (applicable for EU countries that they work with a hard cloth or using the monitor for details...
Instruction Manual
Page 4
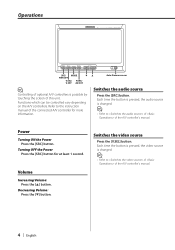
.../ V.OFF AV OUT Auto Dimmer sensor ⁄ Controlling of optional A/V controllers is changed . ⁄ • Refer to of of the A/V controller's manual. Switches the audio source Press the [SRC] button. Turning OFF the Power Press the [SRC] button for more information. Volume Increasing Volume: Press the [5] button. Refer to the instruction manual of this unit. Each time the button is pressed, the video source is possible by touching the screen of the connected A/V controller for at least...
.../ V.OFF AV OUT Auto Dimmer sensor ⁄ Controlling of optional A/V controllers is changed . ⁄ • Refer to of of the A/V controller's manual. Switches the audio source Press the [SRC] button. Turning OFF the Power Press the [SRC] button for more information. Volume Increasing Volume: Press the [5] button. Refer to the instruction manual of this unit. Each time the button is pressed, the video source is possible by touching the screen of the connected A/V controller for at least...

Instruction Manual
Page 5
... screen mode switches as Source Control Screen. Each time the button is pressed, the function control screen is shown in the full-size display mode automatically. The screen mode of the A/V controller's manual. Setting Picture & Easy Control Panel Source Control Screen Picture Panel (OFF) ⁄ • Refer to of of these displays cannot be output at least 1 second, the AV output is changed. ⁄ • Refer to the control screens such as follows: Display "Full" Setting Full picture mode Swithing the Display off mode You...
... screen mode switches as Source Control Screen. Each time the button is pressed, the function control screen is shown in the full-size display mode automatically. The screen mode of the A/V controller's manual. Setting Picture & Easy Control Panel Source Control Screen Picture Panel (OFF) ⁄ • Refer to of of these displays cannot be output at least 1 second, the AV output is changed. ⁄ • Refer to the control screens such as follows: Display "Full" Setting Full picture mode Swithing the Display off mode You...
Instruction Manual
Page 7
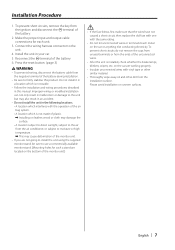
... not remove the caps from unused terminals or from the ends of the battery. 6. Connect the wiring harness connector to use a commercially available monitor stand. (Mounting holes for each unit. 3. on the car are located on leather, wood or cloth may damage the surface. • A location subject to direct sunlight, subject to the air from the negative terminal of the battery. 2. Installation Procedure 1. Improper wiring or modified installation...
... not remove the caps from unused terminals or from the ends of the battery. 6. Connect the wiring harness connector to use a commercially available monitor stand. (Mounting holes for each unit. 3. on the car are located on leather, wood or cloth may damage the surface. • A location subject to direct sunlight, subject to the air from the negative terminal of the battery. 2. Installation Procedure 1. Improper wiring or modified installation...
Instruction Manual
Page 8
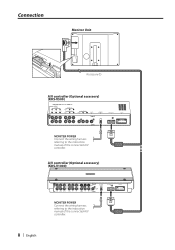
Connection Monitor Unit L ANTENNA FM/AM Accessory 1 A/V controller (Optional accessory) (KOS-V500) MONITER POWER Connect the wiring harness referring to the instruction manual of the connected A/V controller. A/V controller (Optional accessory) (KOS-V1000) FM/ AM PRE OUT SUB REAR FRONT VIDEO AV IN 2 AV IN 1 VIDEO AV OUT 2 MONITOR POWER AV OUT 1 R-CAM V-IN MONITOR I/F POWER MONITER POWER Connect the wiring harness referring to the instruction manual of the connected A/V controller. 8 | English
Connection Monitor Unit L ANTENNA FM/AM Accessory 1 A/V controller (Optional accessory) (KOS-V500) MONITER POWER Connect the wiring harness referring to the instruction manual of the connected A/V controller. A/V controller (Optional accessory) (KOS-V1000) FM/ AM PRE OUT SUB REAR FRONT VIDEO AV IN 2 AV IN 1 VIDEO AV OUT 2 MONITOR POWER AV OUT 1 R-CAM V-IN MONITOR I/F POWER MONITER POWER Connect the wiring harness referring to the instruction manual of the connected A/V controller. 8 | English
Instruction Manual
Page 9
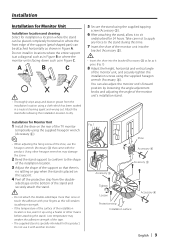
... Loosen Protective strip Installation surface Accessory 4 English | 9 A B C ¤ • Thoroughly wipe away and dust or grease from the double- Attach the stand after allowing the installation location to the stand during this time. 7 Insert the shoe of the installation location is placed on the rear of the TV monitor temporarily using the supplied hexagon wrench (Accessary 4). ⁄ • When adjusting the...
... Loosen Protective strip Installation surface Accessory 4 English | 9 A B C ¤ • Thoroughly wipe away and dust or grease from the double- Attach the stand after allowing the installation location to the stand during this time. 7 Insert the shoe of the installation location is placed on the rear of the TV monitor temporarily using the supplied hexagon wrench (Accessary 4). ⁄ • When adjusting the...
Instruction Manual
Page 10
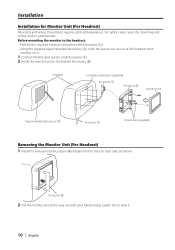
... (not supplied) Removing the Monitor Unit (For Headrest) 1 Insert the removal tool (Accessory 6) deeply into the slots on each side, as shown. Accessory 6 2 Pull the monitor unit all the way out with your hands, being careful not to drop it . 1 Connect Monitor and system cord (Accessory 1). 2 Install the monitor unit in the bracket (Accessory 5). For safety's sake, leave the mounting and wiring work to be...
... (not supplied) Removing the Monitor Unit (For Headrest) 1 Insert the removal tool (Accessory 6) deeply into the slots on each side, as shown. Accessory 6 2 Pull the monitor unit all the way out with your hands, being careful not to drop it . 1 Connect Monitor and system cord (Accessory 1). 2 Install the monitor unit in the bracket (Accessory 5). For safety's sake, leave the mounting and wiring work to be...
Instruction Manual
Page 11
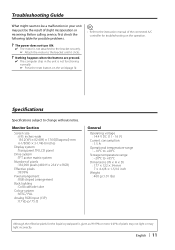
English | 11 Specifications Specifications subject to the instruction manual of the connected A/C controller for troubleshooting on the unit (page 3). ⁄ • Refer to change without notice. Monitor Section Screen size : 6.95 inches wide 156.2(W) × 82.4(H) × 176.0(Diagonal) mm 6-1/8(W) × 3-1/4(H) inches Display system : Transparent TN LCD panel Drive system : TFT active matrix system Number of pixels : 336,960 pixels (480 H × 234 V × RGB) Effective pixels : 99...
English | 11 Specifications Specifications subject to the instruction manual of the connected A/C controller for troubleshooting on the unit (page 3). ⁄ • Refer to change without notice. Monitor Section Screen size : 6.95 inches wide 156.2(W) × 82.4(H) × 176.0(Diagonal) mm 6-1/8(W) × 3-1/4(H) inches Display system : Transparent TN LCD panel Drive system : TFT active matrix system Number of pixels : 336,960 pixels (480 H × 234 V × RGB) Effective pixels : 99...


