North America
Page 35
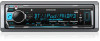
... not connect the [ wires of speakers to the car chassis or Ground wire (black), or connect them in the console of your vehicle. See Wiring connection. ( 33, 34) 3 Install the unit to your vehicle wiring harness does not have the ignition terminal, connect Ignition wire (red) to the ... and off by the ignition key. • Keep all cables away from the ignition switch, then disconnect the [ terminal of the car battery. 2 Connect the wires properly. SPECIFICATIONS Audio Maximum Output Power 50 W × 4 Full Bandwidth Power 22 W × 4 (at an angle of less than 1 % THD) Speaker...
... not connect the [ wires of speakers to the car chassis or Ground wire (black), or connect them in the console of your vehicle. See Wiring connection. ( 33, 34) 3 Install the unit to your vehicle wiring harness does not have the ignition terminal, connect Ignition wire (red) to the ... and off by the ignition key. • Keep all cables away from the ignition switch, then disconnect the [ terminal of the car battery. 2 Connect the wires properly. SPECIFICATIONS Audio Maximum Output Power 50 W × 4 Full Bandwidth Power 22 W × 4 (at an angle of less than 1 % THD) Speaker...
North America
Page 36
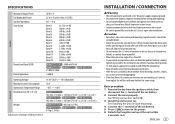
...hold the mounting sleeve firmly in -dash mounting) Hook on the top side Orientate the trim plate as shown on both sides of your car (D) Wiring harness (E) Extraction key (For (For ) (F) Screws (supplied for installation (A) Faceplate (B) Trim plate (C) Mounting sleeve Installing the unit (in place. ...sides) with the vehicle mounting bracket and secure the unit with screws (supplied/ commercially available). Use only the specified screws. Do the required wiring. ( 33, 34) Dashboard of the trim plate, then pull it out. ) 3 Insert the extraction keys deeply into the slots on ...
...hold the mounting sleeve firmly in -dash mounting) Hook on the top side Orientate the trim plate as shown on both sides of your car (D) Wiring harness (E) Extraction key (For (For ) (F) Screws (supplied for installation (A) Faceplate (B) Trim plate (C) Mounting sleeve Installing the unit (in place. ...sides) with the vehicle mounting bracket and secure the unit with screws (supplied/ commercially available). Use only the specified screws. Do the required wiring. ( 33, 34) Dashboard of the trim plate, then pull it out. ) 3 Insert the extraction keys deeply into the slots on ...
North America
Page 37
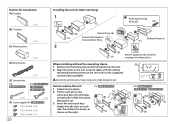
...custom wiring harness specific for your safety. Consult your navigations manual Blue/White (Power control wire/ Antenna control wire) To the power control terminal when using the optional power amplifier or to the antenna control terminal in the vehicle Car fuse box Yellow (Battery wire) Black (Ground wire) ... the car's chassis to professionals for your car and leave this job to avoid damaging the unit. Brown (Mute control wire) To connect the Kenwood navigation system, refer your car audio dealer. Fuse (10 A) MIC (Microphone input terminal) ( 16) Antenna terminal Rear/ ...
...custom wiring harness specific for your safety. Consult your navigations manual Blue/White (Power control wire/ Antenna control wire) To the power control terminal when using the optional power amplifier or to the antenna control terminal in the vehicle Car fuse box Yellow (Battery wire) Black (Ground wire) ... the car's chassis to professionals for your car and leave this job to avoid damaging the unit. Brown (Mute control wire) To connect the Kenwood navigation system, refer your car audio dealer. Fuse (10 A) MIC (Microphone input terminal) ( 16) Antenna terminal Rear/ ...

North America
Page 38
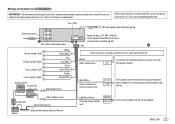
...) If no connections are made, do not let the wire come out from the tab. Wiring connection (for / / ) IMPORTANT : We recommend installing the unit with a commercially available custom wiring harness specific for your safety. Brown (Mute control wire) / : Light blue/yellow (Steering remote control wire) To connect the Kenwood navigation system, refer your car audio dealer. Consult...
...) If no connections are made, do not let the wire come out from the tab. Wiring connection (for / / ) IMPORTANT : We recommend installing the unit with a commercially available custom wiring harness specific for your safety. Brown (Mute control wire) / : Light blue/yellow (Steering remote control wire) To connect the Kenwood navigation system, refer your car audio dealer. Consult...


