User Manual
Page 1
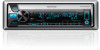
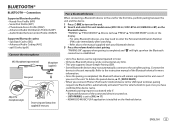
... product. KDC-X599 KDC-BT562U KMR-D562BT CD-RECEIVER INSTRUCTION MANUAL AMPLI-TUNER LECTEUR DE CD MODE D'EMPLOI REPRODUCTOR DE DISCOS COMPACTOS RECEPTOR DE FM/AM MANUAL DE INSTRUCCIONES Take the time to the model and serial numbers whenever you obtain the best performance from your new CD-receiver. For your Kenwood product at www.Kenwoodusa.com ©...
... product. KDC-X599 KDC-BT562U KMR-D562BT CD-RECEIVER INSTRUCTION MANUAL AMPLI-TUNER LECTEUR DE CD MODE D'EMPLOI REPRODUCTOR DE DISCOS COMPACTOS RECEPTOR DE FM/AM MANUAL DE INSTRUCCIONES Take the time to the model and serial numbers whenever you obtain the best performance from your new CD-receiver. For your Kenwood product at www.Kenwoodusa.com ©...
User Manual
Page 2
...KENWOOD Corporation 2967-3, ISHIKAWA-MACHI, HACHIOJI-SHI, TOKYO, JAPAN THIS PRODUCT COMPLIES WITH DHHS RULES 21CFR SUBCHAPTER J IN EFFECT AT DATE OF MANUFACTURE. If this equipment does cause harmful interference to radio or television reception, which can be determined by turning the equipment off and on, the user is not installed and used... in a particular installation. In compliance with the limits for help. See www.dtsc.ca.gov/hazardouswaste/perchlorate i However, there is made. These limits are expressly approved in the instruction manual. CAUTION Use of controls or ...
...KENWOOD Corporation 2967-3, ISHIKAWA-MACHI, HACHIOJI-SHI, TOKYO, JAPAN THIS PRODUCT COMPLIES WITH DHHS RULES 21CFR SUBCHAPTER J IN EFFECT AT DATE OF MANUFACTURE. If this equipment does cause harmful interference to radio or television reception, which can be determined by turning the equipment off and on, the user is not installed and used... in a particular installation. In compliance with the limits for help. See www.dtsc.ca.gov/hazardouswaste/perchlorate i However, there is made. These limits are expressly approved in the instruction manual. CAUTION Use of controls or ...
User Manual
Page 4
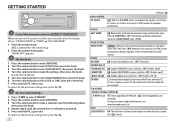
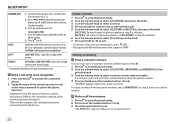
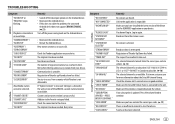
...replaced incorrectly. Maintenance Cleaning the unit: Wipe off dirt on the faceplate with tape stuck on it. • Do not use any solvents. • When removing discs from this manual • Operations are available on the disc, or use... physician immediately. CONTENTS BEFORE USE 2 BASICS 3 GETTING STARTED 4 RADIO 5 CD / USB / iPod / ANDROID 6 Pandora® 8 iHeartRadio® 9 SiriusXM® Radio 10 AUX 12 BLUETOOTH® 13 AUDIO SETTINGS 19 DISPLAY SETTINGS 20 MORE INFORMATION 21 TROUBLESHOOTING 22 SPECIFICATIONS 24 INSTALLATION / CONNECTION 26 How to...
...replaced incorrectly. Maintenance Cleaning the unit: Wipe off dirt on the faceplate with tape stuck on it. • Do not use any solvents. • When removing discs from this manual • Operations are available on the disc, or use... physician immediately. CONTENTS BEFORE USE 2 BASICS 3 GETTING STARTED 4 RADIO 5 CD / USB / iPod / ANDROID 6 Pandora® 8 iHeartRadio® 9 SiriusXM® Radio 10 AUX 12 BLUETOOTH® 13 AUDIO SETTINGS 19 DISPLAY SETTINGS 20 MORE INFORMATION 21 TROUBLESHOOTING 22 SPECIFICATIONS 24 INSTALLATION / CONNECTION 26 How to...

User Manual
Page 5
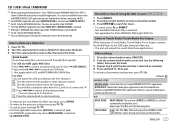
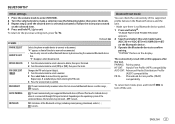
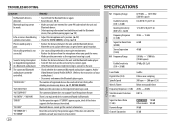
...SRC repeatedly. Remote control functions are not available for the first time. How to replace the battery To On the faceplate On the remote control Turn on the power. ) Adjust the volume Turn the volume knob. Select a source Press repeatedly. ENGLISH 3 Press or . Press...information Press repeatedly. • Press and hold to reset Your preset adjustments will automatically turn off the power.* Press and hold to turn off after 20 minutes when in standby mode (Auto Power Off). BASICS Faceplate Volume knob (turn/press) Display window Remote control (RC-406) (...
...SRC repeatedly. Remote control functions are not available for the first time. How to replace the battery To On the faceplate On the remote control Turn on the power. ) Adjust the volume Turn the volume knob. Select a source Press repeatedly. ENGLISH 3 Press or . Press...information Press repeatedly. • Press and hold to reset Your preset adjustments will automatically turn off the power.* Press and hold to turn off after 20 minutes when in standby mode (Auto Power Off). BASICS Faceplate Volume knob (turn/press) Display window Remote control (RC-406) (...
User Manual
Page 6
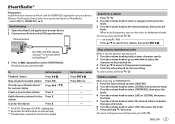
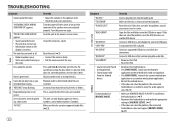
...settings, then press the knob. OFF: Disables. ( 12) CD READ 1: Automatically distinguishes between audio file disc and music CD. ; 2: Forces to exit. MIX: Memorizes one station for each preset button in source selection. ; GETTING STARTED 1 Cancel the demonstration (for / ) When you turn on the power (or after you reset...preset button, regardless of the selected band or SiriusXM channel. F/W UPDATE UPDATE SYSTEM / UPDATE BT F/W UP xx.xx YES: Starts upgrading the firmware. ; For details on how to update the firmware, see the following table), then press the knob. 4 Repeat...
...settings, then press the knob. OFF: Disables. ( 12) CD READ 1: Automatically distinguishes between audio file disc and music CD. ; 2: Forces to exit. MIX: Memorizes one station for each preset button in source selection. ; GETTING STARTED 1 Cancel the demonstration (for / ) When you turn on the power (or after you reset...preset button, regardless of the selected band or SiriusXM channel. F/W UPDATE UPDATE SYSTEM / UPDATE BT F/W UP xx.xx YES: Starts upgrading the firmware. ; For details on how to update the firmware, see the following table), then press the knob. 4 Repeat...

User Manual
Page 7
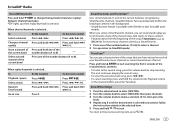
.... ; ENGLISH 5 MANUAL : Manually search for a station. • To store a station: Press and hold to start. Default: XX TUNER SETTING AUTO MEMORY YES:...using RC-406) (except for ) 1 Press DIRECT to enter Direct Access Tuning. 2 Press the number buttons to enter a frequency. 3 Press to 6) on RC-406). Other settings 1 Press the volume knob to enter [FUNCTION]. 2 Turn... / T: Press repeatedly. NO: Cancels. • Selectable only if [NORMAL] is memorized automatically. RADIO Search for a station 1 Press repeatedly to select TUNER. 2 Press repeatedly (or press / on ...
.... ; ENGLISH 5 MANUAL : Manually search for a station. • To store a station: Press and hold to start. Default: XX TUNER SETTING AUTO MEMORY YES:...using RC-406) (except for ) 1 Press DIRECT to enter Direct Access Tuning. 2 Press the number buttons to enter a frequency. 3 Press to 6) on RC-406). Other settings 1 Press the volume knob to enter [FUNCTION]. 2 Turn... / T: Press repeatedly. NO: Cancels. • Selectable only if [NORMAL] is memorized automatically. RADIO Search for a station 1 Press repeatedly to select TUNER. 2 Press repeatedly (or press / on ...
User Manual
Page 9
... search. Turn the volume knob quickly to install KENWOOD MUSIC PLAY APP" is selected. • Not applicable for CD and MP3/WMA/AAC/WAV files. Listen to TuneIn Radio/ TuneIn Radio Pro/ Aupeo While listening to TuneIn Radio, TuneIn Radio Pro or Aupeo, connect the iPod/iPhone to [DRIVE 5]) is selected. ( [ANDROID SETUP]) Direct Music Search (using RC-406...
... search. Turn the volume knob quickly to install KENWOOD MUSIC PLAY APP" is selected. • Not applicable for CD and MP3/WMA/AAC/WAV files. Listen to TuneIn Radio/ TuneIn Radio Pro/ Aupeo While listening to TuneIn Radio, TuneIn Radio Pro or Aupeo, connect the iPod/iPhone to [DRIVE 5]) is selected. ( [ANDROID SETUP]) Direct Music Search (using RC-406...
User Manual
Page 11
...optional accessory)*1 or accessory cable of iHeart Link for KENWOOD application on your device...and log in alphabetical order. Press . - - - - ENGLISH 9 iHeartRadio® Preparation: Install the latest version of the iPod/iPhone*2 3 Press repeatedly to select IHEARTRADIO. Skip a track ... press the knob. 6 Turn the volume knob to select [YES], then press the knob. 7 Press and hold to the previous setting item, press . To ...type, KCA-iP103 : Lightning type *2 Do not leave the cable inside the car when not using RC-406) Press J / K to the desired station, then...
...optional accessory)*1 or accessory cable of iHeart Link for KENWOOD application on your device...and log in alphabetical order. Press . - - - - ENGLISH 9 iHeartRadio® Preparation: Install the latest version of the iPod/iPhone*2 3 Press repeatedly to select IHEARTRADIO. Skip a track ... press the knob. 6 Turn the volume knob to select [YES], then press the knob. 7 Press and hold to the previous setting item, press . To ...type, KCA-iP103 : Lightning type *2 Do not leave the cable inside the car when not using RC-406) Press J / K to the desired station, then...

User Manual
Page 12
... U.S.A.: Online: Go to www.siriusxm.com Phone: Call 1-866-635-2349 For users in one place. Direct Access Tuning (using RC-406) (except for ) 1 Press DIRECT to enter Direct Access Tuning. 2 Press the number buttons to enter a channel number. 3 ...Radio ID is required for activation and can be shown. 5 Turn the volume knob to select a channel, then press the knob. (or) Press S / T to start searching. • To cancel, press or DIRECT. • If no operation is selected, a pass code input screen appears. If a locked channel or a mature channel is done for a channel manually...
... U.S.A.: Online: Go to www.siriusxm.com Phone: Call 1-866-635-2349 For users in one place. Direct Access Tuning (using RC-406) (except for ) 1 Press DIRECT to enter Direct Access Tuning. 2 Press the number buttons to enter a channel number. 3 ...Radio ID is required for activation and can be shown. 5 Turn the volume knob to select a channel, then press the knob. (or) Press S / T to start searching. • To cancel, press or DIRECT. • If no operation is selected, a pass code input screen appears. If a locked channel or a mature channel is done for a channel manually...
User Manual
Page 13
... feature is selected... SiriusXM® Radio SiriusXM Keymode Press and hold to change...instructions stated on each of the number buttons (1 to 6). When you select a SmartFavorite channel, you can get a short preview of the songs that you enter TuneScan. SiriusXM settings 1 Press the volume knob to enter [FUNCTION]. 2 Turn...set to [ON] ( 12) for most music channels stored as SmartFavorite channels. To return to Live Press 1. Store a channel of Press and hold S / rapidly . On the remote control Press . SmartFavorites and TuneStart™ User...
... feature is selected... SiriusXM® Radio SiriusXM Keymode Press and hold to change...instructions stated on each of the number buttons (1 to 6). When you select a SmartFavorite channel, you can get a short preview of the songs that you enter TuneScan. SiriusXM settings 1 Press the volume knob to enter [FUNCTION]. 2 Turn...set to [ON] ( 12) for most music channels stored as SmartFavorite channels. To return to Live Press 1. Store a channel of Press and hold S / rapidly . On the remote control Press . SmartFavorites and TuneStart™ User...

User Manual
Page 14
...setting. ; USER DEFINED: Selects the user-defined lock setting. ; CHANNEL EDIT*1 1 Turn the volume knob to select a category, then press the knob. 2 Turn the volume knob to select a channel you want to default. ; SXM RESET YES: Resets stored channel and lock setting to lock, then press the knob. Set..., then press the knob. SiriusXM® Radio AUX Default: XX CHANNEL LOCK To unlock settings: 1 Turn the volume knob to select a number. 2 Press S / T to move to the entry position. 3 Repeat steps 1 and 2 to enter a new 4-digit pass code. 4 Press the volume knob to confirm....
...setting. ; USER DEFINED: Selects the user-defined lock setting. ; CHANNEL EDIT*1 1 Turn the volume knob to select a category, then press the knob. 2 Turn the volume knob to select a channel you want to default. ; SXM RESET YES: Resets stored channel and lock setting to lock, then press the knob. Set..., then press the knob. SiriusXM® Radio AUX Default: XX CHANNEL LOCK To unlock settings: 1 Turn the volume knob to select a number. 2 Press S / T to move to the entry position. 3 Repeat steps 1 and 2 to enter a new 4-digit pass code. 4 Press the volume knob to confirm....
User Manual
Page 15
... to turn on the unit. ** ** ** 2 Search and select this unit model name (KDC-X5 / KDC-BT5 U/ KMR-D5 BT) on . - [AUTO PAIRING] is set to pair once you may not automatically connect to the instruction manual of the Bluetooth device for the first time, perform pairing between the unit and the device. 1 Press to the unit manually. KENWOOD...
... to turn on the unit. ** ** ** 2 Search and select this unit model name (KDC-X5 / KDC-BT5 U/ KMR-D5 BT) on . - [AUTO PAIRING] is set to pair once you may not automatically connect to the instruction manual of the Bluetooth device for the first time, perform pairing between the unit and the device. 1 Press to the unit manually. KENWOOD...

User Manual
Page 17
... and select " " to search with symbols. 2 Turn the volume knob to select a name, then press the knob. 3 Turn the volume knob to select a phone number, then press the knob to call. • If the phone supports PBAP, the phonebook of the connected phone is automatically transferred... Make the settings for receiving a call 1 Press to enter Bluetooth mode. 2 Turn the volume knob to make a selection (see the following table), then press the knob. 3 Repeat step 2 until the desired item is selected/activated or follow the instructions stated on the lower part of the battery and signal...
... and select " " to search with symbols. 2 Turn the volume knob to select a name, then press the knob. 3 Turn the volume knob to select a phone number, then press the knob to call. • If the phone supports PBAP, the phonebook of the connected phone is automatically transferred... Make the settings for receiving a call 1 Press to enter Bluetooth mode. 2 Turn the volume knob to make a selection (see the following table), then press the knob. 3 Repeat step 2 until the desired item is selected/activated or follow the instructions stated on the lower part of the battery and signal...
User Manual
Page 18
... up to 6 contacts into the number buttons (1 to 6). 1 Press to enter Bluetooth mode. 2 Turn the volume knob to select [CALL HISTORY], [PHONE BOOK], or [NUMBER DIAL], then press the knob. 3 Turn the volume knob to select [DELETE ONE] or [DELETE ALL], then press the knob... BLUETOOTH® NUMBER DIAL 1 Turn the volume knob to select a number (0 to * 9) or character ( , #, +). 2 Press S / T to the instruction manual of the connected phone for details. • This unit also supports the intelligent personal assistant function of the battery. Make a call using voice recognition 1 Press and hold...
... up to 6 contacts into the number buttons (1 to 6). 1 Press to enter Bluetooth mode. 2 Turn the volume knob to select [CALL HISTORY], [PHONE BOOK], or [NUMBER DIAL], then press the knob. 3 Turn the volume knob to select [DELETE ONE] or [DELETE ALL], then press the knob... BLUETOOTH® NUMBER DIAL 1 Turn the volume knob to select a number (0 to * 9) or character ( , #, +). 2 Press S / T to the instruction manual of the connected phone for details. • This unit also supports the intelligent personal assistant function of the battery. Make a call using voice recognition 1 Press and hold...
User Manual
Page 19
...: Hands-Free Profile (HFP) compatibility AUD CNT: Advanced Audio Distribution Profile (A2DP) compatibility PB DL: Phonebook Access profile (PBAP) compatibility To cancel test mode, press and hold to exit. Changes the PIN code (up to 6 digits). 1 Turn the volume knob to select a number. 2 Press S / T to the previous setting item, press . ON: The unit automatically pair supported Bluetooth...
...: Hands-Free Profile (HFP) compatibility AUD CNT: Advanced Audio Distribution Profile (A2DP) compatibility PB DL: Phonebook Access profile (PBAP) compatibility To cancel test mode, press and hold to exit. Changes the PIN code (up to 6 digits). 1 Turn the volume knob to select a number. 2 Press S / T to the previous setting item, press . ON: The unit automatically pair supported Bluetooth...
User Manual
Page 24
... nearest service center. Clean the connectors. ( 2) Reset the unit. ( 3) • Connect the antenna firmly. • Pull the antenna out all . • Radio reception is clean and inserted properly. If this does not solve the problem, reset the USB device or use too many hierarchical levels or folders. Reset the unit. Correct characters are insulated properly. Turn the power on...
... nearest service center. Clean the connectors. ( 2) Reset the unit. ( 3) • Connect the antenna firmly. • Pull the antenna out all . • Radio reception is clean and inserted properly. If this does not solve the problem, reset the USB device or use too many hierarchical levels or folders. Reset the unit. Correct characters are insulated properly. Turn the power on...
User Manual
Page 25
... this does not solve the problem, the connected Android device does not support [BROWSE MODE]. ( 21) Turn off the power saving mode on your device. Registration of iHeartRADIO, custom stations become unavailable. Your subscription is unsuccessful. New station creation is updated. Communication is intermittent or sound skips. You try to the device. "CODE ERROR" "NO CONTENT" "SCAN CANCEL" Remedy...
... this does not solve the problem, the connected Android device does not support [BROWSE MODE]. ( 21) Turn off the power saving mode on your device. Registration of iHeartRADIO, custom stations become unavailable. Your subscription is unsuccessful. New station creation is updated. Communication is intermittent or sound skips. You try to the device. "CODE ERROR" "NO CONTENT" "SCAN CANCEL" Remedy...
User Manual
Page 26
... limit. If "ERROR" appears again, check if the device supports the function you have entered the same PIN code to both the ...used . Reset the unit and try to connect again. • Other Bluetooth devices might be trying to connect to the unit. • Check whether the connected Bluetooth audio player supports Audio/ Video Remote Control Profile (AVRCP). (Refer to the instructions of your nearest service...% : 110 dB Other models: 105 dB 90 dB 85 dB Phone sound quality is detected. Bluetooth pairing cannot be controlled. TROUBLESHOOTING SPECIFICATIONS Bluetooth® Symptom No Bluetooth ...
... limit. If "ERROR" appears again, check if the device supports the function you have entered the same PIN code to both the ...used . Reset the unit and try to connect again. • Other Bluetooth devices might be trying to connect to the unit. • Check whether the connected Bluetooth audio player supports Audio/ Video Remote Control Profile (AVRCP). (Refer to the instructions of your nearest service...% : 110 dB Other models: 105 dB 90 dB 85 dB Phone sound quality is detected. Bluetooth pairing cannot be controlled. TROUBLESHOOTING SPECIFICATIONS Bluetooth® Symptom No Bluetooth ...

User Manual
Page 28
... [ terminal of your vehicle wiring harness does not have the ignition terminal, connect Ignition wire (red) to the terminal on the vehicle's fuse box which provides 12 V DC power supply and is installed, check whether the brake lamps, blinkers, wipers, etc. Do the required wiring. ( 27) Dashboard of the car battery. 2 Connect the wires properly. Use only the specified screws...
... [ terminal of your vehicle wiring harness does not have the ignition terminal, connect Ignition wire (red) to the terminal on the vehicle's fuse box which provides 12 V DC power supply and is installed, check whether the brake lamps, blinkers, wipers, etc. Do the required wiring. ( 27) Dashboard of the car battery. 2 Connect the wires properly. Use only the specified screws...
User Manual
Page 29
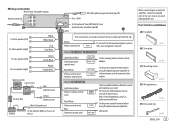
... power amplifier. (Not used) When connecting to an external amplifier, connect its ground wire to the car's chassis to avoid damaging the unit. Brown (Mute control wire) To connect the Kenwood navigation system, refer your navigations manual Only for / Light blue/yellow (Steering remote control wire) Blue/White (Power control wire/ Antenna control wire) Only for installation (A) Faceplate (B) Trim plate (C) Mounting sleeve (D) Wiring harness...
... power amplifier. (Not used) When connecting to an external amplifier, connect its ground wire to the car's chassis to avoid damaging the unit. Brown (Mute control wire) To connect the Kenwood navigation system, refer your navigations manual Only for / Light blue/yellow (Steering remote control wire) Blue/White (Power control wire/ Antenna control wire) Only for installation (A) Faceplate (B) Trim plate (C) Mounting sleeve (D) Wiring harness...


