Quick Start Guide
Page 2
...addition to Adobe® Reader™ 7.1 or Adobe® Acrobat® 7.1 or later. Installation Procedure 10 Before Installation 10 Connecting Wires to Terminals.........12 Installation/Removing the Unit........14 Installation the Microphone Unit ...15 2 | Quick Start Guide For functions not covered in this... unit. You can download the latest version of the Instruction Manual from www.kenwood.com/cs/ce/. Contents About the Quick Start Guide About the Quick Start Guide 2 Before use 3 First step 4 Basic Operations 5...
...addition to Adobe® Reader™ 7.1 or Adobe® Acrobat® 7.1 or later. Installation Procedure 10 Before Installation 10 Connecting Wires to Terminals.........12 Installation/Removing the Unit........14 Installation the Microphone Unit ...15 2 | Quick Start Guide For functions not covered in this... unit. You can download the latest version of the Instruction Manual from www.kenwood.com/cs/ce/. Contents About the Quick Start Guide About the Quick Start Guide 2 Before use 3 First step 4 Basic Operations 5...
Quick Start Guide
Page 10
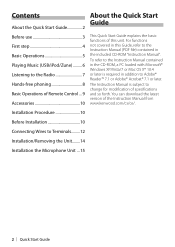
...2 6 ........2 ........4 3 7* ....1 (2 m) ....1 (3 m) 4 * KIV-BT900 only ....1 (2.5 m) Installation Procedure 1. Make the proper input and output wire connections for at least 3 seconds. 10 | Quick Start Guide 2WARNING If you connect the ignition wire (red) and the battery wire (yellow) to the car chassis (ground), you could damage the unit...not install the unit in the following order: ground, battery, ignition. 5. For safety's sake, leave the mounting and wiring work to professionals. • Make sure to ground the unit to a power source with a constant voltage supply, as ...
...2 6 ........2 ........4 3 7* ....1 (2 m) ....1 (3 m) 4 * KIV-BT900 only ....1 (2.5 m) Installation Procedure 1. Make the proper input and output wire connections for at least 3 seconds. 10 | Quick Start Guide 2WARNING If you connect the ignition wire (red) and the battery wire (yellow) to the car chassis (ground), you could damage the unit...not install the unit in the following order: ground, battery, ignition. 5. For safety's sake, leave the mounting and wiring work to professionals. • Make sure to ground the unit to a power source with a constant voltage supply, as ...
Quick Start Guide
Page 11
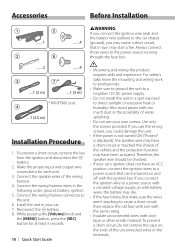
... connected to any metal part in the console of the left speaker to a front output terminal, do not mix front and rear). wires or ground them to this unit during and shortly after the use and the information that can interfere with the cell-phone within the ... the system, connect the connectors either to both the rear output terminals (do not connect the connector to which they correspond. • Connect the speaker wires correctly to the terminals to a rear output terminal. • After the unit is installed, check whether the brake lamps, blinkers, wipers, etc. English...
... connected to any metal part in the console of the left speaker to a front output terminal, do not mix front and rear). wires or ground them to this unit during and shortly after the use and the information that can interfere with the cell-phone within the ... the system, connect the connectors either to both the rear output terminals (do not connect the connector to which they correspond. • Connect the speaker wires correctly to the terminals to a rear output terminal. • After the unit is installed, check whether the brake lamps, blinkers, wipers, etc. English...
Quick Start Guide
Page 12
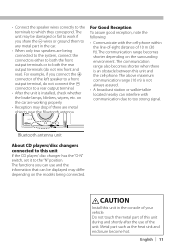
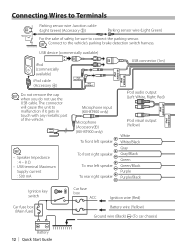
Car fuse box ACC Ignition wire (Red) Battery wire (Yellow) Ground wire (Black) · (To car chassis) Microphone input (KIV-BT900 only) Microphone (Accessory7) (KIV-BT900 only) ⁄ • Speaker Impedance : 4 - 8 Ω • USB terminal Maximum Supply current : 500 mA To front left speaker To ... any metallic part of safety, be sure to connect the parking sensor. ⁄ Connect to Terminals Parking sensor wire Junction cable (Light Green) (Accessory 3) Parking sensor wire (Light Green) For the sake of the vehicle. iPod AUDIO IN iPod VIDEO IN iPod AUDIO OUT iPod VIDEO...
Car fuse box ACC Ignition wire (Red) Battery wire (Yellow) Ground wire (Black) · (To car chassis) Microphone input (KIV-BT900 only) Microphone (Accessory7) (KIV-BT900 only) ⁄ • Speaker Impedance : 4 - 8 Ω • USB terminal Maximum Supply current : 500 mA To front left speaker To ... any metallic part of safety, be sure to connect the parking sensor. ⁄ Connect to Terminals Parking sensor wire Junction cable (Light Green) (Accessory 3) Parking sensor wire (Light Green) For the sake of the vehicle. iPod AUDIO IN iPod VIDEO IN iPod AUDIO OUT iPod VIDEO...
Quick Start Guide
Page 13
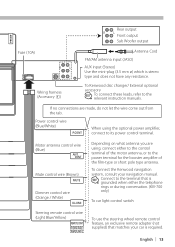
..., connect to its power control terminal. CONT Mute control wire (Brown) MUTE Dimmer control wire (Orange / White) ILLUMI Depending on what antenna you are made, do not let the wire come out from the tab. English | 13 To Kenwood disc changer/ External optional accessory ⁄ To connect these...of the film-type or short pole type antenna. Power control wire (Blue/White) P.CONT When using , connect either the telephone rings or during conversation. (KIV-700 only) To car light control switch Steering remote control wire (Light Blue/Yellow) REMOTE CONT STEERING WHEEL REMOTE INPUT To...
..., connect to its power control terminal. CONT Mute control wire (Brown) MUTE Dimmer control wire (Orange / White) ILLUMI Depending on what antenna you are made, do not let the wire come out from the tab. English | 13 To Kenwood disc changer/ External optional accessory ⁄ To connect these...of the film-type or short pole type antenna. Power control wire (Blue/White) P.CONT When using , connect either the telephone rings or during conversation. (KIV-700 only) To car light control switch Steering remote control wire (Light Blue/Yellow) REMOTE CONT STEERING WHEEL REMOTE INPUT To...
Quick Start Guide
Page 15
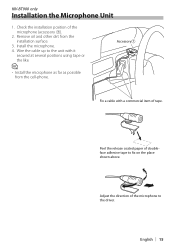
Install the microphone. 4. Wire the cable up to the unit with a commercial item of doubleface adhesive tape to the driver. Check the installation position of the microphone to fix ... installation surface. 3. Remove oil and other dirt from the cell-phone. Peel the release coated paper of tape. Adjust the direction of the microphone (accessory 7). 2. KIV-BT900 only Installation the Microphone Unit 1. English | 15
Install the microphone. 4. Wire the cable up to the unit with a commercial item of doubleface adhesive tape to the driver. Check the installation position of the microphone to fix ... installation surface. 3. Remove oil and other dirt from the cell-phone. Peel the release coated paper of tape. Adjust the direction of the microphone (accessory 7). 2. KIV-BT900 only Installation the Microphone Unit 1. English | 15
Instruction Manual
Page 2
... 28 Connecting a Bluetooth Device Basic Operation Operation of Hands-Free Phoning 30 Connecting a Bluetooth Device Receiving a Call During a Call Call Waiting 2 | KIV-BT900/ KIV-700 Other Functions Making a Call Speed Dialing (Preset Dial) Calling a Number in the Phone Book Calling a Number in the Call log Dial a ... About Audio file About Video files About Picture files iPod/iPhone that can be connected to this unit About USB device About "KENWOOD Music Editor" About the Cell-Phone About Satellite Radio tuner (Optional) About HD Radio Reception (Optional) Menu List Display Indicator ...
... 28 Connecting a Bluetooth Device Basic Operation Operation of Hands-Free Phoning 30 Connecting a Bluetooth Device Receiving a Call During a Call Call Waiting 2 | KIV-BT900/ KIV-700 Other Functions Making a Call Speed Dialing (Preset Dial) Calling a Number in the Phone Book Calling a Number in the Call log Dial a ... About Audio file About Video files About Picture files iPod/iPhone that can be connected to this unit About USB device About "KENWOOD Music Editor" About the Cell-Phone About Satellite Radio tuner (Optional) About HD Radio Reception (Optional) Menu List Display Indicator ...
Instruction Manual
Page 39
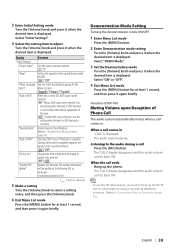
...feature, you need to hook up the phone. Turning off the built-in . www.kenwood.com/cs/ce/ ( : Factory setting) 5 Make a setting Turn the [Volume] knob to your telephone using... a commercial telephone accessory. Function of KIV-700 Muting Volume upon Reception of the sound from AV Output to the external equipment all ...231;ais"/ "Español" "Built in "CALL" is displayed. When a call ends Hang up the MUTE wire to select a setting value, and then press the [Volume] knob. 6 Exit Menu List mode Press the [MENU]...
...feature, you need to hook up the phone. Turning off the built-in . www.kenwood.com/cs/ce/ ( : Factory setting) 5 Make a setting Turn the [Volume] knob to your telephone using... a commercial telephone accessory. Function of KIV-700 Muting Volume upon Reception of the sound from AV Output to the external equipment all ...231;ais"/ "Español" "Built in "CALL" is displayed. When a call ends Hang up the MUTE wire to select a setting value, and then press the [Volume] knob. 6 Exit Menu List mode Press the [MENU]...
Instruction Manual
Page 75
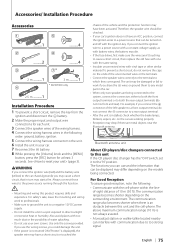
Accessories/ Installation Procedure Accessories 1 5 ..........1 ..........4 2 6 ..........2 ..........4 3 7* 2 m ..........1 3 m ..........1 4 * KIV-BT900 only 2.5 m ..........1 Installation Procedure 1 To prevent a short circuit, remove the key from the ignition and disconnect the - Use only the screws ... 75 battery. 8 While pressing the [Volume] knob and the [MENU] button, press the [SRC] button for each unit. 3 Connect the speaker wires of 10 m (30 ft). If you connect the + connector of water splashing. • Do not use and the information that can be turned ...
Accessories/ Installation Procedure Accessories 1 5 ..........1 ..........4 2 6 ..........2 ..........4 3 7* 2 m ..........1 3 m ..........1 4 * KIV-BT900 only 2.5 m ..........1 Installation Procedure 1 To prevent a short circuit, remove the key from the ignition and disconnect the - Use only the screws ... 75 battery. 8 While pressing the [Volume] knob and the [MENU] button, press the [SRC] button for each unit. 3 Connect the speaker wires of 10 m (30 ft). If you connect the + connector of water splashing. • Do not use and the information that can be turned ...
Instruction Manual
Page 76
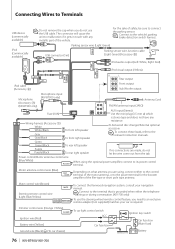
...⁄ Connect to the terminal that is stereo type and does not have any metallic part of the vehicle. To connect the Kenwood navigation system, consult your car is required. The connector will cause the unit to malfunction if it gets in touch with any ... OUT iPod cable (Accessory 4) R L Rear output Front output Sub Woofer output Microphone (Accessory 7) (KIV-BT900 only) Microphone input (KIV-BT900 only) Antenna Cord R L FM/AM antenna input (JASO) Fuse (10A) Wiring harness (Accessory 1) White White/Black Gray Gray/Black To front left speaker Purple Purple/Black To rear ...
...⁄ Connect to the terminal that is stereo type and does not have any metallic part of the vehicle. To connect the Kenwood navigation system, consult your car is required. The connector will cause the unit to malfunction if it gets in touch with any ... OUT iPod cable (Accessory 4) R L Rear output Front output Sub Woofer output Microphone (Accessory 7) (KIV-BT900 only) Microphone input (KIV-BT900 only) Antenna Cord R L FM/AM antenna input (JASO) Fuse (10A) Wiring harness (Accessory 1) White White/Black Gray Gray/Black To front left speaker Purple Purple/Black To rear ...
Instruction Manual
Page 78
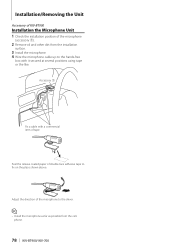
...the installation surface. 3 Install the microphone. 4 Wire the microphone cable up to the hands-free box with a commercial item of the microphone to fix on the place shown above. Installation/Removing the Unit Accessory of KIV-BT900 Installation the Microphone Unit 1 Check the installation ...position of double-face adhesive tape to the driver. ⁄ • Install the microphone as far as possible from the cellphone. 78 | KIV-BT900/ KIV-700
...the installation surface. 3 Install the microphone. 4 Wire the microphone cable up to the hands-free box with a commercial item of the microphone to fix on the place shown above. Installation/Removing the Unit Accessory of KIV-BT900 Installation the Microphone Unit 1 Check the installation ...position of double-face adhesive tape to the driver. ⁄ • Install the microphone as far as possible from the cellphone. 78 | KIV-BT900/ KIV-700
Instruction Manual
Page 80
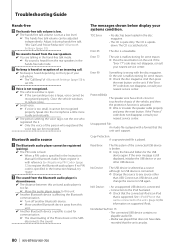
.... You are talking in the hand-free talk mode. No sound is heard from this unit can play. 80 | KIV-BT900/ KIV-700 Bluetooth audio source ? Protect (Blink): The speaker wire has a short-circuit or touches the chassis of the person who registered the it during hands-free talk. Read Error: The... reason. Press the reset button on the type of your cell-phone. The "Call Beep" of the connected USB device is activated. Wire or insulate the speaker cable properly and press the reset button.
.... You are talking in the hand-free talk mode. No sound is heard from this unit can play. 80 | KIV-BT900/ KIV-700 Bluetooth audio source ? Protect (Blink): The speaker wire has a short-circuit or touches the chassis of the person who registered the it during hands-free talk. Read Error: The... reason. Press the reset button on the type of your cell-phone. The "Call Beep" of the connected USB device is activated. Wire or insulate the speaker cable properly and press the reset button.


