Instruction Manual
Page 1
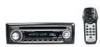
... product. Model KDC-MP2032/MP2032CR/MP232/MP202/232MR Serial number US Residence Only Register Online Register your new CD-receiver. CD-RECEIVER KDC-MP2032 KDC-MP2032CR KDC-MP232 KDC-MP202 KDC-232MR INSTRUCTION MANUAL Take the time to the model and serial numbers whenever you obtain the best performance from your Kenwood product at www.Kenwoodusa.com © B64-3290-10/02 (KW/K0) Familiarity with installation and operation procedures will help you call...
... product. Model KDC-MP2032/MP2032CR/MP232/MP202/232MR Serial number US Residence Only Register Online Register your new CD-receiver. CD-RECEIVER KDC-MP2032 KDC-MP2032CR KDC-MP232 KDC-MP202 KDC-232MR INSTRUCTION MANUAL Take the time to the model and serial numbers whenever you obtain the best performance from your Kenwood product at www.Kenwoodusa.com © B64-3290-10/02 (KW/K0) Familiarity with installation and operation procedures will help you call...
Instruction Manual
Page 2
... Setup Speaker Setting Switching Display Dimmer Control Theft Deterrent Faceplate TEL Mute Tuner features 12 Tuning Tuning Mode Station Preset Memory Auto Memory Entry Preset Tuning CD/Audio file/External disc control features 14 Playing CD & Audio file Playing External Disc Fast Forwarding and Reversing Track/File Search Disc Search/Folder Search Direct Track/File Search Direct Disc Search Track/File/Disc/Folder Repeat Scan Play Random Play Magazine Random Play Folder Select Text/Title Scroll HD Radio control features 18 About HD Radio Tuning Menu system 19 Menu System Activating...
... Setup Speaker Setting Switching Display Dimmer Control Theft Deterrent Faceplate TEL Mute Tuner features 12 Tuning Tuning Mode Station Preset Memory Auto Memory Entry Preset Tuning CD/Audio file/External disc control features 14 Playing CD & Audio file Playing External Disc Fast Forwarding and Reversing Track/File Search Disc Search/Folder Search Direct Track/File Search Direct Disc Search Track/File/Disc/Folder Repeat Scan Play Random Play Magazine Random Play Folder Select Text/Title Scroll HD Radio control features 18 About HD Radio Tuning Menu system 19 Menu System Activating...
Instruction Manual
Page 4
... the unit. • Mounting and wiring this unit. CDs in . Set the "O-N" Switch to this product requires skills and experience. Note that can use the wrong screws, you try to malfunction. • Do not use a new fuse with Canadian ICES-003. In such a situation, remove the disc and wait for the applicable Kenwood disc changers/ CD players. Connecting unsupported disc changers/CD players to evaporate. CD with its adapter into the unit, the adapter might separate...
... the unit. • Mounting and wiring this unit. CDs in . Set the "O-N" Switch to this product requires skills and experience. Note that can use the wrong screws, you try to malfunction. • Do not use a new fuse with Canadian ICES-003. In such a situation, remove the disc and wait for the applicable Kenwood disc changers/ CD players. Connecting unsupported disc changers/CD players to evaporate. CD with its adapter into the unit, the adapter might separate...
Instruction Manual
Page 5
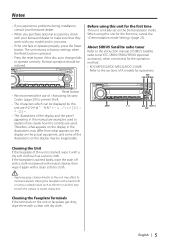
... mode. Cleaning the Unit If the faceplate of A models for the first time, cancel the (page 23). If the faceplate is stained, wipe it again with a dry soft cloth such as thinner or alcohol may affect its mechanical parts. SRC English | 5 About SIRIUS Satellite radio tuner Refer to the instruction manual of SIRIUS Satellite radio tuner KTC-SR901/SR902/SR903 (optional accessory), when connected, for the operation method. • KDC-MP2032/KDC...
... mode. Cleaning the Unit If the faceplate of A models for the first time, cancel the (page 23). If the faceplate is stained, wipe it again with a dry soft cloth such as thinner or alcohol may affect its mechanical parts. SRC English | 5 About SIRIUS Satellite radio tuner Refer to the instruction manual of SIRIUS Satellite radio tuner KTC-SR901/SR902/SR903 (optional accessory), when connected, for the operation method. • KDC-MP2032/KDC...
Instruction Manual
Page 8
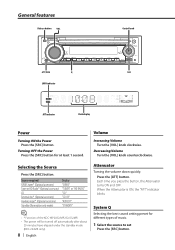
... press the button, the Attenuator turns ON and OFF. Volume Increasing Volume Turn the [VOL] knob clockwise. Source required Display SIRIUS tuner* (Optional accessory) "SIRIUS" Tuner or HD Radio* (Optional accessory) "TUNER" or "HD RADIO" CD "CD" External disc* (Optional accessory) "CD CH" Auxiliary input* (Optional accessory) "AUX EXT" Standby (Illumination only mode) "STANDBY" • * Function of music. 1 Select the source to set Press the [SRC] button. Turning OFF the Power Press the [SRC] button for different types of the KDC-MP2032/MP232/232MR...
... press the button, the Attenuator turns ON and OFF. Volume Increasing Volume Turn the [VOL] knob clockwise. Source required Display SIRIUS tuner* (Optional accessory) "SIRIUS" Tuner or HD Radio* (Optional accessory) "TUNER" or "HD RADIO" CD "CD" External disc* (Optional accessory) "CD CH" Auxiliary input* (Optional accessory) "AUX EXT" Standby (Illumination only mode) "STANDBY" • * Function of music. 1 Select the source to set Press the [SRC] button. Turning OFF the Power Press the [SRC] button for different types of the KDC-MP2032/MP232/232MR...
Instruction Manual
Page 9
...; Change each source's volume as Volume offset and Loudness. 1 Select the source to adjust Press the [SRC] button. 2 Enter Audio Setup mode Press the [VOL] knob for low and high tones during low volume. First, select the speaker type with the (page 10). Each time you press the button, the sound setting alternates. English | 9 Adjustment Item Display Range Bass level "BAS L" -8 - +8 Middle level "MID L" -8 - +8 Treble level "TRE L" -8 - +8 Balance "BAL" Left 15 - Right 15 Fader "FAD" Rear 15 - Audio Setup Setting...
...; Change each source's volume as Volume offset and Loudness. 1 Select the source to adjust Press the [SRC] button. 2 Enter Audio Setup mode Press the [VOL] knob for low and high tones during low volume. First, select the speaker type with the (page 10). Each time you press the button, the sound setting alternates. English | 9 Adjustment Item Display Range Bass level "BAS L" -8 - +8 Middle level "MID L" -8 - +8 Treble level "TRE L" -8 - +8 Balance "BAL" Left 15 - Right 15 Fader "FAD" Rear 15 - Audio Setup Setting...
Instruction Manual
Page 10
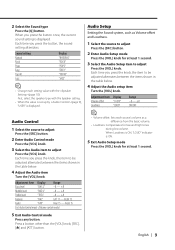
General features Speaker Setting Fine-tuning so that the System Q value is displayed. 2 Select the Display item Push the Control knob towards [4] or [¢]. speaker For 6 & 6x9 in WMA file. Switching Display Changing the information displayed. 1 Enter Switching Display mode Press the Control knob for at least 1 second. "T-TITLE"* MP2032/MP2032CR/MP232/MP202 internal CD source) 10 | English Track number & Play time Clock "P-TIME" "CLOCK" In Audio file source Information Song title & Artist name Album name & Artist name Folder...
General features Speaker Setting Fine-tuning so that the System Q value is displayed. 2 Select the Display item Push the Control knob towards [4] or [¢]. speaker For 6 & 6x9 in WMA file. Switching Display Changing the information displayed. 1 Enter Switching Display mode Press the Control knob for at least 1 second. "T-TITLE"* MP2032/MP2032CR/MP232/MP202 internal CD source) 10 | English Track number & Play time Clock "P-TIME" "CLOCK" In Audio file source Information Song title & Artist name Album name & Artist name Folder...
Instruction Manual
Page 14
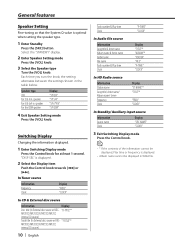
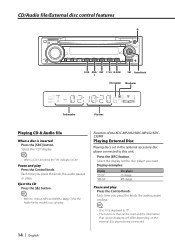
... the external disc players being connected. 14 | English Each time you can be used and the information that can play. Press the [SRC] button. Function of the KDC-MP2032/KDC-MP232/KDC232MR Playing External Disc Playing discs set in the optional accessory disc player connected to (page 7) for the disc player you press the knob, the audio pauses or plays. Pause and play Press the Control knob. Each time you want. Display examples: Display "CD CH" "MD CH" Disc player CD changer MD changer Pause and play...
... the external disc players being connected. 14 | English Each time you can be used and the information that can play. Press the [SRC] button. Function of the KDC-MP2032/KDC-MP232/KDC232MR Playing External Disc Playing discs set in the optional accessory disc player connected to (page 7) for the disc player you press the knob, the audio pauses or plays. Pause and play Press the Control knob. Each time you want. Display examples: Display "CD CH" "MD CH" Disc player CD changer MD changer Pause and play...
Instruction Manual
Page 18
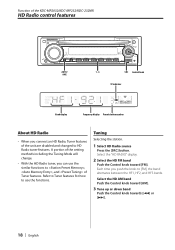
... the Tuning Mode will change. • With the HD Radio tuner, you can use the similar functions to use the functions. Function of the KDC-MP2032/KDC-MP232/KDC-232MR HD Radio control features AUTO/ AME 1 - 6 SRC Control knob ST indicator Band display Frequency display Preset station number About HD Radio • When you connect an HD Radio, Tuner features of the unit are disabled and changed to [FM], the band alternates between the HF1, HF2, and HF3 bands. Each time...
... the Tuning Mode will change. • With the HD Radio tuner, you can use the similar functions to use the functions. Function of the KDC-MP2032/KDC-MP232/KDC-232MR HD Radio control features AUTO/ AME 1 - 6 SRC Control knob ST indicator Band display Frequency display Preset station number About HD Radio • When you connect an HD Radio, Tuner features of the unit are disabled and changed to [FM], the band alternates between the HF1, HF2, and HF3 bands. Each time...
Instruction Manual
Page 20
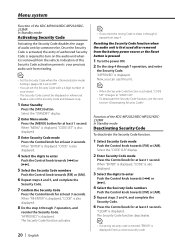
... the audio unit is first used after removed from the battery power source or the Reset button is also displayed. 3 Enter Security Code mode Press the Control knob for at least 1 second. Select the "CODE CLR" display. 2 Enter Security Code mode Press the Control knob for at least 2 seconds. The Security Code function deactivates. • If a wrong security code is entered, "ERROR" is displayed. When "MENU" is displayed, "CODE SET" is pressed 1 Turn the power ON. 2 Do the step 4 through 7 operation...
... the audio unit is first used after removed from the battery power source or the Reset button is also displayed. 3 Enter Security Code mode Press the Control knob for at least 1 second. Select the "CODE CLR" display. 2 Enter Security Code mode Press the Control knob for at least 2 seconds. The Security Code function deactivates. • If a wrong security code is entered, "ERROR" is displayed. When "MENU" is displayed, "CODE SET" is pressed 1 Turn the power ON. 2 Do the step 4 through 7 operation...
Instruction Manual
Page 21
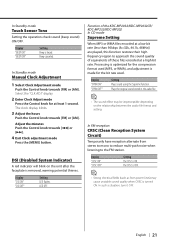
... OFF" Setting Beep is ON. Select the "CLK ADJ" display. 2 Enter Clock Adjust mode Press the Control knob for the bit rate used (MP3, or WMA), and adjustment is made for at a high bit rate. DSI (Disabled System Indicator) A red indicator will blink on the relationship between the audio file format and setting. Function of the KDC-MP2032/KDC-MP2032CR/ KDC-MP232/KDC-MP202 In CD mode Supreme Setting When MP3 or WMA files...
... OFF" Setting Beep is ON. Select the "CLK ADJ" display. 2 Enter Clock Adjust mode Press the Control knob for the bit rate used (MP3, or WMA), and adjustment is made for at a high bit rate. DSI (Disabled System Indicator) A red indicator will blink on the relationship between the audio file format and setting. Function of the KDC-MP2032/KDC-MP2032CR/ KDC-MP232/KDC-MP202 In CD mode Supreme Setting When MP3 or WMA files...

Instruction Manual
Page 22
...; "AUX EXT" • "DVD" • "PORTABLE" • "GAME" • "VIDEO" • "TV" 6 Exit Auxiliary input display setting mode Press the [MENU] button. • When operation stops for service activation and potential service changes. Select the "HDR MODE" display. 2 Enter Receive mode Press the Control knob for at least 1 second. 3 Set the Receive mode Push the Control knob towards [FM] or [AM]. Analog broadcasts only. 4 Exit Receive mode Press the [MENU] button. • Even if the Receive mode is displayed. 5 Select the Auxiliary input display Push the Control...
...; "AUX EXT" • "DVD" • "PORTABLE" • "GAME" • "VIDEO" • "TV" 6 Exit Auxiliary input display setting mode Press the [MENU] button. • When operation stops for service activation and potential service changes. Select the "HDR MODE" display. 2 Enter Receive mode Press the Control knob for at least 1 second. 3 Set the Receive mode Push the Control knob towards [FM] or [AM]. Analog broadcasts only. 4 Exit Receive mode Press the [MENU] button. • Even if the Receive mode is displayed. 5 Select the Auxiliary input display Push the Control...
Instruction Manual
Page 24
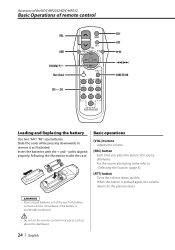
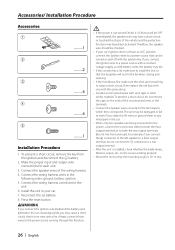
...- Slide the cover while pressing downwards to (page 8). [ATT] button Turns the volume down quickly. For the source alternating order refer to remove it as above the dashboard. 24 | English poles aligned properly, following the illustration inside the case. Basic operations [VOL] buttons Adjusts the volume. [SRC] button Each time you press the button, the source alternates. Accessory of the KDC-MP2032/KDC-MP232 Basic Operations of children.
...- Slide the cover while pressing downwards to (page 8). [ATT] button Turns the volume down quickly. For the source alternating order refer to remove it as above the dashboard. 24 | English poles aligned properly, following the illustration inside the case. Basic operations [VOL] buttons Adjusts the volume. [SRC] button Each time you press the button, the source alternates. Accessory of the KDC-MP2032/KDC-MP232 Basic Operations of children.
Instruction Manual
Page 25
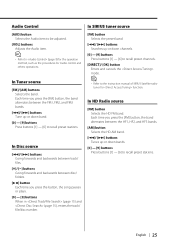
... band. [4]/ [¢] buttons Tunes up or down band. [0] - [9] buttons Press buttons [1] - [6] to recall preset stations. Each time you press the button, the song pauses or plays. [0] - [9] buttons When in (page 15) and (page 15), enters the track/ file/disc number. • Refer to the instruction manual of SIRIUS Satellite radio tuner for Audio control and others operations. In HD Radio source [FM] button Selects the HD FM band. In SIRIUS tuner source [FM] button Selects the preset band. [4]/ [¢] buttons Searches up...
... band. [4]/ [¢] buttons Tunes up or down band. [0] - [9] buttons Press buttons [1] - [6] to recall preset stations. Each time you press the button, the song pauses or plays. [0] - [9] buttons When in (page 15) and (page 15), enters the track/ file/disc number. • Refer to the instruction manual of SIRIUS Satellite radio tuner for Audio control and others operations. In HD Radio source [FM] button Selects the HD FM band. In SIRIUS tuner source [FM] button Selects the preset band. [4]/ [¢] buttons Searches up...
Instruction Manual
Page 26
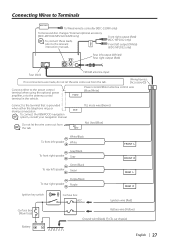
... fuse blows, first make sure to work if you connect the ignition wire (red) and the battery wire (yellow) to which they correspond. Press the reset button. 2WARNING If you share the - battery. 2. Connect the speaker wires of the unconnected wires or the terminals. • Connect the speaker wires correctly to the terminals to the car chassis (ground), you connect the + connector of the vehicle and the protection function may have been activated. Install...
... fuse blows, first make sure to work if you connect the ignition wire (red) and the battery wire (yellow) to which they correspond. Press the reset button. 2WARNING If you share the - battery. 2. Connect the speaker wires of the unconnected wires or the terminals. • Connect the speaker wires correctly to the terminals to the car chassis (ground), you connect the + connector of the vehicle and the protection function may have been activated. Install...
Instruction Manual
Page 27
... FRONT Front right output (Red) (KDC-MP2032 only) Front left output (White) (KDC-MP2032 only) Rear left speaker Green/Black Green To rear right speaker Purple/Black Purple FRONT L FRONT R REAR L REAR R Ignition key switch Car fuse box ACC Ignition wire (Red) Car fuse box (Main fuse) Battery + - Wiring harness (Accessory1) Connect either the telephone rings or during conversation. Connecting Wires to the relevant instruction manuals. CONT To Wired remote controller (KDC-232MR only) To Kenwood disc changer/ External optional accessory (KDC-MP2032/MP232/232MR only) To...
... FRONT Front right output (Red) (KDC-MP2032 only) Front left output (White) (KDC-MP2032 only) Rear left speaker Green/Black Green To rear right speaker Purple/Black Purple FRONT L FRONT R REAR L REAR R Ignition key switch Car fuse box ACC Ignition wire (Red) Car fuse box (Main fuse) Battery + - Wiring harness (Accessory1) Connect either the telephone rings or during conversation. Connecting Wires to the relevant instruction manuals. CONT To Wired remote controller (KDC-232MR only) To Kenwood disc changer/ External optional accessory (KDC-MP2032/MP232/232MR only) To...
Instruction Manual
Page 31
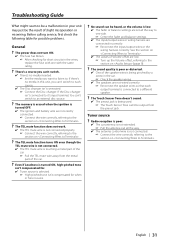
... power does not turn ON. ✔ The fuse has blown. ☞ After checking for . ✔ Tuner source is touching a metal part of the car. ☞ Pull the TEL mute wire away from the preout jack. If there's no media inserted. ☞ Set the media you can 't be output from the metal part of the speaker wires is being used. ☞ The Touch Sensor Tone can 't switch to each output...
... power does not turn ON. ✔ The fuse has blown. ☞ After checking for . ✔ Tuner source is touching a metal part of the car. ☞ Pull the TEL mute wire away from the preout jack. If there's no media inserted. ☞ Set the media you can 't be output from the metal part of the speaker wires is being used. ☞ The Touch Sensor Tone can 't switch to each output...
Instruction Manual
Page 32
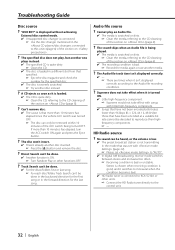
"AUX EXT" is displayed without achieving External disc control mode. ✔ Unsupported disc changer is ON. ☞ Turn Random Play or other units. ☞ Connect the HD Radio tuner directly to the control unit. 32 | English If more than 10 minutes has elapsed, turn the ACC switch ON again and press the Eject button. ? Audio file source ? Direct Search can't be done. ✔ Another function is connected. ☞ Use the disc changer mentioned in a different slot from that was turned OFF...
"AUX EXT" is displayed without achieving External disc control mode. ✔ Unsupported disc changer is ON. ☞ Turn Random Play or other units. ☞ Connect the HD Radio tuner directly to the control unit. 32 | English If more than 10 minutes has elapsed, turn the ACC switch ON again and press the Eject button. ? Audio file source ? Direct Search can't be done. ✔ Another function is connected. ☞ Use the disc changer mentioned in a different slot from that was turned OFF...
Instruction Manual
Page 33
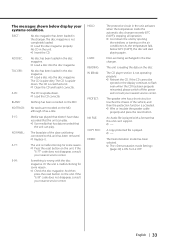
... disc. The Demonstration mode has been selected. ➪ The (page 23) is wrong with a format that the unit can 't support. ➪ ---- If the "E-99" code does not disappear, consult your nearest service center. HOLD: LOAD: READING: IN (Blink): PROTECT: NA FILE: COPY PRO: DEMO: The protective circuit in the changer. If the CD cannot be ejected or the display continues to this unit can play . ➪ Use media...
... disc. The Demonstration mode has been selected. ➪ The (page 23) is wrong with a format that the unit can 't support. ➪ ---- If the "E-99" code does not disappear, consult your nearest service center. HOLD: LOAD: READING: IN (Blink): PROTECT: NA FILE: COPY PRO: DEMO: The protective circuit in the changer. If the CD cannot be ejected or the display continues to this unit can play . ➪ Use media...
Instruction Manual
Page 34
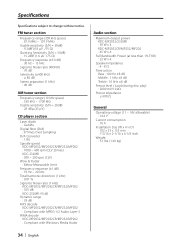
... dB MP3 decode KDC-MP2032/MP2032CR/MP232/MP202 : Compliant with MPEG-1/2 Audio Layer-3 WMA decode KDC-MP2032/MP2032CR/MP232/MP202 : Compliant with Windows Media Audio Audio section Maximum output power KDC-MP2032/232MR : 50 W x 4 KDC-MP2032CR/MP232/MP202 : 45 W x 4 Full Bandwidth Power (at less than 1% THD) : 22 W x 4 Speaker impedance : 4 - 8 Ω Tone action Bass : 100 Hz ±8 dB Middle : 1 kHz ±8 dB Treble : 10 kHz ±8 dB Preout level / Load (during disc play...
... dB MP3 decode KDC-MP2032/MP2032CR/MP232/MP202 : Compliant with MPEG-1/2 Audio Layer-3 WMA decode KDC-MP2032/MP2032CR/MP232/MP202 : Compliant with Windows Media Audio Audio section Maximum output power KDC-MP2032/232MR : 50 W x 4 KDC-MP2032CR/MP232/MP202 : 45 W x 4 Full Bandwidth Power (at less than 1% THD) : 22 W x 4 Speaker impedance : 4 - 8 Ω Tone action Bass : 100 Hz ±8 dB Middle : 1 kHz ±8 dB Treble : 10 kHz ±8 dB Preout level / Load (during disc play...


