Instruction Manual
Page 2
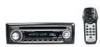
...CDs 6 About MP3 and WMA 7 General features 8 Power Selecting the Source Volume Attenuator System Q Audio Control Audio Setup Speaker Setting Switching Display Dimmer Control Theft Deterrent Faceplate TEL Mute Tuner features 12 Tuning Tuning Mode Station Preset Memory Auto Memory Entry Preset Tuning CD/Audio file/External disc control features 14 Playing CD & Audio file Playing External...System Circuit) Receive mode Setting SIRIUS ID (ESN) display Auxiliary Input Display Setting Text Scroll CD Read Setting Demonstration mode Setting Basic Operations of remote control 24 Accessories...
...CDs 6 About MP3 and WMA 7 General features 8 Power Selecting the Source Volume Attenuator System Q Audio Control Audio Setup Speaker Setting Switching Display Dimmer Control Theft Deterrent Faceplate TEL Mute Tuner features 12 Tuning Tuning Mode Station Preset Memory Auto Memory Entry Preset Tuning CD/Audio file/External disc control features 14 Playing CD & Audio file Playing External...System Circuit) Receive mode Setting SIRIUS ID (ESN) display Auxiliary Input Display Setting Text Scroll CD Read Setting Demonstration mode Setting Basic Operations of remote control 24 Accessories...
Instruction Manual
Page 4
...rating. In such a situation, remove the disc and wait for the applicable Kenwood disc changers/ CD players. CDs in a spot exposed to malfunction. • Do not use your fingers. • Do not subject the faceplate to this unit. Also avoid places with your own screws. Also avoid ...1997 or earlier and disc changers made by other makers cannot be displayed may cause your Kenwood dealer for connectable models of the unit. Set the "O-N" Switch to this unit Kenwood disc changers/ CD players released in . Safety precautions 2WARNING To prevent injury or fire, take the following...
...rating. In such a situation, remove the disc and wait for the applicable Kenwood disc changers/ CD players. CDs in a spot exposed to malfunction. • Do not use your fingers. • Do not subject the faceplate to this unit. Also avoid places with your own screws. Also avoid ...1997 or earlier and disc changers made by other makers cannot be displayed may cause your Kenwood dealer for connectable models of the unit. Set the "O-N" Switch to this unit Kenwood disc changers/ CD players released in . Safety precautions 2WARNING To prevent injury or fire, take the following...
Instruction Manual
Page 5
...KDC-MP2032/KDC-MP232/KDC-232MR Refer to the sections of A models for the first time, cancel the (page 23). Cleaning the Unit If the faceplate of the illustrations on the unit or faceplate ...Normal operation should be displayed by this unit are used to explain more clearly how the controls are A-Z 0-9 The illustrations of (page 20) to prevent theft. • The .... Notes • If you experience problems during installation, consult your Kenwood dealer. • When you purchase optional accessories, check with your Kenwood dealer to make sure that they work with a clean soft dry ...
...KDC-MP2032/KDC-MP232/KDC-232MR Refer to the sections of A models for the first time, cancel the (page 23). Cleaning the Unit If the faceplate of the illustrations on the unit or faceplate ...Normal operation should be displayed by this unit are used to explain more clearly how the controls are A-Z 0-9 The illustrations of (page 20) to prevent theft. • The .... Notes • If you experience problems during installation, consult your Kenwood dealer. • When you purchase optional accessories, check with your Kenwood dealer to make sure that they work with a clean soft dry ...

Instruction Manual
Page 11
... you need to hook up the phone. Removing the Faceplate Press the Release button. Dimmer Control You can lower the brightness of the display by shocks or jolts. • Keep the faceplate in its faceplate case while detached. • Do not expose the faceplate (and the faceplate case) to direct sunlight or excessive heat or humidity...
... you need to hook up the phone. Removing the Faceplate Press the Release button. Dimmer Control You can lower the brightness of the display by shocks or jolts. • Keep the faceplate in its faceplate case while detached. • Do not expose the faceplate (and the faceplate case) to direct sunlight or excessive heat or humidity...
Instruction Manual
Page 21
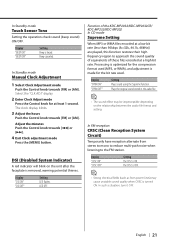
... on the unit after the faceplate is heard. Processing is optimized for at a high bit rate. Display "SPRM ON" "SPRM OFF" Setting Plays sound using the Supreme function. Select the "CLK ADJ" display. 2 Enter Clock Adjust mode Press the Control knob for the compression format used...System Indicator) A red indicator will blink on the relationship between the audio file format and setting. Function of the KDC-MP2032/KDC-MP2032CR/ KDC-MP232/KDC-MP202 In CD mode Supreme Setting When MP3 or WMA files encoded at a low bit rate (less than 96kbps (fs=32k, 44.1k, 48kHz)) are played, ...
... on the unit after the faceplate is heard. Processing is optimized for at a high bit rate. Display "SPRM ON" "SPRM OFF" Setting Plays sound using the Supreme function. Select the "CLK ADJ" display. 2 Enter Clock Adjust mode Press the Control knob for the compression format used...System Indicator) A red indicator will blink on the relationship between the audio file format and setting. Function of the KDC-MP2032/KDC-MP2032CR/ KDC-MP232/KDC-MP202 In CD mode Supreme Setting When MP3 or WMA files encoded at a low bit rate (less than 96kbps (fs=32k, 44.1k, 48kHz)) are played, ...
Instruction Manual
Page 26
..., check whether the brake lamps, blinkers, wipers, etc. Make the proper input and output wire connections for each unit. 3. connector to a power source that the faceplate will be turned on the ends of the vehicle and the protection function may die. • If the console has a lid, make sure the wires...
..., check whether the brake lamps, blinkers, wipers, etc. Make the proper input and output wire connections for each unit. 3. connector to a power source that the faceplate will be turned on the ends of the vehicle and the protection function may die. • If the console has a lid, make sure the wires...

Instruction Manual
Page 29
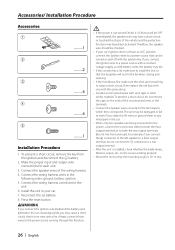
If you want to fasten the faceplate to the main unit so that it will contact and may cause damage to the mechanical parts inside the unit. English | 29 Screwing the Faceplate on the Unit If you screw them in another hole, it does not fall off, screw in the provided screws in any other screw hole than the one specified. Accessory5 • Never insert the screw in the holes shown below.
If you want to fasten the faceplate to the main unit so that it will contact and may cause damage to the mechanical parts inside the unit. English | 29 Screwing the Faceplate on the Unit If you screw them in another hole, it does not fall off, screw in the provided screws in any other screw hole than the one specified. Accessory5 • Never insert the screw in the holes shown below.
Instruction Manual
Page 33
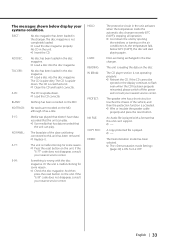
...quite dirty. The Demonstration mode has been selected. ➪ The (page 23) is upsidedown. The CD is ON. E-15: Media was played that doesn't have data recorded that the unit can play. ➪ Use media that has data recorded that this unit has been removed. ➪ Replace it has a title.... the unit. NO TRACK: No tracks are being connected to flash even when the CD has been properly reinserted, please switch off the power and consult your systems condition. NO PANEL: The faceplate of the vehicle, and then the protection function is upside-down the unit by opening...
...quite dirty. The Demonstration mode has been selected. ➪ The (page 23) is upsidedown. The CD is ON. E-15: Media was played that doesn't have data recorded that the unit can play. ➪ Use media that has data recorded that this unit has been removed. ➪ Replace it has a title.... the unit. NO TRACK: No tracks are being connected to flash even when the CD has been properly reinserted, please switch off the power and consult your systems condition. NO PANEL: The faceplate of the vehicle, and then the protection function is upside-down the unit by opening...

