Instruction Manuals
Page 2
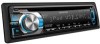
... Using the remote controller (RC-405) Listening to the other external components 14 Function settings 14 Troubleshooting 16 Installation/connection 18 Basic procedure Warning Caution Wiring connection Installing the unit Removing the unit Specifications 21 Muting upon the reception of a phone call To use this feature, connect the MUTE lead to...
... Using the remote controller (RC-405) Listening to the other external components 14 Function settings 14 Troubleshooting 16 Installation/connection 18 Basic procedure Warning Caution Wiring connection Installing the unit Removing the unit Specifications 21 Muting upon the reception of a phone call To use this feature, connect the MUTE lead to...
Instruction Manuals
Page 18
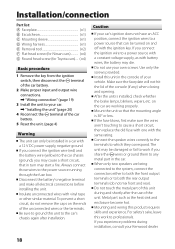
... Basic procedure 1 Remove the key from the ignition switch, then disconnect the · terminal of the car battery. 2 Make proper input and output wire connections. \ "Wiring connection" (page 19) 3 Install the unit to cause a short circuit, then replace the old fuse with one with the same rating. Always connect... to the system, connect the connectors either to both the front output terminals or to the car's chassis again after the use your Kenwood dealer. 18 Install this unit during installation, consult your own screws. Mount the unit so that the mounting angle is installed, check ...
... Basic procedure 1 Remove the key from the ignition switch, then disconnect the · terminal of the car battery. 2 Make proper input and output wire connections. \ "Wiring connection" (page 19) 3 Install the unit to cause a short circuit, then replace the old fuse with one with the same rating. Always connect... to the system, connect the connectors either to both the front output terminals or to the car's chassis again after the use your Kenwood dealer. 18 Install this unit during installation, consult your own screws. Mount the unit so that the mounting angle is installed, check ...
Instruction Manuals
Page 19
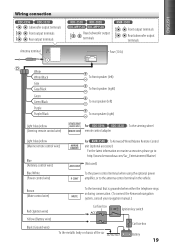
... remote control adapter : To the steering wheel Light blue/yellow (Marine remote control wire) Blue (Antenna control wire) Blue/White (Power control wire) MARINE REMOTE For : To Kenwood Wired Marine Remote Control unit (optional accessory) For the latest information on marine accessories please...control terminal in the vehicle. Brown (Mute control wire) Red (Ignition wire) Yellow (Battery wire) Black (Ground wire) To the terminal that is grounded when either the telephone rings or during conversation. (To connect the Kenwood navigation MUTE system, consult your navigation manual.) ...
... remote control adapter : To the steering wheel Light blue/yellow (Marine remote control wire) Blue (Antenna control wire) Blue/White (Power control wire) MARINE REMOTE For : To Kenwood Wired Marine Remote Control unit (optional accessory) For the latest information on marine accessories please...control terminal in the vehicle. Brown (Mute control wire) Red (Ignition wire) Yellow (Battery wire) Black (Ground wire) To the terminal that is grounded when either the telephone rings or during conversation. (To connect the Kenwood navigation MUTE system, consult your navigation manual.) ...
Instruction Manuals
Page 20
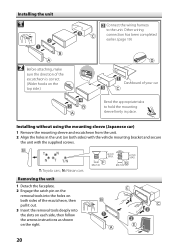
...removal tools into the slots on each side, then follow the arrows instructions as shown on the right. 20 Installing the unit 1 Connect the wiring harness to hold the mounting sleeve firmly in place. Installing without using the mounting sleeve (Japanese car) 1 Remove the mounting sleeve and escutcheon.... (Wider hooks on both sides) with the vehicle mounting bracket and secure the unit with the supplied screws. T: Toyota cars ; Other wiring connection has been completed earlier. (page 19) 2 Before attaching, make sure the direction of your car Bend the appropriate tabs to the unit.
...removal tools into the slots on each side, then follow the arrows instructions as shown on the right. 20 Installing the unit 1 Connect the wiring harness to hold the mounting sleeve firmly in place. Installing without using the mounting sleeve (Japanese car) 1 Remove the mounting sleeve and escutcheon.... (Wider hooks on both sides) with the vehicle mounting bracket and secure the unit with the supplied screws. T: Toyota cars ; Other wiring connection has been completed earlier. (page 19) 2 Before attaching, make sure the direction of your car Bend the appropriate tabs to the unit.


