Instruction Manuals
Page 6
... ENT Pauses/resumes playback of (unless mentioned otherwise). Fast-forwards/reverses tracks if pressed and held . Confirms selection. Selects track/file. Turns off automatically after about 20 minutes have elapsed under the standby mode. Selects items. Volume knob ENT (press) - Refer to the...the source. *AM- / Selects the previous/next folder. 1 ( -) / 2 (+ ) #FM+ - Volume knob (turn) VOL 5 / ∞ Adjusts the volume level. For : The power will be turned off if pressed and held . The illustration and button names used for explanation in this manual are of a disc/ USB...
... ENT Pauses/resumes playback of (unless mentioned otherwise). Fast-forwards/reverses tracks if pressed and held . Confirms selection. Selects track/file. Turns off automatically after about 20 minutes have elapsed under the standby mode. Selects items. Volume knob ENT (press) - Refer to the...the source. *AM- / Selects the previous/next folder. 1 ( -) / 2 (+ ) #FM+ - Volume knob (turn) VOL 5 / ∞ Adjusts the volume level. For : The power will be turned off if pressed and held . The illustration and button names used for explanation in this manual are of a disc/ USB...
Instruction Manuals
Page 7
... operation Changes the display information. Setting the demonstration mode 1 Press the volume knob to enter [FUNCTION]. 2 Turn the volume knob to select [DEMO MODE], then press to enter. 3 Turn the volume knob to select [NO] in clock display screen. If no operation is done for about 20 seconds... press the button again. Enters the controlling mode (MODE ON/ MODE OFF) for ) The display demonstration is done for about 15 seconds or if you turn on the power (or after you reset the unit), the display shows: [CANCEL DEMO] \ [PRESS] \ [VOLUME KNOB] 1 Press the volume knob...
... operation Changes the display information. Setting the demonstration mode 1 Press the volume knob to enter [FUNCTION]. 2 Turn the volume knob to select [DEMO MODE], then press to enter. 3 Turn the volume knob to select [NO] in clock display screen. If no operation is done for about 20 seconds... press the button again. Enters the controlling mode (MODE ON/ MODE OFF) for ) The display demonstration is done for about 15 seconds or if you turn on the power (or after you reset the unit), the display shows: [CANCEL DEMO] \ [PRESS] \ [VOLUME KNOB] 1 Press the volume knob...
Instruction Manuals
Page 8
... [SETTINGS], then press to enter. 3 Turn the volume knob to select [CLOCK], then press to enter. 4 Press the volume knob to update the firmware, see: www.kenwood.com/cs/ce/ About "KENWOOD Music Editor" This unit supports the PC application "KENWOOD Music Editor Light ver1.1" or later. SP... 7 Hold to mean the device that contains audio files with database information added with database information added by the "KENWOOD Music Editor Light ver1.1," you to the line out terminals on the display. 6 Turn the volume knob to adjust the minute, then press to enter minute adjustment.
... [SETTINGS], then press to enter. 3 Turn the volume knob to select [CLOCK], then press to enter. 4 Press the volume knob to update the firmware, see: www.kenwood.com/cs/ce/ About "KENWOOD Music Editor" This unit supports the PC application "KENWOOD Music Editor Light ver1.1" or later. SP... 7 Hold to mean the device that contains audio files with database information added with database information added by the "KENWOOD Music Editor Light ver1.1," you to the line out terminals on the display. 6 Turn the volume knob to adjust the minute, then press to enter minute adjustment.
Instruction Manuals
Page 9
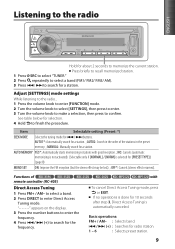
...). with good reception. ; Adjust [SETTINGS] mode settings While listening to the radio... 1 Press the volume knob to enter [FUNCTION] mode. 2 Turn the volume knob to select [SETTINGS], then press to enter. 3 Turn the volume knob to make a selection, then press to search for the frequency. "- - - -" appears on the display. 3 Press the number...
...). with good reception. ; Adjust [SETTINGS] mode settings While listening to the radio... 1 Press the volume knob to enter [FUNCTION] mode. 2 Turn the volume knob to select [SETTINGS], then press to enter. 3 Turn the volume knob to make a selection, then press to search for the frequency. "- - - -" appears on the display. 3 Press the number...
Instruction Manuals
Page 10
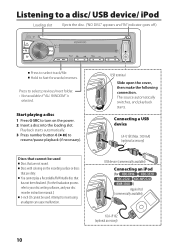
... (commercially available) KCA-iP102 (optional accessory) 10 Start playing a disc 1 Press SRC to resume/pause playback (if necessary). Playback starts automatically. 3 Press number button 6 ( ) to turn on the recording surface or discs that has not been finalized. (For the finalization process refer to your disc writing software, and your disc recorder...
... (commercially available) KCA-iP102 (optional accessory) 10 Start playing a disc 1 Press SRC to resume/pause playback (if necessary). Playback starts automatically. 3 Press number button 6 ( ) to turn on the recording surface or discs that has not been finalized. (For the finalization process refer to your disc writing software, and your disc recorder...
Instruction Manuals
Page 11
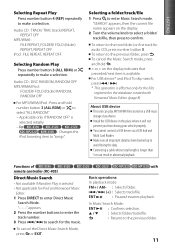
...Search Mode, press or EXIT. Install the USB device in abnormal playback. Connecting a cable whose total length is effective only for iPod and Kenwood Music Editor. 1 Press DIRECT to enter Direct Music Search Mode. Selecting a folder/track/file 1 Press to "songs." Functions of remote ... RANDOM OFF MP3/WMA/iPod : FOLDER/ FOLD (folder) RANDOM, RANDOM OFF For MP3/WMA/iPod : Press and hold . < or > on the display. 2 Turn the volume knob to select a folder/ track/file, then press to confirm. In Music Search Mode: ENT : Confirms selection. 5 / ∞ : Selects folder/track...
...Search Mode, press or EXIT. Install the USB device in abnormal playback. Connecting a cable whose total length is effective only for iPod and Kenwood Music Editor. 1 Press DIRECT to enter Direct Music Search Mode. Selecting a folder/track/file 1 Press to "songs." Functions of remote ... RANDOM OFF MP3/WMA/iPod : FOLDER/ FOLD (folder) RANDOM, RANDOM OFF For MP3/WMA/iPod : Press and hold . < or > on the display. 2 Turn the volume knob to select a folder/ track/file, then press to confirm. In Music Search Mode: ENT : Confirms selection. 5 / ∞ : Selects folder/track...
Instruction Manuals
Page 12
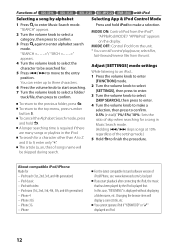
...3rd, and 4th generation) - iPhone 4 - iPhone For the latest compatible list and software version of iPod/iPhone, see: www.kenwood.com/cs/ce/ipod If you start searching. 7 Turn the volume knob to select a folder/ track/file, then press to the previous folder, press . You cannot operate iPod if... "KENWOOD" or "✓" displayed on the display. A longer searching time is played first. iPhone 3G - You can still control ...
...3rd, and 4th generation) - iPhone 4 - iPhone For the latest compatible list and software version of iPod/iPhone, see: www.kenwood.com/cs/ce/ipod If you start searching. 7 Turn the volume knob to select a folder/ track/file, then press to the previous folder, press . You cannot operate iPod if... "KENWOOD" or "✓" displayed on the display. A longer searching time is played first. iPhone 3G - You can still control ...
Instruction Manuals
Page 13
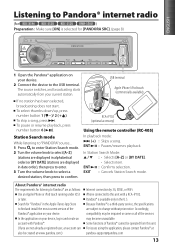
... only in the U.S. Station Search mode While listening to "PANDORA" source... 1 Press to enter Station Search mode. 2 Turn the volume knob to select [A-Z] (stations are displayed in date order), then press to enter. 3 Turn the volume knob to select a desired station, then press to confirm. About Pandora® internet radio The requirements...
... only in the U.S. Station Search mode While listening to "PANDORA" source... 1 Press to enter Station Search mode. 2 Turn the volume knob to select [A-Z] (stations are displayed in date order), then press to enter. 3 Turn the volume knob to select a desired station, then press to confirm. About Pandora® internet radio The requirements...
Instruction Manuals
Page 14
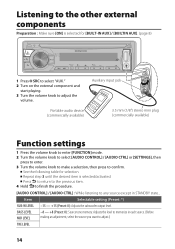
... the following table for [BUILT-IN AUX] / [BUILTIN AUX]. (page 8) 1 Press SRC to select "AUX." 2 Turn on the external component and start playing. 3 Turn the volume knob to any source except in each source. (Before making an adjustment, select the source you want to confirm.... stereo mini plug (commercially available) Function settings 1 Press the volume knob to enter [FUNCTION] mode. 2 Turn the volume knob to select [AUDIO CONTROL] / [AUDIO CTRL] or [SETTINGS], then press to enter. 3 Turn the volume knob to make a selection, then press to adjust.) TRE LEVEL 14 Repeat step 3 until the...
... the following table for [BUILT-IN AUX] / [BUILTIN AUX]. (page 8) 1 Press SRC to select "AUX." 2 Turn on the external component and start playing. 3 Turn the volume knob to any source except in each source. (Before making an adjustment, select the source you want to confirm.... stereo mini plug (commercially available) Function settings 1 Press the volume knob to enter [FUNCTION] mode. 2 Turn the volume knob to select [AUDIO CONTROL] / [AUDIO CTRL] or [SETTINGS], then press to enter. 3 Turn the volume knob to make a selection, then press to adjust.) TRE LEVEL 14 Repeat step 3 until the...
Instruction Manuals
Page 15
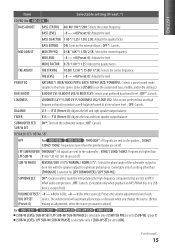
OFF *: Cancels. OFF*: Cancels. SUBWOOFER SET/ ON*: Turns on the extended bass. ; SUB-W SET DETAILED SET/ DETAIL SET HPF For : THROUGH*: All signals are sent to the speaker. ; 100HZ/ 120HZ/ 150HZ: Frequencies lower .../ 1.50/ 2.00: Adjusts the quality factor. TRE LEVEL -8 - +8 (Preset: 0): Adjusts the level. R15 (Preset: 0): Adjusts the left and right speaker output balance. BASS EXTEND ON: Turns on the subwoofer output. ; MID ADJUST MID CTR FRQ 0.5K/ 1.0K */ 1.5K/ 2.5K: Selects the center frequency. OFF: Cancels. OFF: Cancels. (Selectable only when playback...
OFF *: Cancels. OFF*: Cancels. SUBWOOFER SET/ ON*: Turns on the extended bass. ; SUB-W SET DETAILED SET/ DETAIL SET HPF For : THROUGH*: All signals are sent to the speaker. ; 100HZ/ 120HZ/ 150HZ: Frequencies lower .../ 1.50/ 2.00: Adjusts the quality factor. TRE LEVEL -8 - +8 (Preset: 0): Adjusts the level. R15 (Preset: 0): Adjusts the left and right speaker output balance. BASS EXTEND ON: Turns on the subwoofer output. ; MID ADJUST MID CTR FRQ 0.5K/ 1.0K */ 1.5K/ 2.5K: Selects the center frequency. OFF: Cancels. OFF: Cancels. (Selectable only when playback...
Instruction Manuals
Page 16
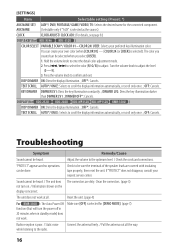
...volume to scroll the display information automatically, or scroll only once. ; Reset the unit. (page 4) For : The Auto Power Off function (that will turn on. / Information shown on the display is selected). OFF*: Cancels. OFF: Cancels. DISPLAY (for the connected component. "PROTECT" appears and no operations ...The unit does not work . Make sure [OFF] is poor. / Static noise while listening to the radio. Clean the connectors. (page 3) not turn the power off in 20 minutes when in standby mode) does not work at all the way. 16 Connect the antenna firmly. / Pull the antenna...
...volume to scroll the display information automatically, or scroll only once. ; Reset the unit. (page 4) For : The Auto Power Off function (that will turn on. / Information shown on the display is selected). OFF*: Cancels. OFF: Cancels. DISPLAY (for the connected component. "PROTECT" appears and no operations ...The unit does not work . Make sure [OFF] is poor. / Static noise while listening to the radio. Clean the connectors. (page 3) not turn the power off in 20 minutes when in standby mode) does not work at all the way. 16 Connect the antenna firmly. / Pull the antenna...
Instruction Manuals
Page 17
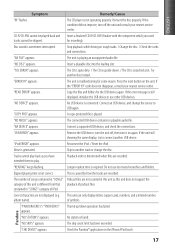
...album name). Pandora "NO STATIONS" appears. The skip count limit has been exceeded. "NA FILE" appears. Remove the USB device, turn the unit off, then turn off the unit and consult your nearest service center. Do not use other USB devices. ENGLISH Symptom Remedy/Cause "IN" flashes. The... CD player is sometimes interrupted. Reinsert the disc properly. If the condition did not improve, turn it on the iPhone/iPod touch. 17 CD-R/CD-RW cannot be played back and Insert a finalized CD-R/CD-RW (finalize with the...
...album name). Pandora "NO STATIONS" appears. The skip count limit has been exceeded. "NA FILE" appears. Remove the USB device, turn the unit off, then turn off the unit and consult your nearest service center. Do not use other USB devices. ENGLISH Symptom Remedy/Cause "IN" flashes. The... CD player is sometimes interrupted. Reinsert the disc properly. If the condition did not improve, turn it on the iPhone/iPod touch. 17 CD-R/CD-RW cannot be played back and Insert a finalized CD-R/CD-RW (finalize with the...
Instruction Manuals
Page 18
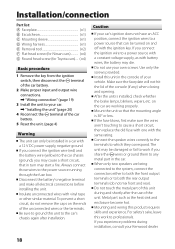
... does not have an ACC position, connect the ignition wires to a power source that can only be installed in the car. Install this unit in turn may cause a short circuit, that the mounting angle is installed, check whether the brake lamps, blinkers, wipers, etc. Installation/connection Part list: A ...the car chassis (ground), you experience problems during and shortly after installation. Mount the unit so that in the console of your Kenwood dealer. 18 Connect the speaker wires correctly to the terminals to the power source running through the fuse box. If you may start ...
... does not have an ACC position, connect the ignition wires to a power source that can only be installed in the car. Install this unit in turn may cause a short circuit, that the mounting angle is installed, check whether the brake lamps, blinkers, wipers, etc. Installation/connection Part list: A ...the car chassis (ground), you experience problems during and shortly after installation. Mount the unit so that in the console of your Kenwood dealer. 18 Connect the speaker wires correctly to the terminals to the power source running through the fuse box. If you may start ...
Instruction Manuals
Page 62
..., if it is no guarantee that an electronic accessory has been designed to connect specifically to iPod, or iPhone, respectively, and has been certified by turning the equipment off and on a circuit different from that the use radio frequency energy. These limits are expressly approved in accordance with the instructions. If...
..., if it is no guarantee that an electronic accessory has been designed to connect specifically to iPod, or iPhone, respectively, and has been certified by turning the equipment off and on a circuit different from that the use radio frequency energy. These limits are expressly approved in accordance with the instructions. If...


