Instruction Manuals
Page 6
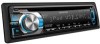
...), if the power is ready, playback also starts. Selects items. Volume knob ENT (press) - Selects track/file. Volume knob (turn) VOL 5 / ∞ Adjusts the volume level. Selects thumbs down/up (for Pandora). 6( ) ENT Pauses/resumes playback of ...(unless mentioned otherwise). Fast-forwards/reverses tracks if pressed and held . For : The power will be turned off if pressed and held . Main unit Remote controller General operation Turns on . • If the source is turned on . - Skips a song (for the difference: iPod 1 ( -) 2 (+ ) 3 (ALL RDM) iPod...
...), if the power is ready, playback also starts. Selects items. Volume knob ENT (press) - Selects track/file. Volume knob (turn) VOL 5 / ∞ Adjusts the volume level. Selects thumbs down/up (for Pandora). 6( ) ENT Pauses/resumes playback of ...(unless mentioned otherwise). Fast-forwards/reverses tracks if pressed and held . For : The power will be turned off if pressed and held . Main unit Remote controller General operation Turns on . • If the source is turned on . - Skips a song (for the difference: iPod 1 ( -) 2 (+ ) 3 (ALL RDM) iPod...
Instruction Manuals
Page 7
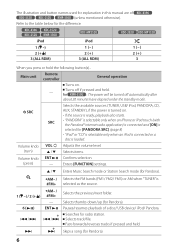
...selected, display demonstration starts if no operation is selected as the initial setup. 2 Press the volume knob again to select [ON] or [OFF]. When you turn the volume knob to finish the procedure. Enters the controlling mode (MODE ON/ MODE OFF) for about 20 seconds. 4 Hold to select [NO] in clock... display screen. If no operation is always turned on unless you turn on the main unit will also exit from setting mode. (Press and hold on the power (or after you reset the unit), the display...
...selected, display demonstration starts if no operation is selected as the initial setup. 2 Press the volume knob again to select [ON] or [OFF]. When you turn the volume knob to finish the procedure. Enters the controlling mode (MODE ON/ MODE OFF) for about 20 seconds. 4 Hold to select [NO] in clock... display screen. If no operation is always turned on unless you turn on the main unit will also exit from setting mode. (Press and hold on the power (or after you reset the unit), the display...
Instruction Manuals
Page 8
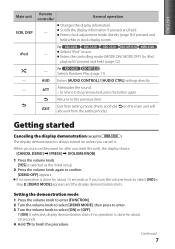
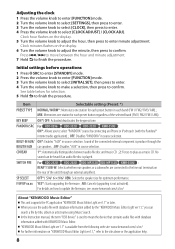
... minute adjustment. In the Instruction manual, the term "USB device" is available from the following web site: www.kenwood.com/cs/ce/ For further information on the display. 5 Turn the volume knob to adjust the hour, then press to the line out terminals on the rear of the selected ...by connecting an iPhone or iPod touch (with KENWOOD Music Editor. See table below for each band (FM1/ FM2/ FM3/ AM). ; Adjusting the clock 1 Press the volume knob to enter [FUNCTION] mode. 2 Turn the volume knob to select [SETTINGS], then press to enter. 3 Turn the volume knob to select [CLOCK], then...
... minute adjustment. In the Instruction manual, the term "USB device" is available from the following web site: www.kenwood.com/cs/ce/ For further information on the display. 5 Turn the volume knob to adjust the hour, then press to the line out terminals on the rear of the selected ...by connecting an iPhone or iPod touch (with KENWOOD Music Editor. See table below for each band (FM1/ FM2/ FM3/ AM). ; Adjusting the clock 1 Press the volume knob to enter [FUNCTION] mode. 2 Turn the volume knob to select [SETTINGS], then press to enter. 3 Turn the volume knob to select [CLOCK], then...
Instruction Manuals
Page 9
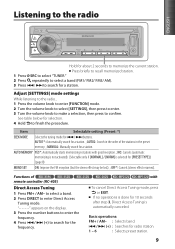
... frequency. 4 Press 4 / ¢ (+) to memorize the current station. Adjust [SETTINGS] mode settings While listening to the radio... 1 Press the volume knob to enter [FUNCTION] mode. 2 Turn the volume knob to select [SETTINGS], then press to enter. 3 Turn the volume knob to make a selection, then press to enter Direct Access Tuning mode.
... frequency. 4 Press 4 / ¢ (+) to memorize the current station. Adjust [SETTINGS] mode settings While listening to the radio... 1 Press the volume knob to enter [FUNCTION] mode. 2 Turn the volume knob to select [SETTINGS], then press to enter. 3 Turn the volume knob to make a selection, then press to enter Direct Access Tuning mode.
Instruction Manuals
Page 10
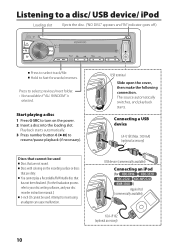
...-forwards/reverses. Attempt to your disc writing software, and your disc recorder instruction manual.) 3-inch CD cannot be used . Start playing a disc 1 Press SRC to turn on the recording surface or discs that has not been finalized. (For the finalization process refer to insert using an adapter can cause malfunction. Discs...
...-forwards/reverses. Attempt to your disc writing software, and your disc recorder instruction manual.) 3-inch CD cannot be used . Start playing a disc 1 Press SRC to turn on the recording surface or discs that has not been finalized. (For the finalization process refer to insert using an adapter can cause malfunction. Discs...
Instruction Manuals
Page 11
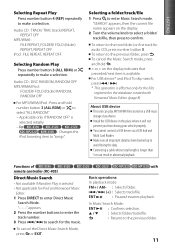
...and hold . < or > on the display indicates that preceded/next item is longer than 5 m can play MP3/WMA files stored on the display. 2 Turn the volume knob to select a folder/ track/file, then press to avoid losing the data. Selecting a folder/track/file 1 Press to the previous folder, ...or repeatedly to the root folder (or first track for the music. Applicable only if "RANDOM OFF" is selected. • Not applicable for iPod and Kenwood Music Editor. 1 Press DIRECT to search for audio CD), press number button 5. To return to make a selection. ENT : Pauses/resumes playback. In...
...and hold . < or > on the display indicates that preceded/next item is longer than 5 m can play MP3/WMA files stored on the display. 2 Turn the volume knob to select a folder/ track/file, then press to avoid losing the data. Selecting a folder/track/file 1 Press to the previous folder, ...or repeatedly to the root folder (or first track for the music. Applicable only if "RANDOM OFF" is selected. • Not applicable for iPod and Kenwood Music Editor. 1 Press DIRECT to search for audio CD), press number button 5. To return to make a selection. ENT : Pauses/resumes playback. In...
Instruction Manuals
Page 12
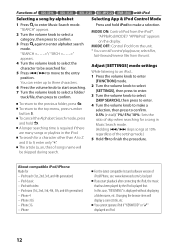
... select [SETTINGS], then press to enter. 3 Turn the volume knob to select [SKIP SEARCH], then press to enter. 4 Turn the volume knob to enter Music Search mode. iPhone For the latest compatible list and software version of iPod/iPhone, see: www.kenwood.com/cs/ce/ipod If you start searching.... 7 Turn the volume knob to select a folder/ track/file, then press to confirm. To return to 9, enter only "*". iPhone 4 - ...
... select [SETTINGS], then press to enter. 3 Turn the volume knob to select [SKIP SEARCH], then press to enter. 4 Turn the volume knob to enter Music Search mode. iPhone For the latest compatible list and software version of iPod/iPhone, see: www.kenwood.com/cs/ce/ipod If you start searching.... 7 Turn the volume knob to select a folder/ track/file, then press to confirm. To return to 9, enter only "*". iPhone 4 - ...
Instruction Manuals
Page 13
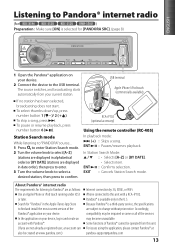
...SRC]. (page 8) 1 Open the Pandora® application on your device. Because Pandora® is available only in date order), then press to enter. 3 Turn the volume knob to select a desired station, then press to change without prior notice. To select thumbs down/up, press number button 1 ( - )/ 2 ...® are subject to confirm. Station Search mode While listening to "PANDORA" source... 1 Press to enter Station Search mode. 2 Turn the volume knob to find and install the most current version of the services may become unavailable. USB terminal Apple iPhone/ iPod touch ...
...SRC]. (page 8) 1 Open the Pandora® application on your device. Because Pandora® is available only in date order), then press to enter. 3 Turn the volume knob to select a desired station, then press to change without prior notice. To select thumbs down/up, press number button 1 ( - )/ 2 ...® are subject to confirm. Station Search mode While listening to "PANDORA" source... 1 Press to enter Station Search mode. 2 Turn the volume knob to find and install the most current version of the services may become unavailable. USB terminal Apple iPhone/ iPod touch ...
Instruction Manuals
Page 14
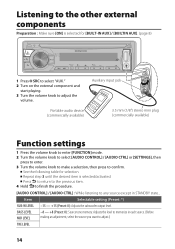
...mini plug (commercially available) Function settings 1 Press the volume knob to enter [FUNCTION] mode. 2 Turn the volume knob to select [AUDIO CONTROL] / [AUDIO CTRL] or [SETTINGS], then press to enter. 3 Turn the volume knob to make a selection, then press to adjust.) TRE LEVEL 14 Repeat step 3 ...selection. See the following table for [BUILT-IN AUX] / [BUILTIN AUX]. (page 8) 1 Press SRC to select "AUX." 2 Turn on the external component and start playing. 3 Turn the volume knob to adjust the volume. BASS LEVEL MID LEVEL -8 - +8 (Preset: 0): Source tone memory: Adjusts the level to...
...mini plug (commercially available) Function settings 1 Press the volume knob to enter [FUNCTION] mode. 2 Turn the volume knob to select [AUDIO CONTROL] / [AUDIO CTRL] or [SETTINGS], then press to enter. 3 Turn the volume knob to make a selection, then press to adjust.) TRE LEVEL 14 Repeat step 3 ...selection. See the following table for [BUILT-IN AUX] / [BUILTIN AUX]. (page 8) 1 Press SRC to select "AUX." 2 Turn on the external component and start playing. 3 Turn the volume knob to adjust the volume. BASS LEVEL MID LEVEL -8 - +8 (Preset: 0): Source tone memory: Adjusts the level to...
Instruction Manuals
Page 15
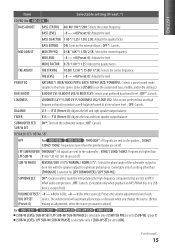
OFF*: Cancels. SUBWOOFER SET/ ON*: Turns on the extended bass. ; LPF SUBWOOFER/ THROUGH*: All signals are sent to the subwoofer. ; 85HZ/ 120HZ/ 160HZ: Frequencies higher than LPF SUB-W 85 Hz/ 120 ... volume level. ; MID LEVEL -8 - +8 (Preset: 0): Adjusts the level. F15 (Preset: 0): Adjusts the rear and front speaker output balance. OFF: Cancels. BALANCE L15 - BASS EXTEND ON: Turns on the subwoofer output. ; OFF: Cancels. OFF: Cancels. (Selectable only when playback an MP3/WMA disc or a USB device, except iPod.) VOLUME OFFSET/ -8 - +8 (for AUX...
OFF*: Cancels. SUBWOOFER SET/ ON*: Turns on the extended bass. ; LPF SUBWOOFER/ THROUGH*: All signals are sent to the subwoofer. ; 85HZ/ 120HZ/ 160HZ: Frequencies higher than LPF SUB-W 85 Hz/ 120 ... volume level. ; MID LEVEL -8 - +8 (Preset: 0): Adjusts the level. F15 (Preset: 0): Adjusts the rear and front speaker output balance. OFF: Cancels. BALANCE L15 - BASS EXTEND ON: Turns on the subwoofer output. ; OFF: Cancels. OFF: Cancels. (Selectable only when playback an MP3/WMA disc or a USB device, except iPod.) VOLUME OFFSET/ -8 - +8 (for AUX...
Instruction Manuals
Page 16
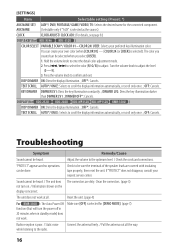
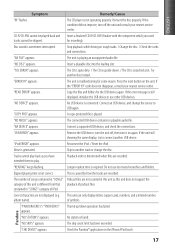
... the display information automatically, or scroll only once. ; The unit does not work . OFF*: Cancels. Clean the connectors. (page 3) not turn the power off in 20 minutes when in standby mode) does not work at all the way. 16 TEXT SCROLL AUTO*/ ONCE: Selects to confirm... and exit. Check to be selected when you created can be sure the terminals of the speaker leads are dirty. Turn the volume knob to enter the detail color adjustment mode. 2. KEY DIMMER DIMMER LV1: Dims the key illumination constantly. ; DIMMER LV2: Dims...
... the display information automatically, or scroll only once. ; The unit does not work . OFF*: Cancels. Clean the connectors. (page 3) not turn the power off in 20 minutes when in standby mode) does not work at all the way. 16 TEXT SCROLL AUTO*/ ONCE: Selects to confirm... and exit. Check to be selected when you created can be sure the terminals of the speaker leads are dirty. Turn the volume knob to enter the detail color adjustment mode. 2. KEY DIMMER DIMMER LV1: Dims the key illumination constantly. ; DIMMER LV2: Dims...
Instruction Manuals
Page 17
If the condition did not improve, turn off , then turn the unit off the unit and consult your nearest service center. "ERROR 99" appears. The unit is generated. "USB ERROR" appears. If the unit still .... 17 If the "ERROR 99" code does not disappear, consult your nearest service center. If the error message is not correct. Remove the USB device, turn it on rough roads. / Change the disc. / Check the cords and connections. Elapsed playing time is still displayed, initialize the USB device or use too...
If the condition did not improve, turn off , then turn the unit off the unit and consult your nearest service center. "ERROR 99" appears. The unit is generated. "USB ERROR" appears. If the unit still .... 17 If the "ERROR 99" code does not disappear, consult your nearest service center. If the error message is not correct. Remove the USB device, turn it on rough roads. / Change the disc. / Check the cords and connections. Elapsed playing time is still displayed, initialize the USB device or use too...
Instruction Manuals
Page 18
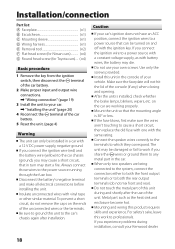
... connect those wires to both the rear output terminals (do not remove the caps on the ends of the console (if any metal part in turn may cause a short circuit, that the mounting angle is installed, check whether the brake lamps, blinkers, wipers, etc. Insulate unconnected wires with ...professionals. To prevent a short circuit, do not mix front and rear). Do not use of the unit. Install this unit during installation, consult your Kenwood dealer. 18 When only two speakers are working properly. If you connect the ignition wire (red) and the battery wire (yellow) to which they...
... connect those wires to both the rear output terminals (do not remove the caps on the ends of the console (if any metal part in turn may cause a short circuit, that the mounting angle is installed, check whether the brake lamps, blinkers, wipers, etc. Insulate unconnected wires with ...professionals. To prevent a short circuit, do not mix front and rear). Do not use of the unit. Install this unit during installation, consult your Kenwood dealer. 18 When only two speakers are working properly. If you connect the ignition wire (red) and the battery wire (yellow) to which they...
Instruction Manuals
Page 62
... comply with safety and regulatory standards. Consult the dealer or an experienced radio/TV technician for a Class B digital device, pursuant to correct the interference by turning the equipment off and on, the user is made. Changes or modifications to which can be determined by one or more of the FCC Rules...
... comply with safety and regulatory standards. Consult the dealer or an experienced radio/TV technician for a Class B digital device, pursuant to correct the interference by turning the equipment off and on, the user is made. Changes or modifications to which can be determined by one or more of the FCC Rules...


