Instruction Manuals
Page 6
... selected for Pandora). *AM- / Selects the FM bands (FM1/ FM2/ FM3) or AM when "TUNER" is loaded. Volume knob (turn) VOL 5 / ∞ Adjusts the volume level. Selects thumbs down/up (for Pandora). 6( ) ENT Pauses/resumes playback of (unless ...-) / 2 (+ ) #FM+ - Fast-forwards/reverses tracks if pressed and held . Selects the available sources (TUNER, USB/ iPod, PANDORA, CD, SRC AUX, STANDBY), if the power is turned on . - Skips a song (for explanation in this manual are of a disc/ USB device/ iPod/ Pandora. 4 / ¢ ¢ + 4 / ¢ + ¢ Searches ...
... selected for Pandora). *AM- / Selects the FM bands (FM1/ FM2/ FM3) or AM when "TUNER" is loaded. Volume knob (turn) VOL 5 / ∞ Adjusts the volume level. Selects thumbs down/up (for Pandora). 6( ) ENT Pauses/resumes playback of (unless ...-) / 2 (+ ) #FM+ - Fast-forwards/reverses tracks if pressed and held . Selects the available sources (TUNER, USB/ iPod, PANDORA, CD, SRC AUX, STANDBY), if the power is turned on . - Skips a song (for explanation in this manual are of a disc/ USB device/ iPod/ Pandora. 4 / ¢ ¢ + 4 / ¢ + ¢ Searches ...
Instruction Manuals
Page 7
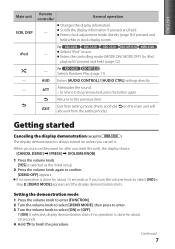
.... - Setting the demonstration mode 1 Press the volume knob to enter [FUNCTION]. 2 Turn the volume knob to select [DEMO MODE], then press to enter. 3 Turn the volume knob to the previous item. When you turn the volume knob to confirm. [DEMO OFF] appears. Continued... 7 General operation Changes the...unit), the display shows: [CANCEL DEMO] \ [PRESS] \ [VOLUME KNOB] 1 Press the volume knob. [YES] is always turned on unless you turn on the main unit will also exit from the setting mode.) Getting started Canceling the display demonstration (except for iPod playback if pressed ...
.... - Setting the demonstration mode 1 Press the volume knob to enter [FUNCTION]. 2 Turn the volume knob to select [DEMO MODE], then press to enter. 3 Turn the volume knob to the previous item. When you turn the volume knob to confirm. [DEMO OFF] appears. Continued... 7 General operation Changes the...unit), the display shows: [CANCEL DEMO] \ [PRESS] \ [VOLUME KNOB] 1 Press the volume knob. [YES] is always turned on unless you turn on the main unit will also exit from the setting mode.) Getting started Canceling the display demonstration (except for iPod playback if pressed ...
Instruction Manuals
Page 8
... Editor Light ver1.1," refer to update the firmware, see: www.kenwood.com/cs/ce/ About "KENWOOD Music Editor" This unit supports the PC application "KENWOOD Music Editor Light ver1.1" or later. OFF: Disables "PANDORA" in source selection. Clock minutes flashes on the display. 6 Turn the volume knob to adjust the minute, then press to...
... Editor Light ver1.1," refer to update the firmware, see: www.kenwood.com/cs/ce/ About "KENWOOD Music Editor" This unit supports the PC application "KENWOOD Music Editor Light ver1.1" or later. OFF: Disables "PANDORA" in source selection. Clock minutes flashes on the display. 6 Turn the volume knob to adjust the minute, then press to...
Instruction Manuals
Page 9
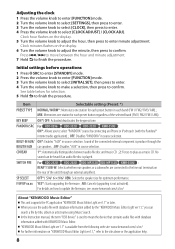
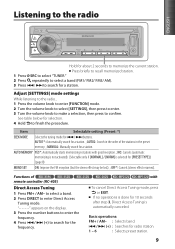
... (stereo effect resumes). Adjust [SETTINGS] mode settings While listening to the radio... 1 Press the volume knob to enter [FUNCTION] mode. 2 Turn the volume knob to select [SETTINGS], then press to enter. 3 Turn the volume knob to make a selection, then press to enter Direct Access Tuning mode. to select a band. 2 Press DIRECT to...
... (stereo effect resumes). Adjust [SETTINGS] mode settings While listening to the radio... 1 Press the volume knob to enter [FUNCTION] mode. 2 Turn the volume knob to select [SETTINGS], then press to enter. 3 Turn the volume knob to make a selection, then press to enter Direct Access Tuning mode. to select a band. 2 Press DIRECT to...
Instruction Manuals
Page 10
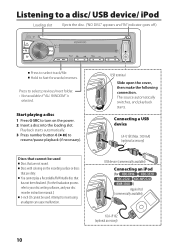
.../ iPod Loading slot Ejects the disc. ("NO DISC" appears and "IN" indicator goes off.) Press to insert using an adapter can cause malfunction. Hold to turn on the recording surface or discs that are not round.
.../ iPod Loading slot Ejects the disc. ("NO DISC" appears and "IN" indicator goes off.) Press to insert using an adapter can cause malfunction. Hold to turn on the recording surface or discs that are not round.
Instruction Manuals
Page 11
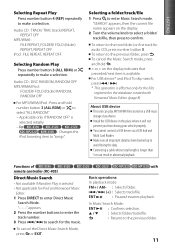
... Search mode, press and hold number button 3 (ALL RDM) or to the root folder (or first track for iPod and Kenwood Music Editor. 1 Press DIRECT to enter Music Search mode. with Kenwood Music Editor. (page 8) About USB device This unit can result in abnormal playback. Audio CD : TRACK/ TRAC (track) ... stored on the display indicates that preceded/next item is selected initially. - "SEARCH" appears, then the current file name appears on the display. 2 Turn the volume knob to select a folder/ track/file, then press to "songs." For : Changes the iPod browsing item to confirm.
... Search mode, press and hold number button 3 (ALL RDM) or to the root folder (or first track for iPod and Kenwood Music Editor. 1 Press DIRECT to enter Music Search mode. with Kenwood Music Editor. (page 8) About USB device This unit can result in abnormal playback. Audio CD : TRACK/ TRAC (track) ... stored on the display indicates that preceded/next item is selected initially. - "SEARCH" appears, then the current file name appears on the display. 2 Turn the volume knob to select a folder/ track/file, then press to "songs." For : Changes the iPod browsing item to confirm.
Instruction Manuals
Page 12
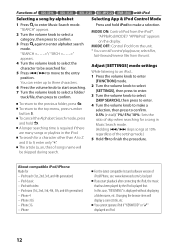
... knob to make a selection. iPhone For the latest compatible list and software version of iPod/iPhone, see: www.kenwood.com/cs/ce/ipod If you start searching. 7 Turn the volume knob to select a folder/ track/file, then press to confirm. Changing the browse item will be...a character other than A to Z and 0 to 9, enter only "*". To return to enter alphabet search mode. with video - You cannot operate iPod if "KENWOOD" or "✓" displayed on the display. iPhone 3G - iPhone 4 - In this case, "RESUMING" is displayed without displaying a folder name, etc. Functions of...
... knob to make a selection. iPhone For the latest compatible list and software version of iPod/iPhone, see: www.kenwood.com/cs/ce/ipod If you start searching. 7 Turn the volume knob to select a folder/ track/file, then press to confirm. Changing the browse item will be...a character other than A to Z and 0 to 9, enter only "*". To return to enter alphabet search mode. with video - You cannot operate iPod if "KENWOOD" or "✓" displayed on the display. iPhone 3G - iPhone 4 - In this case, "RESUMING" is displayed without displaying a folder name, etc. Functions of...
Instruction Manuals
Page 13
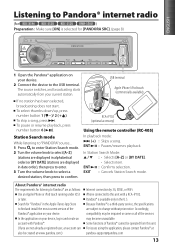
...iPhone or iPod touch running under iOS3 or later. Station Search mode While listening to "PANDORA" source... 1 Press to enter Station Search mode. 2 Turn the volume knob to change without prior notice. In Station Search Mode: 5 Selects [A-Z] or [BY DATE]. • Selects item. Pandora®... on your device. 2 Connect the device to confirm. Because Pandora® is available only in date order), then press to enter. 3 Turn the volume knob to select a desired station, then press to the USB terminal. ENT : Pauses/resumes playback. In the application on your ...
...iPhone or iPod touch running under iOS3 or later. Station Search mode While listening to "PANDORA" source... 1 Press to enter Station Search mode. 2 Turn the volume knob to change without prior notice. In Station Search Mode: 5 Selects [A-Z] or [BY DATE]. • Selects item. Pandora®... on your device. 2 Connect the device to confirm. Because Pandora® is available only in date order), then press to enter. 3 Turn the volume knob to select a desired station, then press to the USB terminal. ENT : Pauses/resumes playback. In the application on your ...
Instruction Manuals
Page 14
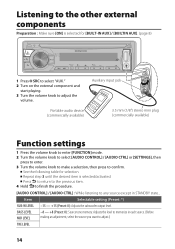
...mini plug (commercially available) Function settings 1 Press the volume knob to enter [FUNCTION] mode. 2 Turn the volume knob to select [AUDIO CONTROL] / [AUDIO CTRL] or [SETTINGS], then press to enter. 3 Turn the volume knob to make a selection, then press to adjust.) TRE LEVEL 14 See the following ...table for [BUILT-IN AUX] / [BUILTIN AUX]. (page 8) 1 Press SRC to select "AUX." 2 Turn on the external component and start playing. 3 Turn the volume knob to adjust the volume. Repeat step 3 until the desired item is selected for selection. Listening to the other ...
...mini plug (commercially available) Function settings 1 Press the volume knob to enter [FUNCTION] mode. 2 Turn the volume knob to select [AUDIO CONTROL] / [AUDIO CTRL] or [SETTINGS], then press to enter. 3 Turn the volume knob to make a selection, then press to adjust.) TRE LEVEL 14 See the following ...table for [BUILT-IN AUX] / [BUILTIN AUX]. (page 8) 1 Press SRC to select "AUX." 2 Turn on the external component and start playing. 3 Turn the volume knob to adjust the volume. Repeat step 3 until the desired item is selected for selection. Listening to the other ...
Instruction Manuals
Page 15
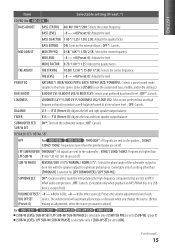
... your preferred bass boost level. ; OFF: Cancels. R15 (Preset: 0): Adjusts the left and right speaker output balance. OFF: Cancels. BASS EXTEND ON: Turns on the subwoofer output. ; PRESET EQ NATURAL*/ USER/ ROCK/ POPS/ EASY/ TOP40/ JAZZ/ POWERFUL: Selects a preset sound mode suitable to the music genre...the subwoofer. ; 85HZ/ 120HZ/ 160HZ: Frequencies higher than LPF SUB-W 85 Hz/ 120 Hz/ 160 Hz are cut off . SUBWOOFER SET/ ON*: Turns on the extended bass. ; LPF SUBWOOFER/ THROUGH*: All signals are sent to produce a well-balanced sound at a low volume level. ; OFF *: Cancels...
... your preferred bass boost level. ; OFF: Cancels. R15 (Preset: 0): Adjusts the left and right speaker output balance. OFF: Cancels. BASS EXTEND ON: Turns on the subwoofer output. ; PRESET EQ NATURAL*/ USER/ ROCK/ POPS/ EASY/ TOP40/ JAZZ/ POWERFUL: Selects a preset sound mode suitable to the music genre...the subwoofer. ; 85HZ/ 120HZ/ 160HZ: Frequencies higher than LPF SUB-W 85 Hz/ 120 Hz/ 160 Hz are cut off . SUBWOOFER SET/ ON*: Turns on the extended bass. ; LPF SUBWOOFER/ THROUGH*: All signals are sent to produce a well-balanced sound at a low volume level. ; OFF *: Cancels...
Instruction Manuals
Page 16
... LV2: Dims the key illumination darker than DIMMER LV1. ; DIMMER OFF*: Cancels. DISPLAY (for the connected component. Clean the connectors. (page 3) not turn the power off in 20 minutes when in standby mode) does not work at all the way. 16 You can create your preferred key illumination...as the source.) CLOCK CLOCK ADJUST/ CLOCK ADJ: (For details, see page 8.) DISP & KEY (for [DEMO MODE]. (page 7) Radio reception is selected). Turn the volume knob to be done. Make sure [OFF] is incorrect. Reset the unit. (page 4) For : The Auto Power Off function (that will...
... LV2: Dims the key illumination darker than DIMMER LV1. ; DIMMER OFF*: Cancels. DISPLAY (for the connected component. Clean the connectors. (page 3) not turn the power off in 20 minutes when in standby mode) does not work at all the way. 16 You can create your preferred key illumination...as the source.) CLOCK CLOCK ADJUST/ CLOCK ADJ: (For details, see page 8.) DISP & KEY (for [DEMO MODE]. (page 7) Radio reception is selected). Turn the volume knob to be done. Make sure [OFF] is incorrect. Reset the unit. (page 4) For : The Auto Power Off function (that will...
Instruction Manuals
Page 17
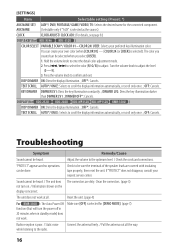
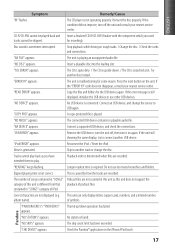
If the condition did not improve, turn off , then turn the unit off the unit and consult your nearest service center. Disc sound is connected. Try another track or change the source to USB again. "... disc properly. for the USB device again. The unit is not operating properly. Connect an USB device, and change the disc. Remove the USB device, turn it on the iPhone/iPod touch. 17 Skip to another disc instead. "PANDORA ERR 5"/ "PNDR ERR 5" Thumb up/down . / The CD is different from that...
If the condition did not improve, turn off , then turn the unit off the unit and consult your nearest service center. Disc sound is connected. Try another track or change the source to USB again. "... disc properly. for the USB device again. The unit is not operating properly. Connect an USB device, and change the disc. Remove the USB device, turn it on the iPhone/iPod touch. 17 Skip to another disc instead. "PANDORA ERR 5"/ "PNDR ERR 5" Thumb up/down . / The CD is different from that...
Instruction Manuals
Page 18
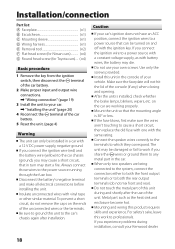
...lid of the unconnected wires or the terminals. Mount the unit so that can only be installed in turn may cause a short circuit, that in a car with a constant voltage supply, as the heat ... terminal of your vehicle. Be sure to ground this unit to the car's chassis again after the use your Kenwood dealer. 18 Do not use of this work if you share the · wires or ground them to a... output terminals (do not remove the caps on and off with battery wires, the battery may be turned on the ends of the console (if any metal part in the console of the car battery. ...
...lid of the unconnected wires or the terminals. Mount the unit so that can only be installed in turn may cause a short circuit, that in a car with a constant voltage supply, as the heat ... terminal of your vehicle. Be sure to ground this unit to the car's chassis again after the use your Kenwood dealer. 18 Do not use of this work if you share the · wires or ground them to a... output terminals (do not remove the caps on and off with battery wires, the battery may be turned on the ends of the console (if any metal part in the console of the car battery. ...
Instruction Manuals
Page 62
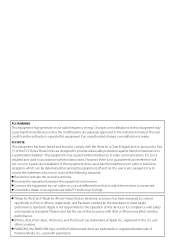
... and regulatory standards. Please note that an electronic accessory has been designed to connect specifically to iPod, or iPhone, respectively, and has been certified by turning the equipment off and on a circuit different from that to provide reasonable protection against harmful interference in the U.S. iPhone, iPod, iPod classic, iPod nano, and...
... and regulatory standards. Please note that an electronic accessory has been designed to connect specifically to iPod, or iPhone, respectively, and has been certified by turning the equipment off and on a circuit different from that to provide reasonable protection against harmful interference in the U.S. iPhone, iPod, iPod classic, iPod nano, and...


