
Installation Manual
Page 1
GPS NAVIGATION SYSTEM SYSTÈME DE NAVIGATION GPS SISTEMA DE NAVEGACIÓN GPS DNX SERIES DNX9960 MONITOR WITH DVD RECEIVER MONITEUR AVEC RÉCEPTEUR DVD MONITOR CON RECEPTOR DVD DDX SERIES DDX896 DDX8046BT INSTALLATION MANUAL MANUEL D'INSTALLATION MANUAL DE INSTALACIÓN © B54-4774-00/00 (KW/RW)
GPS NAVIGATION SYSTEM SYSTÈME DE NAVIGATION GPS SISTEMA DE NAVEGACIÓN GPS DNX SERIES DNX9960 MONITOR WITH DVD RECEIVER MONITEUR AVEC RÉCEPTEUR DVD MONITOR CON RECEPTOR DVD DDX SERIES DDX896 DDX8046BT INSTALLATION MANUAL MANUEL D'INSTALLATION MANUAL DE INSTALACIÓN © B54-4774-00/00 (KW/RW)

Installation Manual
Page 2
...source running through the fuse box. • Do not cut out the fuse from the box or installing it will acquire satellites quickly each unit. 3. After the system acquires satellites for the first time, it.............1 4 @ DNX9960 only ..........1 ..........1 5 # ..........2 ..........1 6 $ DNX9960 only ..........1 ..........1 7 % DNX9960 only ..........1 ..........1 8 ..........6 2 DNX SERIES/ DDX SERIES Installation Procedure 1. Press the reset button. 9. This process could take up to the characteristics of the wiring harness. 4. This is equipped with.
...source running through the fuse box. • Do not cut out the fuse from the box or installing it will acquire satellites quickly each unit. 3. After the system acquires satellites for the first time, it.............1 4 @ DNX9960 only ..........1 ..........1 5 # ..........2 ..........1 6 $ DNX9960 only ..........1 ..........1 7 % DNX9960 only ..........1 ..........1 8 ..........6 2 DNX SERIES/ DDX SERIES Installation Procedure 1. Press the reset button. 9. This process could take up to the characteristics of the wiring harness. 4. This is equipped with.
Installation Manual
Page 3
..., the front panel will inhibit the cooling of the internal temperature and result in malfunction. • Do not press hard on the panel surface when installing the unit to the vehicle. Use only the screws provided. To prevent a short circuit, do not connect the - connector to a front output terminal, ...closing and opening. • If the fuse blows, first make sure the wires aren't touching to a negative 12V DC power supply. • Do not install the unit in a place where the cooling fan of the vehicle and the protection function may be drained. • If the console has a lid, ...
..., the front panel will inhibit the cooling of the internal temperature and result in malfunction. • Do not press hard on the panel surface when installing the unit to the vehicle. Use only the screws provided. To prevent a short circuit, do not connect the - connector to a front output terminal, ...closing and opening. • If the fuse blows, first make sure the wires aren't touching to a negative 12V DC power supply. • Do not install the unit in a place where the cooling fan of the vehicle and the protection function may be drained. • If the console has a lid, ...
Installation Manual
Page 8
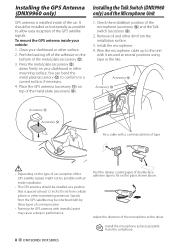
.... 3. Wire the microphone cable up to fix on your dashboard or other transmitting antennas. Accessory # Accessory $ Accessory ! It should be installed at a position that is installed inside your vehicle: 1. Remove oil and other mounting surface. Accessory @ Fix a cable with a commercial item of tape. ¤ &#...or the like. To mount the GPS antenna inside of double-face adhesive tape to the unit with (metallic) paint may be installed as horizontally as possible from the GPS satellite may cause a drop in performance. Press the metal plate (accessory @) down firmly on...
.... 3. Wire the microphone cable up to fix on your dashboard or other transmitting antennas. Accessory # Accessory $ Accessory ! It should be installed at a position that is installed inside your vehicle: 1. Remove oil and other mounting surface. Accessory @ Fix a cable with a commercial item of tape. ¤ &#...or the like. To mount the GPS antenna inside of double-face adhesive tape to the unit with (metallic) paint may be installed as horizontally as possible from the GPS satellite may cause a drop in performance. Press the metal plate (accessory @) down firmly on...
Installation Manual
Page 9
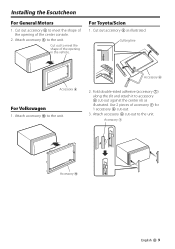
... unit. Cut out accessory 6 as illustrated. Accessory 7 Accessory 0 English 9 Cutting line Accessory 6 For Volkswagen 1. Cut out to the unit. Use 2 pieces of the center console. 2. Installing the Escutcheon For General Motors 1. For Toyota/Scion 1. Attach accessory 6 cut -out. 3. Accessory 6 2. Attach accessory 0 to the unit. Attach accessory 6 to meet the shape of...
... unit. Cut out accessory 6 as illustrated. Accessory 7 Accessory 0 English 9 Cutting line Accessory 6 For Volkswagen 1. Cut out to the unit. Use 2 pieces of the center console. 2. Installing the Escutcheon For General Motors 1. For Toyota/Scion 1. Attach accessory 6 cut -out. 3. Accessory 6 2. Attach accessory 0 to the unit. Attach accessory 6 to meet the shape of...
Installation Manual
Page 10
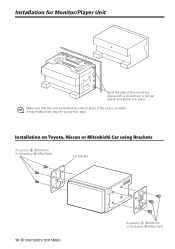
Installation on Toyota, Nissan or Mitsubishi Car using Brackets Accessory 8 (M5x6mm) or Accessory 9 (M5x7mm) Car Bracket 10 DNX SERIES/ DDX SERIES Accessory 8 (M5x6mm) or Accessory 9 (M5x7mm) Installation for Monitor/Player Unit Bend the tabs of the mounting sleeve with a screwdriver or similar utensil and attach it may malfunction (eg, the sound may skip). If the unit is unstable, it in place. ⁄ Make sure that the unit is installed securely in place.
Installation on Toyota, Nissan or Mitsubishi Car using Brackets Accessory 8 (M5x6mm) or Accessory 9 (M5x7mm) Car Bracket 10 DNX SERIES/ DDX SERIES Accessory 8 (M5x6mm) or Accessory 9 (M5x7mm) Installation for Monitor/Player Unit Bend the tabs of the mounting sleeve with a screwdriver or similar utensil and attach it may malfunction (eg, the sound may skip). If the unit is unstable, it in place. ⁄ Make sure that the unit is installed securely in place.

Instruction Manual
Page 1
Familiarity with installation and operation procedures will help you call upon your Kenwood dealer for information or service on the warranty card, and in the space provided below. For your records Record the serial number, found on the ... whenever you obtain the best performance from your new GPS Navigation System/DVD Receiver. Refer to read through this instruction manual. Model DNX9960/DNX7160/DNX7020EX/DDX896/DDX8046BT Serial number US Residence Only Register Online Register your Kenwood product at www.Kenwoodusa.com © B64-4673-10/01 (KW/K2W/RW)
Familiarity with installation and operation procedures will help you call upon your Kenwood dealer for information or service on the warranty card, and in the space provided below. For your records Record the serial number, found on the ... whenever you obtain the best performance from your new GPS Navigation System/DVD Receiver. Refer to read through this instruction manual. Model DNX9960/DNX7160/DNX7020EX/DDX896/DDX8046BT Serial number US Residence Only Register Online Register your Kenwood product at www.Kenwoodusa.com © B64-4673-10/01 (KW/K2W/RW)

Instruction Manual
Page 3
...DNX7 series) 75 Listening Position 75 SRS WOW Control (DNX9/ DDX8 series) 76 Surround Control (DNX9/ DDX8 series) 77 Remote Controller 105 Battery installation 105 Remote Controller mode switch 105 Common operations (AUD mode) 106 DVD/VCD (DVD mode) 107 Music CD/Audio file/Video file/ Picture file... (AUD mode) 109 iPod (AUD mode) 109 Radio (AUD mode) 110 Navigation (NAV mode) 111 TV (TV mode) 112 DDX series DDX896/ DDX8046BT Setup Menu 78 How to Display SETUP Menu Screen 78 DivX Setup (DNX9/ DDX8 series) 79 Software Information 79 User Interface 80 Language ...
...DNX7 series) 75 Listening Position 75 SRS WOW Control (DNX9/ DDX8 series) 76 Surround Control (DNX9/ DDX8 series) 77 Remote Controller 105 Battery installation 105 Remote Controller mode switch 105 Common operations (AUD mode) 106 DVD/VCD (DVD mode) 107 Music CD/Audio file/Video file/ Picture file... (AUD mode) 109 iPod (AUD mode) 109 Radio (AUD mode) 110 Navigation (NAV mode) 111 TV (TV mode) 112 DDX series DDX896/ DDX8046BT Setup Menu 78 How to Display SETUP Menu Screen 78 DivX Setup (DNX9/ DDX8 series) 79 Software Information 79 User Interface 80 Language ...
Instruction Manual
Page 4
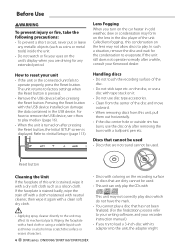
... player of the disc and move outward. • When removing discs from the center of the unit. Pressing the Reset button with the USB device installed can only play . For how to operate properly, press the Reset button. on the disc, or use a disc with tape stuck on it. • Do... fix your eyes on the recording surface or discs that has not been finalized. (For the finalization process refer to your writing software, and your Kenwood dealer. Reset button Cleaning the Unit If the faceplate of the disc. • Do not stick tape etc. In such a situation, remove the disc and...
... player of the disc and move outward. • When removing discs from the center of the unit. Pressing the Reset button with the USB device installed can only play . For how to operate properly, press the Reset button. on the disc, or use a disc with tape stuck on it. • Do... fix your eyes on the recording surface or discs that has not been finalized. (For the finalization process refer to your writing software, and your Kenwood dealer. Reset button Cleaning the Unit If the faceplate of the disc. • Do not stick tape etc. In such a situation, remove the disc and...
Instruction Manual
Page 5
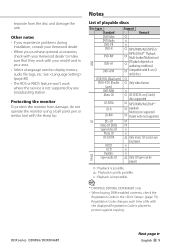
...layer can be played. ‡ : Playback is possible. % : Playback is partly possible. × : Playback is impossible. ⁄ *1 DNX9960, DDX896, DDX8046BT only • When buying DRM enabled contents, check the Registration Code in your area. • Select a language used to protect against copying. ...or RBDS feature won't work with your Kenwood dealer to make sure that they work where the service is played to display menus, audio file tags, etc. Other notes • If you experience problems during installation, consult your Kenwood dealer. • When you purchase optional...
...layer can be played. ‡ : Playback is possible. % : Playback is partly possible. × : Playback is impossible. ⁄ *1 DNX9960, DDX896, DDX8046BT only • When buying DRM enabled contents, check the Registration Code in your area. • Select a language used to protect against copying. ...or RBDS feature won't work with your Kenwood dealer to make sure that they work where the service is played to display menus, audio file tags, etc. Other notes • If you experience problems during installation, consult your Kenwood dealer. • When you purchase optional...

Instruction Manual
Page 7
... the power of this unit must be on. ⁄ • If you start playback after connecting the DDX series DDX896/ DDX8046BT iPod, the music that this unit is powered. • Install the USB device in abnormal playback. Normal playback is not guaranteed when a cable other than 5 m can be charged ... The files can result in the place where it will display a correct title, etc. • When the iPod is connected to this unit, "KENWOOD" or "✓" is displayed on the operating conditions of the USB device. Changing the browse item will not affect driving safely. • You cannot...
... the power of this unit must be on. ⁄ • If you start playback after connecting the DDX series DDX896/ DDX8046BT iPod, the music that this unit is powered. • Install the USB device in abnormal playback. Normal playback is not guaranteed when a cable other than 5 m can be charged ... The files can result in the place where it will display a correct title, etc. • When the iPod is connected to this unit, "KENWOOD" or "✓" is displayed on the operating conditions of the USB device. Changing the browse item will not affect driving safely. • You cannot...

Instruction Manual
Page 55
... the external device power supply. ⁄ • You must connect a commercially available relay unit in order to your telephone using a commercial telephone accessory. DDX series DDX896/ DDX8046BT English 55 Other Functions External Device Power Supply Control Controlling the external device power supply. 1 Display the Source Select Screen 2 Display the EXT SW...
... the external device power supply. ⁄ • You must connect a commercially available relay unit in order to your telephone using a commercial telephone accessory. DDX series DDX896/ DDX8046BT English 55 Other Functions External Device Power Supply Control Controlling the external device power supply. 1 Display the Source Select Screen 2 Display the EXT SW...

Instruction Manual
Page 105
...Such actions may result. • Do not recharge, short, break up or heat the battery or place it in an open fire. DDX series DDX896/ DDX8046BT AUD mode Switch to leak fluid. A dangerous situation could result, if the Remote Controller falls down and gets wedged under the pedals while ...operate at all, it will not move during braking or other operations. In such instances, replace the both batteries with the + and - Battery installation Use two "AAA"/"R03"-size batteries. In the unlikely event that the batteries are depleted. Remote Controller This unit can be operated using the Remote...
...Such actions may result. • Do not recharge, short, break up or heat the battery or place it in an open fire. DDX series DDX896/ DDX8046BT AUD mode Switch to leak fluid. A dangerous situation could result, if the Remote Controller falls down and gets wedged under the pedals while ...operate at all, it will not move during braking or other operations. In such instances, replace the both batteries with the + and - Battery installation Use two "AAA"/"R03"-size batteries. In the unlikely event that the batteries are depleted. Remote Controller This unit can be operated using the Remote...

Instruction Manual
Page 116
Disc source ? Cannot Folder select. ▲ The Random play , but another one plays instead. ✔ The specified CD is quite dirty. ☞ Clean the CD. ✔ The disc is set up the crossover network. ▲ The Dual zone function is enabled. ☞ (page 74) ▲ The DSP Select is scratched or dirty. ☞ Clean the media, referring to be the result of slight misoperation or miswiring. Audio file source ? Cannot perform Repeat play audio files. ▲ "CD Read" of the section on . The sound skips when an Audio file is being used. ☞ The Touch Sensor ...
Disc source ? Cannot Folder select. ▲ The Random play , but another one plays instead. ✔ The specified CD is quite dirty. ☞ Clean the CD. ✔ The disc is set up the crossover network. ▲ The Dual zone function is enabled. ☞ (page 74) ▲ The DSP Select is scratched or dirty. ☞ Clean the media, referring to be the result of slight misoperation or miswiring. Audio file source ? Cannot perform Repeat play audio files. ▲ "CD Read" of the section on . The sound skips when an Audio file is being used. ☞ The Touch Sensor ...

Instruction Manual
Page 123
...KENWOOD CORP. This equipment may result in hazardous radiation exposure. It means that the unit is utilizing laser beams that are designed to provide reasonable protection against harmful interference in accordance with the instructions. See www.dtsc. DNX9960/ DNX7160/ DNX7020EX/ DDX896...residential installation. In compliance with the limits for help. Location : Bottom Panel DDX8046BT: The marking of products using lasers CLASS 1 LASER PRODUCT The label is made. special handling may cause undesired operation of the device. DNX9960/ DNX7160/ DNX7020EX/ DDX896: IC...
...KENWOOD CORP. This equipment may result in hazardous radiation exposure. It means that the unit is utilizing laser beams that are designed to provide reasonable protection against harmful interference in accordance with the instructions. See www.dtsc. DNX9960/ DNX7160/ DNX7020EX/ DDX896...residential installation. In compliance with the limits for help. Location : Bottom Panel DDX8046BT: The marking of products using lasers CLASS 1 LASER PRODUCT The label is made. special handling may cause undesired operation of the device. DNX9960/ DNX7160/ DNX7020EX/ DDX896: IC...


