Instruction Manual
Page 3
...DTA Setup 67 Crossover Network Setup 68 DVD Setup 69 Language Setup 70 Parental Level Setup 71 System Setup 72 AV Interface Setup 73 User Interface 74 Direct Source Button Setup 76 Entering Background 76 Background Delete 77 Background Select 77 Touch Panel Adjustment 78 ... 98 Remote Controller mode switch 98 Common operations (AUD mode) 99 DVD/DVD Audio/VCD/CD/Audio files (DVD mode) 100 Radio (AUD mode) 101 NAVI (NAVI mode) 102 TV (TV mode) 103 DVD Language Codes 104 Help? Troubleshooting 105 Help? Error 106 Specifications 108 English...
...DTA Setup 67 Crossover Network Setup 68 DVD Setup 69 Language Setup 70 Parental Level Setup 71 System Setup 72 AV Interface Setup 73 User Interface 74 Direct Source Button Setup 76 Entering Background 76 Background Delete 77 Background Select 77 Touch Panel Adjustment 78 ... 98 Remote Controller mode switch 98 Common operations (AUD mode) 99 DVD/DVD Audio/VCD/CD/Audio files (DVD mode) 100 Radio (AUD mode) 101 NAVI (NAVI mode) 102 TV (TV mode) 103 DVD Language Codes 104 Help? Troubleshooting 105 Help? Error 106 Specifications 108 English...
Instruction Manual
Page 74
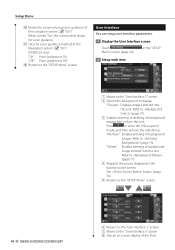
... Touch Menu" screen (page 64). Refer to display. Setup Menu y Mutes the volume during voice guidance of background images. in the favorite source screen. See (page 76). 5 Returns to the "SETUP Menu" screen. 74 DNX8120/DDX812/DDX8032BT 6 7 8 9 10 11 12 6 Returns to the "User Interface 1" screen. 7 Moves to the "User Interface 3" screen...
... Touch Menu" screen (page 64). Refer to display. Setup Menu y Mutes the volume during voice guidance of background images. in the favorite source screen. See (page 76). 5 Returns to the "SETUP Menu" screen. 74 DNX8120/DDX812/DDX8032BT 6 7 8 9 10 11 12 6 Returns to the "User Interface 1" screen. 7 Moves to the "User Interface 3" screen...
Instruction Manual
Page 76
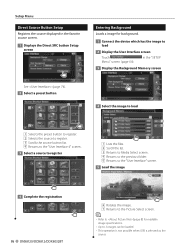
... source to register. 3 Scrolls the source button list. 4 Returns to the "User Interface 4" screen. 3 Select a source to register 4 Complete the registration 76 DNX8120/DDX812/DDX8032BT 4 Select the image to load 1 2 3 4 2 5 1 Lists the files. 2 Scroll the list. 3 Returns to Media Select screen. 4 Returns to...5 Load the image 7 6 6 6 Rotates the image. 7 Returns to the Picture Select screen. ⁄ • Refer to (page 8) for background. 1 Connect the device which has the image to 3 images can be loaded. • This operation is not possible when USB is selected as the source...
... source to register. 3 Scrolls the source button list. 4 Returns to the "User Interface 4" screen. 3 Select a source to register 4 Complete the registration 76 DNX8120/DDX812/DDX8032BT 4 Select the image to load 1 2 3 4 2 5 1 Lists the files. 2 Scroll the list. 3 Returns to Media Select screen. 4 Returns to...5 Load the image 7 6 6 6 Rotates the image. 7 Returns to the Picture Select screen. ⁄ • Refer to (page 8) for background. 1 Connect the device which has the image to 3 images can be loaded. • This operation is not possible when USB is selected as the source...
Instruction Manual
Page 77
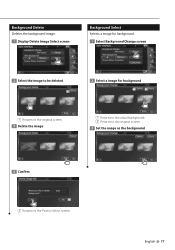
English 77 Background Delete Deletes the background image. 1 Display Delete Image Select screen Background Select Selects a image for background. 1 Select Background Change screen 2 Select the image to be deleted 1 2 Select a image for background 1 2 1 Returns to the original screen. 3 Delete the image 1 Returns to the initial background. 2 Returns to the original screen. 3 Set the image as the background 4 Confirm 2 2 Returns to the Pictrue Select screen.
English 77 Background Delete Deletes the background image. 1 Display Delete Image Select screen Background Select Selects a image for background. 1 Select Background Change screen 2 Select the image to be deleted 1 2 Select a image for background 1 2 1 Returns to the original screen. 3 Delete the image 1 Returns to the initial background. 2 Returns to the original screen. 3 Set the image as the background 4 Confirm 2 2 Returns to the Pictrue Select screen.


