Instruction Manual
Page 1
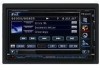
... to read through this instruction manual. For your new GPS Navigation System/ DVD Receiver. GPS NAVIGATION SYSTEM DNX8120 MONITOR WITH DVD RECEIVER DDX812 DDX8032BT INSTRUCTION MANUAL Take the time to the model and serial numbers whenever you obtain the best performance from your records Record the serial number, found on the back of the unit, in the space provided below. Familiarity with installation and operation procedures will help you call upon your...
... to read through this instruction manual. For your new GPS Navigation System/ DVD Receiver. GPS NAVIGATION SYSTEM DNX8120 MONITOR WITH DVD RECEIVER DDX812 DDX8032BT INSTRUCTION MANUAL Take the time to the model and serial numbers whenever you obtain the best performance from your records Record the serial number, found on the back of the unit, in the space provided below. Familiarity with installation and operation procedures will help you call upon your...
Instruction Manual
Page 2
... Screen 20 DVD Disc Menu 21 VCD Zoom Control 22 Music Disc & Audio File Listening 23 Functions While Displaying the Control Screen 23 Set Disc Name 25 Folder Select (Function of Audio File) 25 Video File/Picture Watching 26 Function During Playback Screen 26 Functions When Displaying the Easy Control Panel 26 Functions While Displaying the Control Screen 27 Picture Control 28 Folder Select 28 Radio Listening 29 Functions While Displaying the Control Screen 29 Seek Mode 30 Auto Memory 30 Manual Memory 31 Preset Select 31 Radio Text 32 Set Station...
... Screen 20 DVD Disc Menu 21 VCD Zoom Control 22 Music Disc & Audio File Listening 23 Functions While Displaying the Control Screen 23 Set Disc Name 25 Folder Select (Function of Audio File) 25 Video File/Picture Watching 26 Function During Playback Screen 26 Functions When Displaying the Easy Control Panel 26 Functions While Displaying the Control Screen 27 Picture Control 28 Folder Select 28 Radio Listening 29 Functions While Displaying the Control Screen 29 Seek Mode 30 Auto Memory 30 Manual Memory 31 Preset Select 31 Radio Text 32 Set Station...
Instruction Manual
Page 3
...Setting Up the Hands Free Phone 58 Voice Registration 59 Key Word Voice Registration 60 Phone Number Preset 61 SMS (Short Message Service) 62 Audio Control 92 Audio Control Menu 92 Audio Control 92 Equalizer Control 93 Graphic Equalizer Setup 93 Zone Control 94 SRS WOW Control 94 SRS WOW User Setup 95 Surround Control 95 Surround Control Adjustment 96 Position 96 Position Fine Control 97 Remote Controller 98 Battery installation 98 Remote Controller mode switch 98 Common operations (AUD mode) 99 DVD/DVD Audio/VCD/CD/Audio files (DVD mode) 100 Radio...
...Setting Up the Hands Free Phone 58 Voice Registration 59 Key Word Voice Registration 60 Phone Number Preset 61 SMS (Short Message Service) 62 Audio Control 92 Audio Control Menu 92 Audio Control 92 Equalizer Control 93 Graphic Equalizer Setup 93 Zone Control 94 SRS WOW Control 94 SRS WOW User Setup 95 Surround Control 95 Surround Control Adjustment 96 Position 96 Position Fine Control 97 Remote Controller 98 Battery installation 98 Remote Controller mode switch 98 Common operations (AUD mode) 99 DVD/DVD Audio/VCD/CD/Audio files (DVD mode) 100 Radio...
Instruction Manual
Page 6
... broadcasting station. 6 DNX8120/DDX812/DDX8032BT If the unit still does not operate normally after removing the burrs with its mechanical parts. How to play the CDs with the USB device installed can damage the data contained in the disc player of the disc and move outward. • When removing discs from this condensation on it. • Do not use a disc with tape stuck on the lens may affect its adapter...
... broadcasting station. 6 DNX8120/DDX812/DDX8032BT If the unit still does not operate normally after removing the burrs with its mechanical parts. How to play the CDs with the USB device installed can damage the data contained in the disc player of the disc and move outward. • When removing discs from this condensation on it. • Do not use a disc with tape stuck on the lens may affect its adapter...

Instruction Manual
Page 7
... a disc with the displayed Registration Code is played to the instruction manual of Satellite Radio tuner. Registration Code changes each time a file with one surface containing DVD standard signals and the other surface containing music CD signals.) English 7 By connecting your iPod as well as charge it while playing music. With the HD Radio tuner, you can use the functions. Since the music CD surface does not conform to the CD standard, playback may be controlled...
... a disc with the displayed Registration Code is played to the instruction manual of Satellite Radio tuner. Registration Code changes each time a file with one surface containing DVD standard signals and the other surface containing music CD signals.) English 7 By connecting your iPod as well as charge it while playing music. With the HD Radio tuner, you can use the functions. Since the music CD surface does not conform to the CD standard, playback may be controlled...
Instruction Manual
Page 8
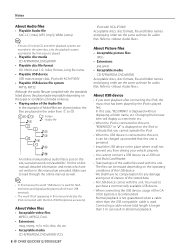
... music of normal CD and other playback systems are recorded in the same disc, only the playback system recorded at the first setout is played. • Playable disc media CD-R/RW/ROM, DVD±R/RW • Playable disc file format ISO 9660 Level 1/2, Joliet, Romeo, Long file name. • Playable USB device USB mass storage class, iPod with KCA-iP300V • Playable USB device file system...
... music of normal CD and other playback systems are recorded in the same disc, only the playback system recorded at the first setout is played. • Playable disc media CD-R/RW/ROM, DVD±R/RW • Playable disc file format ISO 9660 Level 1/2, Joliet, Romeo, Long file name. • Playable USB device USB mass storage class, iPod with KCA-iP300V • Playable USB device file system...
Instruction Manual
Page 10
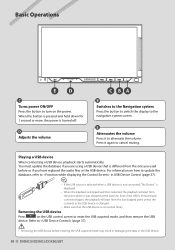
... database if you have replaced the audio files in the USB device. 10 DNX8120/DDX812/DDX8032BT Basic Operations ED C Turns power ON/OFF Press the button to enter the USB suspend mode, and then remove the USB device. Removing the USB device Press on the USB control screen to turn on how to update the database, refer to cancel muting. E Attenuates the volume Press it again to in the USB device is changed. • Make sure that is different...
... database if you have replaced the audio files in the USB device. 10 DNX8120/DDX812/DDX8032BT Basic Operations ED C Turns power ON/OFF Press the button to enter the USB suspend mode, and then remove the USB device. Removing the USB device Press on the USB control screen to turn on how to update the database, refer to cancel muting. E Attenuates the volume Press it again to in the USB device is changed. • Make sure that is different...
Instruction Manual
Page 14
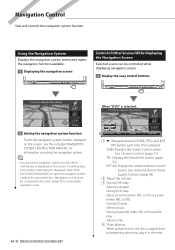
...2 Adjust the volume. 3 During DVD play : Selects music. During VCD play : Selects a file. 4 Stops playing. Navigation Control Sets and controls the navigation system function. During CD play : Selects a chapter. TEL: Displays the Hands Free screen. (page 52) EXT SW: Displays the external device control screen. During Audio file, Video file, or Picture file play : Selects a scene (when PBC is On) or a track (when PBC is selected: 2 Setting the navigation system function Touch the navigation system button displayed on using the navigation system. ⁄ • You can be connected...
...2 Adjust the volume. 3 During DVD play : Selects music. During VCD play : Selects a file. 4 Stops playing. Navigation Control Sets and controls the navigation system function. During CD play : Selects a chapter. TEL: Displays the Hands Free screen. (page 52) EXT SW: Displays the external device control screen. During Audio file, Video file, or Picture file play : Selects a scene (when PBC is On) or a track (when PBC is selected: 2 Setting the navigation system function Touch the navigation system button displayed on using the navigation system. ⁄ • You can be connected...
Instruction Manual
Page 19
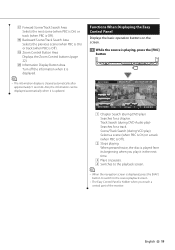
... screen. ⁄ • When the navigation screen is displayed, press the [NAV] button to switch to the source playback screen. • The Easy Control Panel is played from its beginning when you play ) Searches for a track. Also, the information can be displayed automatically when it is displayed. ⁄ • The information display is playing, press the [FNC] button DVD VIDEO Mode:Full AV - English 19 O U T: AV - When pressed twice, the disc...
... screen. ⁄ • When the navigation screen is displayed, press the [NAV] button to switch to the source playback screen. • The Easy Control Panel is played from its beginning when you play ) Searches for a track. Also, the information can be displayed automatically when it is displayed. ⁄ • The information display is playing, press the [FNC] button DVD VIDEO Mode:Full AV - English 19 O U T: AV - When pressed twice, the disc...
Instruction Manual
Page 29
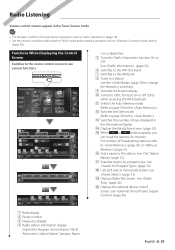
... Control Screen Switches to the source control screen to the station. For memory of receiver button operations, refer to (page 10). • Set the remote controller mode switch to "AUD" mode before starting operation, refer to (page 98). i Lists and selects memorized station. p Turns the CRSC function On or Off. (Only when receiving the FM broadcast) q Selects the Auto Memory mode. (Refer to page 30 for the ) e Switches the number of lines displayed in a station. See (page 33). Displays the external device control screen. y Sets...
... Control Screen Switches to the source control screen to the station. For memory of receiver button operations, refer to (page 10). • Set the remote controller mode switch to "AUD" mode before starting operation, refer to (page 98). i Lists and selects memorized station. p Turns the CRSC function On or Off. (Only when receiving the FM broadcast) q Selects the Auto Memory mode. (Refer to page 30 for the ) e Switches the number of lines displayed in a station. See (page 33). Displays the external device control screen. y Sets...
Instruction Manual
Page 51
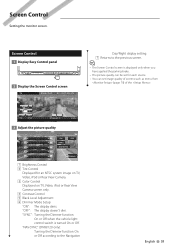
...3 Adjust the picture quality DIM 6 1 1 ON OFF 2 2 SYNC 3 3 NAV-SYNC 4 4 5 5 7 Return 1 Brightness Control 2 Tint Control Displayed for each source. • You can set for an NTSC system image on TV, Video, iPod or Rear View Camera. 3 Color Control Displayed on TV, Video, iPod or Rear View Camera screen only. 4 Contrast Control 5 Black Level Adjustment 6 Dimmer Mode Setup "ON": The display dims. "OFF": The display doesn't dim. "NAV-SYNC" (DNX8120 only): Turning the Dimmer function On or Off according to the previous screen. ⁄ • The Screen Control screen...
...3 Adjust the picture quality DIM 6 1 1 ON OFF 2 2 SYNC 3 3 NAV-SYNC 4 4 5 5 7 Return 1 Brightness Control 2 Tint Control Displayed for each source. • You can set for an NTSC system image on TV, Video, iPod or Rear View Camera. 3 Color Control Displayed on TV, Video, iPod or Rear View Camera screen only. 4 Contrast Control 5 Black Level Adjustment 6 Dimmer Mode Setup "ON": The display dims. "OFF": The display doesn't dim. "NAV-SYNC" (DNX8120 only): Turning the Dimmer function On or Off according to the previous screen. ⁄ • The Screen Control screen...

Instruction Manual
Page 65
... equalizer curve are set automatically. 5 10 9 6 7 7 8 11 5 Selects a speaker to be set. (see , page 66) e Sets the speaker volume. (see , page 65) 8 Displays the Speaker Crossover Setup screen. (See , page 68) You can select any of the following speaker types. If you are selecting front speakers. y Returns to the "SETUP Menu" screen. You can adjust the crossover setup that was set automatically when you wish to adjust 1 2 2 5 3 3 4 1 Center speaker 2 Front speaker 3 Rear speaker 4 Subwoofer 5 Tweeter setup...
... equalizer curve are set automatically. 5 10 9 6 7 7 8 11 5 Selects a speaker to be set. (see , page 66) e Sets the speaker volume. (see , page 65) 8 Displays the Speaker Crossover Setup screen. (See , page 68) You can select any of the following speaker types. If you are selecting front speakers. y Returns to the "SETUP Menu" screen. You can adjust the crossover setup that was set automatically when you wish to adjust 1 2 2 5 3 3 4 1 Center speaker 2 Front speaker 3 Rear speaker 4 Subwoofer 5 Tweeter setup...
Instruction Manual
Page 71
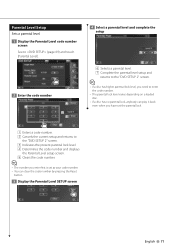
... setup screen. 5 Clears the code number. ⁄ • The number you enter first is set as your code number. • You can clear the code number by pressing the Reset button. 3 Display the Parental Level SETUP screen 4 Select a parental level and complete the setup 6 6 7 6 Selects a parental level. 7 Complete the parental level setup and returns to the "DVD SETUP 2" screen. ⁄ • If a disc has higher parental lock level, you need to enter the code number...
... setup screen. 5 Clears the code number. ⁄ • The number you enter first is set as your code number. • You can clear the code number by pressing the Reset button. 3 Display the Parental Level SETUP screen 4 Select a parental level and complete the setup 6 6 7 6 Selects a parental level. 7 Complete the parental level setup and returns to the "DVD SETUP 2" screen. ⁄ • If a disc has higher parental lock level, you need to enter the code number...
Instruction Manual
Page 72
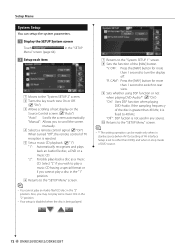
... turn the display off. "2": Forcibly plays back a disc as a music CD. OFF: Press the [NAV] button for more than 1 second to switch to the "SETUP Menu" screen. ⁄ • *1 The setting operation can setup the system parameters. 1 Display the SETUP System screen Touch Menu" screen (page 64). p Returns to rear view. 9 Sets whether using DSP function or not when playing DVD-Audio.*1 ( "On") "On": Uses DSP function when playing DVD-Audio. Setup Menu System Setup You can be made only when in stop mode of DVD source. 72 DNX8120/DDX812...
... turn the display off. "2": Forcibly plays back a disc as a music CD. OFF: Press the [NAV] button for more than 1 second to switch to the "SETUP Menu" screen. ⁄ • *1 The setting operation can setup the system parameters. 1 Display the SETUP System screen Touch Menu" screen (page 64). p Returns to rear view. 9 Sets whether using DSP function or not when playing DVD-Audio.*1 ( "On") "On": Uses DSP function when playing DVD-Audio. Setup Menu System Setup You can be made only when in stop mode of DVD source. 72 DNX8120/DDX812...
Instruction Manual
Page 76
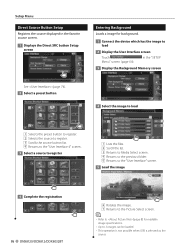
... "User Interface" screen. 5 Load the image 7 6 6 6 Rotates the image. 7 Returns to the Picture Select screen. ⁄ • Refer to (page 8) for background. 1 Connect the device which has the image to 3 images can be loaded. • This operation is not possible when USB is selected as the source. in the favorite source screen. 1 Displays the Direct SRC button Setup screen Entering Background Loads a image for readable image specifications. • Up to load 2 Display the User Interface screen Touch Menu" screen (page...
... "User Interface" screen. 5 Load the image 7 6 6 6 Rotates the image. 7 Returns to the Picture Select screen. ⁄ • Refer to (page 8) for background. 1 Connect the device which has the image to 3 images can be loaded. • This operation is not possible when USB is selected as the source. in the favorite source screen. 1 Displays the Direct SRC button Setup screen Entering Background Loads a image for readable image specifications. • Up to load 2 Display the User Interface screen Touch Menu" screen (page...
Instruction Manual
Page 80
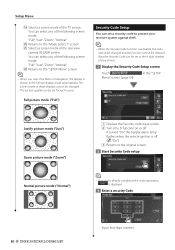
The screen mode of the following screen mode. in the full-size display mode automatically. Setup Menu o Selects a screen mode of the rear view camera (R-CAM) screen. "Full", "Just", "Zoom", "Normal" ; You can be changed and the function cannot be set a security code to protect your choice. 1 Display the Security Code Setup screen Touch Menu" screen (page 64). Full picture mode ("Full") Security Code Setup You can set as the 4 digit number of the following screen mode. If turned "On", the burglar alarm lamp flashes...
The screen mode of the following screen mode. in the full-size display mode automatically. Setup Menu o Selects a screen mode of the rear view camera (R-CAM) screen. "Full", "Just", "Zoom", "Normal" ; You can be changed and the function cannot be set a security code to protect your choice. 1 Display the Security Code Setup screen Touch Menu" screen (page 64). Full picture mode ("Full") Security Code Setup You can set as the 4 digit number of the following screen mode. If turned "On", the burglar alarm lamp flashes...

Instruction Manual
Page 84
... the number to register as Sirius Parental Code. Parental Lock function is now set to on or off. 1 Display the Parental Code screen Sirius Parental code is now set , and the display returns to SIRIUS SETUP screen. ⁄ • You need to input the code once more. 84 DNX8120/DDX812/DDX8032BT Setup Menu 4 Confirm the code number Enter the same code number as you input in step 3. Sirius Parental Lock Setup Sets a Sirius Parental Lock function on or off, and the display returns to SIRIUS SETUP screen. ⁄...
... the number to register as Sirius Parental Code. Parental Lock function is now set to on or off. 1 Display the Parental Code screen Sirius Parental code is now set , and the display returns to SIRIUS SETUP screen. ⁄ • You need to input the code once more. 84 DNX8120/DDX812/DDX8032BT Setup Menu 4 Confirm the code number Enter the same code number as you input in step 3. Sirius Parental Lock Setup Sets a Sirius Parental Lock function on or off, and the display returns to SIRIUS SETUP screen. ⁄...

Instruction Manual
Page 94
... Control Zone Control You can set the front and rear audio source. 1 Display Zone Control Touch in the "Audio Control Menu" screen (page 92). 2 1 Displays the current source. 2 Returns to the "Audio Control Menu" screen. 2 Set the Zone Control 3 4 5 5 6 7 3 Turns the Zone Function (that sets different source sounds for front and rear speakers) On or Off. 4 Switches the front and rear audio sources. (This button appears when the Zone function is On.) Use "Reverse" to change over the front and rear audio sources. 5 Sets the front and rear audio source separately. (This button appears...
... Control Zone Control You can set the front and rear audio source. 1 Display Zone Control Touch in the "Audio Control Menu" screen (page 92). 2 1 Displays the current source. 2 Returns to the "Audio Control Menu" screen. 2 Set the Zone Control 3 4 5 5 6 7 3 Turns the Zone Function (that sets different source sounds for front and rear speakers) On or Off. 4 Switches the front and rear audio sources. (This button appears when the Zone function is On.) Use "Reverse" to change over the front and rear audio sources. 5 Sets the front and rear audio source separately. (This button appears...
Instruction Manual
Page 105
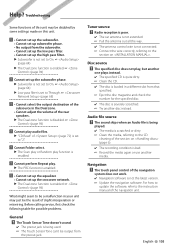
...; Cannot adjust the volume of the navigation unit. Cannot set up the high pass filter. ▲ Subwoofer is not set to On. ☞ (page 64) ▲ The Dual zone function is not the latest version. ☞ Update the navigation software. The touch panel control of the section on . Disc source ? Troubleshooting Some functions of this unit. ! • Cannot set up the subwoofer. • Cannot set up subwoofer phase. • No output from the subwoofer...
...; Cannot adjust the volume of the navigation unit. Cannot set up the high pass filter. ▲ Subwoofer is not set to On. ☞ (page 64) ▲ The Dual zone function is not the latest version. ☞ Update the navigation software. The touch panel control of the section on . Disc source ? Troubleshooting Some functions of this unit. ! • Cannot set up the subwoofer. • Cannot set up subwoofer phase. • No output from the subwoofer...
Instruction Manual
Page 106
... the unit's Reset button. USB Device Error!!: The connected USB device is different from operating. Some trouble may not be played with this message will appear. ➡ Use when the temperature at the site where the disc changer has been fitted has dropped. Authorization Error: Connection to any source other than the allowable limit. . ➡ Check the USB device. Protect : Protective circuit has been activated because a speaker cord has shorted or it . Contact the Kenwood...
... the unit's Reset button. USB Device Error!!: The connected USB device is different from operating. Some trouble may not be played with this message will appear. ➡ Use when the temperature at the site where the disc changer has been fitted has dropped. Authorization Error: Connection to any source other than the allowable limit. . ➡ Check the USB device. Protect : Protective circuit has been activated because a speaker cord has shorted or it . Contact the Kenwood...


