
User Manual
Page 3
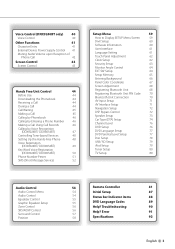
... 66 Panel Color Coordinate 67 Screen Adjustment 68 Registering Bluetooth Unit 68 Registering Bluetooth Unit PIN Code 70 Bluetooth Unit Connection 70 AV Input Setup 71 AV Interface Setup 71 Navigation Setup 72 DSP Bypass Control 72 Speaker Setup 73 Car Type (DTA) Setup 74 Channel Level 76 DVD Setup 76 DVD Language Setup 77 DVD Parental Level Setup 77 Disc Setup 78 USB/ SD Setup 79 iPod Setup 79 Tuner Setup 80 TV Setup 80 Audio Control Audio Control Menu Audio Control Equalizer Control Graphic Equalizer Setup Zone Control SRS WOW Control Surround Control...
... 66 Panel Color Coordinate 67 Screen Adjustment 68 Registering Bluetooth Unit 68 Registering Bluetooth Unit PIN Code 70 Bluetooth Unit Connection 70 AV Input Setup 71 AV Interface Setup 71 Navigation Setup 72 DSP Bypass Control 72 Speaker Setup 73 Car Type (DTA) Setup 74 Channel Level 76 DVD Setup 76 DVD Language Setup 77 DVD Parental Level Setup 77 Disc Setup 78 USB/ SD Setup 79 iPod Setup 79 Tuner Setup 80 TV Setup 80 Audio Control Audio Control Menu Audio Control Equalizer Control Graphic Equalizer Setup Zone Control SRS WOW Control Surround Control...

User Manual
Page 4
... operation. Display Setting "AUTO1" Tunes in memory one after another. Source Control Screen Switches to the source control screen to provide clear explanations of the instruction. 4 DNX9240BT/DDX8024BT/DDX8054BT [MONO] FM Select the Monaural reception. [SEEK] Switches the Seek mode. Continue to the next page The instruction continues to touch until the memory number appears. "AUTO2" Tunes in stations in a station with the mark differs from the actual displays or panels used to use various functions. 1 Display the Source Control Screen See . 2 Operation...
... operation. Display Setting "AUTO1" Tunes in memory one after another. Source Control Screen Switches to the source control screen to provide clear explanations of the instruction. 4 DNX9240BT/DDX8024BT/DDX8054BT [MONO] FM Select the Monaural reception. [SEEK] Switches the Seek mode. Continue to the next page The instruction continues to touch until the memory number appears. "AUTO2" Tunes in stations in a station with the mark differs from the actual displays or panels used to use various functions. 1 Display the Source Control Screen See . 2 Operation...

User Manual
Page 6
... work where the service is pressed. • Remove the USB device before pressing the Reset button. Other notes • If you experience problems during installation, consult your Kenwood dealer. • When you try to load a 3-inch-disc with a hard cloth or using a volatile liquid such as thinner or alcohol may not allow discs to factory settings when the Reset button is not supported by any broadcasting station. Wiping the faceplate...
... work where the service is pressed. • Remove the USB device before pressing the Reset button. Other notes • If you experience problems during installation, consult your Kenwood dealer. • When you try to load a 3-inch-disc with a hard cloth or using a volatile liquid such as thinner or alcohol may not allow discs to factory settings when the Reset button is not supported by any broadcasting station. Wiping the faceplate...

User Manual
Page 8
... standard. • A special adapter is displayed without displaying a folder name, etc. Navigation units that can be charged up provided that has been played by connecting an iPod/iPhone (commercial product) with Dock connector using an optional accessory iPod connection cable (KCA-iP301V). See . Changing the browse item will not prevent you start playback after connecting the iPod, the music that this unit is powered. • Install the USB device in abnormal playback...
... standard. • A special adapter is displayed without displaying a folder name, etc. Navigation units that can be charged up provided that has been played by connecting an iPod/iPhone (commercial product) with Dock connector using an optional accessory iPod connection cable (KCA-iP301V). See . Changing the browse item will not prevent you start playback after connecting the iPod, the music that this unit is powered. • Install the USB device in abnormal playback...

User Manual
Page 19
.... [ ] Switches to change play it . [ ] Closes the multi function bar. VideoCD Selects a scene (when PBC is On) or a track (when PBC is played from its beginning when you play time display. [ ] When appears, the text display is scrolled by touching it the next time. [0] Ejects a disc. [1], [¡] Fast Forwards or Fast Backwards. [4], [¢] DVD-VIDEO Searches for a chapter. "Title" Title Number Display "Chap" Chapter Number Display "Scene" Scene/Track Number Display "3" Play Mode Display "T"/ "C"/ "R"/ "P" Play Time Display Use...
.... [ ] Switches to change play it . [ ] Closes the multi function bar. VideoCD Selects a scene (when PBC is On) or a track (when PBC is played from its beginning when you play time display. [ ] When appears, the text display is scrolled by touching it the next time. [0] Ejects a disc. [1], [¡] Fast Forwards or Fast Backwards. [4], [¢] DVD-VIDEO Searches for a chapter. "Title" Title Number Display "Chap" Chapter Number Display "Scene" Scene/Track Number Display "3" Play Mode Display "T"/ "C"/ "R"/ "P" Play Time Display Use...

User Manual
Page 36
... Auto Memory mode. "MANU" Switches to the next frequency manually. [PRE] Lists and selects memorized station. [NAME] Sets a name to the TV screen. 1 Information display Channel information display "TV" Band display "Group" TV Area Group Display. "Preset" Memory Number Display "ch" Channel display [ ] When appears, the text display is switched in memory one after another. See (page 38). [P1] - [P6] When [P1] to TV1 or TV2. [4], [¢] Select a channel. TV Menu (only with good reception automatically. "AUTO2" Tunes...
... Auto Memory mode. "MANU" Switches to the next frequency manually. [PRE] Lists and selects memorized station. [NAME] Sets a name to the TV screen. 1 Information display Channel information display "TV" Band display "Group" TV Area Group Display. "Preset" Memory Number Display "ch" Channel display [ ] When appears, the text display is switched in memory one after another. See (page 38). [P1] - [P6] When [P1] to TV1 or TV2. [4], [¢] Select a channel. TV Menu (only with good reception automatically. "AUTO2" Tunes...

User Manual
Page 43
...each source. • You can set for an NTSC system image on Video, iPod, TV or Rear View Camera. [Color] Color Control Displayed on Video, iPod, TV or Rear View Camera screen only. [Contrast] Contrast Control [Black] Black Level Adjustment [Sharpness] Sharpness control Displayed on Video, iPod, USB, SD, TV or Rear View Camera screen only. [Dimmer] Dimmer Mode Setup "ON": The display dims. "OFF": The display doesn't dim. Screen Control 1 Display the Easy Control Screen See (page 17). 2 Display the Screen Control screen 3 Adjust the picture quality "NAV-SYNC": Turning the Dimmer function...
...each source. • You can set for an NTSC system image on Video, iPod, TV or Rear View Camera. [Color] Color Control Displayed on Video, iPod, TV or Rear View Camera screen only. [Contrast] Contrast Control [Black] Black Level Adjustment [Sharpness] Sharpness control Displayed on Video, iPod, USB, SD, TV or Rear View Camera screen only. [Dimmer] Dimmer Mode Setup "ON": The display dims. "OFF": The display doesn't dim. Screen Control 1 Display the Easy Control Screen See (page 17). 2 Display the Screen Control screen 3 Adjust the picture quality "NAV-SYNC": Turning the Dimmer function...

User Manual
Page 45
... of this button switches the calling party. [ ] • Answering another incoming call Making a Call Displaying the control screen and using various functions. 1 Display the Hands-Free Control screen TEL 2 Select a dialing method 1 DNX9240BT 1 Calls the displayed phone number. See (page 47). [BT SETUP] Displays the Bluetooth SETUP screen. (page 68) [TEL SETUP] Displays the Hands Free Setup screen. (page 48) ⁄ • While your car is different from that of the cell-phone, the statuses displayed on the control unit may...
... of this button switches the calling party. [ ] • Answering another incoming call Making a Call Displaying the control screen and using various functions. 1 Display the Hands-Free Control screen TEL 2 Select a dialing method 1 DNX9240BT 1 Calls the displayed phone number. See (page 47). [BT SETUP] Displays the Bluetooth SETUP screen. (page 68) [TEL SETUP] Displays the Hands Free Setup screen. (page 48) ⁄ • While your car is different from that of the cell-phone, the statuses displayed on the control unit may...

User Manual
Page 57
... II Music Adjust screen 2 Adjust the sound field 1 Sets a sound field. If you select another Dolby PLII mode, the sound is NOT output from rear speakers when you receive monaural broadcasting sounds. • Surround control can be set the Dolby PL, we recommend you set for each source. [Dimension Control] Sets the surround position by adjusting the front and rear volume balance. [Center Width Control] Sets the vocal image position by adjusting the right and left vocal volume level. [Panorama Mode] Turns...
... II Music Adjust screen 2 Adjust the sound field 1 Sets a sound field. If you select another Dolby PLII mode, the sound is NOT output from rear speakers when you receive monaural broadcasting sounds. • Surround control can be set the Dolby PL, we recommend you set for each source. [Dimension Control] Sets the surround position by adjusting the front and rear volume balance. [Center Width Control] Sets the vocal image position by adjusting the right and left vocal volume level. [Panorama Mode] Turns...
User Manual
Page 59
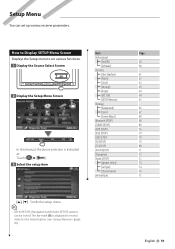
...Select] 73 [Car Type] 74 [Channel Level] 76 [AV Interface] 71 [5], [∞] Scrolls the setup menu. ⁄ • [AV-IN SETUP], [Navigation] and [Audio SETUP] options can set various functions. [Information] [DivX(R)] 60 1 Display the Source Select Screen [Software] 60 [System] [User Interface] 61 SRC [Touch] 62 [Clock] 62 [Security] 63 [Angle] 64 2 Display the Setup Menu Screen [EXT SW] 64 [SETUP Memory] 65 [Display] [Background] 66 [Color] 67 [Screen Adjust] 68 [Bluetooth SETUP] 68 [TUNER SETUP] 80 [DVD SETUP] 76 [iPod SETUP] 79 [USB SETUP...
...Select] 73 [Car Type] 74 [Channel Level] 76 [AV Interface] 71 [5], [∞] Scrolls the setup menu. ⁄ • [AV-IN SETUP], [Navigation] and [Audio SETUP] options can set various functions. [Information] [DivX(R)] 60 1 Display the Source Select Screen [Software] 60 [System] [User Interface] 61 SRC [Touch] 62 [Clock] 62 [Security] 63 [Angle] 64 2 Display the Setup Menu Screen [EXT SW] 64 [SETUP Memory] 65 [Display] [Background] 66 [Color] 67 [Screen Adjust] 68 [Bluetooth SETUP] 68 [TUNER SETUP] 80 [DVD SETUP] 76 [iPod SETUP] 79 [USB SETUP...

User Manual
Page 67
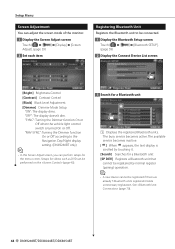
... color. 1 Display the Color screen Touch [ ] > [ (page 59) ] > [Display] > [Color]. 2 Display the Panel Color Coordinate screen To register your original color 1 Start the RGB coordinate 2 Adjust each color value 1 [Initialize] Initialization resets the settings made using the Panel Color to the default settings made at the factory. [Panel Color Scan] When set to "OFF". 3 Select a color 1 1 Selects a preset number to register. [Red Value] Adjusts the Red value. [Green Value] Adjusts the Green value. [Blue Value] Adjusts the Blue value. 3 Select a Preset number to the preset buttons...
... color. 1 Display the Color screen Touch [ ] > [ (page 59) ] > [Display] > [Color]. 2 Display the Panel Color Coordinate screen To register your original color 1 Start the RGB coordinate 2 Adjust each color value 1 [Initialize] Initialization resets the settings made using the Panel Color to the default settings made at the factory. [Panel Color Scan] When set to "OFF". 3 Select a color 1 1 Selects a preset number to register. [Red Value] Adjusts the Red value. [Green Value] Adjusts the Green value. [Blue Value] Adjusts the Blue value. 3 Select a Preset number to the preset buttons...
User Manual
Page 68
...Bluetooth unit. [SP DEV] Registers a Bluetooth unit that cannot be registered by normal register (pairing) operation. ⁄ • A new device cannot be connected. 1 Display the Bluetooth Setup screen Touch [ ] > [ (page 59) ] > [Bluetooth SETUP]. 2 Display the Connect Device List screen [Bright] Brightness Control [Contrast] Contrast Control [Black] Black Level Adjustment [Dimmer] Dimmer Mode Setup "ON": The display dims. "OFF": The display doesn't dim. The busy service becomes active. Delete unnecessary registration. Setup Menu Screen Adjustment You can adjust the screen mode...
...Bluetooth unit. [SP DEV] Registers a Bluetooth unit that cannot be registered by normal register (pairing) operation. ⁄ • A new device cannot be connected. 1 Display the Bluetooth Setup screen Touch [ ] > [ (page 59) ] > [Bluetooth SETUP]. 2 Display the Connect Device List screen [Bright] Brightness Control [Contrast] Contrast Control [Black] Black Level Adjustment [Dimmer] Dimmer Mode Setup "ON": The display dims. "OFF": The display doesn't dim. The busy service becomes active. Delete unnecessary registration. Setup Menu Screen Adjustment You can adjust the screen mode...
User Manual
Page 69
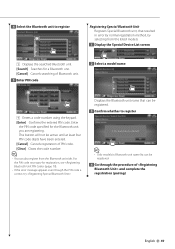
... Bluetooth unit name that resulted in Bluetooth unit name list can also register from the listed models. 1 Display the Special Device List screen 1 Displays the searched Bluetooth unit. [Search] Searches for a Bluetooth unit. [Cancel] Cancels searching of and complete the registration (pairing) English 69 4 Select the Bluetooth unit to register ⁄ • Only models in error by normal registration method, by selecting from the Bluetooth unit side. For the PIN code necessary for the Bluetooth unit...
... Bluetooth unit name that resulted in Bluetooth unit name list can also register from the listed models. 1 Display the Special Device List screen 1 Displays the searched Bluetooth unit. [Search] Searches for a Bluetooth unit. [Cancel] Cancels searching of and complete the registration (pairing) English 69 4 Select the Bluetooth unit to register ⁄ • Only models in error by normal registration method, by selecting from the Bluetooth unit side. For the PIN code necessary for the Bluetooth unit...

User Manual
Page 70
... [Yes]. Setup Menu Registering Bluetooth Unit PIN Code Sets the PIN code of the Bluetooth unit to enter when registering (pairing) from the cell-phone or audio player side. 1 Display the Bluetooth Setup screen Touch [ ] > [ (page 59) ] > [Bluetooth SETUP]. 2 Display the Receiver PIN Code screen Bluetooth Unit Connection Selects the Bluetooth unit to connect. 1 Display the Bluetooth Setup screen Touch [ ] > [ (page 59) ] > [Bluetooth SETUP]. 2 Display the Connect Device List screen 3 Enter PIN code 1 3 Select a registered Bluetooth unit 1 Enters a code number using the keypad...
... [Yes]. Setup Menu Registering Bluetooth Unit PIN Code Sets the PIN code of the Bluetooth unit to enter when registering (pairing) from the cell-phone or audio player side. 1 Display the Bluetooth Setup screen Touch [ ] > [ (page 59) ] > [Bluetooth SETUP]. 2 Display the Receiver PIN Code screen Bluetooth Unit Connection Selects the Bluetooth unit to connect. 1 Display the Bluetooth Setup screen Touch [ ] > [ (page 59) ] > [Bluetooth SETUP]. 2 Display the Connect Device List screen 3 Enter PIN code 1 3 Select a registered Bluetooth unit 1 Enters a code number using the keypad...

User Manual
Page 71
... displayed when "iPod" is selected in [iPod AV Interface Use] and three are displayed when not selected. [AV-OUT] Selects an AV source to be output at the AV OUTPUT port. ( "AV-IN1") [R-CAM Interrupt] Sets a method to switch to the rear view camera video display. ( "OFF") "ON": Switches to USB or SD. Set to DVD or SD. When in SD source, "AV-OUT" cannot be set to "ON" and the rear view will be displayed...
... displayed when "iPod" is selected in [iPod AV Interface Use] and three are displayed when not selected. [AV-OUT] Selects an AV source to be output at the AV OUTPUT port. ( "AV-IN1") [R-CAM Interrupt] Sets a method to switch to the rear view camera video display. ( "OFF") "ON": Switches to USB or SD. Set to DVD or SD. When in SD source, "AV-OUT" cannot be set to "ON" and the rear view will be displayed...

User Manual
Page 73
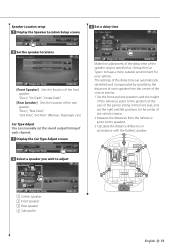
... get the best sound effects. 1 Display the Speaker Select screen Touch Audio SETUP] > [Speaker Select]. (page 59) 2 Select a speaker you wish to adjust When the speaker type and size are set, the speaker crossover network and equalizer curve are set automatically. 1 2 3 4 1 Center speaker 2 Front speaker 3 Rear speaker 4 Subwoofer [Tweeter] You can set the tweeter when you selected the speaker type. 3 Select a speaker type You can adjust the crossover setup that was set automatically when you are selecting front speakers. "Center" NONE, 40x70...
... get the best sound effects. 1 Display the Speaker Select screen Touch Audio SETUP] > [Speaker Select]. (page 59) 2 Select a speaker you wish to adjust When the speaker type and size are set, the speaker crossover network and equalizer curve are set automatically. 1 2 3 4 1 Center speaker 2 Front speaker 3 Rear speaker 4 Subwoofer [Tweeter] You can set the tweeter when you selected the speaker type. 3 Select a speaker type You can adjust the crossover setup that was set automatically when you are selecting front speakers. "Center" NONE, 40x70...
User Manual
Page 75
... front seat, and set the sound output timing of each channel. 1 Display the Car Type Adjust screen 2 Select a speaker you wish to adjust 1 2 3 4 1 Center speaker 2 Front speaker 3 Rear speaker 4 Subwoofer Make fine adjustment of the delay time of the vehicle interior. 2 Measure the distances from the reference point to have a more suitable environment for your vehicle. "Door", "Rear Deck" "2nd Row", "3rd Row" (Minivan, Passenger van) Car Type Adjust You can manually set the right and...
... front seat, and set the sound output timing of each channel. 1 Display the Car Type Adjust screen 2 Select a speaker you wish to adjust 1 2 3 4 1 Center speaker 2 Front speaker 3 Rear speaker 4 Subwoofer Make fine adjustment of the delay time of the vehicle interior. 2 Measure the distances from the reference point to have a more suitable environment for your vehicle. "Door", "Rear Deck" "2nd Row", "3rd Row" (Minivan, Passenger van) Car Type Adjust You can manually set the right and...
User Manual
Page 77
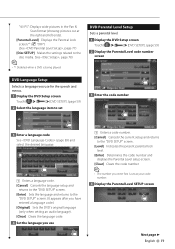
... 77) [Disc SETUP] Makes the settings related to the "DVD SETUP" screen. [Level] Indicates the present parental lock level. [Enter] Determines the code number and displays the Parental Level setup screen. [Clear] Clears the code number. ⁄ • The number you enter first is being played. DVD Parental Level Setup Sets a parental level. 1 Display the DVD Setup screen Touch DVD SETUP]. (page 59) 2 Display the Parental Level code number screen DVD Language Setup Selects a language you use for the speech and menus. 1 Display the DVD Setup screen Touch DVD SETUP]. (page 59) 2 Select the...
... 77) [Disc SETUP] Makes the settings related to the "DVD SETUP" screen. [Level] Indicates the present parental lock level. [Enter] Determines the code number and displays the Parental Level setup screen. [Clear] Clears the code number. ⁄ • The number you enter first is being played. DVD Parental Level Setup Sets a parental level. 1 Display the DVD Setup screen Touch DVD SETUP]. (page 59) 2 Display the Parental Level code number screen DVD Language Setup Selects a language you use for the speech and menus. 1 Display the DVD Setup screen Touch DVD SETUP]. (page 59) 2 Select the...

User Manual
Page 87
... is displayed. "OFF": Switches to "R-CAM" beforehand. See (page 61). [Color] Sets the screen and button illumination color. (page 67) [EXT SW] Setting up power specification of the monitor. (page 64) [iPod AV Interface Use] Sets the terminal to the rear camera video display when "Reverse" gear is controlled from this unit. (page 64) English 87 Initial Setup When pressing the Reset button or turning on the unit for the first time, the Initial SETUP screen...
... is displayed. "OFF": Switches to "R-CAM" beforehand. See (page 61). [Color] Sets the screen and button illumination color. (page 67) [EXT SW] Setting up power specification of the monitor. (page 64) [iPod AV Interface Use] Sets the terminal to the rear camera video display when "Reverse" gear is controlled from this unit. (page 64) English 87 Initial Setup When pressing the Reset button or turning on the unit for the first time, the Initial SETUP screen...
User Manual
Page 90
... 72) ▲ The equalizer is set to "iPod". ☞ (page 55) ▲ The unit is enabled. ! Radio reception is poor. ✔ The car antenna is not extended. ☞ Pull the antenna out all the way. ✔ The antenna control wire is set to "2". ! Audio file source ? Cannot Folder select. ▲ The Random play audio files. ▲ "CD Read" of slight misoperation or miswiring. Troubleshooting Some functions of the section...
... 72) ▲ The equalizer is set to "iPod". ☞ (page 55) ▲ The unit is enabled. ! Radio reception is poor. ✔ The car antenna is not extended. ☞ Pull the antenna out all the way. ✔ The antenna control wire is set to "2". ! Audio file source ? Cannot Folder select. ▲ The Random play audio files. ▲ "CD Read" of slight misoperation or miswiring. Troubleshooting Some functions of the section...


