Instruction Manual
Page 2
Contents Before use 3 How to reset your unit 3 INTRODUCTIONS Initial Settings 5 Initial setup 5 Updating the system 6 Activating the security function 7 Component names and functions....8 Setting the clock 10 Common operations 11... camera 49 Setting menu items 50 Memorizing/recalling the settings 54 Locking the settings 54 Adjusting the touch position 54 BLUETOOTH OPERATIONS (Only for DDX790/DDX770/DDX7070BT/ DDX470/DDX4070BT) Information for using Bluetooth® devices 55 Bluetooth operations 55 Connecting Bluetooth devices 56 Setting up Bluetooth 58 Using the Bluetooth ...
Contents Before use 3 How to reset your unit 3 INTRODUCTIONS Initial Settings 5 Initial setup 5 Updating the system 6 Activating the security function 7 Component names and functions....8 Setting the clock 10 Common operations 11... camera 49 Setting menu items 50 Memorizing/recalling the settings 54 Locking the settings 54 Adjusting the touch position 54 BLUETOOTH OPERATIONS (Only for DDX790/DDX770/DDX7070BT/ DDX470/DDX4070BT) Information for using Bluetooth® devices 55 Bluetooth operations 55 Connecting Bluetooth devices 56 Setting up Bluetooth 58 Using the Bluetooth ...
Instruction Manual
Page 3
...8226; Do not operate the touch panel using a ball-point pen or similar tool with your unit DDX790/DDX770/DDX7070BT Reset button DDX470/DDX4070BT/DDX370/DDX3070 Reset button If the unit fails to reset your finger directly (if you have some ineffective dots. If you are mainly used for a long time... the operation of the operations. Pictures may not be synchronized with high precision, but it may have parked the car for the purpose of DDX770 are wearing a glove, take it may obstruct visibility. • DO NOT operate the unit while driving. For operations using the buttons on...
...8226; Do not operate the touch panel using a ball-point pen or similar tool with your unit DDX790/DDX770/DDX7070BT Reset button DDX470/DDX4070BT/DDX370/DDX3070 Reset button If the unit fails to reset your finger directly (if you have some ineffective dots. If you are mainly used for a long time... the operation of the operations. Pictures may not be synchronized with high precision, but it may have parked the car for the purpose of DDX770 are wearing a glove, take it may obstruct visibility. • DO NOT operate the unit while driving. For operations using the buttons on...
Instruction Manual
Page 5
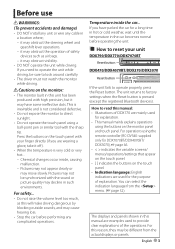
... setup When you power on the unit for the first time or reset the unit, the initial setting screen appears. • You can also change the settings on the screen. (☞ page 50) 1 For DDX790/DDX770/DDX7070BT: For DDX470/DDX4070BT/DDX3070: For DDX370: Language Select the text... language used for on the monitor panel. (☞ page 45) 2 Finish the procedure. *1 Only for DDX790/DDX770/DDX7070BT. *2 Only for SiriusXM Connect Vehicle Tuner. (☞ page 52) R-CAM Select [ON] when Interrupt connecting the rear view camera. (☞ page ...
... setup When you power on the unit for the first time or reset the unit, the initial setting screen appears. • You can also change the settings on the screen. (☞ page 50) 1 For DDX790/DDX770/DDX7070BT: For DDX470/DDX4070BT/DDX3070: For DDX370: Language Select the text... language used for on the monitor panel. (☞ page 45) 2 Finish the procedure. *1 Only for DDX790/DDX770/DDX7070BT. *2 Only for SiriusXM Connect Vehicle Tuner. (☞ page 52) R-CAM Select [ON] when Interrupt connecting the rear view camera. (☞ page ...
Instruction Manual
Page 6
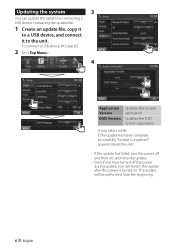
Reset the unit. • If the update has failed, turn the power off and then on, and retry the update. • Even if you have turned ...
Reset the unit. • If the update has failed, turn the power off and then on, and retry the update. • Even if you have turned ...
Instruction Manual
Page 8
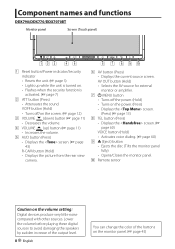
Component names and functions DDX790/DDX770/DDX7070BT Monitor panel Screen (Touch panel) 1 Reset button/Power indicator/Security indicator • Resets the unit. (☞ page 3) • Lights up ) button (☞ page 11) • Increases the volume. 5 AUD button (Press) • Displays the screen. (☞ page 43) R-...
Component names and functions DDX790/DDX770/DDX7070BT Monitor panel Screen (Touch panel) 1 Reset button/Power indicator/Security indicator • Resets the unit. (☞ page 3) • Lights up ) button (☞ page 11) • Increases the volume. 5 AUD button (Press) • Displays the screen. (☞ page 43) R-...
Instruction Manual
Page 9
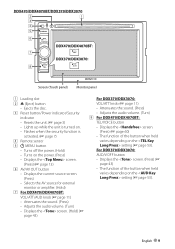
DDX470/DDX4070BT/DDX370/DDX3070 Screen (Touch panel) Monitor panel 1 Loading slot 2 0 (Eject) button • Ejects the disc. 3 Reset button/Power indicator/Security indicator • Resets the unit. (☞ page 3) • Lights up while the unit is turned on. • Flashes when the security function is activated. (☞ page 7) 4 Remote sensor 5 ...
DDX470/DDX4070BT/DDX370/DDX3070 Screen (Touch panel) Monitor panel 1 Loading slot 2 0 (Eject) button • Ejects the disc. 3 Reset button/Power indicator/Security indicator • Resets the unit. (☞ page 3) • Lights up while the unit is turned on. • Flashes when the security function is activated. (☞ page 7) 4 Remote sensor 5 ...
Instruction Manual
Page 10
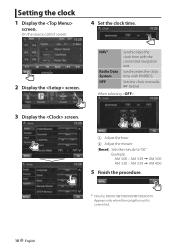
... when the navigation unit is connected. 10 English Sets the clock manually. (☞ below) When selecting : 3 Display the screen. 1 Adjust the hour 2 Adjust the minute [Reset]: Sets the minute to "00." AM 3:59 = AM 4:00 5 Finish the procedure. * Only for DDX7070BT/DDX4070BT/DDX3070. NAV * Radio Data System OFF Synchronizes the clock...
... when the navigation unit is connected. 10 English Sets the clock manually. (☞ below) When selecting : 3 Display the screen. 1 Adjust the hour 2 Adjust the minute [Reset]: Sets the minute to "00." AM 3:59 = AM 4:00 5 Finish the procedure. * Only for DDX7070BT/DDX4070BT/DDX3070. NAV * Radio Data System OFF Synchronizes the clock...
Instruction Manual
Page 23
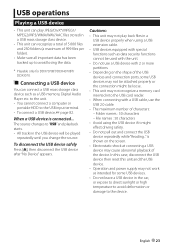
.... • USB devices equipped with special functions such as a USB memory, Digital Audio Player etc. English 23 In this case, disconnect the USB device then reset this unit and the USB device. • Operation and power supply may not work as intended for DDX7070BT/DDX4070BT/ DDX3070. USB operations Playing a USB device...
.... • USB devices equipped with special functions such as a USB memory, Digital Audio Player etc. English 23 In this case, disconnect the USB device then reset this unit and the USB device. • Operation and power supply may not work as intended for DDX7070BT/DDX4070BT/ DDX3070. USB operations Playing a USB device...
Instruction Manual
Page 26
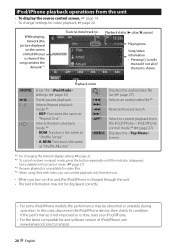
While playing, Artwork (the picture displayed on the screen of iPod/iPhone) is shown if the song contains the Artwork.*1 Track no./total track no. iPod/iPhone playback operations from the unit • To display the source control screen, ☞ page 14. • To change settings for video playback, ☞ page 20. Playback status (3: play/8: pause) Playing time Song/video information • Pressing [
While playing, Artwork (the picture displayed on the screen of iPod/iPhone) is shown if the song contains the Artwork.*1 Track no./total track no. iPod/iPhone playback operations from the unit • To display the source control screen, ☞ page 14. • To change settings for video playback, ☞ page 20. Playback status (3: play/8: pause) Playing time Song/video information • Pressing [
Instruction Manual
Page 54
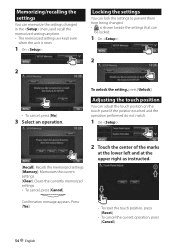
... On : 2 • To cancel, press [No]. 3 Select an operation. To unlock the setting, press [Unlock]. Press [Yes]. • To reset the touch position, press [Reset]. • To cancel the current operation, press [Cancel]. 54 English Memorizing/recalling the settings You can memorize the settings changed in the menu... and recall the memorized settings anytime. • The memorized settings are kept even when the unit is reset. 1 On : 2 Locking the settings You can lock the settings to prevent them from being changed. • is shown beside the ...
... On : 2 • To cancel, press [No]. 3 Select an operation. To unlock the setting, press [Unlock]. Press [Yes]. • To reset the touch position, press [Reset]. • To cancel the current operation, press [Cancel]. 54 English Memorizing/recalling the settings You can memorize the settings changed in the menu... and recall the memorized settings anytime. • The memorized settings are kept even when the unit is reset. 1 On : 2 Locking the settings You can lock the settings to prevent them from being changed. • is shown beside the ...
Instruction Manual
Page 56
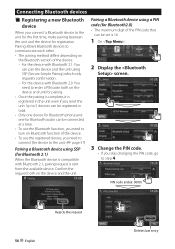
... device for Bluetooth phone and one for Bluetooth audio can be set is 16. 1 On : 2 Display the screen. 3 Change the PIN code. • If you reset the unit. PIN code (initial: 0000) Rejects the request 56 English Deletes last entry Up to 5 devices can be registered in the unit even if...
... device for Bluetooth phone and one for Bluetooth audio can be set is 16. 1 On : 2 Display the screen. 3 Change the PIN code. • If you reset the unit. PIN code (initial: 0000) Rejects the request 56 English Deletes last entry Up to 5 devices can be registered in the unit even if...

Instruction Manual
Page 74
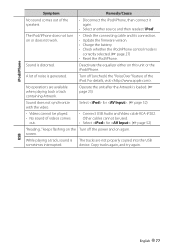
...the Bluetooth function. "No Navigation" No navigation unit is registered but the connection has failed. Bluetooth (Only for the connections (as well as appropriate, then reset the unit (☞ pages 3 and 81). "Initialize Error" The unit has failed to be trouble is removed. "Hung Up Error" The call . ... device. (☞ page 57) "Please Wait..." Wire or insulate the speaker cord as the instructions supplied with the adapters used for DDX790/DDX770/DDX7070BT/DDX470/DDX4070BT) Message Remedy/Cause "No BT Dongle" The Bluetooth adapter (KS-UBT1) is not always serious...
...the Bluetooth function. "No Navigation" No navigation unit is registered but the connection has failed. Bluetooth (Only for the connections (as well as appropriate, then reset the unit (☞ pages 3 and 81). "Initialize Error" The unit has failed to be trouble is removed. "Hung Up Error" The call . ... device. (☞ page 57) "Please Wait..." Wire or insulate the speaker cord as the instructions supplied with the adapters used for DDX790/DDX770/DDX7070BT/DDX470/DDX4070BT) Message Remedy/Cause "No BT Dongle" The Bluetooth adapter (KS-UBT1) is not always serious...

Instruction Manual
Page 76
... radio. No picture appears on the external monitor. • Connect the video cord correctly. • Select the correct input on the screen. (☞ page 12) Reset the unit. (☞ page 3) The remote controller* does not work. The unit does not work . The format of the speakers. Tracks are not played back... back. • Record the tracks using other players. AME automatic presetting does not work at all. • Adjust the volume to [AV-IN]. * For DDX790/DDX770/DDX470/DDX370, purchase KNA-RCDV331 separately. 76 English
... radio. No picture appears on the external monitor. • Connect the video cord correctly. • Select the correct input on the screen. (☞ page 12) Reset the unit. (☞ page 3) The remote controller* does not work. The unit does not work . The format of the speakers. Tracks are not played back... back. • Record the tracks using other players. AME automatic presetting does not work at all. • Adjust the volume to [AV-IN]. * For DDX790/DDX770/DDX470/DDX370, purchase KNA-RCDV331 separately. 76 English
Instruction Manual
Page 77
... English 77 The iPod/iPhone does not turn on the Turn off (uncheck) the "VoiceOver" feature of noise is correctly selected. (☞ page 27) • Reset the iPod/iPhone. For details, visit . screen. Copy tracks again, and try again. A lot of the iPod. Select for . (☞ page 52) • Videos cannot...
... English 77 The iPod/iPhone does not turn on the Turn off (uncheck) the "VoiceOver" feature of noise is correctly selected. (☞ page 27) • Reset the iPod/iPhone. For details, visit . screen. Copy tracks again, and try again. A lot of the iPod. Select for . (☞ page 52) • Videos cannot...
Instruction Manual
Page 79
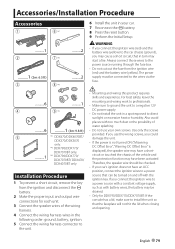
.... • Do not cut out the fuse from the ignition and disconnect the · battery. 2 Make the proper input and output wire connections for DDX790/DDX770/DDX7070BT: If the console has a lid, make sure to the unit. 6 Install the unit in a spot exposed to the wires via the fuse. ¤ &#...to ground the unit to a negative 12V DC power supply. • Do not install the unit in your car. 7 Reconnect the · battery. 8 Press the reset button. 9 Perform the Initial Setup. If you use your car's ignition does not have been activated. Also avoid places with too much dust or the...
.... • Do not cut out the fuse from the ignition and disconnect the · battery. 2 Make the proper input and output wire connections for DDX790/DDX770/DDX7070BT: If the console has a lid, make sure to the unit. 6 Install the unit in a spot exposed to the wires via the fuse. ¤ &#...to ground the unit to a negative 12V DC power supply. • Do not install the unit in your car. 7 Reconnect the · battery. 8 Press the reset button. 9 Perform the Initial Setup. If you use your car's ignition does not have been activated. Also avoid places with too much dust or the...


