Instruction Manual
Page 2
...11 Adjusting the panel angle 11 Adjusting the volume 11 Putting the unit in standby 12 Turning off the screen 12 Switching screens 13 AV SOURCE OPERATIONS Selecting the playback source ...... 14 Displaying the source control screen ..........14 Displaying all sources and items 15 Customizing the screen ........15 Disc operations 16 Playing a disc 16 Playable disc types 17 Playback operations 18 settings 22 USB operations 23 Playing a USB device 23 Listening to the iPod/iPhone device 25 iPod/iPhone playback operations from the unit 26 Selecting an audio/video file from the menu...
...11 Adjusting the panel angle 11 Adjusting the volume 11 Putting the unit in standby 12 Turning off the screen 12 Switching screens 13 AV SOURCE OPERATIONS Selecting the playback source ...... 14 Displaying the source control screen ..........14 Displaying all sources and items 15 Customizing the screen ........15 Disc operations 16 Playing a disc 16 Playable disc types 17 Playback operations 18 settings 22 USB operations 23 Playing a USB device 23 Listening to the iPod/iPhone device 25 iPod/iPhone playback operations from the unit 26 Selecting an audio/video file from the menu...
Instruction Manual
Page 3
... clear explanations of explanation. English 3 If you need to operate the unit while driving, be different from the menu. (☞ page 52) The displays and panels shown in a location where; - Chemical changes occur inside the car... If you are examples used for explanation. • This manual mainly explains operations using the remote controller (RC-DV340: supplied only for a long time in hot or cold weather, wait until...
... clear explanations of explanation. English 3 If you need to operate the unit while driving, be different from the menu. (☞ page 52) The displays and panels shown in a location where; - Chemical changes occur inside the car... If you are examples used for explanation. • This manual mainly explains operations using the remote controller (RC-DV340: supplied only for a long time in hot or cold weather, wait until...
Instruction Manual
Page 4
... different from the factory. Location : Top plate DDX7070BT/DDX4070BT/DDX3070: The marking of a weaker class. There is utilizing laser beams that to the chassis/case and says that the component uses laser beams that interference will not occur in a particular installation. When the adapter is made. DDX790/DDX770/DDX470/DDX370: CAUTION Use of controls or adjustments or performance of the...
... different from the factory. Location : Top plate DDX7070BT/DDX4070BT/DDX3070: The marking of a weaker class. There is utilizing laser beams that to the chassis/case and says that the component uses laser beams that interference will not occur in a particular installation. When the adapter is made. DDX790/DDX770/DDX470/DDX370: CAUTION Use of controls or adjustments or performance of the...
Instruction Manual
Page 5
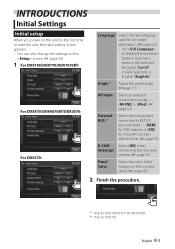
Angle *1 Adjust the panel angle. (☞page 11) AV Input Select an external component to play - [AV-IN2] or [iPod]. (☞ page 52) External BUS *2 Select the component connected to EXT I/F input terminal - [OEM] for ADS adapter or [SXi] for SiriusXM Connect Vehicle Tuner. (☞ page 52) R-CAM Select [ON] when Interrupt connecting the rear view camera. (☞ page 52) Panel Color Select the color of the buttons on the monitor panel. (☞ page...
Angle *1 Adjust the panel angle. (☞page 11) AV Input Select an external component to play - [AV-IN2] or [iPod]. (☞ page 52) External BUS *2 Select the component connected to EXT I/F input terminal - [OEM] for ADS adapter or [SXi] for SiriusXM Connect Vehicle Tuner. (☞ page 52) R-CAM Select [ON] when Interrupt connecting the rear view camera. (☞ page 52) Panel Color Select the color of the buttons on the monitor panel. (☞ page...
Instruction Manual
Page 10
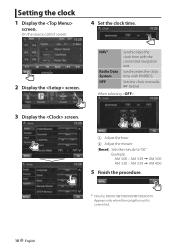
... connected navigation unit. Example: AM 3:00 - Sets the clock manually. (☞ below) When selecting : 3 Display the screen. 1 Adjust the hour 2 Adjust the minute [Reset]: Sets the minute to "00." AM 3:29 = AM 3:00 AM 3:30 - Appears only when the navigation unit is connected. 10 English AM 3:59 = AM 4:00 5 Finish the procedure. * Only for DDX7070BT/DDX4070BT/DDX3070. Setting the clock 1 Display the screen. On the source control screen: 4 Set the clock time. 2 Display the screen. NAV * Radio...
... connected navigation unit. Example: AM 3:00 - Sets the clock manually. (☞ below) When selecting : 3 Display the screen. 1 Adjust the hour 2 Adjust the minute [Reset]: Sets the minute to "00." AM 3:29 = AM 3:00 AM 3:30 - Appears only when the navigation unit is connected. 10 English AM 3:59 = AM 4:00 5 Finish the procedure. * Only for DDX7070BT/DDX4070BT/DDX3070. Setting the clock 1 Display the screen. On the source control screen: 4 Set the clock time. 2 Display the screen. NAV * Radio...
Instruction Manual
Page 13
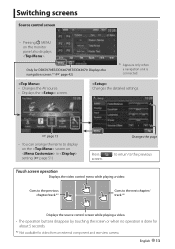
... video control menu while playing a video. Switching screens Source control screen • Pressing MENU on in setting. (☞ page 51) Changes the page Press [ screen. ] to return to the next chapter/ track.*2 Displays the source control screen while playing a video. • The operation buttons disappear by touching the screen or when no operation is done for about 5 seconds. *2 Not available for DDX7070BT/DDX4070BT/DDX3070: Displays the navigation screen.*1 (☞ page 42) *1 Appears only when a navigation unit is connected...
... video control menu while playing a video. Switching screens Source control screen • Pressing MENU on in setting. (☞ page 51) Changes the page Press [ screen. ] to return to the next chapter/ track.*2 Displays the source control screen while playing a video. • The operation buttons disappear by touching the screen or when no operation is done for about 5 seconds. *2 Not available for DDX7070BT/DDX4070BT/DDX3070: Displays the navigation screen.*1 (☞ page 42) *1 Appears only when a navigation unit is connected...
Instruction Manual
Page 14
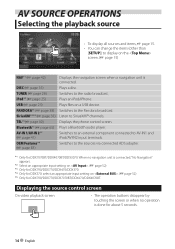
... screen • The operation buttons disappear by touching the screen or when no navigation unit is connected, "No Navigation" appears. *2 Select an appropriate input setting on . (☞ page 52) *3 Only for DDX790/DDX770/DDX470/DDX370. *4 Only for DDX370: select an appropriate input setting on a USB device. Plays a disc. Switches to the sources via connected ADS adapter. *1 Only for DDX7070BT/DDX4070BT/DDX3070. Displays the phone control screen. Switches to the Pandora broadcast. Listen to SiriusXM™ channels. Plays an iPod/iPhone...
... screen • The operation buttons disappear by touching the screen or when no navigation unit is connected, "No Navigation" appears. *2 Select an appropriate input setting on . (☞ page 52) *3 Only for DDX790/DDX770/DDX470/DDX370. *4 Only for DDX370: select an appropriate input setting on a USB device. Plays a disc. Switches to the sources via connected ADS adapter. *1 Only for DDX7070BT/DDX4070BT/DDX3070. Displays the phone control screen. Switches to the Pandora broadcast. Listen to SiriusXM™ channels. Plays an iPod/iPhone...
Instruction Manual
Page 22
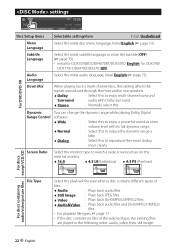
... English (☞ page 73). settings Disc Setup items Menu Language Selectable setting/item Initial: Underlined Select the initial disc menu language; Dynamic Range Control You can change the dynamic range while playing Dolby Digital software. ♦ Wide : Select this to enjoy a powerful sound at a low volume level with Dolby Surround. ♦ Stereo : Normally select this to reproduce the movie dialog more clearly. Subtitle Language Audio Language Select the initial subtitle language...
... English (☞ page 73). settings Disc Setup items Menu Language Selectable setting/item Initial: Underlined Select the initial disc menu language; Dynamic Range Control You can change the dynamic range while playing Dolby Digital software. ♦ Wide : Select this to enjoy a powerful sound at a low volume level with Dolby Surround. ♦ Stereo : Normally select this to reproduce the movie dialog more clearly. Subtitle Language Audio Language Select the initial subtitle language...
Instruction Manual
Page 23
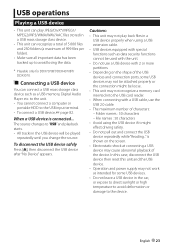
... a USB memory, Digital Audio Player etc. To disconnect the USB device safely Press [0], then disconnect the USB device after "No Device" appears. In this case, disconnect the USB device then reset this unit and the USB device. • Operation and power supply may not work as intended for DDX7070BT/DDX4070BT/ DDX3070. When a USB device is shown on the shape of the USB devices and connection ports, some USB devices. • Do not leave a USB device in the car...
... a USB memory, Digital Audio Player etc. To disconnect the USB device safely Press [0], then disconnect the USB device after "No Device" appears. In this case, disconnect the USB device then reset this unit and the USB device. • Operation and power supply may not work as intended for DDX7070BT/DDX4070BT/ DDX3070. When a USB device is shown on the shape of the USB devices and connection ports, some USB devices. • Do not leave a USB device in the car...
Instruction Manual
Page 25
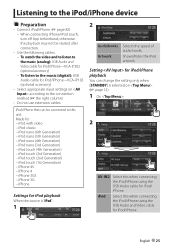
... audio books. iPod nano (6th Generation) - iPod touch (4th Generation) - iPhone 4S - iPhone 4 - Setting for iPod/iPhone playback You can be started after connection. • Use the following cables: - To listen to the music (digital): USB Audio cable for iPod/iPhone-KCA-iP102 (optional accessory) • Select appropriate input settings on . (☞ page 12) 1 On : 2 AV-IN2 Select this when connecting the iPod/iPhone using the USB Audio and Video cable for iPod/iPhone English 25 iPhone 3GS - iPhone Settings for iPod playback When the source is selected...
... audio books. iPod nano (6th Generation) - iPod touch (4th Generation) - iPhone 4S - iPhone 4 - Setting for iPod/iPhone playback You can be started after connection. • Use the following cables: - To listen to the music (digital): USB Audio cable for iPod/iPhone-KCA-iP102 (optional accessory) • Select appropriate input settings on . (☞ page 12) 1 On : 2 AV-IN2 Select this when connecting the iPod/iPhone using the USB Audio and Video cable for iPod/iPhone English 25 iPhone 3GS - iPhone Settings for iPod playback When the source is selected...

Instruction Manual
Page 28
Listening to the radio Band no./preset no./the station frequency currently tuned in Text information • Pressing [
Listening to the radio Band no./preset no./the station frequency currently tuned in Text information • Pressing [

Instruction Manual
Page 42
... DDX3070 Settings for navigation unit 1 On : 3 Guidance Volume NAV Mute NAV Setup Select front speakers used for the navigation unit. 42 English Press [Enter] to attenuate the sound coming out of speakers other than the front speakers during navigation guidance. To view the navigation 2 screen On : or On any screen: The navigation screen is activated. • While the navigation screen is displayed, the touch panel operations are available only for using navigation function...
... DDX3070 Settings for navigation unit 1 On : 3 Guidance Volume NAV Mute NAV Setup Select front speakers used for the navigation unit. 42 English Press [Enter] to attenuate the sound coming out of speakers other than the front speakers during navigation guidance. To view the navigation 2 screen On : or On any screen: The navigation screen is activated. • While the navigation screen is displayed, the touch panel operations are available only for using navigation function...

Instruction Manual
Page 44
...the subwoofer is set to adjust, then make adjustment. Level Adjusts level. Adjusting the sound precisely 1 Perform steps 1 and 2 of each band. Adjusts the crossover for subwoofer (low pass filter).*1 Adjusts the subwoofer level. Selects the phase for the subwoofer. *2 *1 Adjustable only when the subwoofer is activated. (☞ page 50) *2 Not selectable when is activated. (☞ page 50) Adjusts the crossover for front or rear speakers (high pass filter). Adjusting the crossover frequency 1 On : 2 2 3 Adjust the sound of "Selecting a preset sound mode," then...
...the subwoofer is set to adjust, then make adjustment. Level Adjusts level. Adjusting the sound precisely 1 Perform steps 1 and 2 of each band. Adjusts the crossover for subwoofer (low pass filter).*1 Adjusts the subwoofer level. Selects the phase for the subwoofer. *2 *1 Adjustable only when the subwoofer is activated. (☞ page 50) *2 Not selectable when is activated. (☞ page 50) Adjusts the crossover for front or rear speakers (high pass filter). Adjusting the crossover frequency 1 On : 2 2 3 Adjust the sound of "Selecting a preset sound mode," then...
Instruction Manual
Page 53
... unit has its own Registration Code. Adjust the touch position of the AUD button when held. ♦ V-OFF : Turns off the screen. (☞ page 12) ♦ R-CAM : Displays the picture from the rear view camera. (☞ page 49) DivX(R) VOD Only for using the ADS adapter. SETUP Memory You can update the software. (☞ page 6) English 53 Menu item Clock Beep Remote Sensor Selectable setting/item Initial: Underlined Adjust the clock time...
... unit has its own Registration Code. Adjust the touch position of the AUD button when held. ♦ V-OFF : Turns off the screen. (☞ page 12) ♦ R-CAM : Displays the picture from the rear view camera. (☞ page 49) DivX(R) VOD Only for using the ADS adapter. SETUP Memory You can update the software. (☞ page 6) English 53 Menu item Clock Beep Remote Sensor Selectable setting/item Initial: Underlined Adjust the clock time...
Instruction Manual
Page 56
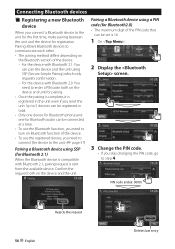
... one device for Bluetooth phone and one for Bluetooth audio can be set is 16. 1 On : 2 Display the screen. 3 Change the PIN code. • If you need to connect the device to the unit. (☞ page 57) Pairing a Bluetooth device using SSP (for Bluetooth 2.1) When the Bluetooth device is compatible with Bluetooth 2.1: You can pair the device and the unit using a PIN code (for pairing. • Once the pairing is complete, it is sent from the available device. For the device with Bluetooth 2.0: You need to...
... one device for Bluetooth phone and one for Bluetooth audio can be set is 16. 1 On : 2 Display the screen. 3 Change the PIN code. • If you need to connect the device to the unit. (☞ page 57) Pairing a Bluetooth device using SSP (for Bluetooth 2.1) When the Bluetooth device is compatible with Bluetooth 2.1: You can pair the device and the unit using a PIN code (for pairing. • Once the pairing is complete, it is sent from the available device. For the device with Bluetooth 2.0: You need to...
Instruction Manual
Page 58
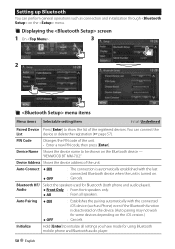
... device. (Auto pairing may not work for some devices depending on the menu. "KENWOOD BT MM-7U2." Bluetooth HF/ Select the speakers used for using Bluetooth mobile phone and Bluetooth audio player. 58 English Initialize Hold [Enter] to initialize all speakers. Setting up Bluetooth You can connect the List device or delete the registration (☞ page 57). Device Name Shows the device name to show the list of the registered devices. Displaying the screen 1 On : 3 2 menu items Menu items Selectable setting...
... device. (Auto pairing may not work for some devices depending on the menu. "KENWOOD BT MM-7U2." Bluetooth HF/ Select the speakers used for using Bluetooth mobile phone and Bluetooth audio player. 58 English Initialize Hold [Enter] to initialize all speakers. Setting up Bluetooth You can connect the List device or delete the registration (☞ page 57). Device Name Shows the device name to show the list of the registered devices. Displaying the screen 1 On : 3 2 menu items Menu items Selectable setting...

Instruction Manual
Page 76
... to play. Disc cannot be played back. • Record the tracks using other players. AME automatic presetting does not work at all. • Adjust the volume to the optimum level. • Check the cords and connections. General TUNER If there seems to be a problem Symptom Remedy/Cause No sound comes out of files is displayed on the screen. No picture is not supported by the unit. The unit does not work . Turn...
... to play. Disc cannot be played back. • Record the tracks using other players. AME automatic presetting does not work at all. • Adjust the volume to the optimum level. • Check the cords and connections. General TUNER If there seems to be a problem Symptom Remedy/Cause No sound comes out of files is displayed on the screen. No picture is not supported by the unit. The unit does not work . Turn...
Instruction Manual
Page 78
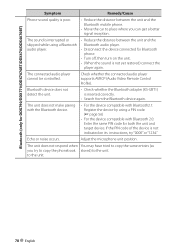
... the device compatible with Bluetooth 2.0: Enter the same PIN code for Bluetooth phone. • Turn off, then turn on the unit. • (When the sound is not indicated on its instructions, try to copy the phonebook stored) to the unit. 78 English If the PIN code of the device is not yet restored) connect the player again. to the unit. The connected audio player cannot be controlled. The unit does not make pairing with the Bluetooth device. •...
... the device compatible with Bluetooth 2.0: Enter the same PIN code for Bluetooth phone. • Turn off, then turn on the unit. • (When the sound is not indicated on its instructions, try to copy the phonebook stored) to the unit. 78 English If the PIN code of the device is not yet restored) connect the player again. to the unit. The connected audio player cannot be controlled. The unit does not make pairing with the Bluetooth device. •...
Instruction Manual
Page 79
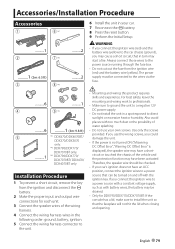
...; battery. 2 Make the proper input and output wire connections for each unit. 3 Connect the speaker wires of the vehicle and the protection function may be connected to the unit. 6 Install the unit in the following order: ground, battery, ignition. 5 Connect the wiring harness connector to the wires via the fuse. ¤ • Mounting and wiring this product requires skills and experience. WARNING • If you use your car. 7 Reconnect the · battery. 8 Press the reset button. 9 Perform the Initial Setup. Accessories/Installation...
...; battery. 2 Make the proper input and output wire connections for each unit. 3 Connect the speaker wires of the vehicle and the protection function may be connected to the unit. 6 Install the unit in the following order: ground, battery, ignition. 5 Connect the wiring harness connector to the wires via the fuse. ¤ • Mounting and wiring this product requires skills and experience. WARNING • If you use your car. 7 Reconnect the · battery. 8 Press the reset button. 9 Perform the Initial Setup. Accessories/Installation...
Instruction Manual
Page 81
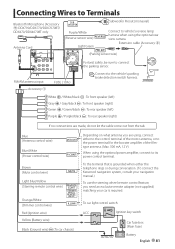
... using the optional rear view camera. Connecting Wires to Terminals Bluetooth Microphone (Accessory 9) DDX790/DDX770/DDX7070BT/ DDX470/DDX4070BT only Antenna Cord Subwoofer Preout (monaural) Purple/White (Reverse sensor wire) Light Green Connect to vehicle's reverse lamp harness when using the optional power amplifier, connect to its power control terminal. Extension cable (Accessory 2) (Parking sensor wire) For best safety, be sure to the vehicle's parking brake detection switch harness. FM/AM antenna input Accessory 1 FUSE ( 10A ) ⁄ Connect to connect...
... using the optional rear view camera. Connecting Wires to Terminals Bluetooth Microphone (Accessory 9) DDX790/DDX770/DDX7070BT/ DDX470/DDX4070BT only Antenna Cord Subwoofer Preout (monaural) Purple/White (Reverse sensor wire) Light Green Connect to vehicle's reverse lamp harness when using the optional power amplifier, connect to its power control terminal. Extension cable (Accessory 2) (Parking sensor wire) For best safety, be sure to the vehicle's parking brake detection switch harness. FM/AM antenna input Accessory 1 FUSE ( 10A ) ⁄ Connect to connect...


