

User Manual
Page 2
... device/iPod/ iPhone 80 Connecting Other Products........... 81 Installing the Unit 82 Specifications 83 KS-UBT1 (USB Bluetooth adapter)... 86 Contents Before use 3 How to reset your unit 3 INTRODUCTIONS Initial Settings 5 Initial setup 5 Updating the system 6 Setting the security function 7 Component names and functions....8 Setting the clock 10 Common operations 11 Turning on the power 11 Turning off the power 11 Adjusting the panel angle 11 Adjusting the volume 11 Putting the unit in standby 12 Turning off the screen 12 Switching screens 13 AV SOURCE OPERATIONS Selecting...
... device/iPod/ iPhone 80 Connecting Other Products........... 81 Installing the Unit 82 Specifications 83 KS-UBT1 (USB Bluetooth adapter)... 86 Contents Before use 3 How to reset your unit 3 INTRODUCTIONS Initial Settings 5 Initial setup 5 Updating the system 6 Setting the security function 7 Component names and functions....8 Setting the clock 10 Common operations 11 Turning on the power 11 Turning off the power 11 Adjusting the panel angle 11 Adjusting the volume 11 Putting the unit in standby 12 Turning off the screen 12 Switching screens 13 AV SOURCE OPERATIONS Selecting...
User Manual
Page 3
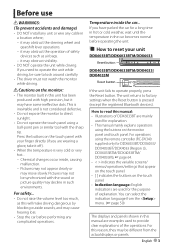
...... • Do not raise the volume level too much, as air bags. - The unit returns to operate properly, press the Reset button. it may cause hearing loss. • Stop the car before operating the unit. Temperature inside , causing malfunction. - You can select the indication language from the actual displays or panels. For operations using the remote controller (RC-DV340: supplied only for DDX6033BT/DDX6033/ DDX4033BT/DDX4033 (Region...
...... • Do not raise the volume level too much, as air bags. - The unit returns to operate properly, press the Reset button. it may cause hearing loss. • Stop the car before operating the unit. Temperature inside , causing malfunction. - You can select the indication language from the actual displays or panels. For operations using the remote controller (RC-DV340: supplied only for DDX6033BT/DDX6033/ DDX4033BT/DDX4033 (Region...

User Manual
Page 5
... Settings Initial setup When you power on the unit for the first time or reset the unit, the initial setting screen appears. • You can also change the settings on -screen information. (☞ page 50) • Set to display the operation buttons and menu items in the selected language ([Local]: initially selected) or English ([English]). Angle *2 Adjust the panel angle. (☞page 11) AV Input Select an external component to play - [AV-IN2] or [iPod...
... Settings Initial setup When you power on the unit for the first time or reset the unit, the initial setting screen appears. • You can also change the settings on -screen information. (☞ page 50) • Set to display the operation buttons and menu items in the selected language ([Local]: initially selected) or English ([English]). Angle *2 Adjust the panel angle. (☞page 11) AV Input Select an external component to play - [AV-IN2] or [iPod...
User Manual
Page 7
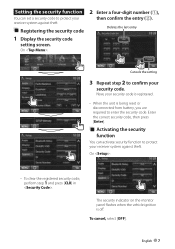
... code is registered. • When the unit is off. Activating the security function You can set a security code to protect your receiver system against theft. On : • To clear the registered security code, perform step 1 and press [CLR] in . Registering the security code 1 Display the security code setting screen. The security indicator on the monitor panel flashes when the vehicle ignition is being reset or disconnected from battery...
... code is registered. • When the unit is off. Activating the security function You can set a security code to protect your receiver system against theft. On : • To clear the registered security code, perform step 1 and press [CLR] in . Registering the security code 1 Display the security code setting screen. The security indicator on the monitor panel flashes when the vehicle ignition is being reset or disconnected from battery...
User Manual
Page 9
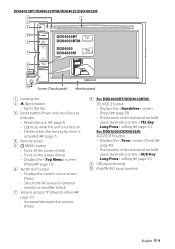
.../DDX4033M Screen (Touch panel) Monitor panel 1 Loading slot 2 0 (Eject) button • Ejects the disc. 3 Reset button/Power indicator/Security indicator • Resets the unit. (☞ page 3) • Lights up while the unit is turned on. • Flashes when the security function is activated. (☞ page 7) 4 Remote sensor 5 MENU button • Turns off the power. (Hold) • Turns on the power. (Press) • Displays the screen. (Press) (☞ page 13) 6 AV/AV OUT button • Displays the current source screen. (Press) • Selects...
.../DDX4033M Screen (Touch panel) Monitor panel 1 Loading slot 2 0 (Eject) button • Ejects the disc. 3 Reset button/Power indicator/Security indicator • Resets the unit. (☞ page 3) • Lights up while the unit is turned on. • Flashes when the security function is activated. (☞ page 7) 4 Remote sensor 5 MENU button • Turns off the power. (Hold) • Turns on the power. (Press) • Displays the screen. (Press) (☞ page 13) 6 AV/AV OUT button • Displays the current source screen. (Press) • Selects...

User Manual
Page 10
... - 3:29 = 3:00 3:30 - 3:59 = 4:00 5 Finish the procedure. • The time format of the clock display differs as follows: 24 hours: Region 2/3 models 12 hours: Region 4 models *1 Appears only when the navigation unit is connected. *2 Not selectable for Region 4 models. Sets the clock manually. (☞ below) When selecting : 3 Display the screen. 10 English 1 Adjust the hour 2 Adjust the minute [Reset]: Sets the minute to "00." On the source control screen: 4 Set the clock time. 2 Display the screen.
... - 3:29 = 3:00 3:30 - 3:59 = 4:00 5 Finish the procedure. • The time format of the clock display differs as follows: 24 hours: Region 2/3 models 12 hours: Region 4 models *1 Appears only when the navigation unit is connected. *2 Not selectable for Region 4 models. Sets the clock manually. (☞ below) When selecting : 3 Display the screen. 10 English 1 Adjust the hour 2 Adjust the minute [Reset]: Sets the minute to "00." On the source control screen: 4 Set the clock time. 2 Display the screen.
User Manual
Page 13
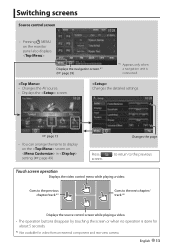
... unit is done for about 5 seconds. *2 Not available for video from an external component and rear view camera. English 13 Goes to the previous chapter/track.*2 Goes to the previous Touch screen operation Displays the video control menu while playing a video. Switching screens Source control screen • Pressing MENU on in setting. (☞ page 49) Changes the page Press [ screen. ] to return to the next chapter/ track.*2 Displays the source control screen while playing a video. • The operation buttons...
... unit is done for about 5 seconds. *2 Not available for video from an external component and rear view camera. English 13 Goes to the previous chapter/track.*2 Goes to the previous Touch screen operation Displays the video control menu while playing a video. Switching screens Source control screen • Pressing MENU on in setting. (☞ page 49) Changes the page Press [ screen. ] to return to the next chapter/ track.*2 Displays the source control screen while playing a video. • The operation buttons...

User Manual
Page 14
... screen when a navigation unit is connected. PANDORA*5 (☞ page 35) Switches to the radio broadcast. DISC (☞ page 16) Plays a disc. TUNER (☞ page 30) Switches to the Pandora broadcast. AV SOURCE OPERATIONS Selecting the playback source • To display all sources and items, ☞ page 15. • You can change the items (other than [SETUP]) to AV-IN1 and iPod/AV-IN2 input terminals. *1 When no operation is done for DDX6033BT...
... screen when a navigation unit is connected. PANDORA*5 (☞ page 35) Switches to the radio broadcast. DISC (☞ page 16) Plays a disc. TUNER (☞ page 30) Switches to the Pandora broadcast. AV SOURCE OPERATIONS Selecting the playback source • To display all sources and items, ☞ page 15. • You can change the items (other than [SETUP]) to AV-IN1 and iPod/AV-IN2 input terminals. *1 When no operation is done for DDX6033BT...
User Manual
Page 22
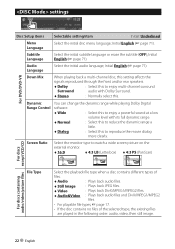
...). For DVD/DVD-VR Down Mix When playing back a multi-channel disc, this setting affects the signals reproduced through the front and/or rear speakers. ♦ Dolby : Select this to enjoy multi-channel surround Surround audio with its full dynamic range. ♦ Normal : Select this to reduce the dynamic range a little. ♦ Dialog : Select this . settings Disc Setup items Menu Language Selectable setting/item Initial: Underlined Select the initial disc menu language;
...). For DVD/DVD-VR Down Mix When playing back a multi-channel disc, this setting affects the signals reproduced through the front and/or rear speakers. ♦ Dolby : Select this to enjoy multi-channel surround Surround audio with its full dynamic range. ♦ Normal : Select this to reduce the dynamic range a little. ♦ Dialog : Select this . settings Disc Setup items Menu Language Selectable setting/item Initial: Underlined Select the initial disc menu language;
User Manual
Page 23
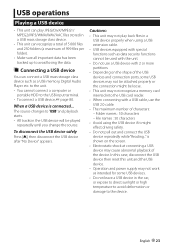
... the USB input terminal. • To connect a USB device, ☞ page 80. The source changes to avoid losing the data. is connected... USB operations Playing a USB device • This unit can play back files in a USB device properly when using the USB device if it might be played repeatedly until you change the source. File names : 50 characters • Avoid using a USB extension cable. • USB devices equipped with special functions such as a USB memory, Digital Audio Player etc. Cautions: • This unit may...
... the USB input terminal. • To connect a USB device, ☞ page 80. The source changes to avoid losing the data. is connected... USB operations Playing a USB device • This unit can play back files in a USB device properly when using the USB device if it might be played repeatedly until you change the source. File names : 50 characters • Avoid using a USB extension cable. • USB devices equipped with special functions such as a USB memory, Digital Audio Player etc. Cautions: • This unit may...

User Manual
Page 25
... when connecting the iPod/iPhone using the USB Audio cable for iPod playback When the source is selected on according to the music (analog): USB Audio and Video cable for iPod/iPhone English 25 iPod nano (5th Generation) - otherwise the playback may not be connected to the iPod/iPhone device Preparation • Connect iPod/iPhone. (☞ page 80) - iPod touch (2nd Generation) - iPod Select this when connecting the iPod/iPhone using the USB Audio and Video cable for iPod/iPhone-KCA-iP22F/KCAiP202 (optional accessory) - When connecting iPhone/iPod touch, turn off...
... when connecting the iPod/iPhone using the USB Audio cable for iPod playback When the source is selected on according to the music (analog): USB Audio and Video cable for iPod/iPhone English 25 iPod nano (5th Generation) - otherwise the playback may not be connected to the iPod/iPhone device Preparation • Connect iPod/iPhone. (☞ page 80) - iPod touch (2nd Generation) - iPod Select this when connecting the iPod/iPhone using the USB Audio and Video cable for iPod/iPhone-KCA-iP22F/KCAiP202 (optional accessory) - When connecting iPhone/iPod touch, turn off...

User Manual
Page 30
Listening to the radio Band no./preset no./the station frequency currently tuned in Text information • Pressing [
Listening to the radio Band no./preset no./the station frequency currently tuned in Text information • Pressing [

User Manual
Page 39
... setup screen for the navigation unit. See the instruction manual supplied for the navigation unit. Adjust the volume of the navigation guidance. (0 to 35) Select [ON] to attenuate the sound coming out of the front speakers even when you listen to an audio source. English 39 To view the navigation 2 screen On : or On any screen: The navigation screen is activated. • While the navigation screen is displayed, the touch panel operations...
... setup screen for the navigation unit. See the instruction manual supplied for the navigation unit. Adjust the volume of the navigation guidance. (0 to 35) Select [ON] to attenuate the sound coming out of the front speakers even when you listen to an audio source. English 39 To view the navigation 2 screen On : or On any screen: The navigation screen is activated. • While the navigation screen is displayed, the touch panel operations...
User Manual
Page 41
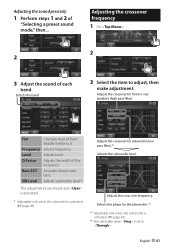
... for front or rear speakers (high pass filter). Adjusting the sound precisely 1 Perform steps 1 and 2 of Bass/ Middle/Treble to 0. Adjusts the crossover for subwoofer (low pass filter).*1 Adjusts the subwoofer level. Q Factor Adjusts the width of each band. SW Level Adjusts subwoofer level.* The adjustments are stored and is activated. * Adjustable only when the subwoofer is set to adjust, then make adjustment. Frequency Selects frequency. Selects the band 3 Select the item to . Adjusting the crossover frequency 1 On : 2 2 3 Adjust the sound of the...
... for front or rear speakers (high pass filter). Adjusting the sound precisely 1 Perform steps 1 and 2 of Bass/ Middle/Treble to 0. Adjusts the crossover for subwoofer (low pass filter).*1 Adjusts the subwoofer level. Q Factor Adjusts the width of each band. SW Level Adjusts subwoofer level.* The adjustments are stored and is activated. * Adjustable only when the subwoofer is set to adjust, then make adjustment. Frequency Selects frequency. Selects the band 3 Select the item to . Adjusting the crossover frequency 1 On : 2 2 3 Adjust the sound of the...

User Manual
Page 51
...) Assign the functions to the keys on the remote controller of the TEL button when held . ♦ V-OFF : Turns off the screen. (☞ page 12) ♦ VOICE : Activates voice dialing fuction. (☞ page 58) ♦ R-CAM : Displays the picture from the rear view camera. (☞ page 46) This unit has its own Registration Code. System Menu item Clock Beep Remote Sensor SETUP Memory Bluetooth Setup Only for DDX6033BT/ DDX6033BTM/ DDX4033BT...
...) Assign the functions to the keys on the remote controller of the TEL button when held . ♦ V-OFF : Turns off the screen. (☞ page 12) ♦ VOICE : Activates voice dialing fuction. (☞ page 58) ♦ R-CAM : Displays the picture from the rear view camera. (☞ page 46) This unit has its own Registration Code. System Menu item Clock Beep Remote Sensor SETUP Memory Bluetooth Setup Only for DDX6033BT/ DDX6033BTM/ DDX4033BT...
User Manual
Page 54
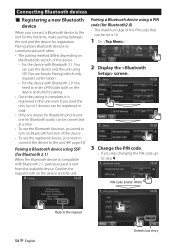
... device and unit for Bluetooth audio can be registered in total. • Only one device for Bluetooth phone and one for pairing. • Once the pairing is complete, it is 16. 1 On : 2 Display the screen. 3 Change the PIN code. • If you connect a Bluetooth device to communicate each other. • The pairing method differs depending on the Bluetooth version of the device. • To use the Bluetooth function, you need to enter a PIN code both on Bluetooth function...
... device and unit for Bluetooth audio can be registered in total. • Only one device for Bluetooth phone and one for pairing. • Once the pairing is complete, it is 16. 1 On : 2 Display the screen. 3 Change the PIN code. • If you connect a Bluetooth device to communicate each other. • The pairing method differs depending on the Bluetooth version of the device. • To use the Bluetooth function, you need to enter a PIN code both on Bluetooth function...

User Manual
Page 74
.... • Connect the video cord correctly. • Select the correct input on the screen. (☞ page 12) Reset the unit. (☞ page 3) The remote controller* does not work. AME automatic presetting does not work at all. • Adjust the volume to the radio. Store stations manually. (☞ page 32) Static noise while listening to the optimum level. • Check the cords and connections. Tracks are not played back as the source, set to play. Disc cannot...
.... • Connect the video cord correctly. • Select the correct input on the screen. (☞ page 12) Reset the unit. (☞ page 3) The remote controller* does not work. AME automatic presetting does not work at all. • Adjust the volume to the radio. Store stations manually. (☞ page 32) Static noise while listening to the optimum level. • Check the cords and connections. Tracks are not played back as the source, set to play. Disc cannot...
User Manual
Page 76
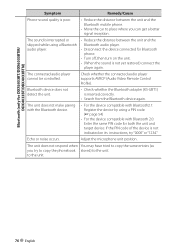
.... The sound is interrupted or skipped while using a PIN code. (☞ page 54) • For the device compatible with Bluetooth 2.0: Enter the same PIN code for Bluetooth phone. • Turn off, then turn on its instructions, try to copy the phonebook stored) to the unit. 76 English Echo or noise occurs. Adjust the microphone unit position. The connected audio player cannot be controlled. Bluetooth device does not detect the unit. • Check whether the Bluetooth adapter...
.... The sound is interrupted or skipped while using a PIN code. (☞ page 54) • For the device compatible with Bluetooth 2.0: Enter the same PIN code for Bluetooth phone. • Turn off, then turn on its instructions, try to copy the phonebook stored) to the unit. 76 English Echo or noise occurs. Adjust the microphone unit position. The connected audio player cannot be controlled. Bluetooth device does not detect the unit. • Check whether the Bluetooth adapter...

User Manual
Page 77
... in your car. 7 Reconnect the · battery. 8 Press the reset button. 9 Perform the Initial Setup. If you may start a fire. Therefore, the speaker wire should be connected to direct sunlight or excessive heat or humidity. For best safety, leave the mounting and wiring work to professionals. • Make sure to ground the unit to a negative 12V DC power supply. • Do not install the unit in turn may...
... in your car. 7 Reconnect the · battery. 8 Press the reset button. 9 Perform the Initial Setup. If you may start a fire. Therefore, the speaker wire should be connected to direct sunlight or excessive heat or humidity. For best safety, leave the mounting and wiring work to professionals. • Make sure to ground the unit to a negative 12V DC power supply. • Do not install the unit in turn may...

User Manual
Page 79
... booster amplifier of the film-type antenna. (Max. 300 mA, 12 V) When using the optional rear view camera. Blue (Antenna control wire) Blue/White (Power control wire) Brown (Mute control wire) Depending on what antenna you are made, do not let the cable come out from the tab. Contact your navigation manual.) Not used Orange/White (Dimmer control wire) Red (Ignition wire) Yellow (Battery wire) Black (Ground wire) · (To car chassis) To car light control switch ACC Ignition key switch Car fuse box (Main fuse) Battery...
... booster amplifier of the film-type antenna. (Max. 300 mA, 12 V) When using the optional rear view camera. Blue (Antenna control wire) Blue/White (Power control wire) Brown (Mute control wire) Depending on what antenna you are made, do not let the cable come out from the tab. Contact your navigation manual.) Not used Orange/White (Dimmer control wire) Red (Ignition wire) Yellow (Battery wire) Black (Ground wire) · (To car chassis) To car light control switch ACC Ignition key switch Car fuse box (Main fuse) Battery...


