
User Manual
Page 2
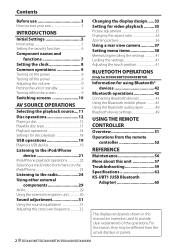
... 7 Setting the clock 8 Common operations 9 Turning on the power 9 Turning off the power 9 Adjusting the volume 9 Putting the unit in standby 9 Turning off/on the screen 9 Switching screens 10 AV SOURCE OPERATIONS Selecting the playback source....11 Disc operations 12 Playing a disc 12 Playable disc type 13 Playback operations 14 Settings for disc playback 18 USB operations 19 Playing a USB device 19 Listening to the iPod/iPhone device 21 iPod/iPhone playback operations 22 Selecting a track/video from the actual displays or panels. 2 DDX4038BT/DDX4038BTM/DDX4038/DDX4038M
... 7 Setting the clock 8 Common operations 9 Turning on the power 9 Turning off the power 9 Adjusting the volume 9 Putting the unit in standby 9 Turning off/on the screen 9 Switching screens 10 AV SOURCE OPERATIONS Selecting the playback source....11 Disc operations 12 Playing a disc 12 Playable disc type 13 Playback operations 14 Settings for disc playback 18 USB operations 19 Playing a USB device 19 Listening to the iPod/iPhone device 21 iPod/iPhone playback operations 22 Selecting a track/video from the actual displays or panels. 2 DDX4038BT/DDX4038BTM/DDX4038/DDX4038M
User Manual
Page 3
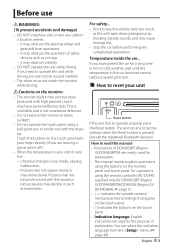
...) • DO NOT install any unit or wire any complicated operations. If you need to direct sunlight. • Do not operate the touch panel using a ball-point pen or similar tool with your unit Reset button If the unit fails to factory settings when the Reset button is pressed (except the registered Bluetooth devices). Cautions on the touch panel. • Indication language: English indications are used for a long time in hot or...
...) • DO NOT install any unit or wire any complicated operations. If you need to direct sunlight. • Do not operate the touch panel using a ball-point pen or similar tool with your unit Reset button If the unit fails to factory settings when the Reset button is pressed (except the registered Bluetooth devices). Cautions on the touch panel. • Indication language: English indications are used for a long time in hot or...

User Manual
Page 5
...) Panel Color Selects the color of the AV-IN input terminal- English 5 Language Select the text language used for the first time or reset the unit, the initial setting screen appears. • You can also change the settings on the screen. (☞ page 38) 1 2 Finish the procedure. INTRODUCTIONS Initial Settings Initial setup When you power on the unit for on-screen information. (☞ page 40) AV Input Select the use of the buttons on...
...) Panel Color Selects the color of the AV-IN input terminal- English 5 Language Select the text language used for the first time or reset the unit, the initial setting screen appears. • You can also change the settings on the screen. (☞ page 38) 1 2 Finish the procedure. INTRODUCTIONS Initial Settings Initial setup When you power on the unit for on-screen information. (☞ page 40) AV Input Select the use of the buttons on...
User Manual
Page 6
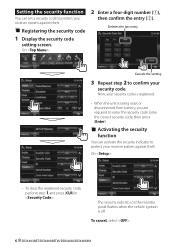
... monitor panel flashes when the vehicle ignition is being reset or disconnected from battery, you are required to protect your receiver system against theft. Enter the correct security code, then press [Enter]. To cancel, select . 6 DDX4038BT/DDX4038BTM/DDX4038/DDX4038M On : 2 Enter a four-digit number (1), then confirm the entry (2). Now, your security code is registered. • When the unit is off. Setting the security function...
... monitor panel flashes when the vehicle ignition is being reset or disconnected from battery, you are required to protect your receiver system against theft. Enter the correct security code, then press [Enter]. To cancel, select . 6 DDX4038BT/DDX4038BTM/DDX4038/DDX4038M On : 2 Enter a four-digit number (1), then confirm the entry (2). Now, your security code is registered. • When the unit is off. Setting the security function...

User Manual
Page 7
... color of the output level. Component names and functions Screen (touch panel) Monitor panel 1 Loading slot 2 0 (Eject) button Ejects the disc. 3 Remote sensor 4 Reset button/Power indicator/Security indicator • Resets the unit. (☞ page 3) • Lights up while the unit is turned on. • Flashes when the security function is activated. (☞ page 6) 5 MENU/ button • Turns off the power. (Hold) • Turns on the power. (Press) • Displays screen. (Press) (☞ page 10) 6 AV/AV OUT button • Displays the current source screen...
... color of the output level. Component names and functions Screen (touch panel) Monitor panel 1 Loading slot 2 0 (Eject) button Ejects the disc. 3 Remote sensor 4 Reset button/Power indicator/Security indicator • Resets the unit. (☞ page 3) • Lights up while the unit is turned on. • Flashes when the security function is activated. (☞ page 6) 5 MENU/ button • Turns off the power. (Hold) • Turns on the power. (Press) • Displays screen. (Press) (☞ page 10) 6 AV/AV OUT button • Displays the current source screen...
User Manual
Page 10
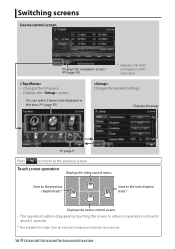
... ☞ page 9 Press [ ] to return to be displayed in this area. (☞ page 39) Changes the detailed settings. Touch screen operation Displays the video control menu. You can select 3 items to the previous screen. Switching screens Source control screen Displays the navigation screen.* (☞ page 30) * Appears only when a navigation unit is done for about 5 seconds. * Not available for video from an external component and rear view camera. 10 DDX4038BT/DDX4038BTM/DDX4038/DDX4038M
... ☞ page 9 Press [ ] to return to be displayed in this area. (☞ page 39) Changes the detailed settings. Touch screen operation Displays the video control menu. You can select 3 items to the previous screen. Switching screens Source control screen Displays the navigation screen.* (☞ page 30) * Appears only when a navigation unit is done for about 5 seconds. * Not available for video from an external component and rear view camera. 10 DDX4038BT/DDX4038BTM/DDX4038/DDX4038M

User Manual
Page 11
... navigation unit is connected. *2 Plays a disc. Switches to an external component connected to AV-IN input terminal on a USB device. Displays the Bluetooth mobile phone setting screen. AV SOURCE OPERATIONS Selecting the playback source DDX4038BT/DDX4038BTM DDX4038/DDX4038M *1 NAV (☞ page 30) DISC (☞ page 12) TEL*3 (☞ page 46) USB (☞ page 19) iPod*4 (☞ page 21) TUNER (☞ page 24) VIDEO*4 (☞ page 29) Bluetooth*3 (☞ page 49) Displays the navigation screen when a navigation unit is connected...
... navigation unit is connected. *2 Plays a disc. Switches to an external component connected to AV-IN input terminal on a USB device. Displays the Bluetooth mobile phone setting screen. AV SOURCE OPERATIONS Selecting the playback source DDX4038BT/DDX4038BTM DDX4038/DDX4038M *1 NAV (☞ page 30) DISC (☞ page 12) TEL*3 (☞ page 46) USB (☞ page 19) iPod*4 (☞ page 21) TUNER (☞ page 24) VIDEO*4 (☞ page 29) Bluetooth*3 (☞ page 49) Displays the navigation screen when a navigation unit is connected...

User Manual
Page 19
... Max: optional accessory) The source changes to the unit at connecting a USB device may cause abnormal playback of the device. In this case, disconnect the USB device then reset this unit and the USB device. • Operation and power supply may not work as a USB memory, Digital Audio Player etc. Folder names : 50 characters - Do not use the USB 2.0 cable. • The maximum number of 999 files per folder). • Make sure all important data...
... Max: optional accessory) The source changes to the unit at connecting a USB device may cause abnormal playback of the device. In this case, disconnect the USB device then reset this unit and the USB device. • Operation and power supply may not work as a USB memory, Digital Audio Player etc. Folder names : 50 characters - Do not use the USB 2.0 cable. • The maximum number of 999 files per folder). • Make sure all important data...
User Manual
Page 24
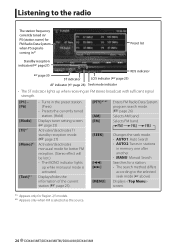
... program search mode. (☞ page 26) Selects AM band. Listening to the radio The station frequency currently tuned in/ PS (station name) for Region 2/3 models. *2 Appears only when FM is activated. Selects FM band. [SEEK] [4] [¢] [MENU] Changes the seek mode. • AUTO1: Auto Search • AUTO2: Tunes in stations in the preset station. (Press) • Presets the currently tuned station. (Hold) Displays tuner setting screen. (☞ page 25) Activates/deactivates TI standby reception mode. (☞ page 27) Activates...
... program search mode. (☞ page 26) Selects AM band. Listening to the radio The station frequency currently tuned in/ PS (station name) for Region 2/3 models. *2 Appears only when FM is activated. Selects FM band. [SEEK] [4] [¢] [MENU] Changes the seek mode. • AUTO1: Auto Search • AUTO2: Tunes in stations in the preset station. (Press) • Presets the currently tuned station. (Hold) Displays tuner setting screen. (☞ page 25) Activates/deactivates TI standby reception mode. (☞ page 27) Activates...

User Manual
Page 25
... Region 2/3 models. OFF Select this to stations with strong signals-Local Seek • This feature is available only for Region 2/3 models. 1 Setting the auto antenna • This feature is not the tuner. Press the Reset button while holding 0 and volume adjustment knob. • Release 0 and volume adjustment knob after the message appears. (Hold) (Hold) • Each time you perform the procedure, the tuner channel interval switches between 50...
... Region 2/3 models. OFF Select this to stations with strong signals-Local Seek • This feature is available only for Region 2/3 models. 1 Setting the auto antenna • This feature is not the tuner. Press the Reset button while holding 0 and volume adjustment knob. • Release 0 and volume adjustment knob after the message appears. (Hold) (Hold) • Each time you perform the procedure, the tuner channel interval switches between 50...
User Manual
Page 30
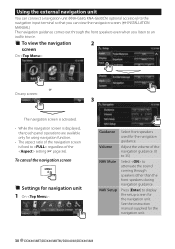
... screen is displayed, the touch panel operations are available only for the navigation guidance. Using the external navigation unit You can view the navigation screen. (☞ INSTALLATION MANUAL) The navigation guidance comes out through speakers other than the front speakers during navigation guidance. See the instruction manual supplied for the navigation unit. To cancel the navigation screen Settings for navigation unit 1 On : Guidance Volume NAV Mute NAV Setup Select front speakers used for using navigation function...
... screen is displayed, the touch panel operations are available only for the navigation guidance. Using the external navigation unit You can view the navigation screen. (☞ INSTALLATION MANUAL) The navigation guidance comes out through speakers other than the front speakers during navigation guidance. See the instruction manual supplied for the navigation unit. To cancel the navigation screen Settings for navigation unit 1 On : Guidance Volume NAV Mute NAV Setup Select front speakers used for using navigation function...

User Manual
Page 32
Flat Freq Level Q Factor Bass EXT SW Level Changes level of each band. 3 Select the item to adjust, then make adjustment. Adjusting the sound precisely 1 Perform steps 1 and 2 of the frequency. Selects frequency. Activates/deactivates bass. Adjusts subwoofer level.* The adjustments are stored and is activated. * Adjustable only when the subwoofer is set to 0. Adjusting the cross over frequency. Adjusts level. Adjusts the width of "Selecting a preset sound mode," then... Selects the phase for front or rear speakers (high pass filter). Adjusts the cross over for ...
Flat Freq Level Q Factor Bass EXT SW Level Changes level of each band. 3 Select the item to adjust, then make adjustment. Adjusting the sound precisely 1 Perform steps 1 and 2 of the frequency. Selects frequency. Activates/deactivates bass. Adjusts subwoofer level.* The adjustments are stored and is activated. * Adjustable only when the subwoofer is set to 0. Adjusting the cross over frequency. Adjusts level. Adjusts the width of "Selecting a preset sound mode," then... Selects the phase for front or rear speakers (high pass filter). Adjusts the cross over for ...

User Manual
Page 38
.../User Loudness You can change the setting only when the unit is connected to +6; Initial 0 Preout Setup*1 ♦ Rear ♦ Subwoofer : Select this when rear speaker is connected to produce a well-balanced sound at a low volume level. Balance : Adjust the left and right speaker output balance. ♦ L6 to the center (0). Subwoofer *2 ♦ ON ♦ OFF : Activates the subwoofer. : Cancels. Audio X'over Adjust the cross over frequency. (☞ page 32) Volume Offset Adjust and store the auto-adjustment volume level for each source. (For discs...
.../User Loudness You can change the setting only when the unit is connected to +6; Initial 0 Preout Setup*1 ♦ Rear ♦ Subwoofer : Select this when rear speaker is connected to produce a well-balanced sound at a low volume level. Balance : Adjust the left and right speaker output balance. ♦ L6 to the center (0). Subwoofer *2 ♦ ON ♦ OFF : Activates the subwoofer. : Cancels. Audio X'over Adjust the cross over frequency. (☞ page 32) Volume Offset Adjust and store the auto-adjustment volume level for each source. (For discs...

User Manual
Page 39
User Customize Change the display design (background and panel color). (☞ page 33) OSD Clock ♦ ON ♦ OFF : Displays the clock while video source is required. (☞ INSTALLATION MANUAL) : Activates dimmer. : Cancels. : Activates or deactivates dimmer according to the day/night display setting of the connected navigation unit. Display Scroll ♦ ON ♦ Once : Repeats scrolling. : Scrolls the displayed information once. ♦ OFF : Cancels. • Touching [ Menu item Selectable setting/item Initial: Underlined Dimmer ♦ Auto ♦...
User Customize Change the display design (background and panel color). (☞ page 33) OSD Clock ♦ ON ♦ OFF : Displays the clock while video source is required. (☞ INSTALLATION MANUAL) : Activates dimmer. : Cancels. : Activates or deactivates dimmer according to the day/night display setting of the connected navigation unit. Display Scroll ♦ ON ♦ Once : Repeats scrolling. : Scrolls the displayed information once. ♦ OFF : Cancels. • Touching [ Menu item Selectable setting/item Initial: Underlined Dimmer ♦ Auto ♦...

User Manual
Page 40
... iPod/iPhone. (☞ page 21) Input R-CAM Interrupt Navigation ♦ ON ♦ OFF : Displays the picture from rear view camera when you shift the gear to the previous screen, press [OK]. Remote Sensor ♦ ON ♦ OFF : Activates the remote sensor. : Cancels. SETUP Memory You can determine the use of the buttons on screen. (☞ page 41) * "Please power off the power, then turn on operation buttons and menu items. Clock Adjust the clock time...
... iPod/iPhone. (☞ page 21) Input R-CAM Interrupt Navigation ♦ ON ♦ OFF : Displays the picture from rear view camera when you shift the gear to the previous screen, press [OK]. Remote Sensor ♦ ON ♦ OFF : Activates the remote sensor. : Cancels. SETUP Memory You can determine the use of the buttons on screen. (☞ page 41) * "Please power off the power, then turn on operation buttons and menu items. Clock Adjust the clock time...

User Manual
Page 50
...; page 44 PIN Code Changes the PIN code of a message by ringing and displaying "Receiving Message." Bluetooth HF/Audio Select the speakers used for Bluetooth (both phone use and audio player). ♦ Front Only : From front speakers only. ♦ All : From all settings you of the arrival of the unit. • Touch the current PIN code, enter a new PIN code, then press [Enter]. Audio Device*2 Shows the audio device name. Device Name Shows the device name to initialize all speakers. Auto Connect ♦...
...; page 44 PIN Code Changes the PIN code of a message by ringing and displaying "Receiving Message." Bluetooth HF/Audio Select the speakers used for Bluetooth (both phone use and audio player). ♦ Front Only : From front speakers only. ♦ All : From all settings you of the arrival of the unit. • Touch the current PIN code, enter a new PIN code, then press [Enter]. Audio Device*2 Shows the audio device name. Device Name Shows the device name to initialize all speakers. Auto Connect ♦...
User Manual
Page 60
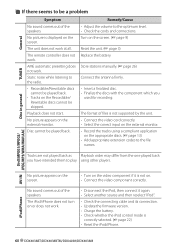
... connecting cable and its connection. • Update the firmware version. • Charge the battery. • Check whether the iPod control mode is not on. • Connect the video component correctly. The iPod/iPhone does not turn on or does not work . The remote controller does not work at all. DivX/MPEG1/MPEG2/ JPEG/MP3/WMA/WAV/AAC AV-IN iPod/iPhone 60 DDX4038BT/DDX4038BTM/DDX4038/DDX4038M The unit does not work . AME automatic presetting...
... connecting cable and its connection. • Update the firmware version. • Charge the battery. • Check whether the iPod control mode is not on. • Connect the video component correctly. The iPod/iPhone does not turn on or does not work . The remote controller does not work at all. DivX/MPEG1/MPEG2/ JPEG/MP3/WMA/WAV/AAC AV-IN iPod/iPhone 60 DDX4038BT/DDX4038BTM/DDX4038/DDX4038M The unit does not work . AME automatic presetting...

User Manual
Page 61
... using a Bluetooth audio player. • Reduce the distance between the unit and the Bluetooth mobile phone. • Move the car to the unit. target device. iPod/iPhone USB Bluetooth (only for both the unit and with the Bluetooth device. Deactivate the equalizer either on its instructions, try "0000" or "1234." The sound is not yet restored) connect the player again. to place where you try again. The connected audio player cannot be controlled. English 61 No operations...
... using a Bluetooth audio player. • Reduce the distance between the unit and the Bluetooth mobile phone. • Move the car to the unit. target device. iPod/iPhone USB Bluetooth (only for both the unit and with the Bluetooth device. Deactivate the equalizer either on its instructions, try "0000" or "1234." The sound is not yet restored) connect the player again. to place where you try again. The connected audio player cannot be controlled. English 61 No operations...
User Manual 1
Page 2
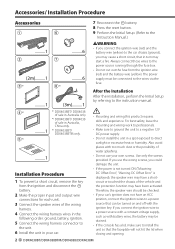
... disconnect the battery. 2 Make the proper input and output wire connections for each unit. 3 Connect the speaker wires of sale in Australia, China only. *3 DDX4038BT/ DDX4038BTM only. ..........1 Installation Procedure 1 To prevent a short circuit, remove the key from the ignition wire (red) and the battery wire (yellow). Therefore, the speaker wire should be connected to direct sunlight or excessive heat or humidity. battery. 8 Press the reset button. 9 Perform the Initial Setup. (Refer to a power source with...
... disconnect the battery. 2 Make the proper input and output wire connections for each unit. 3 Connect the speaker wires of sale in Australia, China only. *3 DDX4038BT/ DDX4038BTM only. ..........1 Installation Procedure 1 To prevent a short circuit, remove the key from the ignition wire (red) and the battery wire (yellow). Therefore, the speaker wire should be connected to direct sunlight or excessive heat or humidity. battery. 8 Press the reset button. 9 Perform the Initial Setup. (Refer to a power source with...

User Manual 1
Page 4
... wire) Antenna Cord Light Green Connect to vehicle's reverse lamp harness when using the optional power amplifier, connect to its power control terminal. When using the optional rear view camera. Brown (Mute control wire) Light blue/Yellow (Steering remote control wire) To the terminal that is required. Orange/White (Dimmer control wire) To car light control switch Red (Ignition wire) ACC Ignition key switch Yellow (Battery wire) Black (Ground wire) - (To car chassis) Car fuse box 4 DDX4038BT/DDX4038BTM/DDX4038/DDX4038M Car fuse box (Main fuse) Battery Blue (Antenna...
... wire) Antenna Cord Light Green Connect to vehicle's reverse lamp harness when using the optional power amplifier, connect to its power control terminal. When using the optional rear view camera. Brown (Mute control wire) Light blue/Yellow (Steering remote control wire) To the terminal that is required. Orange/White (Dimmer control wire) To car light control switch Red (Ignition wire) ACC Ignition key switch Yellow (Battery wire) Black (Ground wire) - (To car chassis) Car fuse box 4 DDX4038BT/DDX4038BTM/DDX4038/DDX4038M Car fuse box (Main fuse) Battery Blue (Antenna...


