
User Manual
Page 2
...11 Turning on the power 11 Turning off the power 11 Adjusting the volume 11 Putting the unit in standby 11 Turning off the screen 11 Switching screens 12 AV SOURCE OPERATIONS Selecting the playback source....13 Displaying the source control screen ..........13 Disc operations 14 Playing a disc 14 Playable disc types 15 Playback operations 16 Settings for disc playback 20 USB operations 21 Playing a USB device 21 Listening to the iPod/iPhone device 23 iPod/iPhone playback operations 24 Selecting a track/video from menu on the iPod/iPhone 25 Operating in iPod/iPhone control mode...
...11 Turning on the power 11 Turning off the power 11 Adjusting the volume 11 Putting the unit in standby 11 Turning off the screen 11 Switching screens 12 AV SOURCE OPERATIONS Selecting the playback source....13 Displaying the source control screen ..........13 Disc operations 14 Playing a disc 14 Playable disc types 15 Playback operations 16 Settings for disc playback 20 USB operations 21 Playing a USB device 21 Listening to the iPod/iPhone device 23 iPod/iPhone playback operations 24 Selecting a track/video from menu on the iPod/iPhone 25 Operating in iPod/iPhone control mode...
User Manual
Page 3
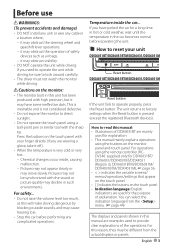
.... - You can select the indication language from the actual displays or panels. it may obstruct the operation of safety devices such as this unit has been produced with your unit DDX6031BT/DDX6031BTM/DDX6031/DDX6031M Reset button DDX4031BT/DDX4031BTM/DDX4031/DDX4031M Reset button If the unit fails to look around carefully. • The driver must not watch the monitor while driving. For operations using the remote controller (RCDV340: supplied only...
.... - You can select the indication language from the actual displays or panels. it may obstruct the operation of safety devices such as this unit has been produced with your unit DDX6031BT/DDX6031BTM/DDX6031/DDX6031M Reset button DDX4031BT/DDX4031BTM/DDX4031/DDX4031M Reset button If the unit fails to look around carefully. • The driver must not watch the monitor while driving. For operations using the remote controller (RCDV340: supplied only...
User Manual
Page 5
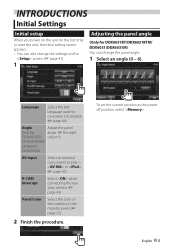
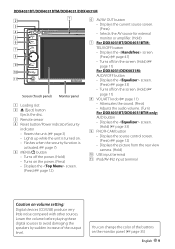
...) Select when connecting the rear view camera. (☞ page 43) Panel Color Select the color of the buttons on -screen information. (☞ page 44) Angle Adjust the panel Only for DDX6031BT/DDX6031BTM/ DDX6031/DDX6031M) You can change the panel angle. 1 Select an angle (0 - 6). INTRODUCTIONS Initial Settings Initial setup When you power on the unit for the first time or reset the unit, the initial setting screen appears. • You can also change the settings on the screen...
...) Select when connecting the rear view camera. (☞ page 43) Panel Color Select the color of the buttons on -screen information. (☞ page 44) Angle Adjust the panel Only for DDX6031BT/DDX6031BTM/ DDX6031/DDX6031M) You can change the panel angle. 1 Select an angle (0 - 6). INTRODUCTIONS Initial Settings Initial setup When you power on the unit for the first time or reset the unit, the initial setting screen appears. • You can also change the settings on the screen...
User Manual
Page 7
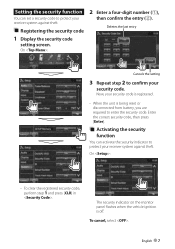
... unit is off. The security indicator on the monitor panel flashes when the vehicle ignition is being reset or disconnected from battery, you are required to confirm your security code. Registering the security code 1 Display the security code setting screen. Enter the correct security code, then press [Enter]. Setting the security function You can activate the security indicator to protect your receiver system against theft. Activating the security function...
... unit is off. The security indicator on the monitor panel flashes when the vehicle ignition is being reset or disconnected from battery, you are required to confirm your security code. Registering the security code 1 Display the security code setting screen. Enter the correct security code, then press [Enter]. Setting the security function You can activate the security indicator to protect your receiver system against theft. Activating the security function...
User Manual
Page 9
... sound. (Press) • Adjusts the audio volume. (Turn) For DDX4031BT/DDX4031BTM only: AUD button • Displays the screen. (Hold) (☞ page 33) 9 FNC/R-CAM button • Displays the source control screen. (Press) (☞ page 12) • Displays the picture from the rear view camera. (Hold) p USB input terminal q iPod/AV-IN2 input terminal Caution on the monitor panel. (☞ page 35) English 9 You can change the color of the output level. Lower the volume before playing these digital sources...
... sound. (Press) • Adjusts the audio volume. (Turn) For DDX4031BT/DDX4031BTM only: AUD button • Displays the screen. (Hold) (☞ page 33) 9 FNC/R-CAM button • Displays the source control screen. (Press) (☞ page 12) • Displays the picture from the rear view camera. (Hold) p USB input terminal q iPod/AV-IN2 input terminal Caution on the monitor panel. (☞ page 35) English 9 You can change the color of the output level. Lower the volume before playing these digital sources...

User Manual
Page 12
.... (☞ page 13) Changes the detailed settings. Switching screens Source control screen Displays the navigation screen.* (☞ page 32) * Appears only when a navigation unit is done for about 5 seconds. * Not available for video from an external component and rear view camera. 12 DDX6031BT/DDX6031BTM/DDX6031/DDX6031M/DDX4031BT/DDX4031BTM/DDX4031/DDX4031M Changes the page ☞ page 11 Press [ ] to return to the previous screen. Touch screen operation Displays the video control menu while playing a video.
.... (☞ page 13) Changes the detailed settings. Switching screens Source control screen Displays the navigation screen.* (☞ page 32) * Appears only when a navigation unit is done for about 5 seconds. * Not available for video from an external component and rear view camera. 12 DDX6031BT/DDX6031BTM/DDX6031/DDX6031M/DDX4031BT/DDX4031BTM/DDX4031/DDX4031M Changes the page ☞ page 11 Press [ ] to return to the previous screen. Touch screen operation Displays the video control menu while playing a video.

User Manual
Page 13
Plays a disc. Displays the Bluetooth mobile phone setting screen. Switches to AV-IN input terminal. Switches to an external component connected to the radio broadcast. Plays a Bluetooth audio player. *1 You can select 3 items to be displayed in this area. (☞ page 42) *2 Switches between the previous and next pages. *3 When no operation is done for DDX6031BT/DDX6031BTM/DDX4031BT/DDX4031BTM. *5 Select an appropriate input setting on a USB device. Plays files on . (☞ page 43) Displaying the source control screen On each playback screen, perform...
Plays a disc. Displays the Bluetooth mobile phone setting screen. Switches to AV-IN input terminal. Switches to an external component connected to the radio broadcast. Plays a Bluetooth audio player. *1 You can select 3 items to be displayed in this area. (☞ page 42) *2 Switches between the previous and next pages. *3 When no operation is done for DDX6031BT/DDX6031BTM/DDX4031BT/DDX4031BTM. *5 Select an appropriate input setting on a USB device. Plays files on . (☞ page 43) Displaying the source control screen On each playback screen, perform...

User Manual
Page 18
.... [Audio] [Subtitle] [Angle] [MENU] [T MENU] [CUR] [Highlight] [Picture Adjust] [Aspect] [ZOOM] Selects the audio type. • For DVD-VR: Selects the audio channel (ST: stereo, L: left, R: right). Selects the subtitle type. Displays the disc menu (DVD)/original program (DVD-VR). Video menu operations You can display the video menu screen while watching the playback pictures on the screen. • Available items on the screen differ depending on the types of the loaded disc and playback files. • The operation buttons...
.... [Audio] [Subtitle] [Angle] [MENU] [T MENU] [CUR] [Highlight] [Picture Adjust] [Aspect] [ZOOM] Selects the audio type. • For DVD-VR: Selects the audio channel (ST: stereo, L: left, R: right). Selects the subtitle type. Displays the disc menu (DVD)/original program (DVD-VR). Video menu operations You can display the video menu screen while watching the playback pictures on the screen. • Available items on the screen differ depending on the types of the loaded disc and playback files. • The operation buttons...

User Manual
Page 21
... car, or expose to direct sunlight or high temperature to avoid deformation or damage to the USB input terminal. • To connect a USB device, ☞ page 71. In this case, disconnect the USB device then reset this unit and the USB device. • Operation and power supply may not work as a USB memory, Digital Audio Player etc. To disconnect the USB device safely Press [0], then disconnect the USB device after "No Device" appears. to the unit...
... car, or expose to direct sunlight or high temperature to avoid deformation or damage to the USB input terminal. • To connect a USB device, ☞ page 71. In this case, disconnect the USB device then reset this unit and the USB device. • Operation and power supply may not work as a USB memory, Digital Audio Player etc. To disconnect the USB device safely Press [0], then disconnect the USB device after "No Device" appears. to the unit...
User Manual
Page 26
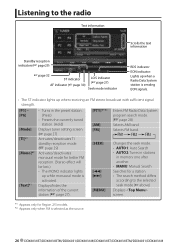
...;] [MENU] Changes the seek mode. • AUTO1: Auto Search • AUTO2: Tunes in stations in the preset station. (Press) • Presets the currently tuned station. (Hold) Displays tuner setting screen. (☞ page 27) Activates/deactivates TI standby reception mode. (☞ page 29) Activates/deactivates monaural mode for Region 2/3 models. *2 Appears only when FM is activated. Displays/hides the information of the current station (☞ page 27). [PTY] *1 *2 [AM] [FM] Enters FM Radio Data System program...
...;] [MENU] Changes the seek mode. • AUTO1: Auto Search • AUTO2: Tunes in stations in the preset station. (Press) • Presets the currently tuned station. (Hold) Displays tuner setting screen. (☞ page 27) Activates/deactivates TI standby reception mode. (☞ page 29) Activates/deactivates monaural mode for Region 2/3 models. *2 Appears only when FM is activated. Displays/hides the information of the current station (☞ page 27). [PTY] *1 *2 [AM] [FM] Enters FM Radio Data System program...
User Manual
Page 27
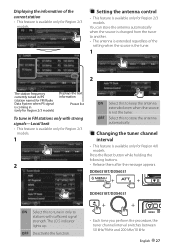
... for Region 2/3 models. OFF Deactivate the function. • Each time you perform the procedure, the tuner channel interval switches between 50 kHz/9 kHz and 200 kHz/10 kHz. OFF Select this to keep the antenna extended even when the source is not the tuner. DDX6031BT/DDX6031 DDX4031BT/DDX4031 ON Select this to tune in FM stations only with sufficient signal strength. Setting the antenna control • This...
... for Region 2/3 models. OFF Deactivate the function. • Each time you perform the procedure, the tuner channel interval switches between 50 kHz/9 kHz and 200 kHz/10 kHz. OFF Select this to keep the antenna extended even when the source is not the tuner. DDX6031BT/DDX6031 DDX4031BT/DDX4031 ON Select this to tune in FM stations only with sufficient signal strength. Setting the antenna control • This...
User Manual
Page 31
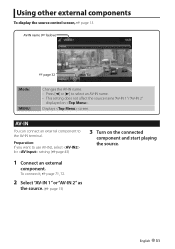
... you want to use AV-IN2, select for setting. (☞page 43) 3 Turn on . Using other external components To display the source control screen, ☞ page 13. AV-IN name (☞ below) ☞ page 32 [Mode] [MENU] Changes the AV-IN name. • Press [2] or [3] to the AV-IN terminal. Displays screen. AV-IN You can connect an external component to select an AV-IN name...
... you want to use AV-IN2, select for setting. (☞page 43) 3 Turn on . Using other external components To display the source control screen, ☞ page 13. AV-IN name (☞ below) ☞ page 32 [Mode] [MENU] Changes the AV-IN name. • Press [2] or [3] to the AV-IN terminal. Displays screen. AV-IN You can connect an external component to select an AV-IN name...
User Manual
Page 32
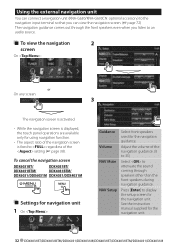
Adjust the volume of the setting (☞ page 38). To cancel the navigation screen DDX6031BT/ DDX4031BT/ DDX6031BTM/ DDX4031BTM/ DDX6031/DDX6031M DDX4031/DDX4031M Settings for navigation unit 1 On : Guidance Volume NAV Mute NAV Setup Select front speakers used for the navigation unit. Press [Enter] to display the setup screen for the navigation guidance. Using the external navigation unit You can connect a navigation unit (KNA-G630/KNA-G630CN: optional accessory) to the navigation input terminal...
Adjust the volume of the setting (☞ page 38). To cancel the navigation screen DDX6031BT/ DDX4031BT/ DDX6031BTM/ DDX4031BTM/ DDX6031/DDX6031M DDX4031/DDX4031M Settings for navigation unit 1 On : Guidance Volume NAV Mute NAV Setup Select front speakers used for the navigation unit. Press [Enter] to display the setup screen for the navigation guidance. Using the external navigation unit You can connect a navigation unit (KNA-G630/KNA-G630CN: optional accessory) to the navigation input terminal...
User Manual
Page 34
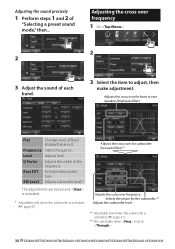
... selectable when is set to . 34 DDX6031BT/DDX6031BTM/DDX6031/DDX6031M/DDX4031BT/DDX4031BTM/DDX4031/DDX4031M Flat Changes level of each band. 3 Select the item to 0. Bass EXT Activates/deactivates bass. Adjusting the cross over for front or rear speakers (high pass filter). Level Adjusts level. Adjusting the sound precisely 1 Perform steps 1 and 2 of the frequency. Adjusts the cross over frequency 1 On : 2 2 3 Adjust the sound of Bass/ Middle/Treble to adjust, then make adjustment. Q Factor Adjusts the width of "Selecting a preset sound mode," then...
... selectable when is set to . 34 DDX6031BT/DDX6031BTM/DDX6031/DDX6031M/DDX4031BT/DDX4031BTM/DDX4031/DDX4031M Flat Changes level of each band. 3 Select the item to 0. Bass EXT Activates/deactivates bass. Adjusting the cross over for front or rear speakers (high pass filter). Level Adjusts level. Adjusting the sound precisely 1 Perform steps 1 and 2 of the frequency. Adjusts the cross over frequency 1 On : 2 2 3 Adjust the sound of Bass/ Middle/Treble to adjust, then make adjustment. Q Factor Adjusts the width of "Selecting a preset sound mode," then...
User Manual
Page 41
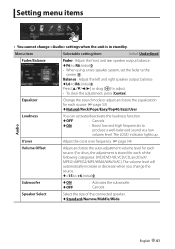
...-balanced sound at a low volume level. Equalizer Change the sound mode or adjust and store the equalization for each source. (☞ page 33) ♦ Natural/Rock/Pops/Easy/Top40/Jazz/User Audio Loudness X'over frequency. (☞ page 34) Volume Offset Adjust and store the auto-adjustment volume level for each of the connected speaker. ♦ Standard/Narrow/Middle/Wide English 41 Setting menu items • You cannot change the source. ♦ -15 to R6; Initial 0 Subwoofer ♦...
...-balanced sound at a low volume level. Equalizer Change the sound mode or adjust and store the equalization for each source. (☞ page 33) ♦ Natural/Rock/Pops/Easy/Top40/Jazz/User Audio Loudness X'over frequency. (☞ page 34) Volume Offset Adjust and store the auto-adjustment volume level for each of the connected speaker. ♦ Standard/Narrow/Middle/Wide English 41 Setting menu items • You cannot change the source. ♦ -15 to R6; Initial 0 Subwoofer ♦...
User Manual
Page 65
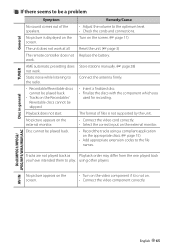
... players. The format of the speakers. The remote controller does not work. Playback does not start. Tracks are not played back as Playback order may differ from the one played back you used for recording. using a compliant application on the screen. (☞ page 11) Reset the unit. (☞ page 3) Replace the battery. Remedy/Cause • Adjust the volume to the optimum level. • Check the cords and connections. Store stations manually...
... players. The format of the speakers. The remote controller does not work. Playback does not start. Tracks are not played back as Playback order may differ from the one played back you used for recording. using a compliant application on the screen. (☞ page 11) Reset the unit. (☞ page 3) Replace the battery. Remedy/Cause • Adjust the volume to the optimum level. • Check the cords and connections. Store stations manually...

User Manual
Page 67
... between the unit and the Bluetooth mobile phone. • Move the car to the unit. Check whether the connected audio player supports AVRCP (Audio Video Remote Control Profile). Adjust the microphone unit position. The connected audio player cannot be controlled. If the PIN code of the device is not indicated on the unit. • (When the sound is not yet restored) connect the player again. English 67 Bluetooth device does not detect the unit. • Check whether the Bluetooth adapter (KS...
... between the unit and the Bluetooth mobile phone. • Move the car to the unit. Check whether the connected audio player supports AVRCP (Audio Video Remote Control Profile). Adjust the microphone unit position. The connected audio player cannot be controlled. If the PIN code of the device is not indicated on the unit. • (When the sound is not yet restored) connect the player again. English 67 Bluetooth device does not detect the unit. • Check whether the Bluetooth adapter (KS...
User Manual
Page 68
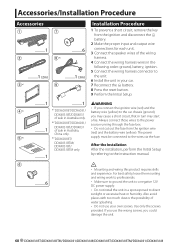
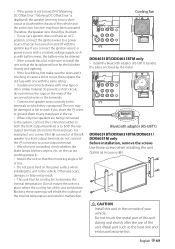
... battery wire (yellow) to the car chassis (ground), you could damage the unit. 68 DDX6031BT/DDX6031BTM/DDX6031/DDX6031M/DDX4031BT/DDX4031BTM/DDX4031/DDX4031M battery. 8 Press the reset button. 9 Perform the Initial Setup. 4*2 5*2 6 ..........1 ..........1 ..........1 *1 DDX6031BT/DDX6031/ DDX4031BT/DDX4031 of sale in Australia only. *2 DDX6031BT/DDX6031/ DDX4031BT/DDX4031 of the wiring harness. 4 Connect the wiring harness wires in the following order: ground, battery, ignition. 5 Connect the wiring harness connector to the unit. 6 Install the unit in turn may start a fire. Use...
... battery wire (yellow) to the car chassis (ground), you could damage the unit. 68 DDX6031BT/DDX6031BTM/DDX6031/DDX6031M/DDX4031BT/DDX4031BTM/DDX4031/DDX4031M battery. 8 Press the reset button. 9 Perform the Initial Setup. 4*2 5*2 6 ..........1 ..........1 ..........1 *1 DDX6031BT/DDX6031/ DDX4031BT/DDX4031 of sale in Australia only. *2 DDX6031BT/DDX6031/ DDX4031BT/DDX4031 of the wiring harness. 4 Connect the wiring harness wires in the following order: ground, battery, ignition. 5 Connect the wiring harness connector to the unit. 6 Install the unit in turn may start a fire. Use...
User Manual
Page 69
... the fuse blows, first make sure the wires aren't touching to any metal part in malfunction. To prevent a short circuit, do not connect the - Otherwise scars, damage, or failure may have an ACC position, connect the ignition wires to a power source that the mounting angle is displayed), the speaker wire may be damaged or fail to the vehicle. • If the power is not turned...
... the fuse blows, first make sure the wires aren't touching to any metal part in malfunction. To prevent a short circuit, do not connect the - Otherwise scars, damage, or failure may have an ACC position, connect the ignition wires to a power source that the mounting angle is displayed), the speaker wire may be damaged or fail to the vehicle. • If the power is not turned...
User Manual
Page 70
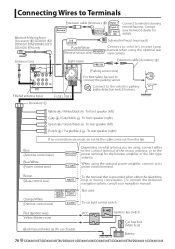
... only Antenna Cord Extension cable (Accessory 9) Connect to the vehicle's parking brake detection switch harness. Subwoofer Preout (monaural) Purple/White (Reverse sensor wire) Connect to vehicle's reverse lamp harness when using the optional power amplifier, connect to the power terminal for details. Brown (Mute control wire) To the terminal that is grounded when either to the control terminal of the film-type antenna. Contact your navigation manual.) Not used Orange/White (Dimmer control wire) To car light control switch...
... only Antenna Cord Extension cable (Accessory 9) Connect to the vehicle's parking brake detection switch harness. Subwoofer Preout (monaural) Purple/White (Reverse sensor wire) Connect to vehicle's reverse lamp harness when using the optional power amplifier, connect to the power terminal for details. Brown (Mute control wire) To the terminal that is grounded when either to the control terminal of the film-type antenna. Contact your navigation manual.) Not used Orange/White (Dimmer control wire) To car light control switch...


