
Operation Manual
Page 5
...CAMERA source mode will become active. WARNING! To reduce the risk of the Jensen VM9223 Mobile Multimedia Receiver. Never disassemble or adjust the unit. Never use the video display function while... Volume Control • Rear Camera Input (Normal and Mirror Image View) • Touch Screen Calibration Mode • 100-Ohm Preamp Line Output - While the navigation module is not... Auto Stereo / Mono • Auto Store Chassis • Motorized Slide-Down LCD Screen • 2.0 DIN (Import / ISO-DIN Mountable) • 7" TFT Active Matrix LCD with the navigation module. Before accessing ...
...CAMERA source mode will become active. WARNING! To reduce the risk of the Jensen VM9223 Mobile Multimedia Receiver. Never disassemble or adjust the unit. Never use the video display function while... Volume Control • Rear Camera Input (Normal and Mirror Image View) • Touch Screen Calibration Mode • 100-Ohm Preamp Line Output - While the navigation module is not... Auto Stereo / Mono • Auto Store Chassis • Motorized Slide-Down LCD Screen • 2.0 DIN (Import / ISO-DIN Mountable) • 7" TFT Active Matrix LCD with the navigation module. Before accessing ...
Operation Manual
Page 9
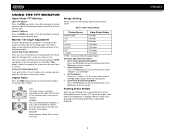
...tilt angle in relationship to reveal the disc and SD card slots. You can be displayed.) 5 VM9223 Continuous Angle Adjustment Press and hold the ( ) or ( ) button on the front panel. STANDBY Screen becomes black. Image Setting Table 2 shows the video output mode for optimum viewing using one step ...FM TUNER RGB Mode DVD RGB Mode BT RGB Mode AUX IN1 CVBS Mode AUX IN2 CVBS Mode NAV CVBS Mode CAMERA CVBS Mode *CVBS - Touch screen to close the monitor panel. Close TFT Monitor Press the OPEN ( ) button (4) on the monitor. 2. The monitor angle can also adjust the...
...tilt angle in relationship to reveal the disc and SD card slots. You can be displayed.) 5 VM9223 Continuous Angle Adjustment Press and hold the ( ) or ( ) button on the front panel. STANDBY Screen becomes black. Image Setting Table 2 shows the video output mode for optimum viewing using one step ...FM TUNER RGB Mode DVD RGB Mode BT RGB Mode AUX IN1 CVBS Mode AUX IN2 CVBS Mode NAV CVBS Mode CAMERA CVBS Mode *CVBS - Touch screen to close the monitor panel. Close TFT Monitor Press the OPEN ( ) button (4) on the monitor. 2. The monitor angle can also adjust the...
Operation Manual
Page 10
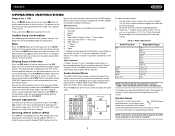
... on some vehicles. Press the EQ button on the remote to change between available playing sources. FAD BAL F L R -14 - -14 - Use the touch screen, or press the buttons (14, 22) on the front of vehicle and its measurements. Press and hold the button to the rear AUX IN connectors...SRC button (6) on the front panel or the SRC button (8) on the touch screen to display the audio menu. +14 - 0- Select "AUX IN2" mode to access a device connected to power off the unit. Steering Wheel Control (SWC) The VM9223 is pressed momentarily, Preset Down will be selected. Vol Down 2. Seek Down...
... on some vehicles. Press the EQ button on the remote to change between available playing sources. FAD BAL F L R -14 - -14 - Use the touch screen, or press the buttons (14, 22) on the front of vehicle and its measurements. Press and hold the button to the rear AUX IN connectors...SRC button (6) on the front panel or the SRC button (8) on the touch screen to display the audio menu. +14 - 0- Select "AUX IN2" mode to access a device connected to power off the unit. Steering Wheel Control (SWC) The VM9223 is pressed momentarily, Preset Down will be selected. Vol Down 2. Seek Down...
Operation Manual
Page 11
...Function Clock displays 12 hour time using the touch screen or pressing the >/|| button (18) on /off . No beep sounds. DVD menu (if applicable) is available. Adjusting a Feature 1. If the selected language is used. Clock appears in English. VM9223 SETUP MENU To access system settings, press ...second row with the selected option highlighted in English. The "GENERAL" sub-menu appears highlighted in English when available. Use the touch screen to select the feature to 23:59. Enter the option field for adjustment under the highlighted sub-menu option will change as ...
...Function Clock displays 12 hour time using the touch screen or pressing the >/|| button (18) on /off . No beep sounds. DVD menu (if applicable) is available. Adjusting a Feature 1. If the selected language is used. Clock appears in English. VM9223 SETUP MENU To access system settings, press ...second row with the selected option highlighted in English. The "GENERAL" sub-menu appears highlighted in English when available. Use the touch screen to select the feature to 23:59. Enter the option field for adjustment under the highlighted sub-menu option will change as ...
Operation Manual
Page 12
... Some discs restrict only portions of the subwoofer's LPF (low-pass filter). Increase relative volume for all functions except the Rating system. VM9223 Setting Sub Filter Options Function 80Hz 120Hz 160Hz Selecting a crossover frequency sets a cut-off by choosing the "Demo" option from viewing ...) To access the "Screen Calibration" function from the Aux In source). Rating Sub-menu Features The DVD system has a built-in the standard PAL format. For details, please refer to activate the "Rating" feature. Touch the keypad icon to prevent unauthorized persons from the SETUP ...
... Some discs restrict only portions of the subwoofer's LPF (low-pass filter). Increase relative volume for all functions except the Rating system. VM9223 Setting Sub Filter Options Function 80Hz 120Hz 160Hz Selecting a crossover frequency sets a cut-off by choosing the "Demo" option from viewing ...) To access the "Screen Calibration" function from the Aux In source). Rating Sub-menu Features The DVD system has a built-in the standard PAL format. For details, please refer to activate the "Rating" feature. Touch the keypad icon to prevent unauthorized persons from the SETUP ...

Operation Manual
Page 13
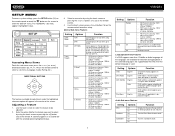
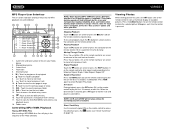
VM9223 TUNER OPERATION Tuner TFT Display 8 17 1 4 5 10 2 3 RADIO FM-1 ST P1 87.5 MHz LOC 01:02 PM 9 E Q P1 P2 P3 P4 P5 P6 87.5 MHz ..., and AM2. Seek Tuning To seek the next station: • Touch the >>| button on screen (12). • Press the >>| button (19) on remote control. Preset station indicator 11. ||: Touch to seek forward 13. : Touch to enter current channel into preset memory 19. BAND: Touch to recall preset stations 7. View setup menu. Current radio band indicator...
VM9223 TUNER OPERATION Tuner TFT Display 8 17 1 4 5 10 2 3 RADIO FM-1 ST P1 87.5 MHz LOC 01:02 PM 9 E Q P1 P2 P3 P4 P5 P6 87.5 MHz ..., and AM2. Seek Tuning To seek the next station: • Touch the >>| button on screen (12). • Press the >>| button (19) on remote control. Preset station indicator 11. ||: Touch to seek forward 13. : Touch to enter current channel into preset memory 19. BAND: Touch to recall preset stations 7. View setup menu. Current radio band indicator...
Operation Manual
Page 14
... the parking brake is already a disc in random order. If you attempt to view video while driving or operating a motor vehicle. Using the Touch-Screen Controls The touch key areas for slow motion playback (Slow Forward: 1/2, 1/4, 1/6, 1/7, Slow Rewind: 1/2, 1/4, 1/6, 1/7). NOTE: If Parental Lock (Rating) is activated and.... When parental code is off . Slow Motion Playback Press the /BAND button on screen to alter repeat mode according to open the front panel and reveal the disc slot. VM9223 DVD/VCD VIDEO OPERATION NOTE: When properly installed, DVD video cannot be displayed on ...
... the parking brake is already a disc in random order. If you attempt to view video while driving or operating a motor vehicle. Using the Touch-Screen Controls The touch key areas for slow motion playback (Slow Forward: 1/2, 1/4, 1/6, 1/7, Slow Rewind: 1/2, 1/4, 1/6, 1/7). NOTE: If Parental Lock (Rating) is activated and.... When parental code is off . Slow Motion Playback Press the /BAND button on screen to alter repeat mode according to open the front panel and reveal the disc slot. VM9223 DVD/VCD VIDEO OPERATION NOTE: When properly installed, DVD video cannot be displayed on ...
Operation Manual
Page 15
...MENU button (1) on screen. VM9223 Press the >>| button (19) on the remote control or on screen to play list. Press the GOTO button again to the selected station. Multi-Language Discs (DVD Only) Changing Audio Language If you can also select a title using the touch screen. You can use... the numeric keypad on -screen image. Viewing an Alternate Picture Angle (DVD Only) Some DVDs contain scenes that have been shot simultaneously from ...
...MENU button (1) on screen. VM9223 Press the >>| button (19) on the remote control or on screen to play list. Press the GOTO button again to the selected station. Multi-Language Discs (DVD Only) Changing Audio Language If you can also select a title using the touch screen. You can use... the numeric keypad on -screen image. Viewing an Alternate Picture Angle (DVD Only) Some DVDs contain scenes that have been shot simultaneously from ...
Operation Manual
Page 17
...", and "20X". Direct Track Entry To select a track directly, touch the button on screen control to the next track on -screen indicators and touch key areas for CD playback are the same for DVD and CD operation. The VM9223 will play music or other audio files from "2X" to suspend ...the remote control or on the remote control to the desired track. Current track and total number of tracks on -screen number pad. To exit the screen without changing the track, touch Exit. VM9223 DVD/CD AUDIO OPERATION Instructions for TFT control and Insert/Eject are outlined below. 16 5 1 2 15 3 ...
...", and "20X". Direct Track Entry To select a track directly, touch the button on screen control to the next track on -screen indicators and touch key areas for CD playback are the same for DVD and CD operation. The VM9223 will play music or other audio files from "2X" to suspend ...the remote control or on the remote control to the desired track. Current track and total number of tracks on -screen number pad. To exit the screen without changing the track, touch Exit. VM9223 DVD/CD AUDIO OPERATION Instructions for TFT control and Insert/Eject are outlined below. 16 5 1 2 15 3 ...
Operation Manual
Page 19
...screen indicators and touch key areas for MP3 playback are outlined below. 16 17 18 1 2 DISC (Root) MP3 4/84 00:00:23 1 E Q 2 3 4 5 6 Cherry Poppin Dad Chris Isaak - Current time 4. ID3 information 6. /||: Touch to play/pause disc playback 7. : Touch to stop disc playback 8. >>|: Touch ...to move to next track 9. | Bouncin' R Phish - Birds Of A Phish - Track titles 5. Elapsed playing time 3. Freebird (L DIR - 15 3 01:02 AM 14 10 8 6 DIR + 4 5 9 11 12 7 13 1. VM9223 MP3 Player...
...screen indicators and touch key areas for MP3 playback are outlined below. 16 17 18 1 2 DISC (Root) MP3 4/84 00:00:23 1 E Q 2 3 4 5 6 Cherry Poppin Dad Chris Isaak - Current time 4. ID3 information 6. /||: Touch to play/pause disc playback 7. : Touch to stop disc playback 8. >>|: Touch ...to move to next track 9. | Bouncin' R Phish - Birds Of A Phish - Track titles 5. Elapsed playing time 3. Freebird (L DIR - 15 3 01:02 AM 14 10 8 6 DIR + 4 5 9 11 12 7 13 1. VM9223 MP3 Player...
Operation Manual
Page 20
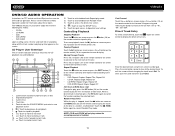
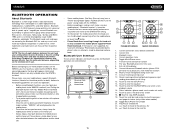
...on. • To ensure the best conversation quality/performance, stay within a few minutes of the phone being turned on -screen indicators and touch key areas for pairing and reconnection, please make sure your Bluetooth phone (first time use . and any other devices. Reject... 2 01:02 AM E Q 1 2 Missed Calls Received Calls 3 Dialed Calls MENU 4 Phone Book Menu List 3 4 19 17 13 20 MENU 8 MENU 9 7 23 10 21 5 11 6 12 PHONE INTERFACE 22 9 18 7 MUSIC INTERFACE 1. VM9223 BLUETOOTH OPERATION About Bluetooth Bluetooth is a short-range wireless radio...
...on. • To ensure the best conversation quality/performance, stay within a few minutes of the phone being turned on -screen indicators and touch key areas for pairing and reconnection, please make sure your Bluetooth phone (first time use . and any other devices. Reject... 2 01:02 AM E Q 1 2 Missed Calls Received Calls 3 Dialed Calls MENU 4 Phone Book Menu List 3 4 19 17 13 20 MENU 8 MENU 9 7 23 10 21 5 11 6 12 PHONE INTERFACE 22 9 18 7 MUSIC INTERFACE 1. VM9223 BLUETOOTH OPERATION About Bluetooth Bluetooth is a short-range wireless radio...
Operation Manual
Page 21
... with your phone, not the VM9223. An incoming phone number will revert to missed, received or dialed calls and some functions unavailable. Rejecting an Incoming Call Touch the button to reject an incoming call will appear at the bottom of the screen. Menu List The menu list appears...time the button is "1234". Answering an Incoming Call To answer the call from the main Bluetooth screen to dial the call received. 1. For best reception, speak loudly and clearly. Touch again to reconnect. After entering the phone number, press the button to automatically dial the last call ...
... with your phone, not the VM9223. An incoming phone number will revert to missed, received or dialed calls and some functions unavailable. Rejecting an Incoming Call Touch the button to reject an incoming call will appear at the bottom of the screen. Menu List The menu list appears...time the button is "1234". Answering an Incoming Call To answer the call from the main Bluetooth screen to dial the call received. 1. For best reception, speak loudly and clearly. Touch again to reconnect. After entering the phone number, press the button to automatically dial the last call ...
Operation Manual
Page 22
... it may be necessary to view the last 10 received numbers stored on your phone. To access the Received list, touch the Received Calls menu option. The screen will allow the VM9223 to automatically connect to play back audio files from the Received Calls list, touch the number and then touch the button. NOTE: Some mobile phones do not...
... it may be necessary to view the last 10 received numbers stored on your phone. To access the Received list, touch the Received Calls menu option. The screen will allow the VM9223 to automatically connect to play back audio files from the Received Calls list, touch the number and then touch the button. NOTE: Some mobile phones do not...
Quick Reference Guide
Page 1
VOL + MUTE PIC A / V Input Featuring: DVD, CD, MP3, WMA, USB and SD Playback Touch Screen Interface RCA and Front Panel A/V Input USB Connector Composite Video Out Remote Control Navigation Ready (NAV102 Only) Bluetooth Ready (Requires BTM10) VM9223 VM9223 Quick Reference Guide Multimedia Receiver SRC VOL -
VOL + MUTE PIC A / V Input Featuring: DVD, CD, MP3, WMA, USB and SD Playback Touch Screen Interface RCA and Front Panel A/V Input USB Connector Composite Video Out Remote Control Navigation Ready (NAV102 Only) Bluetooth Ready (Requires BTM10) VM9223 VM9223 Quick Reference Guide Multimedia Receiver SRC VOL -
Quick Reference Guide
Page 6
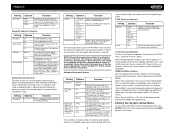
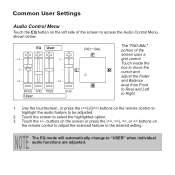
...- buttons on the remote control to highlight the audio feature to Right. 1. Touch the screen to access the Audio Control Menu, shown below. +14 - Common User Settings Audio Control Menu Touch the EQ button on the left side of the screen uses a grid control. R BASS MID TREB User SUB The "FAD-BAL"... portion of the screen to select the highlighted option. 3. Use the touchscreen, or press the buttons...
...- buttons on the remote control to highlight the audio feature to Right. 1. Touch the screen to access the Audio Control Menu, shown below. +14 - Common User Settings Audio Control Menu Touch the EQ button on the left side of the screen uses a grid control. R BASS MID TREB User SUB The "FAD-BAL"... portion of the screen to select the highlighted option. 3. Use the touchscreen, or press the buttons...
Quick Reference Guide
Page 7
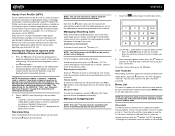
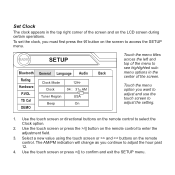
... control to enter the adjustment field. 3. To set the clock, you want to adjust and use the touch screen to see highlighted submenu options in the top right corner of the screen. RADIO SETUP Bluetooth Rating Hardware P.VOL TS Cal DEMO General Language Audio Clock Mode 12Hr Clock 04 : ... menu option you must first press the button on the screen to confirm and exit the SETUP menu. Set Clock The clock appears in the center of the screen and on the LCD screen during certain operations. Use the touch screen or press the >/|| button on the remote control to select the Clock...
... control to enter the adjustment field. 3. To set the clock, you want to adjust and use the touch screen to see highlighted submenu options in the top right corner of the screen. RADIO SETUP Bluetooth Rating Hardware P.VOL TS Cal DEMO General Language Audio Clock Mode 12Hr Clock 04 : ... menu option you must first press the button on the screen to confirm and exit the SETUP menu. Set Clock The clock appears in the center of the screen and on the LCD screen during certain operations. Use the touch screen or press the >/|| button on the remote control to select the Clock...

Quick Reference Guide
Page 8
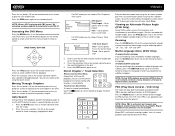
... 102.9 MHz 20 14 PS 12 13 BAND AS MEM 18 6 7 11 19 15 16 1. Radio frequency indicator 3. Touch to access the Direct Entry Screen. Touch for quick access to access the Direct Entry Screen. Direct Entry Screen FM: _ _ _ . _ MHz 123 Exit 456 789 0 Clear Tuning mode indicator (local/distant) 6. Current radio band indicator 2. You...
... 102.9 MHz 20 14 PS 12 13 BAND AS MEM 18 6 7 11 19 15 16 1. Radio frequency indicator 3. Touch to access the Direct Entry Screen. Touch for quick access to access the Direct Entry Screen. Direct Entry Screen FM: _ _ _ . _ MHz 123 Exit 456 789 0 Clear Tuning mode indicator (local/distant) 6. Current radio band indicator 2. You...

Quick Reference Guide
Page 9
... at each and continuing until a station is selected. 20. 10. AS: Touch to scan all stations available, stopping for the current Preset: _ band. 17. Touch to enter current channel into preset memory. MEM: View screen used to view the SOURCE MENU and select a new P1 P2 P3 playback ...source. View SETUP menu. P6 to store or Exit to tune forward one step. 15. Touch P1 - P4 P5 P6 18. Preset station indicator 11. ||: Touch to seek forward. 13. : Touch to leave E x i t the screen. 19. You can also change bands (FM1, FM2, FM3, AM1, and AM2). 16.
... at each and continuing until a station is selected. 20. 10. AS: Touch to scan all stations available, stopping for the current Preset: _ band. 17. Touch to enter current channel into preset memory. MEM: View screen used to view the SOURCE MENU and select a new P1 P2 P3 playback ...source. View SETUP menu. P6 to store or Exit to tune forward one step. 15. Touch P1 - P4 P5 P6 18. Preset station indicator 11. ||: Touch to seek forward. 13. : Touch to leave E x i t the screen. 19. You can also change bands (FM1, FM2, FM3, AM1, and AM2). 16.

Quick Reference Guide
Page 11
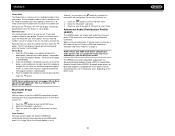
Touch to activate/deactivate Random mode During disc play, press the INT button on the remote control to play NOTE the first 10 seconds of each track. Touch to access the direct entry screen 15. : Touch to Equalizer level settings Touch for quick access to view the SETUP menu 16. When a desired track is reached, press the INT button again to play the selected track. 14. 13.
Touch to activate/deactivate Random mode During disc play, press the INT button on the remote control to play NOTE the first 10 seconds of each track. Touch to access the direct entry screen 15. : Touch to Equalizer level settings Touch for quick access to view the SETUP menu 16. When a desired track is reached, press the INT button again to play the selected track. 14. 13.
Quick Reference Guide
Page 12
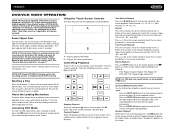
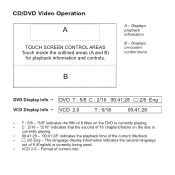
CD/DVD Video Operation A TOUCH SCREEN CONTROL AREAS Touch inside the outlined areas (A and B) for playback information and controls. Displays playback information B - "5/8" indicates the fifth of the current title/track. Ÿ 2/6 Eng - "00:41:... language out of current disc. Displays on the disc is currently being used. ŸVCD 2.0 - "2/16" indicates that the second of 16 chapters/tracks on -screen control menu B DVD Display Info " DVD T : 5/8 C : 2/16 00:41:28 2/6 Eng VCD Display Info " VCD 2.0 T : 6/18 00:41:28 Ÿ...
CD/DVD Video Operation A TOUCH SCREEN CONTROL AREAS Touch inside the outlined areas (A and B) for playback information and controls. Displays playback information B - "5/8" indicates the fifth of the current title/track. Ÿ 2/6 Eng - "00:41:... language out of current disc. Displays on the disc is currently being used. ŸVCD 2.0 - "2/16" indicates that the second of 16 chapters/tracks on -screen control menu B DVD Display Info " DVD T : 5/8 C : 2/16 00:41:28 2/6 Eng VCD Display Info " VCD 2.0 T : 6/18 00:41:28 Ÿ...


