
Installation Guide
Page 5
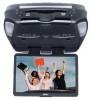
... additional preparation work necessary, depending on the installation of the video monitor and related console accessories. 3) Generally, the best location for the video monitor is where the vehicle's factory dome light is in such a manner... that may be required are: A) Removal of the monitor has been determined, there may . Some of the steps that it will vary ...comfortably viewed by rear seat passengers. NEVER INSTALL THE MONITOR IN A PLACE WITHIN THE DRIVER'S VIEW. The monitor should be trimmed to vehicle, so this manual. -3- VEHICLE PREPARATION: 1) Locate ...
... additional preparation work necessary, depending on the installation of the video monitor and related console accessories. 3) Generally, the best location for the video monitor is where the vehicle's factory dome light is in such a manner... that may be required are: A) Removal of the monitor has been determined, there may . Some of the steps that it will vary ...comfortably viewed by rear seat passengers. NEVER INSTALL THE MONITOR IN A PLACE WITHIN THE DRIVER'S VIEW. The monitor should be trimmed to vehicle, so this manual. -3- VEHICLE PREPARATION: 1) Locate ...
Installation Guide
Page 8
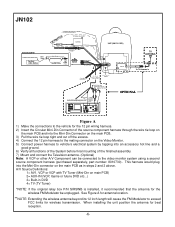
...tie loop tight and cut off the excess. 4) Connect the 12 pin harness to the mating connector on the Video Monitor. 5) Connect power harness to the video monitor system using a second source component harness (purchased separately, part number: 8010730). Remove Adhesive Backing and Apply IR LED to ... to vehicle's electrical system by tapping into the Mini-Din connector on the front of the finished assembly. 7) Mount and connect the Television antenna. (Optional) Note: A VCP or other A/V Component can be unplugged. JN102 To Secondary AV Monitor 12 VDC Power and Ground Auxillary video...
...tie loop tight and cut off the excess. 4) Connect the 12 pin harness to the mating connector on the Video Monitor. 5) Connect power harness to the video monitor system using a second source component harness (purchased separately, part number: 8010730). Remove Adhesive Backing and Apply IR LED to ... to vehicle's electrical system by tapping into the Mini-Din connector on the front of the finished assembly. 7) Mount and connect the Television antenna. (Optional) Note: A VCP or other A/V Component can be unplugged. JN102 To Secondary AV Monitor 12 VDC Power and Ground Auxillary video...
Installation Guide
Page 10
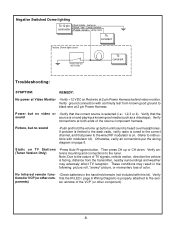
...held remote (not included with modulator kit). These conditions may adversely affect TV reception. Verify connections at 2 pin Power Harness behind video monitor. Lamp Auto To constant Factory Dome light circuit Factory Door ajar switch or Body To constant Troubleshooting: SYMPTOM: REMEDY: No... power at Video Monitor -Verify +12 VDC on connector Black / red - Otherwise, verify all connections per the wiring diagram on . (Refer to ...
...held remote (not included with modulator kit). These conditions may adversely affect TV reception. Verify connections at 2 pin Power Harness behind video monitor. Lamp Auto To constant Factory Dome light circuit Factory Door ajar switch or Body To constant Troubleshooting: SYMPTOM: REMEDY: No... power at Video Monitor -Verify +12 VDC on connector Black / red - Otherwise, verify all connections per the wiring diagram on . (Refer to ...


