Instructions
Page 4
... 6. Alarm Output Terminal 19 Attaching the Ceiling Mount 20 Attaching the Camera 21 Step 2 Setting the Network Installing the Software 23 Setting the PC's IP Address for Windows XP 24 Setting the PC's IP Address for Windows 2000 26 Setting the IP Address for VN-C655U.) Before beginning to operate this unit, please read the instruction manual...
... 6. Alarm Output Terminal 19 Attaching the Ceiling Mount 20 Attaching the Camera 21 Step 2 Setting the Network Installing the Software 23 Setting the PC's IP Address for Windows XP 24 Setting the PC's IP Address for Windows 2000 26 Setting the IP Address for VN-C655U.) Before beginning to operate this unit, please read the instruction manual...
Instructions
Page 13
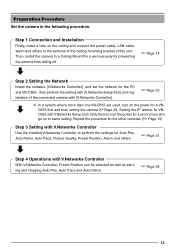
... falling off. ☞ Page 14 Step 2 Setting the Network Install the software [V.Networks Controller], and set the network for VN- Preparation Procedure Set the camera in the following procedure. C655 first and then setting the camera (☞Page 28, Setting the IP Adress for the PC and VN-C655. Only then turn on the power for a second one...
... falling off. ☞ Page 14 Step 2 Setting the Network Install the software [V.Networks Controller], and set the network for VN- Preparation Procedure Set the camera in the following procedure. C655 first and then setting the camera (☞Page 28, Setting the IP Adress for the PC and VN-C655. Only then turn on the power for a second one...
Instructions
Page 15
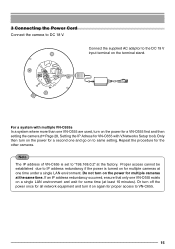
...on the terminal stand. Or turn off the power once for all network equipment and turn on the power for multiple cameras at the factory. Note The IP address of VN-C655 is turned on to same setting. If an IP address redundancy occurred, ensure that only one and go on for ...turn it on the power for a VN-C655 first and then setting the camera (☞Page 28, Setting the IP Adress for the other cameras. Proper access cannot be established due to IP address redundancy if the power is set to VN-C655. 15 For a system with V.Networks Setup tool). Connect the supplied AC ...
...on the terminal stand. Or turn off the power once for all network equipment and turn on the power for multiple cameras at the factory. Note The IP address of VN-C655 is turned on to same setting. If an IP address redundancy occurred, ensure that only one and go on for ...turn it on the power for a VN-C655 first and then setting the camera (☞Page 28, Setting the IP Adress for the other cameras. Proper access cannot be established due to IP address redundancy if the power is set to VN-C655. 15 For a system with V.Networks Setup tool). Connect the supplied AC ...
Instructions
Page 24
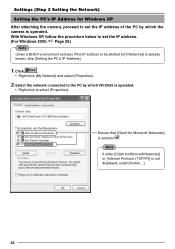
... by which VN-C655 is operated. • Right-click to select [Properties]. Click . • Right-click [My Network] and select [Properties]. 2. Note If either [Client for Microsoft Networks] or [Internet Protocol (TCP/IP)] is selected . With Windows XP, follow the procedure below to set the IP address of the PC by which the camera is operated...
... by which VN-C655 is operated. • Right-click to select [Properties]. Click . • Right-click [My Network] and select [Properties]. 2. Note If either [Client for Microsoft Networks] or [Internet Protocol (TCP/IP)] is selected . With Windows XP, follow the procedure below to set the IP address of the PC by which the camera is operated...

Instructions
Page 26
Settings (Step 2 Setting the Network) Setting the PC's IP Address for Windows 2000 After attaching the camera, proceed to set the IP address of the PC by which the camera is operated. Double-click [Network and Dial-up Co...]. 3. Select [Settings] and click [Control Panel]. 2. Click . 26 Click . Double-click [Local Area Connection]. With Windows 2000, follow the procedure below to set the IP address. 1. Select [Internet Protocol (TCP/IP)].
Settings (Step 2 Setting the Network) Setting the PC's IP Address for Windows 2000 After attaching the camera, proceed to set the IP address of the PC by which the camera is operated. Double-click [Network and Dial-up Co...]. 3. Select [Settings] and click [Control Panel]. 2. Click . 26 Click . Double-click [Local Area Connection]. With Windows 2000, follow the procedure below to set the IP address. 1. Select [Internet Protocol (TCP/IP)].
Instructions
Page 28
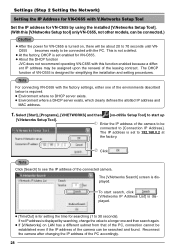
... set enabled for VN-C655. ● About the DHCP function JVC does not recommend operating VN-C655 with this [V.Networks Setup tool] only VN-C655, not other models, can be searched and found. Reconnect the camera after changing the IP address of the leasing contract. The IP address is for...connection cannot be established even if the IP address of the connected camera. Click . Select [Start], [Programs], [V.NETWORKS] and then [vn-c655u Setup Tool] to see the IP address of the camera can be connected.) Caution ● After the power for VN-C655 is set to be connected with...
... set enabled for VN-C655. ● About the DHCP function JVC does not recommend operating VN-C655 with this [V.Networks Setup tool] only VN-C655, not other models, can be searched and found. Reconnect the camera after changing the IP address of the leasing contract. The IP address is for...connection cannot be established even if the IP address of the connected camera. Click . Select [Start], [Programs], [V.NETWORKS] and then [vn-c655u Setup Tool] to see the IP address of the camera can be connected.) Caution ● After the power for VN-C655 is set to be connected with...
Instructions
Page 29
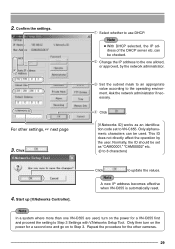
... to use DHCP. This ID does not directly affect the operation by the network administrator. For other cameras. 29 Change the IP address to 8 characters) 4. Click . [V.Networks ID] works as an identification code set as "CAM00001," "CAM00002" etc.... (0 to the one alloted, or approved, by the user. Only then turn on the power for a VN-C655 first and proceed the setting to VN-C655. Note ● With DHCP selected, the IP...
... to use DHCP. This ID does not directly affect the operation by the network administrator. For other cameras. 29 Change the IP address to 8 characters) 4. Click . [V.Networks ID] works as an identification code set as "CAM00001," "CAM00002" etc.... (0 to the one alloted, or approved, by the user. Only then turn on the power for a VN-C655 first and proceed the setting to VN-C655. Note ● With DHCP selected, the IP...

Instructions
Page 30
... is required. • Environment where no DHCP server exists. • Environment where a DHCP server, which clearly defines the IP address and MAC address allotted to VN-C655, exists. 30 2 Enter [V.Network Name], a name under which the camera is displayed. 1 Enter 198.168.0.2 in a designated folder here. 5 You can set to High Speed for each...
... is required. • Environment where no DHCP server exists. • Environment where a DHCP server, which clearly defines the IP address and MAC address allotted to VN-C655, exists. 30 2 Enter [V.Network Name], a name under which the camera is displayed. 1 Enter 198.168.0.2 in a designated folder here. 5 You can set to High Speed for each...
Instructions
Page 36
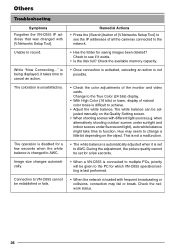
...be adjusted manually on the object. The coloration is changed with [V.Networks Setup Tool]. Change to AWC. Hue may fail or break. Unable to function. Check to see the IP addresses of all the cameras connected to VN-C655 cannot be set to achieve. • Adjust the white ...balance. During the adjustment, the picture quality cannot be established or fails. Check the network status. 36 Check the available memory capacity....
...be adjusted manually on the object. The coloration is changed with [V.Networks Setup Tool]. Change to AWC. Hue may fail or break. Unable to function. Check to see the IP addresses of all the cameras connected to VN-C655 cannot be set to achieve. • Adjust the white ...balance. During the adjustment, the picture quality cannot be established or fails. Check the network status. 36 Check the available memory capacity....

