
Printer Friendly Spec
Page 2
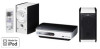
...; Headphone Out: Front Input • Connection for iPod: Front Input • USB Host: Front Input Plays: MP3 and WMA • USB Audio (PC LINK): Rear input Connection for iPod, USB host, USB Audio Connection, and Front Audio Input. Product Description MP3/WMA-Compatible Micro System featuring Connection for iPod: • Control Keys (Play, Pause, Stop) • Power Supply General: • Fluorescent Display • Display Dimmer • COMPU PLAY • Clock/3-Preset Timer (1 Timer) • Sleep Timer • Wake-up Volume Speakers: • Full-Range, Bass reflex •...
...; Headphone Out: Front Input • Connection for iPod: Front Input • USB Host: Front Input Plays: MP3 and WMA • USB Audio (PC LINK): Rear input Connection for iPod, USB host, USB Audio Connection, and Front Audio Input. Product Description MP3/WMA-Compatible Micro System featuring Connection for iPod: • Control Keys (Play, Pause, Stop) • Power Supply General: • Fluorescent Display • Display Dimmer • COMPU PLAY • Clock/3-Preset Timer (1 Timer) • Sleep Timer • Wake-up Volume Speakers: • Full-Range, Bass reflex •...
Instruction Manual
Page 2
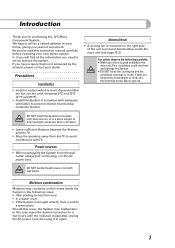
... the instructions, may be determined by JVC could void the user's authority to radio or television reception, which the receiver is no guarantee that to provide reasonable protection against harmful interference in a particular installation. If this equipment does cause harmful interference to operate the equipment. However, there is connected. CAUTION Changes or modifications not approved by turning the...
... the instructions, may be determined by JVC could void the user's authority to radio or television reception, which the receiver is no guarantee that to provide reasonable protection against harmful interference in a particular installation. If this equipment does cause harmful interference to operate the equipment. However, there is connected. CAUTION Changes or modifications not approved by turning the...
Instruction Manual
Page 3
... normal operation of Conformity Model Number: UX-EP25 Trade Name: JVC Responsible Party: JVC Americas Corp. Le ventilateur de refroidissement commence à tourner et à aspirer de l'air frais automatiquement quand le volume est augmenté au-dessus d'un certain niveau. Veillez à ce que sa ventilation correcte puisse se faire en le plaçant sur un support...
... normal operation of Conformity Model Number: UX-EP25 Trade Name: JVC Responsible Party: JVC Americas Corp. Le ventilateur de refroidissement commence à tourner et à aspirer de l'air frais automatiquement quand le volume est augmenté au-dessus d'un certain niveau. Veillez à ce que sa ventilation correcte puisse se faire en le plaçant sur un support...
Instruction Manual
Page 5
... USB mass storage class device 13 Playing Back from the PC...15 Playing Back from Other Equipment...16 Daily Operations- Sound & Other Adjustments 17 Adjusting the Volume ...17 Adjusting the Sound Remote ONLY ...17 Changing the Display Brightness - Random Play Remote ONLY 21 Playing Repeatedly - Playback 9 Listening to Read This Manual ...3 Getting Started ...4 Step 1: Unpack ...4 Step 2: Prepare the Remote Control ...4 Step 3: Hook Up...5 To assemble and connect the AM loop antenna 7 To connect the speaker cords...7 Before Operating...
... USB mass storage class device 13 Playing Back from the PC...15 Playing Back from Other Equipment...16 Daily Operations- Sound & Other Adjustments 17 Adjusting the Volume ...17 Adjusting the Sound Remote ONLY ...17 Changing the Display Brightness - Random Play Remote ONLY 21 Playing Repeatedly - Playback 9 Listening to Read This Manual ...3 Getting Started ...4 Step 1: Unpack ...4 Step 2: Prepare the Remote Control ...4 Step 3: Hook Up...5 To assemble and connect the AM loop antenna 7 To connect the speaker cords...7 Before Operating...
Instruction Manual
Page 6
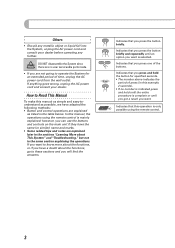
... Should this instruction manual carefully before operating your new stereo system. In this case, leave the System turned on the lenses inside the System. Moisture condensation Moisture may condense on for purchasing the JVC Micro Component System. Poor ventilation could overheat and damage the System. • DO NOT block the cooling fan and the ventilation openings or holes. DO NOT handle the AC power cord with...
... Should this instruction manual carefully before operating your new stereo system. In this case, leave the System turned on the lenses inside the System. Moisture condensation Moisture may condense on for purchasing the JVC Micro Component System. Poor ventilation could overheat and damage the System. • DO NOT block the cooling fan and the ventilation openings or holes. DO NOT handle the AC power cord with...
Instruction Manual
Page 7
... about This System" and "Troubleshooting," but not in the table below. How to operate the System for specified seconds. • The number above indicates the period of press (in this example, 2 seconds). • If no user serviceable parts inside. • If you are not going to Read This Manual To make this operation is only possible using the remote control is indicated...
... about This System" and "Troubleshooting," but not in the table below. How to operate the System for specified seconds. • The number above indicates the period of press (in this example, 2 seconds). • If no user serviceable parts inside. • If you are not going to Read This Manual To make this operation is only possible using the remote control is indicated...
Instruction Manual
Page 9
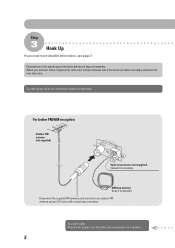
... Plug the AC power cord only after all components before connections. For better FM/AM reception Outdoor FM antenna (not supplied) Vynil-covered wire (not supplied) Extend it connected. Disconnect the supplied FM antenna, and connect to all connections are typical examples. Turn the power off to an outdoor FM antenna using a 75 Ω wire with coaxial type connector. Illustrations of the input/output terminals below are complete. 5 Step 3 Hook Up If you connect...
... Plug the AC power cord only after all components before connections. For better FM/AM reception Outdoor FM antenna (not supplied) Vynil-covered wire (not supplied) Extend it connected. Disconnect the supplied FM antenna, and connect to all connections are typical examples. Turn the power off to an outdoor FM antenna using a 75 Ω wire with coaxial type connector. Illustrations of the input/output terminals below are complete. 5 Step 3 Hook Up If you connect...
Instruction Manual
Page 13
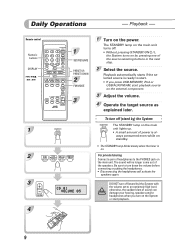
Remote control Numeric buttons DISPLAY 4,1,7, 33, ¢ 1 2 3 4 STANDBY/ON 1 SET/RESUME PRESET UP, PRESET DOWN 2 FM MODE 3 1 Turn on the external component. 3 Adjust the volume. 4 Operate the target source as explained later. Be sure to start. • If you turn off . • Without pressing STANDBY/ON , the System turns on by ) the System with the volume set to the PHONES jack on . Playback - Playback automatically starts if the selected source is on the main unit. To turn off (stand...
Remote control Numeric buttons DISPLAY 4,1,7, 33, ¢ 1 2 3 4 STANDBY/ON 1 SET/RESUME PRESET UP, PRESET DOWN 2 FM MODE 3 1 Turn on the external component. 3 Adjust the volume. 4 Operate the target source as explained later. Be sure to start. • If you turn off . • Without pressing STANDBY/ON , the System turns on by ) the System with the volume set to the PHONES jack on . Playback - Playback automatically starts if the selected source is on the main unit. To turn off (stand...
Instruction Manual
Page 14
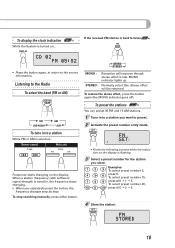
... display the clock indication Remote ONLY While the System is turned on the display. To restore the stereo effect, press the button again (the MONO indicator goes off). To preset the stations Remote ONLY You can preset 30 FM and 15 AM stations. 1 Tune in to the source information. To select preset number 15, press >=10 J 1 J 5. Remote control: 1 sec. To stop searching manually, press either button. Normally select this. If the received...
... display the clock indication Remote ONLY While the System is turned on the display. To restore the stereo effect, press the button again (the MONO indicator goes off). To preset the stations Remote ONLY You can preset 30 FM and 15 AM stations. 1 Tune in to the source information. To select preset number 15, press >=10 J 1 J 5. Remote control: 1 sec. To stop searching manually, press either button. Normally select this. If the received...

Instruction Manual
Page 15
... OPEN/CLOSE button. Remote control: Main unit: Playable media and files This system can set a disc You can playback following discs- FM USB AUDIO AM AUX 2 Select a preset number for DualDisc playback The Non-DVD side of media and files. regular CD and CD-R/CD-RW (recorded either in to a preset station Remote ONLY 1 Select a band (FM or AM). To release, press again. To tune in the audio CD, MP3, or WMA format). Playing...
... OPEN/CLOSE button. Remote control: Main unit: Playable media and files This system can set a disc You can playback following discs- FM USB AUDIO AM AUX 2 Select a preset number for DualDisc playback The Non-DVD side of media and files. regular CD and CD-R/CD-RW (recorded either in to a preset station Remote ONLY 1 Select a band (FM or AM). To release, press again. To tune in the audio CD, MP3, or WMA format). Playing...
Instruction Manual
Page 16
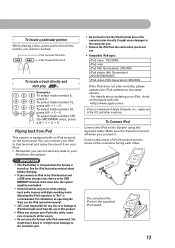
.... Make sure the System is recommended. See the iPod instruction manual about updating your iPod to the System using the supplied cable. and other . 2 1 You can connect your iPod to this system. ✎ IMPORTANT • The iPod battery is charged while the System is equipped with an iPod terminal on . To locate a track directly and start play correctly, please update your iPod from iPod This system is turned on the front panel. To locate a particular portion While playing a disc...
.... Make sure the System is recommended. See the iPod instruction manual about updating your iPod to the System using the supplied cable. and other . 2 1 You can connect your iPod to this system. ✎ IMPORTANT • The iPod battery is charged while the System is equipped with an iPod terminal on . To locate a track directly and start play correctly, please update your iPod from iPod This system is turned on the front panel. To locate a particular portion While playing a disc...
Instruction Manual
Page 17
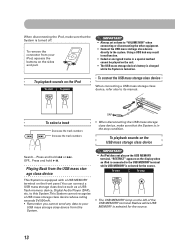
... played on the unit. • The USB mass storage device's battery is charged while the System is turned on the display when an iPod is connected to the system. You can connect a USB mass storage class device such as a USB flash memory device, Digital Audio Player (DAP), etc. "RESTRICT" appears on . To start : To pause: To connect the USB mass storage class device When connecting a USB mass storage class device, refer also to its manual...
... played on the unit. • The USB mass storage device's battery is charged while the System is turned on the display when an iPod is connected to the system. You can connect a USB mass storage class device such as a USB flash memory device, Digital Audio Player (DAP), etc. "RESTRICT" appears on . To start : To pause: To connect the USB mass storage class device When connecting a USB mass storage class device, refer also to its manual...
Instruction Manual
Page 19
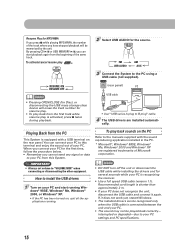
... you press 7 while playing MP3/WMA, the number of the track where you have stopped playback will erase the track number for resume play. • To play is activated, press 7 twice during playback. (rear panel) PC USB cable • Use "USB series A plug to B plug" cable. 4 The USB drivers are registered trademarks of Microsoft corporation. cally. How to the PC using a USB cable (not supplied). FM USB AUDIO AM AUX 3 Connect the System to install the USB drivers 1 Turn on the rear panel.
... you press 7 while playing MP3/WMA, the number of the track where you have stopped playback will erase the track number for resume play. • To play is activated, press 7 twice during playback. (rear panel) PC USB cable • Use "USB series A plug to B plug" cable. 4 The USB drivers are registered trademarks of Microsoft corporation. cally. How to the PC using a USB cable (not supplied). FM USB AUDIO AM AUX 3 Connect the System to install the USB drivers 1 Turn on the rear panel.

Instruction Manual
Page 20
Stereo mini plug cord (not supplied) AUX (front panel) Portable audio device, Game machine, etc. Suitable for the source. 16 Ordinary input level (factory setting). FM USB AUDIO AM AUX To adjust the sound input level from other equipment You can adjust the sound input level from Other Equipment To connect other equipment By using a stereo mini plug cord (not supplied), you can connect other equipment with high output level (such as a DVD player). If the audio output on the other equipment is too small or...
Stereo mini plug cord (not supplied) AUX (front panel) Portable audio device, Game machine, etc. Suitable for the source. 16 Ordinary input level (factory setting). FM USB AUDIO AM AUX To adjust the sound input level from other equipment You can adjust the sound input level from Other Equipment To connect other equipment By using a stereo mini plug cord (not supplied), you can connect other equipment with high output level (such as a DVD player). If the audio output on the other equipment is too small or...
Instruction Manual
Page 23
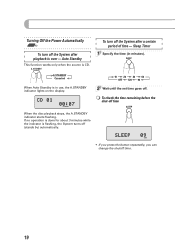
Auto Standby This function works only when the source is flashing, the System turns off (stands by) automatically. • If you press the button repeatedly, you can change the shutoff time. 19 Sleep Timer 1 Specify the time (in use, the A.STANDBY indicator lights on the display. 10 20 30 60 OFF 120 90 2 Wait until the set time goes off. To check the time remaining before the shut...
Auto Standby This function works only when the source is flashing, the System turns off (stands by) automatically. • If you press the button repeatedly, you can change the shutoff time. 19 Sleep Timer 1 Specify the time (in use, the A.STANDBY indicator lights on the display. 10 20 30 60 OFF 120 90 2 Wait until the set time goes off. To check the time remaining before the shut...
Instruction Manual
Page 27
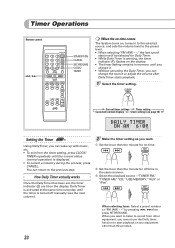
... adjust the volume after Daily Timer starts playback. 1 Select the timer setting. When selecting tuner: Select a preset number or "FM (AM) - -" by pressing 4 / ¢ then press SET/RESUME. Timer Operations Remote control 4 / ¢ STANDBY/ON CANCEL SET/RESUME CLOCK/ TIMER When the on-time comes The System turns on, tunes in to the selected source, and sets the volume level to the preset level. • When selecting "FM (AM) - -," the last tuned station will be selected for off manually...
... adjust the volume after Daily Timer starts playback. 1 Select the timer setting. When selecting tuner: Select a preset number or "FM (AM) - -" by pressing 4 / ¢ then press SET/RESUME. Timer Operations Remote control 4 / ¢ STANDBY/ON CANCEL SET/RESUME CLOCK/ TIMER When the on-time comes The System turns on, tunes in to the selected source, and sets the volume level to the preset level. • When selecting "FM (AM) - -," the last tuned station will be selected for off manually...

Instruction Manual
Page 29
... MP3/WMA playback... - Setting the Clock: • The clock blinks on the display. This System can recognize the total of 999 tracks and of the letter case-upper/lower). - Sound & Other Adjustments (see pages 17o 19) Adjusting the Volume: • Be sure to 22) Programming the Playing Order - Advanced Disc/USB mass storage class device (see pages 20 to turn down the volume before connecting or putting the...
... MP3/WMA playback... - Setting the Clock: • The clock blinks on the display. This System can recognize the total of 999 tracks and of the letter case-upper/lower). - Sound & Other Adjustments (see pages 17o 19) Adjusting the Volume: • Be sure to 22) Programming the Playing Order - Advanced Disc/USB mass storage class device (see pages 20 to turn down the volume before connecting or putting the...

Instruction Manual
Page 30
... antenna is too close . @The AC power cord is blocked. @Point it back in . Place the disc with a USB cable. Repeat the procedure again. Set the clock first, then the timer again. 26 To remove the speaker grilles Troubleshooting If you are having a problem with your System, check this list for a possible solution before you do not play . @The disc is scratched or dirty. Sound from PC connected...
... antenna is too close . @The AC power cord is blocked. @Point it back in . Place the disc with a USB cable. Repeat the procedure again. Set the clock first, then the timer again. 26 To remove the speaker grilles Troubleshooting If you are having a problem with your System, check this list for a possible solution before you do not play . @The disc is scratched or dirty. Sound from PC connected...
Instruction Manual
Page 31
... 125 mV/47 kΩ USB Audio ver. 1.1 USB Host ver. 1.1 Compatible device Mass Storage Class Compatible file system FAT16, FAT32 Bus power supply Max. 5V/500 mA Compatible iPod types See Page 12 Bus power supply Max. 5V/500 mA Speaker terminals 6 Ω - 16 Ω Phones 32 Ω - 1 kΩ 15 mW/ch output into 6Ω at the edge while pressing the center hole lightly. • Do not...
... 125 mV/47 kΩ USB Audio ver. 1.1 USB Host ver. 1.1 Compatible device Mass Storage Class Compatible file system FAT16, FAT32 Bus power supply Max. 5V/500 mA Compatible iPod types See Page 12 Bus power supply Max. 5V/500 mA Speaker terminals 6 Ω - 16 Ω Phones 32 Ω - 1 kΩ 15 mW/ch output into 6Ω at the edge while pressing the center hole lightly. • Do not...
Instruction Manual
Page 34
... JVC authorized service center. Operational adjustments covered in -home service. Batteries (except that occurs in basis. Loss of data resultant from the date of the cabinet. and Serial No. Retain this product and all parts thereof, except as listed above. WHAT WE WILL DO: If this product is located either repair the TV there or remove and return it if it carefully, preferably in -home service, the service...
... JVC authorized service center. Operational adjustments covered in -home service. Batteries (except that occurs in basis. Loss of data resultant from the date of the cabinet. and Serial No. Retain this product and all parts thereof, except as listed above. WHAT WE WILL DO: If this product is located either repair the TV there or remove and return it if it carefully, preferably in -home service, the service...


