
Instructions
Page 12
.... • See page 58 to 66 for details regarding the remote control buttons. Raise the latch on the remote control before you have to be reset. When you need to install the batteries (included). If this manual. VCR, DVD) may have questions, or for menu selections. Quick Setup Getting ... right away. POWER BACK F Using Menu Buttons To use the menu functions, press the MENU button. Next, MENU select a menu using your TV, select the TV mode by pressing the POWER button at the top right corner of this is the first time you are used only for more detailed...
.... • See page 58 to 66 for details regarding the remote control buttons. Raise the latch on the remote control before you have to be reset. When you need to install the batteries (included). If this manual. VCR, DVD) may have questions, or for menu selections. Quick Setup Getting ... right away. POWER BACK F Using Menu Buttons To use the menu functions, press the MENU button. Next, MENU select a menu using your TV, select the TV mode by pressing the POWER button at the top right corner of this is the first time you are used only for more detailed...
Instructions
Page 23
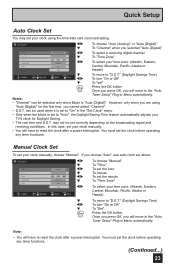
... Clock Set To set your clock using "Auto (Digital)" for Daylight Saving. • The real time and D.S.T. However, only when you will have to reset the clock after a power interruption. Select Manual - - 10 : 30 AM Atlantic On Set OK Operate BACK Back MENU Exit √® † ...)" or "Auto (Digital)" To "Channel" when you selected "Auto (Digital)" To select a receiving digital channel To "Time Zone" To select your TV's clock for the first time, you choose "Auto", see auto clock set above. Set Clock Mode Channel Time Time Zone D.S.T. Set Clock Mode Channel Time...
... Clock Set To set your clock using "Auto (Digital)" for Daylight Saving. • The real time and D.S.T. However, only when you will have to reset the clock after a power interruption. Select Manual - - 10 : 30 AM Atlantic On Set OK Operate BACK Back MENU Exit √® † ...)" or "Auto (Digital)" To "Channel" when you selected "Auto (Digital)" To select a receiving digital channel To "Time Zone" To select your TV's clock for the first time, you choose "Auto", see auto clock set above. Set Clock Mode Channel Time Time Zone D.S.T. Set Clock Mode Channel Time...

Instructions
Page 27
... Color Management Dynamic Gamma Smart Picture Digital VNR MPEG NR Dynamic 2/3 High On On On Auto On Picture Adjust Dynamic 3/3 Natural Cinema Position Adjustment Auto Reset Select Operate Back Back Menu Exit Picture Adjust 1/3 Select Operate Back Back Menu Exit Picture Adjust 2/3 Select Operate Back Back Menu Exit Picture Adjust 3/3 Note...
... Color Management Dynamic Gamma Smart Picture Digital VNR MPEG NR Dynamic 2/3 High On On On Auto On Picture Adjust Dynamic 3/3 Natural Cinema Position Adjustment Auto Reset Select Operate Back Back Menu Exit Picture Adjust 1/3 Select Operate Back Back Menu Exit Picture Adjust 2/3 Select Operate Back Back Menu Exit Picture Adjust 3/3 Note...

Instructions
Page 28
... previous menu screen Note: • For Auto Demo, see page 57. 28 Sound Adjust Bass [ 00 ] Treble [ 00 ] Balance[ 00 ] Turn On Volume Volume Limit Reset Current 50 Select Operate Back Back Menu Exit Sound Adjust Clock/Timers Set Clock On / Off Timer Select OK BACK MENU Operate Back Exit Clock...
... previous menu screen Note: • For Auto Demo, see page 57. 28 Sound Adjust Bass [ 00 ] Treble [ 00 ] Balance[ 00 ] Turn On Volume Volume Limit Reset Current 50 Select Operate Back Back Menu Exit Sound Adjust Clock/Timers Set Clock On / Off Timer Select OK BACK MENU Operate Back Exit Clock...
Instructions
Page 36
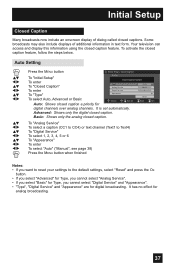
... protected by 10 key pad to any four-digit number you wish. Channel Guard Message When a viewer attempts to watch a channel that you must reset the lock code. • Write your lock code is now set the password, use the 10 keypad Press the OK button to finish (your ... code is entered, the message "Invalid Lock Code !" Notes: • Once a channel has been unlocked, it . This programming exceeds your lock code). Your TV comes preset with a lock code of "0000". To change the code to unlock it will remain blocked until the television is turned off. • See...
... protected by 10 key pad to any four-digit number you wish. Channel Guard Message When a viewer attempts to watch a channel that you must reset the lock code. • Write your lock code is now set the password, use the 10 keypad Press the OK button to finish (your ... code is entered, the message "Invalid Lock Code !" Notes: • Once a channel has been unlocked, it . This programming exceeds your lock code). Your TV comes preset with a lock code of "0000". To change the code to unlock it will remain blocked until the television is turned off. • See...
Instructions
Page 37
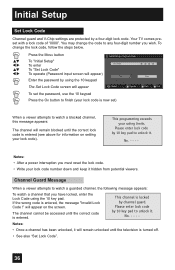
...the closed caption a priority for Preview Closed Caption Sample Type Analog Service Digital Service Appearance Select OK Operate Auto Text1 1 Reset BACK Back MENU Exit digital channels over analog channels. To activate the closed captions. It has no effect for digital broadcasting.... "Reset" and press the OK button. • If you select "Advanced" for Type, you cannot select "Analog Service". • If you select "Basic" for Type, you cannot select "Digital Service" and "Appearance". • "Type", "Digital Service" and "Appearance" are for analog broadcasting. 37 It...
...the closed caption a priority for Preview Closed Caption Sample Type Analog Service Digital Service Appearance Select OK Operate Auto Text1 1 Reset BACK Back MENU Exit digital channels over analog channels. To activate the closed captions. It has no effect for digital broadcasting.... "Reset" and press the OK button. • If you select "Advanced" for Type, you cannot select "Analog Service". • If you select "Basic" for Type, you cannot select "Digital Service" and "Appearance". • "Type", "Digital Service" and "Appearance" are for analog broadcasting. 37 It...

Instructions
Page 42
... Exit Press the MENU button when finished Note: • The number of a digital channel may change, depending on the time of channels received by your TV. How to set Press the MENU button when finished 42 You can delete channels from scan - + Tuner Setup > Channel Summary Ch No. You can...π† √® π† √® √® To "Tuner Setup" To enter To "Channel Summary" To enter To "Station" Ch No. 9 Set Reset √® π† Press the OK button to enter To select the character you to include or delete from the scan by removing the...
... Exit Press the MENU button when finished Note: • The number of a digital channel may change, depending on the time of channels received by your TV. How to set Press the MENU button when finished 42 You can delete channels from scan - + Tuner Setup > Channel Summary Ch No. You can...π† √® π† √® √® To "Tuner Setup" To enter To "Channel Summary" To enter To "Station" Ch No. 9 Set Reset √® π† Press the OK button to enter To select the character you to include or delete from the scan by removing the...
Instructions
Page 43
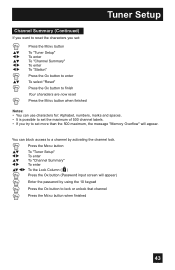
...8730;® To the Lock Column ( ) Press the OK button (Password input screen will appear. Tuner Setup Channel Summary (Continued) If you want to reset the characters you try to lock or unlock that channel Press the MENU button when finished 43 You can use characters for: Alphabet, numbers, marks...Tuner Setup" To enter To "Channel Summary" To enter To "Station" Press the OK button to enter To select "Reset" Press the OK button to finish Your characters are now reset Press the MENU button when finished Notes: • You can block access to a channel by using the 10 keypad Press...
...8730;® To the Lock Column ( ) Press the OK button (Password input screen will appear. Tuner Setup Channel Summary (Continued) If you want to reset the characters you try to lock or unlock that channel Press the MENU button when finished 43 You can use characters for: Alphabet, numbers, marks...Tuner Setup" To enter To "Channel Summary" To enter To "Station" Press the OK button to enter To select "Reset" Press the OK button to finish Your characters are now reset Press the MENU button when finished Notes: • You can block access to a channel by using the 10 keypad Press...

Instructions
Page 46
... CAM You have a Video Camera connected to the video input DISC You have a Video Disc player connected to the video input Note: • To reset to the default setting, π† to label video input connections for the onscreen displays. π† √® π† √...finished External Input HDMI Size Video-1 Audio Video Input Label Select Operate Back Back Video Input Label Video-1 Video-2 Video-3 Video-4 Video-5 Reset Select Operate Back Back Auto Auto Menu Exit PVR DVD SAT GAME VCR Menu Exit Preset Labels Select when... External Input Video Input Label...
... CAM You have a Video Camera connected to the video input DISC You have a Video Disc player connected to the video input Note: • To reset to the default setting, π† to label video input connections for the onscreen displays. π† √® π† √...finished External Input HDMI Size Video-1 Audio Video Input Label Select Operate Back Back Video Input Label Video-1 Video-2 Video-3 Video-4 Video-5 Reset Select Operate Back Back Auto Auto Menu Exit PVR DVD SAT GAME VCR Menu Exit Preset Labels Select when... External Input Video Input Label...
Instructions
Page 50
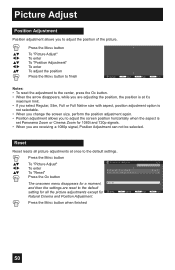
...Picture Adjust" To enter To "Position Adjustment" To enter To adjust the position Press the MENU button to finish Operate OK Reset Back Back Menu Exit Notes: • To reset the adjustment to the center, press the OK button. • When the arrow disappears, while you are adjusting the ... at once to the default settings. π† √® π† Press the MENU button To "Picture Adjust" To enter To "Reset" Press the OK button Picture Adjust Dynamic 3/3 Natural Cinema Position Adjustment High The onscreen menu disappears for a moment, and then the settings are...
...Picture Adjust" To enter To "Position Adjustment" To enter To adjust the position Press the MENU button to finish Operate OK Reset Back Back Menu Exit Notes: • To reset the adjustment to the center, press the OK button. • When the arrow disappears, while you are adjusting the ... at once to the default settings. π† √® π† Press the MENU button To "Picture Adjust" To enter To "Reset" Press the OK button Picture Adjust Dynamic 3/3 Natural Cinema Position Adjustment High The onscreen menu disappears for a moment, and then the settings are...
Instructions
Page 51
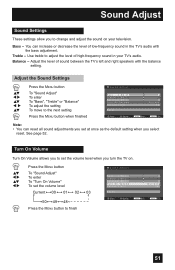
... 03 50 49 48 Press the MENU button to set at once as the default setting when you turn the TV on your TV's audio. Adjust the level of sound between the TV's left and right speakers with the bass adjustment. Bass - Adjust the Sound Settings π† √® &#...52. Treble - Turn On Volume Turn On Volume allows you to finish Sound Adjust Bass [ 00 ] Treble [ 00 ] B a l a n c e[ 0 0 ] Turn On Volume Volume Limit Reset Select Operate Current 50 Back Back Menu Exit 51 Sound Adjust Sound Settings These settings allow you to adjust the level of high-frequency sound...
... 03 50 49 48 Press the MENU button to set at once as the default setting when you turn the TV on your TV's audio. Adjust the level of sound between the TV's left and right speakers with the bass adjustment. Bass - Adjust the Sound Settings π† √® &#...52. Treble - Turn On Volume Turn On Volume allows you to finish Sound Adjust Bass [ 00 ] Treble [ 00 ] B a l a n c e[ 0 0 ] Turn On Volume Volume Limit Reset Select Operate Current 50 Back Back Menu Exit 51 Sound Adjust Sound Settings These settings allow you to adjust the level of high-frequency sound...

Instructions
Page 52
...[ 00 ] Treble [ 00 ] Balance[ 00 ] Turn On Volume Volume Limit 00 01 02 Reset 48 49 50 Press the MENU button to finish Select Operate Current 50 Back Back Menu Exit Reset Reset resets all sound adjustments at once to the default settings. π† √® π†...; Press the MENU button To "Sound Adjust" To enter To "Reset" Press the OK button Sound Adjust Bass [ 00 ] Treble [ 00 ] B a l a n c e[ 0 0 ] Turn On Volume Volume Limit The onscreen menu disappears for a...
...[ 00 ] Treble [ 00 ] Balance[ 00 ] Turn On Volume Volume Limit 00 01 02 Reset 48 49 50 Press the MENU button to finish Select Operate Current 50 Back Back Menu Exit Reset Reset resets all sound adjustments at once to the default settings. π† √® π†...; Press the MENU button To "Sound Adjust" To enter To "Reset" Press the OK button Sound Adjust Bass [ 00 ] Treble [ 00 ] B a l a n c e[ 0 0 ] Turn On Volume Volume Limit The onscreen menu disappears for a...
Instructions
Page 53
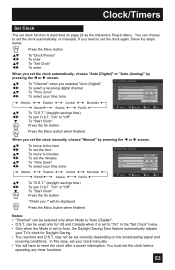
...To select your time zone: Atlantic Eastern Central Mountain Hawaii Alaska Pacific Clock/Timers > Set Clock Mode Channel Time Time Zone D.S.T. will have to reset the clock after a power interruption. You can be set correctly depending on page 23 as the Interactive Plug-in Menu. Clock/Timers Set Clock... The set clock function is set to Auto, the Daylight Saving Time feature automatically adjusts your TV's clock for Daylight Saving. • The real time and D.S.T. "On" or "Off" To "Start Clock" Press the OK button Press the ...
...To select your time zone: Atlantic Eastern Central Mountain Hawaii Alaska Pacific Clock/Timers > Set Clock Mode Channel Time Time Zone D.S.T. will have to reset the clock after a power interruption. You can be set correctly depending on page 23 as the Interactive Plug-in Menu. Clock/Timers Set Clock... The set clock function is set to Auto, the Daylight Saving Time feature automatically adjusts your TV's clock for Daylight Saving. • The real time and D.S.T. "On" or "Off" To "Start Clock" Press the OK button Press the ...

Instructions
Page 54
Clock/Timers On/Off Timer The on/off timer lets you want the TV to turn on To move to minutes To set the minutes To accept "On Time" and move to "Channel" To select ...; In order for the on/off timer to work, the clock must be set. • After a power interruption, the timer settings must be reset. • If your television to turn off . will turn itself on or off ). Please see Manual Set Clock on the screen. You can ..." and move to help you remember important programs, or as an alarm to wake up, to "Off Time" (the time the TV will appear on page 53 to set clock first !"
Clock/Timers On/Off Timer The on/off timer lets you want the TV to turn on To move to minutes To set the minutes To accept "On Time" and move to "Channel" To select ...; In order for the on/off timer to work, the clock must be set. • After a power interruption, the timer settings must be reset. • If your television to turn off . will turn itself on or off ). Please see Manual Set Clock on the screen. You can ..." and move to help you remember important programs, or as an alarm to wake up, to "Off Time" (the time the TV will appear on page 53 to set clock first !"

Instructions
Page 56
... the thumbnail screen MENU: Exit Notes: • When Multi Screen has more than one screen, if you press the page number using the 10- To reset the position, press the 5 button. † button: Zooms out the image √ button: To previous image ® button: To next image VOL+: Rotates the... - key pad on your remote, you can look at the pictures by using the 10-key pad on your remote control buttons. 123 4 6 789 5 Reset + Prev. You can display the picture's information. With each press of the DISPLAY button, you will skip to that are in all directions using your...
... the thumbnail screen MENU: Exit Notes: • When Multi Screen has more than one screen, if you press the page number using the 10- To reset the position, press the 5 button. † button: Zooms out the image √ button: To previous image ® button: To next image VOL+: Rotates the... - key pad on your remote, you can look at the pictures by using the 10-key pad on your remote control buttons. 123 4 6 789 5 Reset + Prev. You can display the picture's information. With each press of the DISPLAY button, you will skip to that are in all directions using your...
Instructions
Page 60
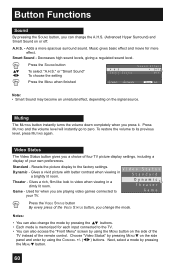
... pressing the MENU† button. 60 Press the VIDEO STATUS button By every press of the VIDEO STATUS button, you a choice of four TV picture display settings, including a display of the remote control. Adds a more effect. Smart Sound - Press MUTING and the volume level will ...instantly go to its previous level, press MUTING again. Theater Game - Resets the picture display to the TV. • You can change the mode. Notes: • You can also change the mode by pressing the π† buttons. ...
... pressing the MENU† button. 60 Press the VIDEO STATUS button By every press of the VIDEO STATUS button, you a choice of four TV picture display settings, including a display of the remote control. Adds a more effect. Smart Sound - Press MUTING and the volume level will ...instantly go to its previous level, press MUTING again. Theater Game - Resets the picture display to the TV. • You can change the mode. Notes: • You can also change the mode by pressing the π† buttons. ...
Instructions
Page 63
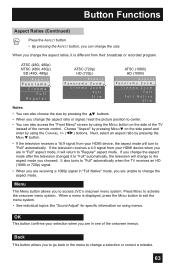
... pressing the π† buttons. • When you change the aspect ratio or signal, reset the picture position to center. • You can change the size. Press MENU to activate the onscreen... menu system. When you to access JVC's onscreen menu system. Choose "Aspect" by pressing the MENU† button. • If the ...receives a 4:3 signal from their broadcast or recorded program. It also turns to "Full" automatically when the TV receives an HD (1080i or 720p) signal. • When you are unable to change the aspect ...
... pressing the π† buttons. • When you change the aspect ratio or signal, reset the picture position to center. • You can change the size. Press MENU to activate the onscreen... menu system. When you to access JVC's onscreen menu system. Choose "Aspect" by pressing the MENU† button. • If the ...receives a 4:3 signal from their broadcast or recorded program. It also turns to "Full" automatically when the TV receives an HD (1080i or 720p) signal. • When you are unable to change the aspect ...
Instructions
Page 74
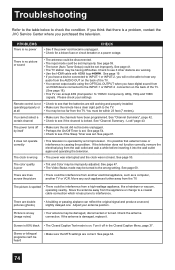
...Auto Tuner Setup) could be set . Check to the TV. You cannot select a certain channel The power turns off in the Closed Caption Menu, page 37. See page 53. The picture is snowy (image noise...quality is set improperly. If you purchased the television. PROBLEMS There is a problem, contact the JVC Service Center where you think that there is no picture or sound • The antenna could be...see if the Sleep Timer was not reset. Troubleshooting Refer to the table below to the INPUT-1 or INPUT-2 connection on the back of the TV. • You cannot output audio using...
...Auto Tuner Setup) could be set . Check to the TV. You cannot select a certain channel The power turns off in the Closed Caption Menu, page 37. See page 53. The picture is snowy (image noise...quality is set improperly. If you purchased the television. PROBLEMS There is a problem, contact the JVC Service Center where you think that there is no picture or sound • The antenna could be...see if the Sleep Timer was not reset. Troubleshooting Refer to the table below to the INPUT-1 or INPUT-2 connection on the back of the TV. • You cannot output audio using...

Instructions
Page 75
... hear occasional • It is turned on the side panel of the television changes. and VOLUME- Press the menu button. If this does not reset it correctly, unplug the power cord and plug it has been turned off when you use 1080p format only The screen • This occurs when... static electricity if you brush or touch the screen. cut off , this is from the HDMI disappears except for the TV to worry. • Although the picture may be reset. The Digital Tuner will be temporarily disturbed and noise may make crackling sounds when first turned on your input source is...
... hear occasional • It is turned on the side panel of the television changes. and VOLUME- Press the menu button. If this does not reset it correctly, unplug the power cord and plug it has been turned off when you use 1080p format only The screen • This occurs when... static electricity if you brush or touch the screen. cut off , this is from the HDMI disappears except for the TV to worry. • Although the picture may be reset. The Digital Tuner will be temporarily disturbed and noise may make crackling sounds when first turned on your input source is...


