Instructions
Page 2
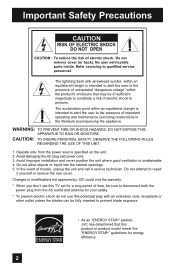
...receptacle or other outlet unless the blades can be fully inserted to prevent blade exposure. • As an "ENERGY STAR®" partner, JVC has determined that may be sure to constitute a risk of important operating and maintenance (servicing) instructions in the literature accompanying the appliance. Avoid... both the power plug from the power source specified on the unit. 2. Changes or modifications not approved by JVC could void the warranty. * When you don't use this TV set for energy efficiency. 2 Refer servicing to repair it yourself or remove the rear cover. WARNING: TO PREVENT...
...receptacle or other outlet unless the blades can be fully inserted to prevent blade exposure. • As an "ENERGY STAR®" partner, JVC has determined that may be sure to constitute a risk of important operating and maintenance (servicing) instructions in the literature accompanying the appliance. Avoid... both the power plug from the power source specified on the unit. 2. Changes or modifications not approved by JVC could void the warranty. * When you don't use this TV set for energy efficiency. 2 Refer servicing to repair it yourself or remove the rear cover. WARNING: TO PREVENT...

Instructions
Page 4
...POWER 17) Cautions for inserting and removing the power plug. Keep to allow satisfactory cooling. 18) Make enough room for installation - Install the TV in any way, such as power-supply cord or plug is damaged, liquid has been spilled or objects have fallen into the apparatus, the apparatus...Servicing is required when the apparatus has been damaged in a corner on standby even when all servicing to qualified service personnel. 13) Unplug this TV, distance recommendations must be maintained between the set and the wall, as well as inside a tightly enclosed area or piece of furniture.
...POWER 17) Cautions for inserting and removing the power plug. Keep to allow satisfactory cooling. 18) Make enough room for installation - Install the TV in any way, such as power-supply cord or plug is damaged, liquid has been spilled or objects have fallen into the apparatus, the apparatus...Servicing is required when the apparatus has been damaged in a corner on standby even when all servicing to qualified service personnel. 13) Unplug this TV, distance recommendations must be maintained between the set and the wall, as well as inside a tightly enclosed area or piece of furniture.
Instructions
Page 6
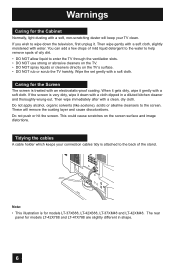
...LT-37X688, LT-42X688, LT-37XM48 and LT-42XM48. You can add a few drops of mild liquid detergent to the water to enter the TV through the ventilation slots. • DO NOT use strong or abrasive cleaners on the TV. • DO NOT spray liquids or cleaners directly on the screen surface and image distortions. Wipe the set... gently with a clean, dry cloth. Then wipe immediately after with a soft cloth. Tidying the cables A cable holder which keeps your TV clean. Then wipe gently with a soft cloth, slightly moistened...
...LT-37X688, LT-42X688, LT-37XM48 and LT-42XM48. You can add a few drops of mild liquid detergent to the water to enter the TV through the ventilation slots. • DO NOT use strong or abrasive cleaners on the TV. • DO NOT spray liquids or cleaners directly on the screen surface and image distortions. Wipe the set... gently with a clean, dry cloth. Then wipe immediately after with a soft cloth. Tidying the cables A cable holder which keeps your TV clean. Then wipe gently with a soft cloth, slightly moistened...
Instructions
Page 9
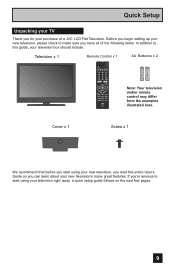
... 0 TV - Before you begin setting up your new television, please check to make sure you for your purchase of the following items. In addition to start using your television right away, a quick setup guide follows on the next few pages. 9 Quick Setup Unpacking your TV Thank you have all of a JVC LCD Flat ...Television. VOL + MUTING OK AVORITE DVR STATUS SOUND VIDEO ASPECT GUIDE SUB CH TV/VCR C.C.
... 0 TV - Before you begin setting up your new television, please check to make sure you for your purchase of the following items. In addition to start using your television right away, a quick setup guide follows on the next few pages. 9 Quick Setup Unpacking your TV Thank you have all of a JVC LCD Flat ...Television. VOL + MUTING OK AVORITE DVR STATUS SOUND VIDEO ASPECT GUIDE SUB CH TV/VCR C.C.
Instructions
Page 10
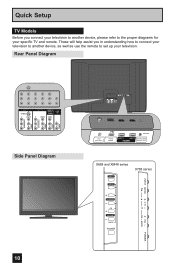
... series MENU INPUT MENU C H CHANNEL OK VOLUME BACK POWER VOL OK BACK POWER Quick Setup TV Models Before you in understanding how to connect your television to another device, please refer to set up your specific TV and remote. These will help assist you connect your television to another device, as well as...
... series MENU INPUT MENU C H CHANNEL OK VOLUME BACK POWER VOL OK BACK POWER Quick Setup TV Models Before you in understanding how to connect your television to another device, please refer to set up your specific TV and remote. These will help assist you connect your television to another device, as well as...
Instructions
Page 14
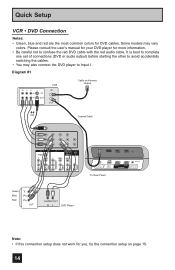
Some models may also connect the DVD player to Input 1. It is best to complete one set of connections (DVD or audio output) before starting the other to confuse the red DVD cable with the red audio cable. Please consult the user's ... PB L PR R INPUT 4 INPUT 5 / INPUT 1 AUDIO AUDIO OUT Y VIDEO VIDEO PB L L L PR R R R 75 Ω (VHF/UHF) PHOTO VIEWER INPUT 1 SERVICE INPUT 2 DIGITAL AUDIO OPTICAL OUT TV Rear Panel Green Blue Red Y PB PR OUT AUDIO OUT R L DVD Player Note: • If this connection setup does not work for DVD cables.
Some models may also connect the DVD player to Input 1. It is best to complete one set of connections (DVD or audio output) before starting the other to confuse the red DVD cable with the red audio cable. Please consult the user's ... PB L PR R INPUT 4 INPUT 5 / INPUT 1 AUDIO AUDIO OUT Y VIDEO VIDEO PB L L L PR R R R 75 Ω (VHF/UHF) PHOTO VIEWER INPUT 1 SERVICE INPUT 2 DIGITAL AUDIO OPTICAL OUT TV Rear Panel Green Blue Red Y PB PR OUT AUDIO OUT R L DVD Player Note: • If this connection setup does not work for DVD cables.
Instructions
Page 18
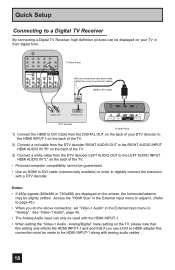
...the connections have been made to the HDMI INPUT-1 along with analog audio cables. 18 Analog/Digital" menu setting on your DTV decoder to the HDMI INPUT-1 on the back of the TV. 2) Connect a red cable from the DTV decoder RIGHT AUDIO OUT to the RIGHT AUDIO INPUT HDMI ..."L" on the screen, the horizontal balance may be slightly shifted. Quick Setup Connecting to a Digital TV Receiver By connecting a Digital TV Receiver, high definition pictures can only be used with the HDMI INPUT-1. • When setting the "Video-1 Audio - HDMI to DVI Cable LR AUDIO OUT DIGITAL OUT 75 Ω (...
...the connections have been made to the HDMI INPUT-1 along with analog audio cables. 18 Analog/Digital" menu setting on your DTV decoder to the HDMI INPUT-1 on the back of the TV. 2) Connect a red cable from the DTV decoder RIGHT AUDIO OUT to the RIGHT AUDIO INPUT HDMI ..."L" on the screen, the horizontal balance may be slightly shifted. Quick Setup Connecting to a Digital TV Receiver By connecting a Digital TV Receiver, high definition pictures can only be used with the HDMI INPUT-1. • When setting the "Video-1 Audio - HDMI to DVI Cable LR AUDIO OUT DIGITAL OUT 75 Ω (...
Instructions
Page 19
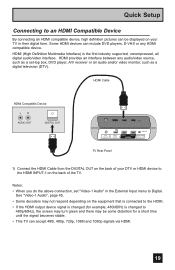
... (VHF/UHF) PHOTO VIEWER INPUT 1 SERVICE INPUT 2 DIGITAL AUDIO OPTICAL OUT TV Rear Panel 1) Connect the HDMI Cable from the DIGITAL OUT on the back of your TV in their digital form. Notes: • When you do the above connection, set -top box, DVD player, A/V receiver or an audio and/or video monitor..., such as a set "Video-1 Audio" in the External Input menu to 480p/60Hz), the ...
... (VHF/UHF) PHOTO VIEWER INPUT 1 SERVICE INPUT 2 DIGITAL AUDIO OPTICAL OUT TV Rear Panel 1) Connect the HDMI Cable from the DIGITAL OUT on the back of your TV in their digital form. Notes: • When you do the above connection, set -top box, DVD player, A/V receiver or an audio and/or video monitor..., such as a set "Video-1 Audio" in the External Input menu to 480p/60Hz), the ...
Instructions
Page 22
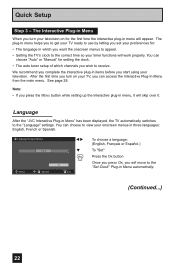
...you turn your timer functions will move to receive. Language After the "JVC Interactive Plug-in items before you start using your TV, you can access the Interactive Plug-In Menu from the main menu. After the first time you set your onscreen menus in menu, it will appear. You can choose ...to view your preferences for the first time the interactive plug-in Menu When you want the onscreen menus to appear. • Setting the TV's clock to the correct time so your television on your television. See page 28. The Interactive Plug-in menu will skip over it. You...
...you turn your timer functions will move to receive. Language After the "JVC Interactive Plug-in items before you start using your TV, you can access the Interactive Plug-In Menu from the main menu. After the first time you set your onscreen menus in menu, it will appear. You can choose ...to view your preferences for the first time the interactive plug-in Menu When you want the onscreen menus to appear. • Setting the TV's clock to the correct time so your television on your television. See page 28. The Interactive Plug-in menu will skip over it. You...
Instructions
Page 23
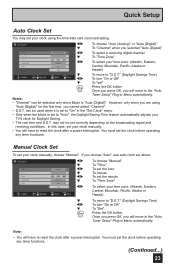
... Savings Time) To turn "On or Off" † To "set" Press the OK button Once you press OK, you cannot select "Channel". • D.S.T. You must set to "Auto", the Daylight Saving Time feature automatically adjusts your TV's clock for the first time, you will have to reset the ...clock after a power interruption. Set Clock Mode Channel Time Time Zone D.S.T. Quick Setup Auto Clock Set You may not be set your clock manually. • You will move ...
... Savings Time) To turn "On or Off" † To "set" Press the OK button Once you press OK, you cannot select "Channel". • D.S.T. You must set to "Auto", the Daylight Saving Time feature automatically adjusts your TV's clock for the first time, you will have to reset the ...clock after a power interruption. Set Clock Mode Channel Time Time Zone D.S.T. Quick Setup Auto Clock Set You may not be set your clock manually. • You will move ...

Instructions
Page 27
... menu you selected will appear Press the BACK button to return to the previous menu screen Initial Setup 1/2 Noise Muting Language Front Panel Lock V-Chip Set Lock Code Closed Caption On English Off Select Operate BACK Back MENU Exit Initial Setup 1/2 Initial Setup Auto Shut Off Software Version Power Indicator Optical...
... menu you selected will appear Press the BACK button to return to the previous menu screen Initial Setup 1/2 Noise Muting Language Front Panel Lock V-Chip Set Lock Code Closed Caption On English Off Select Operate BACK Back MENU Exit Initial Setup 1/2 Initial Setup Auto Shut Off Software Version Power Indicator Optical...

Instructions
Page 28
... On Volume Volume Limit Reset Current 50 Select Operate Back Back Menu Exit Sound Adjust Clock/Timers Set Clock On / Off Timer Select OK BACK MENU Operate Back Exit Clock/Timers Language/Langue/Idioma English Set Select OK BACK MENU Operate Back Exit Interactive Plug-in Menu Photo Viewer Device Multi-Screen...
... On Volume Volume Limit Reset Current 50 Select Operate Back Back Menu Exit Sound Adjust Clock/Timers Set Clock On / Off Timer Select OK BACK MENU Operate Back Exit Clock/Timers Language/Langue/Idioma English Set Select OK BACK MENU Operate Back Exit Interactive Plug-in Menu Photo Viewer Device Multi-Screen...
Instructions
Page 29
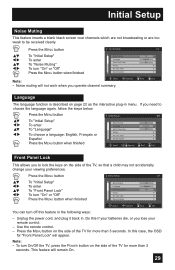
... Exit Language The language function is described on page 22 as the interactive plug-in menu. Press the MENU button on the side of the TV for more than 3 seconds. This feature will not work when you to be received clearly. Note: • To turn "On" or "Off" ...Press the MENU button when finished Noise Muting Language Front Panel Lock V-Chip Set Lock Code Closed Caption Note: Select Operate • Noise muting will remain On. 29 Press the MENU button Initial Setup π† √® ...
... Exit Language The language function is described on page 22 as the interactive plug-in menu. Press the MENU button on the side of the TV for more than 3 seconds. This feature will not work when you to be received clearly. Note: • To turn "On" or "Off" ...Press the MENU button when finished Noise Muting Language Front Panel Lock V-Chip Set Lock Code Closed Caption Note: Select Operate • Noise muting will remain On. 29 Press the MENU button Initial Setup π† √® ...
Instructions
Page 30
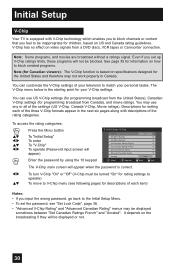
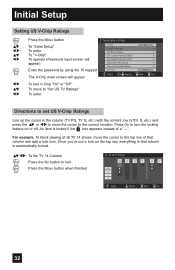
... "V-Chip" To operate (Password input screen will appear) Enter the password by using the 10 keypad Initial Setup > V-Chip V-Chip On Set US TV Ratings Set Movie Ratings Set Canadian Ratings English Set Canadian Ratings French Advanced V-Chip Rating Advanced Canadian Rating Unrated Select Operate View BACK Back MENU Exit √® π† The...
... "V-Chip" To operate (Password input screen will appear) Enter the password by using the 10 keypad Initial Setup > V-Chip V-Chip On Set US TV Ratings Set Movie Ratings Set Canadian Ratings English Set Canadian Ratings French Advanced V-Chip Rating Advanced Canadian Rating Unrated Select Operate View BACK Back MENU Exit √® π† The...
Instructions
Page 32
...;† or √® to move the cursor to turn V-Chip "On" or "Off" To move to "Set US TV Ratings" To enter Initial Setup > V-Chip V-Chip Set US TV Ratings Set Movie Ratings Set Canadian Ratings English Set Canadian Ratings French Advanced V-Chip Rating Advanced Canadian Rating Unrated Select OK Operate On View BACK MENU Back...
...;† or √® to move the cursor to turn V-Chip "On" or "Off" To move to "Set US TV Ratings" To enter Initial Setup > V-Chip V-Chip Set US TV Ratings Set Movie Ratings Set Canadian Ratings English Set Canadian Ratings French Advanced V-Chip Rating Advanced Canadian Rating Unrated Select OK Operate On View BACK MENU Back...
Instructions
Page 33
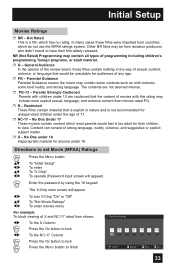
... Operate BACK Back MENU Exit 33 No One Under 17 These movies contain content which do not use the MPAA ratings system. Directions to finish Set Movie Ratings X NC 17 R PG 13 PG G NR - - - - - - - General Audience In the opinion of the review board, these films were imported from ...the 10 keypad √® π† √® The V-Chip main screen will appear To turn V-Chip "On" or "Off" To "Set Movie Ratings" To enter movies menu For example: To block viewing of any age. ❒ PG - Restricted These films contain material that would feel is...
... Operate BACK Back MENU Exit 33 No One Under 17 These movies contain content which do not use the MPAA ratings system. Directions to finish Set Movie Ratings X NC 17 R PG 13 PG G NR - - - - - - - General Audience In the opinion of the review board, these films were imported from ...the 10 keypad √® π† √® The V-Chip main screen will appear To turn V-Chip "On" or "Off" To "Set Movie Ratings" To enter movies menu For example: To block viewing of any age. ❒ PG - Restricted These films contain material that would feel is...
Instructions
Page 34
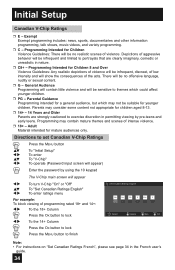
... 8-13. ❒ 14+ - 14 Years and Older Parents are clearly imaginary, comedic or unrealistic in nature. ❒ C8+ - Directions to set Canadian V-Chip Ratings π† √® π† √® Press the MENU button To "Initial Setup" To enter To "V-...portrayals that are strongly cautioned to themes which may contain mature themes and scenes of low intensity and will be infrequent and limited to finish Set Canadian Ratings English 18+ 14+ PG - - - Exempt Exempt programming includes: news, sports, documentaries and other information programming, talk ...
... 8-13. ❒ 14+ - 14 Years and Older Parents are clearly imaginary, comedic or unrealistic in nature. ❒ C8+ - Directions to set Canadian V-Chip Ratings π† √® π† √® Press the MENU button To "Initial Setup" To enter To "V-...portrayals that are strongly cautioned to themes which may contain mature themes and scenes of low intensity and will be infrequent and limited to finish Set Canadian Ratings English 18+ 14+ PG - - - Exempt Exempt programming includes: news, sports, documentaries and other information programming, talk ...
Instructions
Page 35
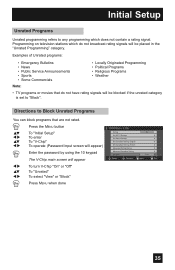
..."Unrated" To select "View" or "Block" Press MENU when done Initial Setup > V-Chip V-Chip On Set US TV Ratings Set Movie Ratings Set Canadian Ratings English Set Canadian Ratings French Advanced V-Chip Rating Advanced Canadian Rating Unrated Select Operate View BACK Back MENU Exit 35 Press the...the 10 keypad √® π† √® The V-Chip main screen will be blocked if the unrated category is set to "Block". Programming on television stations which does not contain a rating signal. Examples of Unrated programs: • Emergency Bulletins •...
..."Unrated" To select "View" or "Block" Press MENU when done Initial Setup > V-Chip V-Chip On Set US TV Ratings Set Movie Ratings Set Canadian Ratings English Set Canadian Ratings French Advanced V-Chip Rating Advanced Canadian Rating Unrated Select Operate View BACK Back MENU Exit 35 Press the...the 10 keypad √® π† √® The V-Chip main screen will be blocked if the unrated category is set to "Block". Programming on television stations which does not contain a rating signal. Examples of Unrated programs: • Emergency Bulletins •...
Instructions
Page 36
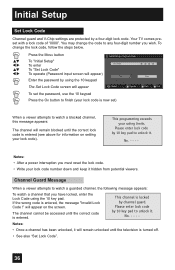
... been unlocked, it . To change the code to any four-digit number you must reset the lock code. • Write your lock code is now set) 0 1 2 3 Clear BACK Back MENU Exit When a viewer attempts to watch a guarded channel, the following message appears: To watch a blocked channel, this... remain unlocked until the correct code is turned off. • See also "Set Lock Code". 36 Your TV comes preset with a lock code of "0000". No. - - - - Initial Setup Set Lock Code Channel guard and V-Chip settings are protected by channel guard. Please enter lock code by using the 10 key...
... been unlocked, it . To change the code to any four-digit number you must reset the lock code. • Write your lock code is now set) 0 1 2 3 Clear BACK Back MENU Exit When a viewer attempts to watch a guarded channel, the following message appears: To watch a blocked channel, this... remain unlocked until the correct code is turned off. • See also "Set Lock Code". 36 Your TV comes preset with a lock code of "0000". No. - - - - Initial Setup Set Lock Code Channel guard and V-Chip settings are protected by channel guard. Please enter lock code by using the 10 key...
Instructions
Page 37
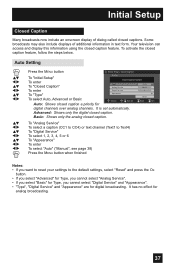
... Sample Type Analog Service Digital Service Appearance Select OK Operate Auto Text1 1 Reset BACK Back MENU Exit digital channels over analog channels. Auto Setting π† √® π† √® π† √® π† √® &#...settings, select "Reset" and press the OK button. • If you select "Advanced" for Type, you cannot select "Analog Service". • If you select "Basic" for Type, you cannot select "Digital Service" and "Appearance". • "Type", "Digital Service" and "Appearance" are for analog broadcasting. 37...
... Sample Type Analog Service Digital Service Appearance Select OK Operate Auto Text1 1 Reset BACK Back MENU Exit digital channels over analog channels. Auto Setting π† √® π† √® π† √® π† √® &#...settings, select "Reset" and press the OK button. • If you select "Advanced" for Type, you cannot select "Analog Service". • If you select "Basic" for Type, you cannot select "Digital Service" and "Appearance". • "Type", "Digital Service" and "Appearance" are for analog broadcasting. 37...


