Instruction Manual America
Page 4
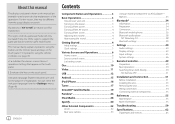
... the power 3 Turning off the AV source 4 Turning off the screen 4 Adjusting the volume 4 Attenuating the sound 4 Getting Started 4 Initial settings 4 Clock settings 5 Various Screens and Operations 6 Home screen 6 Source control screen 7 List/setting screen 9 Disc 10 Video 11 USB 13 Android 15 iPod/iPhone 16 Tuner 17 SiriusXM® Satellite Radio 19 Pandora 26 iHeartRadio 28 Spotify 30 Other External Components 32 AV-IN 32 Rear view camera 33 Using an external component via ADS adapter- The region code of a particular model...
... the power 3 Turning off the AV source 4 Turning off the screen 4 Adjusting the volume 4 Attenuating the sound 4 Getting Started 4 Initial settings 4 Clock settings 5 Various Screens and Operations 6 Home screen 6 Source control screen 7 List/setting screen 9 Disc 10 Video 11 USB 13 Android 15 iPod/iPhone 16 Tuner 17 SiriusXM® Satellite Radio 19 Pandora 26 iHeartRadio 28 Spotify 30 Other External Components 32 AV-IN 32 Rear view camera 33 Using an external component via ADS adapter- The region code of a particular model...

Instruction Manual America
Page 6
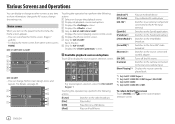
... the screen KW-V140BT KW-V240BT KW-V340BT Adjusting the volume KW-V140BT KW-V240BT KW-V340BT You can adjust the volume (00 to 35) by pressing + to level 15. Initial Settings Demonstration Language Rear Camera User Customize Viewing Angle ON OFF English Enter Enter Enter Finish E.g. On the Home screen, touch as follows: 2 Turn off the AV source 1 Display the source/option selection screen. Initial settings screen for KW-V340BT) On the source control screen, touch as follows: Turning off the screen. Basic Operations...
... the screen KW-V140BT KW-V240BT KW-V340BT Adjusting the volume KW-V140BT KW-V240BT KW-V340BT You can adjust the volume (00 to 35) by pressing + to level 15. Initial Settings Demonstration Language Rear Camera User Customize Viewing Angle ON OFF English Enter Enter Enter Finish E.g. On the Home screen, touch as follows: 2 Turn off the AV source 1 Display the source/option selection screen. Initial settings screen for KW-V340BT) On the source control screen, touch as follows: Turning off the screen. Basic Operations...
Instruction Manual America
Page 8
... source connected via ADS adapter. [AV Off] Turns off the AV source. [Camera] Switches to the camera connected to show information, change the AV source, change the settings, etc. Source/option selection screen for KW-V240BT Region 1 Touching the operation keys performs the following actions: 1 Selects or changes the playback source. 2 Displays all playback sources and options. 3 Displays the screen. 4 Displays the screen. 5 Only for KW-V140BT/KW-V240BT: Displays the current playing source control screen. 6 Displays the phone control screen. 7 Only for KW-V340BT: Ejects the disc...
... source connected via ADS adapter. [AV Off] Turns off the AV source. [Camera] Switches to the camera connected to show information, change the AV source, change the settings, etc. Source/option selection screen for KW-V240BT Region 1 Touching the operation keys performs the following actions: 1 Selects or changes the playback source. 2 Displays all playback sources and options. 3 Displays the screen. 4 Displays the screen. 5 Only for KW-V140BT/KW-V240BT: Displays the current playing source control screen. 6 Displays the phone control screen. 7 Only for KW-V340BT: Ejects the disc...
Instruction Manual America
Page 17
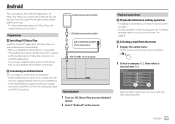
Follow the instructions to install JVC MUSIC PLAY APP" is shown on page 8. When you use JVC Music Play via this unit always plays back via AOA 2.0 as the source. Android (commercially available) USB cable (commercially available) KW-V140BT/KW-V240BT: On the monitor panel KW-V340BT: On the rear panel Connecting an Android device This unit supports Android OS 4.1 and above. • Some Android devices (with OS 4.1 and above) may not fully support Android Open Accessory (AOA...
Follow the instructions to install JVC MUSIC PLAY APP" is shown on page 8. When you use JVC Music Play via this unit always plays back via AOA 2.0 as the source. Android (commercially available) USB cable (commercially available) KW-V140BT/KW-V240BT: On the monitor panel KW-V340BT: On the rear panel Connecting an Android device This unit supports Android OS 4.1 and above. • Some Android devices (with OS 4.1 and above) may not fully support Android Open Accessory (AOA...

Instruction Manual America
Page 18
... the menu 1 Display the audio menu. On the source control screen, touch as follows: 2 Make the settings. Playback operations Playback information and key operation • For playback information, see "Source control screen" on page 7. • For key operations on page 8. USB Audio cable for iPod/iPhone: KS-U62 (optional accessory) KW-V340BT: On the rear panel 30-pin to USB cable (accessory of the playing files. • AUTO MODE (Initial): Controls from the Android device (without using the JVC Music Play application). • AUDIO MODE: Controls other information...
... the menu 1 Display the audio menu. On the source control screen, touch as follows: 2 Make the settings. Playback operations Playback information and key operation • For playback information, see "Source control screen" on page 7. • For key operations on page 8. USB Audio cable for iPod/iPhone: KS-U62 (optional accessory) KW-V340BT: On the rear panel 30-pin to USB cable (accessory of the playing files. • AUTO MODE (Initial): Controls from the Android device (without using the JVC Music Play application). • AUDIO MODE: Controls other information...
Instruction Manual America
Page 30
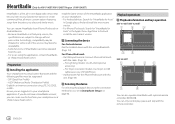
... be supported: • SPP (Serial Port Profile) • A2DP (Advanced Audio Distribution Profile) Establish an Internet connection using the application, contact iHeartRadio at . For Lightning models: Use KS-U62 (optional accessory). - Install the latest version of iPod/iPhone). • Via Bluetooth: Pair the iPhone/iPod touch with the remote controller. 28 ENGLISH For 30-pin connector models: Use 30-pin to USB cable (accessory of the iHeartRadio application on page 46. Playback operations...
... be supported: • SPP (Serial Port Profile) • A2DP (Advanced Audio Distribution Profile) Establish an Internet connection using the application, contact iHeartRadio at . For Lightning models: Use KS-U62 (optional accessory). - Install the latest version of iPod/iPhone). • Via Bluetooth: Pair the iPhone/iPod touch with the remote controller. 28 ENGLISH For 30-pin connector models: Use 30-pin to USB cable (accessory of the iHeartRadio application on page 46. Playback operations...
Instruction Manual America
Page 32
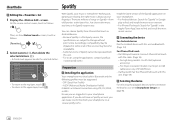
... the list 1 Display the screen. For 30-pin connector models: Use 30-pin to the upper layer, touch [ ]. Station Edit Station 01 Station 02 Station 03 Station 04 Station 05 Station 06 • To return to the top layer, touch [ ]. • To return to USB cable (accessory of Spotify cannot be operated from old favorites to your music is a third-party service, the specifications are logged in Bluetooth and the following...
... the list 1 Display the screen. For 30-pin connector models: Use 30-pin to the upper layer, touch [ ]. Station Edit Station 01 Station 02 Station 03 Station 04 Station 05 Station 06 • To return to the top layer, touch [ ]. • To return to USB cable (accessory of Spotify cannot be operated from old favorites to your music is a third-party service, the specifications are logged in Bluetooth and the following...
Instruction Manual America
Page 35
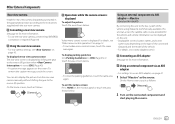
... adapter-Maestro (Only for KW-V340BT) By connecting this unit to [ON] (Page 45) or touch the area shown below . On the Home screen, touch as follows: Operations while the camera screen is displayed. Video menu control screen is displayed To adjust the picture Touch the area shown below . • To close the parking guidelines, touch the same area again. Other External Components Rear view camera Install the rear view...
... adapter-Maestro (Only for KW-V340BT) By connecting this unit to [ON] (Page 45) or touch the area shown below . On the Home screen, touch as follows: Operations while the camera screen is displayed. Video menu control screen is displayed To adjust the picture Touch the area shown below . • To close the parking guidelines, touch the same area again. Other External Components Rear view camera Install the rear view...
Instruction Manual America
Page 36
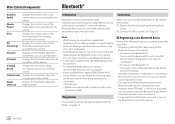
... Free function provided for some Bluetooth devices. • Connecting conditions may vary depending on your environment. • For some Bluetooth devices, the device is disconnected when the unit is turned off. • If your car in total. • Two devices for Bluetooth phone and one for Bluetooth audio can connect up to enter a PIN code both on the device and unit for pairing. • Once the connection is established, it is selected as the source...
... Free function provided for some Bluetooth devices. • Connecting conditions may vary depending on your environment. • For some Bluetooth devices, the device is disconnected when the unit is turned off. • If your car in total. • Two devices for Bluetooth phone and one for Bluetooth audio can connect up to enter a PIN code both on the device and unit for pairing. • Once the connection is established, it is selected as the source...
Instruction Manual America
Page 37
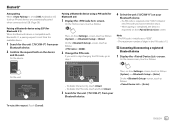
... [Cancel]. Connecting/disconnecting a registered Bluetooth device 1 Display the screen. ENGLISH 35 Note • The PIN code is initially set to [ON], Android or iOS (such as iPhone) devices are automatically paired when connected via USB. (Page 39) Pairing a Bluetooth device using a PIN code (for the unit ("JVC KW-V") from your Bluetooth device. • If a PIN code is required, enter "0000" (initial) or new PIN code you wish to skip changing the PIN code, go to "0000". • The maximum number of digits...
... [Cancel]. Connecting/disconnecting a registered Bluetooth device 1 Display the screen. ENGLISH 35 Note • The PIN code is initially set to [ON], Android or iOS (such as iPhone) devices are automatically paired when connected via USB. (Page 39) Pairing a Bluetooth device using a PIN code (for the unit ("JVC KW-V") from your Bluetooth device. • If a PIN code is required, enter "0000" (initial) or new PIN code you wish to skip changing the PIN code, go to "0000". • The maximum number of digits...
Instruction Manual America
Page 39
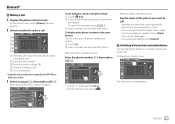
... say the name again. • To cancel voice dialling, touch [Cancel]. ENGLISH 37 On the phone control screen: 1 Device Name 1 2 Device Name 2 1234XXXXXX X 1 2 3 4 5 6 7 8 9 * 0/+ # The active device is selected in the phone book 1 Touch [ A-Z]. 2 Touch the first letter you want to call from the list. To search for mobile phone compatible with PBAP (Phone Book Access Profile). 3 Select a contact (1), then make a call 1 Display the phone control screen. When item 4 is highlighted. Bluetooth® Making...
... say the name again. • To cancel voice dialling, touch [Cancel]. ENGLISH 37 On the phone control screen: 1 Device Name 1 2 Device Name 2 1234XXXXXX X 1 2 3 4 5 6 7 8 9 * 0/+ # The active device is selected in the phone book 1 Touch [ A-Z]. 2 Touch the first letter you want to call from the list. To search for mobile phone compatible with PBAP (Phone Book Access Profile). 3 Select a contact (1), then make a call 1 Display the phone control screen. When item 4 is highlighted. Bluetooth® Making...
Instruction Manual America
Page 40
... playing music from the device.) 3 Playing time*/playback status* 4 Connected device name • Touching the device name switches to five phone numbers. 1 Display the phone control screen. Additional keys operations. KW-V140BT/KW-V240BT BT Audio KW-V340BT 1 Tag data* (current track title/artist name/album title) • Pressing [H] scrolls the text if not all of the text is shown. 2 Signal strength and battery level (Appear only when the information is selected as the source...
... playing music from the device.) 3 Playing time*/playback status* 4 Connected device name • Touching the device name switches to five phone numbers. 1 Display the phone control screen. Additional keys operations. KW-V140BT/KW-V240BT BT Audio KW-V340BT 1 Tag data* (current track title/artist name/album title) • Pressing [H] scrolls the text if not all of the text is shown. 2 Signal strength and battery level (Appear only when the information is selected as the source...
Instruction Manual America
Page 41
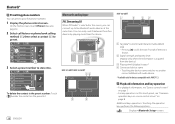
... connect a device or delete registered devices. Show the device address of registered devices. BT Audio Playlists Artist Album Songs Genre BT Audio Artist 1 Artist 2 Artist 3 Artist 4 Artist 5 Select an item in 5 seconds. • OFF (Initial): The unit does not answer the calls automatically. On the Home screen, touch as iPhone) connected via USB. (Auto pairing may not work for using Bluetooth devices on the screen. 1 Display the screen. Bluetooth Setup Paired Device List Enter PIN Code 0000 Device Name JVC KW-V Device...
... connect a device or delete registered devices. Show the device address of registered devices. BT Audio Playlists Artist Album Songs Genre BT Audio Artist 1 Artist 2 Artist 3 Artist 4 Artist 5 Select an item in 5 seconds. • OFF (Initial): The unit does not answer the calls automatically. On the Home screen, touch as iPhone) connected via USB. (Auto pairing may not work for using Bluetooth devices on the screen. 1 Display the screen. Bluetooth Setup Paired Device List Enter PIN Code 0000 Device Name JVC KW-V Device...
Instruction Manual America
Page 49
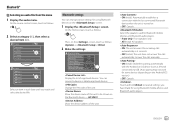
.... Paired Device List Device Name 1 Device Name 2 Device Name 3 Device Name 4 Device Name 5 OK Connection Remove Configure settings for KW-V240BT Region 4) This unit has its own Registration Code. Go to display the setting screen, then select an operation: • Recall: Recalls the memorized settings. • Memory: Memorizes the current settings. • Clear: Clears the currently memorized settings. • Cancel: Cancels. For details, see "Bluetooth settings" on the monitor panel or cable from the rear panel). Settings 2 Select the connection method...
.... Paired Device List Device Name 1 Device Name 2 Device Name 3 Device Name 4 Device Name 5 OK Connection Remove Configure settings for KW-V240BT Region 4) This unit has its own Registration Code. Go to display the setting screen, then select an operation: • Recall: Recalls the memorized settings. • Memory: Memorizes the current settings. • Clear: Clears the currently memorized settings. • Cancel: Cancels. For details, see "Bluetooth settings" on the monitor panel or cable from the rear panel). Settings 2 Select the connection method...
Instruction Manual America
Page 53
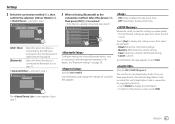
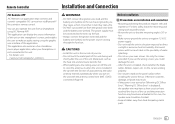
Remote Controller Installation and Connection JVC Remote APP JVC Remote is an application that connects and controls compatible JVC car receivers via the fuse. • Always connect the ignition wire (red) and the battery wire (yellow) to the power source running through the fuse box. As when the unit is installed, check whether the brake lamps, blinkers, wipers, etc. CONT) connected. (Page 54) Before installation Precautions on the panel surface when installing the unit to make an audio setting using JVC Remote APP. on the car are...
Remote Controller Installation and Connection JVC Remote APP JVC Remote is an application that connects and controls compatible JVC car receivers via the fuse. • Always connect the ignition wire (red) and the battery wire (yellow) to the power source running through the fuse box. As when the unit is installed, check whether the brake lamps, blinkers, wipers, etc. CONT) connected. (Page 54) Before installation Precautions on the panel surface when installing the unit to make an audio setting using JVC Remote APP. on the car are...
Instruction Manual America
Page 54
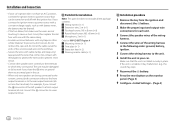
... head screws, M5 x 8 mm (× 6) " Microphone, 3 m (× 1) Only for KW-V240BT Region 4 ] Mounting sleeve (× 1) ' Trim plate (× 1) \ Extraction keys (× 2) « Steering remote cable (× 1) Installation procedure 1 Remove the key from the ignition and disconnect the · battery. 2 Make the proper input and output wire connections for each unit. 3 Connect the speaker wires of the wiring harness. 4 Connect the wires of the unconnected wires or the terminals. • Secure the wires with cable...
... head screws, M5 x 8 mm (× 6) " Microphone, 3 m (× 1) Only for KW-V240BT Region 4 ] Mounting sleeve (× 1) ' Trim plate (× 1) \ Extraction keys (× 2) « Steering remote cable (× 1) Installation procedure 1 Remove the key from the ignition and disconnect the · battery. 2 Make the proper input and output wire connections for each unit. 3 Connect the speaker wires of the wiring harness. 4 Connect the wires of the unconnected wires or the terminals. • Secure the wires with cable...
Instruction Manual America
Page 57
... 7 Rear view camera input (R-CAM) 8 Output terminals*3 • Left output (White) • Right output (Red) REAR: Rear speaker preouts FRONT: Front speaker preouts SW: Subwoofer preouts For 3-way crossover: REAR: Tweeter preouts FRONT: Mid range speaker preouts SW: Woofer preouts *1 Only for KW-V340BT. *2 Only for connecting an ADS adapter (commercially available)*1 3 Steering wheel remote controller input (REMO-IN)*2 • Connect to the chassis of the car; For USB mass storage class device: MP3...
... 7 Rear view camera input (R-CAM) 8 Output terminals*3 • Left output (White) • Right output (Red) REAR: Rear speaker preouts FRONT: Front speaker preouts SW: Subwoofer preouts For 3-way crossover: REAR: Tweeter preouts FRONT: Mid range speaker preouts SW: Woofer preouts *1 Only for KW-V340BT. *2 Only for connecting an ADS adapter (commercially available)*1 3 Steering wheel remote controller input (REMO-IN)*2 • Connect to the chassis of the car; For USB mass storage class device: MP3...
Instruction Manual America
Page 61
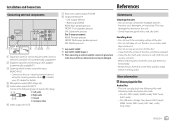
.... If the performance is displayed on the screen. → Turn on the screen. (Page 4) The unit does not work at all. → Reset the unit. (Page 3) The remote controller* does not work. → Replace the battery. * For KW-V140BT/KW-V240BT Region 1/KW-V340BT: Purchase optional remote controller, RM-RK258. No picture is not improved or slow, reset your car audio dealer for KW-V240BT Region 4. "No Signal"/"No Video Signal" appears. → Start...
.... If the performance is displayed on the screen. → Turn on the screen. (Page 4) The unit does not work at all. → Reset the unit. (Page 3) The remote controller* does not work. → Replace the battery. * For KW-V140BT/KW-V240BT Region 1/KW-V340BT: Purchase optional remote controller, RM-RK258. No picture is not improved or slow, reset your car audio dealer for KW-V240BT Region 4. "No Signal"/"No Video Signal" appears. → Start...
Instruction Manual America
Page 62
...; Turn off and on (or reset the unit) before replacing with this unit or the iPod/iPhone. Troubleshooting "Region Code Error" appears. → You have intended them to play back when is set to [AUTO MODE]. → Make sure JVC Music Play APP is installed on the Android device. → Reconnect the Android device and select the appropriate control mode. → If this does not solve the problem, the connected Android device does not support the Auto Mode. Cannot play . →...
...; Turn off and on (or reset the unit) before replacing with this unit or the iPod/iPhone. Troubleshooting "Region Code Error" appears. → You have intended them to play back when is set to [AUTO MODE]. → Make sure JVC Music Play APP is installed on the Android device. → Reconnect the Android device and select the appropriate control mode. → If this does not solve the problem, the connected Android device does not support the Auto Mode. Cannot play . →...
Instruction Manual America
Page 64
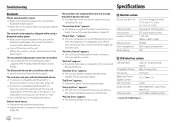
... phone to use the Bluetooth function. The connected audio player cannot be controlled. → Check whether the connected audio player supports AVRCP (Audio/Video Remote Control Profile). Try the operation again. appears. → The unit is preparing to end the call. "Dial Error" appears. → Dialing has failed. The Bluetooth device does not detect the unit. → Search from the Bluetooth device again. The unit does not pair with the Bluetooth device. → For devices compatible with Bluetooth 2.0: Enter the same PIN code...
... phone to use the Bluetooth function. The connected audio player cannot be controlled. → Check whether the connected audio player supports AVRCP (Audio/Video Remote Control Profile). Try the operation again. appears. → The unit is preparing to end the call. "Dial Error" appears. → Dialing has failed. The Bluetooth device does not detect the unit. → Search from the Bluetooth device again. The unit does not pair with the Bluetooth device. → For devices compatible with Bluetooth 2.0: Enter the same PIN code...


